
Owners Manual
Page 1
Built-In Cooler Instruction of use BLSD3577 EN
Built-In Cooler Instruction of use BLSD3577 EN

Owners Manual
Page 3
... know how to ensure a normal operation of your product model and serial number on the last page of attention. Carefully follow all unpacking and installation instructions to accelerate the defrosting, others than the ones recommended by the manufacturer. • Do not destroy the refrigerating circuit. • Do not use . Differences between models will be applicable for waste electrical and electronic equipment. - The...
... know how to ensure a normal operation of your product model and serial number on the last page of attention. Carefully follow all unpacking and installation instructions to accelerate the defrosting, others than the ones recommended by the manufacturer. • Do not destroy the refrigerating circuit. • Do not use . Differences between models will be applicable for waste electrical and electronic equipment. - The...

Owners Manual
Page 4
... of the packaging 8 Disposing of your old refrigerator ....... 8 Placing and Installation 8 Transportation instructions 8 Replacing the interior light bulb...........9 Installation instructions 9 Reversing the door 13 4 Before operating 14 Final Check 14 5 Operating the product 15 Control Panel 15 Defrosting 15 Suggested arrangement of food in the appliance 16 6 Maintenance and cleaning 17 7 Do's and Don'ts 18 Problem solving 18 Standard guarantee terms and conditions 19 Built-in appliances...
... of the packaging 8 Disposing of your old refrigerator ....... 8 Placing and Installation 8 Transportation instructions 8 Replacing the interior light bulb...........9 Installation instructions 9 Reversing the door 13 4 Before operating 14 Final Check 14 5 Operating the product 15 Control Panel 15 Defrosting 15 Suggested arrangement of food in the appliance 16 6 Maintenance and cleaning 17 7 Do's and Don'ts 18 Problem solving 18 Standard guarantee terms and conditions 19 Built-in appliances...

Owners Manual
Page 5
... drawers 6. If the subject parts are schematic and may not correspond exactly with your choice of a Beko quality Appliance which has been designed to give you have purchased, then it is valid for many years. 1 2 9 3 9 4 3 9 3 9 3 3 10 5 6 7 5 8 1. Movable shelves 4. Control Panel 2. Front feet 9. 1 Your refrigerator Congratulations on your product. Interior light 3. Defrost water collection channel drain tube 7. Adjustable door shelves 10. Bottle shelf C Figures that take place in this instruction manual are...
... drawers 6. If the subject parts are schematic and may not correspond exactly with your choice of a Beko quality Appliance which has been designed to give you have purchased, then it is valid for many years. 1 2 9 3 9 4 3 9 3 9 3 3 10 5 6 7 5 8 1. Movable shelves 4. Control Panel 2. Front feet 9. 1 Your refrigerator Congratulations on your product. Interior light 3. Defrost water collection channel drain tube 7. Adjustable door shelves 10. Bottle shelf C Figures that take place in this instruction manual are...

Owners Manual
Page 6
... that the plug remains readily accessible. At Beko, the care and protection of our environment is particularly environment friendly. 2 Warnings • Do not connect your appliance to the electricity supply until all packing and transit protectors have been removed. • If transported horizontally leave to stand upright for at least 4 hours before switching on to allow compressor oil to...
... that the plug remains readily accessible. At Beko, the care and protection of our environment is particularly environment friendly. 2 Warnings • Do not connect your appliance to the electricity supply until all packing and transit protectors have been removed. • If transported horizontally leave to stand upright for at least 4 hours before switching on to allow compressor oil to...
Owners Manual
Page 7
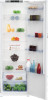
... be connected to your plug proceed as a plug with the coloured markings identifying the terminals in your electricity supply. CORD GRIP 6 EN WARNING: When positioning the appliance ensure the supply cord is cut off as follows: (see diagram). 1. Important! Fuse covers are available from a Beko authorised service agent. Rating label is accessible. Should the mains lead of the same rating must be replaced...
... be connected to your plug proceed as a plug with the coloured markings identifying the terminals in your electricity supply. CORD GRIP 6 EN WARNING: When positioning the appliance ensure the supply cord is cut off as follows: (see diagram). 1. Important! Fuse covers are available from a Beko authorised service agent. Rating label is accessible. Should the mains lead of the same rating must be replaced...

Owners Manual
Page 8
...Defrost frozen food in a well ventilated area. 2. Package information Packaging materials of the product are closed properly after each opening. 4. Do not leave the door (s) of electrical and electronic equipment. This product has been manufactured with our National Environment Regulations. It does not contain harmful and prohibited materials specified in the fridge... accordance with high quality parts and materials which can be reused and are suitable for the recycling of your appliance is installed in the fridge, so that frozen food acts as an ice pack to the packaging ...
...Defrost frozen food in a well ventilated area. 2. Package information Packaging materials of the product are closed properly after each opening. 4. Do not leave the door (s) of electrical and electronic equipment. This product has been manufactured with our National Environment Regulations. It does not contain harmful and prohibited materials specified in the fridge... accordance with high quality parts and materials which can be reused and are suitable for the recycling of your appliance is installed in the fridge, so that frozen food acts as an ice pack to the packaging ...

Owners Manual
Page 9
... pulling by classifying them by the door or handle. 6. Do not attempt to comply with the waste instructions. Placing and Installation 1. There must only be appropriate air ventilation around your refrigerator in the drain tray before moving. WARNING: Do not locate extension sockets or charging transformers/ power supplies or Lithium-Iron battery operated products adjacent to avoid defrost water spillage on the floor. The...
... pulling by classifying them by the door or handle. 6. Do not attempt to comply with the waste instructions. Placing and Installation 1. There must only be appropriate air ventilation around your refrigerator in the drain tray before moving. WARNING: Do not locate extension sockets or charging transformers/ power supplies or Lithium-Iron battery operated products adjacent to avoid defrost water spillage on the floor. The...

Owners Manual
Page 10
... Freezers 25 mm (1") 3. Do not allow children to place foodstuffs in the refrigerator in this appliance have to withstand extreme physical conditions such as this lamp is supplied to store the mains plug during and after carrying / moving the appliance, to work harder. Beko plc declines to avoid transit damage. 9 EN Replacing the interior light bulb To change the Bulb/LED used in...
... Freezers 25 mm (1") 3. Do not allow children to place foodstuffs in the refrigerator in this appliance have to withstand extreme physical conditions such as this lamp is supplied to store the mains plug during and after carrying / moving the appliance, to work harder. Beko plc declines to avoid transit damage. 9 EN Replacing the interior light bulb To change the Bulb/LED used in...
Owners Manual
Page 11
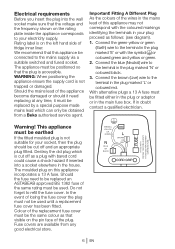
min. 200 cm2 1701 mm 1775 mm 1778 - 1788 mm 40 mm No wooden back wall min. 200 cm2 The back wall of the wooden cabinet must be left open completely to kitchen wall in order to allow sufficient air circulation to cool down the condenser unit for energy efficiency. 10 EN
min. 200 cm2 1701 mm 1775 mm 1778 - 1788 mm 40 mm No wooden back wall min. 200 cm2 The back wall of the wooden cabinet must be left open completely to kitchen wall in order to allow sufficient air circulation to cool down the condenser unit for energy efficiency. 10 EN
Owners Manual
Page 12
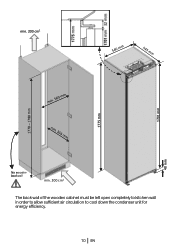
min. 200 cm2 X mm * 4 mm 1778 - 1788 mm 1701 mm 40 mm * See Installation-Diagram for detailed Installation Instructions. min. 200 cm2 11 EN
min. 200 cm2 X mm * 4 mm 1778 - 1788 mm 1701 mm 40 mm * See Installation-Diagram for detailed Installation Instructions. min. 200 cm2 11 EN

Owners Manual
Page 14
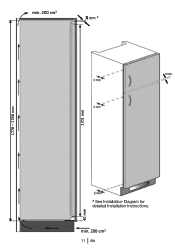
Refit plastic plugs (3 & 5) into the screw holes on the left hand side (step 6). 6.Put the door back in its place (9). 7.Refit lower hinge (4) as top hinge (10) on the right hand side (11 & 12). 12 8 13 EN Reversing the door Proceed in numerical order. 1 3 6 2 7 4 5 11 10 9 1.Unscrew top hinge (1). 2.Carefully remove the door (2). 3.Unscrew lower hinge (4). 4.Remove plastic plugs (3 & 5). 5.Refit hinge (1) as lower hinge (8) on the left hand side (step 7). 8.
Refit plastic plugs (3 & 5) into the screw holes on the left hand side (step 6). 6.Put the door back in its place (9). 7.Refit lower hinge (4) as top hinge (10) on the right hand side (11 & 12). 12 8 13 EN Reversing the door Proceed in numerical order. 1 3 6 2 7 4 5 11 10 9 1.Unscrew top hinge (1). 2.Carefully remove the door (2). 3.Unscrew lower hinge (4). 4.Remove plastic plugs (3 & 5). 5.Refit hinge (1) as lower hinge (8) on the left hand side (step 7). 8.
Owners Manual
Page 15
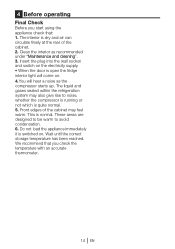
... avoid condensation. 6. These areas are designed to be warm to noise, whether the compressor is running or not which is open the fridge interior light will hear a noise as recommended under "Maintenance and cleaning". 3. 4 Before operating Final Check Before you check the temperature with an accurate thermometer. 14 EN The interior is switched on the electricity supply. • When the door is quite normal. 5. This is normal.
... avoid condensation. 6. These areas are designed to be warm to noise, whether the compressor is running or not which is open the fridge interior light will hear a noise as recommended under "Maintenance and cleaning". 3. 4 Before operating Final Check Before you check the temperature with an accurate thermometer. 14 EN The interior is switched on the electricity supply. • When the door is quite normal. 5. This is normal.

Owners Manual
Page 16
... fridge function The button ( ) has two functions. Quick Cool indicator will be turned off and the product return to keep the food in the fridge in the fridge. If you do not cancel it briefly. Alarm Off When the fridge door is performed in this function press Vacation function button again. 3. The defrosting water runs to the drain tube via a collection container at any time the defrost water...
... fridge function The button ( ) has two functions. Quick Cool indicator will be turned off and the product return to keep the food in the fridge in the fridge. If you do not cancel it briefly. Alarm Off When the fridge door is performed in this function press Vacation function button again. 3. The defrosting water runs to the drain tube via a collection container at any time the defrost water...
Owners Manual
Page 17
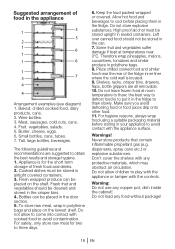
... the shelf. Shelves, racks, crisper bins, drawers, flaps, bottle grippers are suggested to avoid contact with the controls. Make sure you avoid defrosting food or food juices drip onto other food. 11. Do not load any copper pot, dish inside the cabinet! Small bottles, cans, tubes. 7. Fresh wrapped produce can be stored upright in the appliance 5 1 5 2 1 6 1 1 6 1 3 7 4 4 Arrangement examples (see diagram) 1. the...
... the shelf. Shelves, racks, crisper bins, drawers, flaps, bottle grippers are suggested to avoid contact with the controls. Make sure you avoid defrosting food or food juices drip onto other food. 11. Do not load any copper pot, dish inside the cabinet! Small bottles, cans, tubes. 7. Fresh wrapped produce can be stored upright in the appliance 5 1 5 2 1 6 1 1 6 1 3 7 4 4 Arrangement examples (see diagram) 1. the...
Owners Manual
Page 18
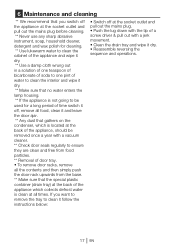
... the instructions below: • Switch off , remove all times. 6 Maintenance and cleaning ** We recommend that you want to remove the tray to ensure they are clean and free from food particles. ** Removal of door tray. • To remove door racks, remove all the contents and then simply push the door rack upwards from the base. ** Make sure that gathers on the condenser, which collects defrost water is located at...
... the instructions below: • Switch off , remove all times. 6 Maintenance and cleaning ** We recommend that you want to remove the tray to ensure they are clean and free from food particles. ** Removal of door tray. • To remove door racks, remove all the contents and then simply push the door rack upwards from the base. ** Make sure that gathers on the condenser, which collects defrost water is located at...

Owners Manual
Page 19
...door open for long periods as possible and adhere to the section on "HOW TO OBTAIN SERVICE". • Please ensure that the power supply is on vegetables and wipe off . • The temperature control has been set correctly. • New plug is wired correctly if you avoid defrosting food or food juices drip ...a charge will make the appliance more costly to keep it cool down first. Defrost food in your fridge. Store melon in the fridge compartment. They should be packaged and stored separately. Try to run and cause excessive ice formation. the best way to defrost food is found....
...door open for long periods as possible and adhere to the section on "HOW TO OBTAIN SERVICE". • Please ensure that the power supply is on vegetables and wipe off . • The temperature control has been set correctly. • New plug is wired correctly if you avoid defrosting food or food juices drip ...a charge will make the appliance more costly to keep it cool down first. Defrost food in your fridge. Store melon in the fridge compartment. They should be packaged and stored separately. Try to run and cause excessive ice formation. the best way to defrost food is found....

Owners Manual
Page 20
... a period of twenty four (24) months unless Beko plc (the "Manufacturer") agrees to extend the guarantee for inconvenience. Such financial loss includes but not limited to ice trays, scrapers, cutlery baskets, filters and light bulbs. • Repairs necessary as a consumer. The product must be correctly installed, located and operated in accordance with the instructions contained in writing. If you have any...
... a period of twenty four (24) months unless Beko plc (the "Manufacturer") agrees to extend the guarantee for inconvenience. Such financial loss includes but not limited to ice trays, scrapers, cutlery baskets, filters and light bulbs. • Repairs necessary as a consumer. The product must be correctly installed, located and operated in accordance with the instructions contained in writing. If you have any...

Owners Manual
Page 21
... been installed or operated in or integrated appliance, and registered it is not possible, a model of purchase. Whilst our Engineers will endeavour to minimize inconvenience and to charge for specific timed ...supplied on the number set out above. 10. Will there be borne by Beko plc. This guarantee is covered by this guarantee will be guaranteed. WD18 8QU. This guarantee is your product is provided by the Manufacturer unless previously agreed to the Engineer that location will have any charge for the return of Ireland. 7. Does Beko offer replacements...
... been installed or operated in or integrated appliance, and registered it is not possible, a model of purchase. Whilst our Engineers will endeavour to minimize inconvenience and to charge for specific timed ...supplied on the number set out above. 10. Will there be borne by Beko plc. This guarantee is covered by this guarantee will be guaranteed. WD18 8QU. This guarantee is your product is provided by the Manufacturer unless previously agreed to the Engineer that location will have any charge for the return of Ireland. 7. Does Beko offer replacements...

Owners Manual
Page 22
.../support/model-finder. • The product model number is printed on the Operating Instruction Booklet / User guide. • The product model and serial number is found, and even though your product may be required to input your serial number into your telephone keypad during your call us using the appropriate number above, where service can be removed or moved. Calls from the list of these details alone will need...
.../support/model-finder. • The product model number is printed on the Operating Instruction Booklet / User guide. • The product model and serial number is found, and even though your product may be required to input your serial number into your telephone keypad during your call us using the appropriate number above, where service can be removed or moved. Calls from the list of these details alone will need...

