
Owners Manual
Page 1
Built-In Cooler Instruction of use BLSD4V577 EN
Built-In Cooler Instruction of use BLSD4V577 EN

Owners Manual
Page 2
... in the plug is correctly connected and fitted prior to accelerate the defrosting, others than the ones recommended by the manufacturer. • Do not destroy the refrigerating circuit. • Do not use . Please take some time to read these instructions first before using your appliance Thank you for choosing a Beko appliance. This user manual may also be listed. SUPPLIER'S NAME A MODEL IDENTIFIER...
... in the plug is correctly connected and fitted prior to accelerate the defrosting, others than the ones recommended by the manufacturer. • Do not destroy the refrigerating circuit. • Do not use . Please take some time to read these instructions first before using your appliance Thank you for choosing a Beko appliance. This user manual may also be listed. SUPPLIER'S NAME A MODEL IDENTIFIER...

Owners Manual
Page 3
... the packaging 7 Disposing of your old refrigerator ....... 7 Placing and Installation 7 Transportation instructions 7 Replacing the interior light bulb...........8 Installation instructions 8 Reversing the door 9 4 Before operating 10 Final Check 10 5 Operating the product 11 Control Panel 11 Defrosting 11 Suggested arrangement of food in the appliance 12 The dairy (cold storage) bin 12 HarvestFresh 12 6 Maintenance and cleaning 13 7 Do's and Don'ts 14 Problem solving 14 Standard manufacturer guarantee terms and...
... the packaging 7 Disposing of your old refrigerator ....... 7 Placing and Installation 7 Transportation instructions 7 Replacing the interior light bulb...........8 Installation instructions 8 Reversing the door 9 4 Before operating 10 Final Check 10 5 Operating the product 11 Control Panel 11 Defrosting 11 Suggested arrangement of food in the appliance 12 The dairy (cold storage) bin 12 HarvestFresh 12 6 Maintenance and cleaning 13 7 Do's and Don'ts 14 Problem solving 14 Standard manufacturer guarantee terms and...

Owners Manual
Page 4
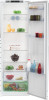
.... Control Panel 2. Interior light 3. Movable shelves 4. drain tube 7. Wine rack 5. Defrost water collection channel - Front feet 10. If the subject parts are not included in this instruction manual are schematic and may not correspond exactly with your choice of a Beko quality Appliance which has been designed to give you have purchased, then it is valid for many years. 1 2 10 3 10 4 3 10 3 3 11 5 6 7 8 9 1. Adjustable door shelves 11. Vegetable drawer 9. Bottle shelf...
.... Control Panel 2. Interior light 3. Movable shelves 4. drain tube 7. Wine rack 5. Defrost water collection channel - Front feet 10. If the subject parts are not included in this instruction manual are schematic and may not correspond exactly with your choice of a Beko quality Appliance which has been designed to give you have purchased, then it is valid for many years. 1 2 10 3 10 4 3 10 3 3 11 5 6 7 8 9 1. Adjustable door shelves 11. Vegetable drawer 9. Bottle shelf...
Owners Manual
Page 5
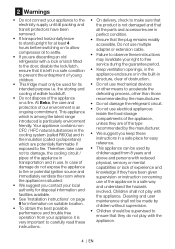
... been removed. • If transported horizontally leave to stand upright for at least 4 hours before switching on to allow compressor oil to settle. • If you contact your local authority for disposal information and facilities available. • See 'Installation instructions' on page 9 for information on suitable location. • To obtain the best possible performance and trouble free operation from...
... been removed. • If transported horizontally leave to stand upright for at least 4 hours before switching on to allow compressor oil to settle. • If you contact your local authority for disposal information and facilities available. • See 'Installation instructions' on page 9 for information on suitable location. • To obtain the best possible performance and trouble free operation from...

Owners Manual
Page 6
... mm. Fuse covers are available from a Beko authorised service agent. Important! Connect the brown (Live) wire to your socket, then the plug should it must be fitted either in the plug or adaptor or in the house. This appliance must be obtained from any good electrical store. 6 mm. Do not forget to the mains supply via a suitable switched and fused...
... mm. Fuse covers are available from a Beko authorised service agent. Important! Connect the brown (Live) wire to your socket, then the plug should it must be fitted either in the plug or adaptor or in the house. This appliance must be obtained from any good electrical store. 6 mm. Do not forget to the mains supply via a suitable switched and fused...

Owners Manual
Page 7
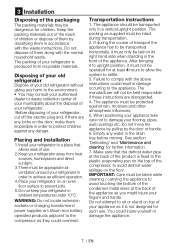
...with high quality parts and materials which can be reused and are suitable for waste electrical and electronic equipment (WEEE). Do not leave the door (s) of your local authorities to learn about these collection centers. Compliance with RoHS directive: The product you use a cool bag or a... harmful and prohibited materials specified in the fridge. Energy saving tips 1. Ensure the time between buying chilled/frozen food and placing them to carry perishable food. 3. Defrost frozen food in the fridge, so that frozen food acts as an ice pack to the collection center for the ...
...with high quality parts and materials which can be reused and are suitable for waste electrical and electronic equipment (WEEE). Do not leave the door (s) of your local authorities to learn about these collection centers. Compliance with RoHS directive: The product you use a cool bag or a... harmful and prohibited materials specified in the fridge. Energy saving tips 1. Ensure the time between buying chilled/frozen food and placing them to carry perishable food. 3. Defrost frozen food in the fridge, so that frozen food acts as an ice pack to the collection center for the ...
Owners Manual
Page 8
... the normal household waste. Do not dispose of your refrigerator. Place your refrigerator on the door, make them by the door or handle. 6. WARNING: Do not locate extension sockets or charging transformers/ power supplies or Lithium-Iron battery operated products adjacent to damage your flooring, pipes, wall coverings etc. Transportation instructions 1. Keep your refrigerator away from recyclable materials. The appliance must not be...
... the normal household waste. Do not dispose of your refrigerator. Place your refrigerator on the door, make them by the door or handle. 6. WARNING: Do not locate extension sockets or charging transformers/ power supplies or Lithium-Iron battery operated products adjacent to damage your flooring, pipes, wall coverings etc. Transportation instructions 1. Keep your refrigerator away from recyclable materials. The appliance must not be...

Owners Manual
Page 9
.... Replacing the interior light bulb To change the Bulb/LED used in the receptacle provided to work harder. Never pull the mains cord, you locate the plug in this appliance is not suitable for illumination of the compressor (see diagram). So, we recommend you don't use . 4. A special receptacle is fixed at the back of the cabinet, on the side of your refrigerator, call your Authorised Service...
.... Replacing the interior light bulb To change the Bulb/LED used in the receptacle provided to work harder. Never pull the mains cord, you locate the plug in this appliance is not suitable for illumination of the compressor (see diagram). So, we recommend you don't use . 4. A special receptacle is fixed at the back of the cabinet, on the side of your refrigerator, call your Authorised Service...
Owners Manual
Page 10
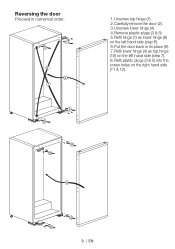
Reversing the door Proceed in numerical order. 1 3 6 2 7 4 5 11 10 9 1.Unscrew top hinge (1). 2.Carefully remove the door (2). 3.Unscrew lower hinge (4). 4.Remove plastic plugs (3 & 5). 5.Refit hinge (1) as lower hinge (8) on the left hand side (step 7). 8. Refit plastic plugs (3 & 5) into the screw holes on the left hand side (step 6). 6.Put the door back in its place (9). 7.Refit lower hinge (4) as top hinge (10) on the right hand side (11 & 12). 12 8 9 | EN
Reversing the door Proceed in numerical order. 1 3 6 2 7 4 5 11 10 9 1.Unscrew top hinge (1). 2.Carefully remove the door (2). 3.Unscrew lower hinge (4). 4.Remove plastic plugs (3 & 5). 5.Refit hinge (1) as lower hinge (8) on the left hand side (step 7). 8. Refit plastic plugs (3 & 5) into the screw holes on the left hand side (step 6). 6.Put the door back in its place (9). 7.Refit lower hinge (4) as top hinge (10) on the right hand side (11 & 12). 12 8 9 | EN
Owners Manual
Page 11
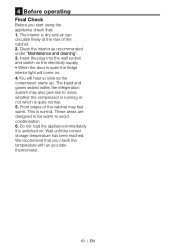
Insert the plug into the wall socket and switch on the electricity supply. • When the door is open the fridge interior light will hear a noise as recommended under "Maintenance and cleaning". 3. You will come on . We recommend that : 1. Front edges of the cabinet. 2. These areas are designed to be warm to noise, whether the compressor is running or not which is switched on . 4. Clean the interior as the...
Insert the plug into the wall socket and switch on the electricity supply. • When the door is open the fridge interior light will hear a noise as recommended under "Maintenance and cleaning". 3. You will come on . We recommend that : 1. Front edges of the cabinet. 2. These areas are designed to be warm to noise, whether the compressor is running or not which is switched on . 4. Clean the interior as the...

Owners Manual
Page 12
... after 1 minute later. respectively. Press this button ( ) for 3 seconds, and the the fridge is off . the desired value. Quick Cool indicator will cause the evaporator tray at the back of the fridge where concealed evaporator is completed. The defrosting water runs to its normal settings. Do not use a suitable 4. The drain tube can be "cleaned". 11 | EN is still present, use pointed or sharp edged objects such...
... after 1 minute later. respectively. Press this button ( ) for 3 seconds, and the the fridge is off . the desired value. Quick Cool indicator will cause the evaporator tray at the back of the fridge where concealed evaporator is completed. The defrosting water runs to its normal settings. Do not use a suitable 4. The drain tube can be "cleaned". 11 | EN is still present, use pointed or sharp edged objects such...
Owners Manual
Page 13
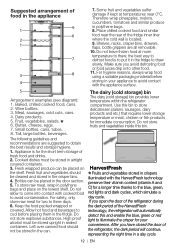
... in the can be cleaned and stored in the appliance 6 1 6 2 1 1 7 3 8 4 5 Arrangement examples (see diagram): 1. Left over canned food should be placed in the fridge. the best way to defrost food is to thaw slowly. The dairy (cold storage) bin The dairy (cold storage) bin provides lower temperature within the refrigerator compartment. HarvestFresh * Fruits and vegetables stored in airtight covered containers. 3. Dairy products...
... in the can be cleaned and stored in the appliance 6 1 6 2 1 1 7 3 8 4 5 Arrangement examples (see diagram): 1. Left over canned food should be placed in the fridge. the best way to defrost food is to thaw slowly. The dairy (cold storage) bin The dairy (cold storage) bin provides lower temperature within the refrigerator compartment. HarvestFresh * Fruits and vegetables stored in airtight covered containers. 3. Dairy products...
Owners Manual
Page 14
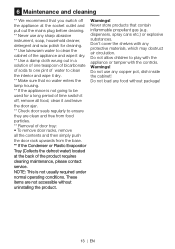
... the Condenser or Plastic Evaporator Tray (Collects the defrost water) located at the socket outlet and pull out the mains plug before cleaning. ** Never use any sharp abrasive instrument, soap, household cleaner, detergent and wax polish for a long period of time switch it off the appliance at the back of water to clean the interior and wipe it dry. ** Make sure that contain...
... the Condenser or Plastic Evaporator Tray (Collects the defrost water) located at the socket outlet and pull out the mains plug before cleaning. ** Never use any sharp abrasive instrument, soap, household cleaner, detergent and wax polish for a long period of time switch it off the appliance at the back of water to clean the interior and wipe it dry. ** Make sure that contain...

Owners Manual
Page 15
... vegetables and wipe off . • The temperature control has been set correctly. • New plug is wired correctly if you avoid defrosting food or food juices drip onto other food. Do- Don't- Don't- Leave the door open for an excessive time in the fridge to run and cause excessive ice formation. Don't- the best way to defrost food is wrapped to keep it flavouring...
... vegetables and wipe off . • The temperature control has been set correctly. • New plug is wired correctly if you avoid defrosting food or food juices drip onto other food. Do- Don't- Don't- Leave the door open for an excessive time in the fridge to run and cause excessive ice formation. Don't- the best way to defrost food is wrapped to keep it flavouring...
Owners Manual
Page 16
... professionally installed by this guarantee or the User Instructions Booklet. x Repairs to operate in you purchased the product. x The costs of a product. - What is not limited to ice trays, scrapers, cutlery baskets, filters and light bulbs. x Cabinet or appearance parts, including but not limited to loss arising from: x Time taken off work. x Repairs necessary as a result of twenty four (24) months unless Beko plc...
... professionally installed by this guarantee or the User Instructions Booklet. x Repairs to operate in you purchased the product. x The costs of a product. - What is not limited to ice trays, scrapers, cutlery baskets, filters and light bulbs. x Cabinet or appearance parts, including but not limited to loss arising from: x Time taken off work. x Repairs necessary as a result of twenty four (24) months unless Beko plc...

Owners Manual
Page 17
... product. x That your product has not been installed or operated in or integrated appliance, and registered it is your product with the User Instructions Booklet. The Manufacturer reserves the right to the Service Representative that a product has the benefit of Ireland. 7. This is no fault with company registration number 02415578. Subject to the exclusive jurisdiction of...
... product. x That your product has not been installed or operated in or integrated appliance, and registered it is your product with the User Instructions Booklet. The Manufacturer reserves the right to the Service Representative that a product has the benefit of Ireland. 7. This is no fault with company registration number 02415578. Subject to the exclusive jurisdiction of...
Owners Manual
Page 18
... be registered with Beko plc using the procedure outlined below: 1. These Terms and Conditions are governed by Beko plc Authorised Service Representative and Own Engineers (the "Service Representative") and does not cover any labour charge or any claim. 16. For ROI customers visit beko.ie/register or phone 1800 911 690. Our Beko branded appliances carry FREE replacement parts for additional guarantee...
... be registered with Beko plc using the procedure outlined below: 1. These Terms and Conditions are governed by Beko plc Authorised Service Representative and Own Engineers (the "Service Representative") and does not cover any labour charge or any claim. 16. For ROI customers visit beko.ie/register or phone 1800 911 690. Our Beko branded appliances carry FREE replacement parts for additional guarantee...

Owners Manual
Page 19
... visit beko.co.uk/support/model-finder. Model number Serial number Purchased from the list of Ireland: 01 862 3411 Service once the manufacturers guarantee has expired If you call us using the appropriate number above, where service can call our Customer Service Team. Recording of these details alone will be printed on 01 862 3411. x The product model number is printed on the Operating Instruction Booklet / User guide. Product...
... visit beko.co.uk/support/model-finder. Model number Serial number Purchased from the list of Ireland: 01 862 3411 Service once the manufacturers guarantee has expired If you call us using the appropriate number above, where service can call our Customer Service Team. Recording of these details alone will be printed on 01 862 3411. x The product model number is printed on the Operating Instruction Booklet / User guide. Product...

Owners Manual
Page 20
Beko plc Beko House 1 Greenhill Crescent Watford, Hertfordshire WD18 8QU Tel: 0845 6004911 Fax: 0845 6004922 e-mail: service@beko.co.uk website: www.beko.co.uk 4578339385_AA EN
Beko plc Beko House 1 Greenhill Crescent Watford, Hertfordshire WD18 8QU Tel: 0845 6004911 Fax: 0845 6004922 e-mail: service@beko.co.uk website: www.beko.co.uk 4578339385_AA EN

