User Manual
Page 2
... user manual and all warnings and information in TURKEY CE This product was manufactured using the product and keep it as well. Therefore, please read this Beko product. Follow all other models....product which has been manufactured with regard to someone else, give the user manual as a reference for future use. Differences between models will be identified in environmentally friendly conditions. A6 Warning of risk of hazardous situations with high quality and state-of electric shock. Remember that you for several other accompanying documents carefully before using...
... user manual and all warnings and information in TURKEY CE This product was manufactured using the product and keep it as well. Therefore, please read this Beko product. Follow all other models....product which has been manufactured with regard to someone else, give the user manual as a reference for future use. Differences between models will be identified in environmentally friendly conditions. A6 Warning of risk of hazardous situations with high quality and state-of electric shock. Remember that you for several other accompanying documents carefully before using...
User Manual
Page 3
... fl How to operate the oven 19 General information on baking, roasting and grilling19 How to operate the electric oven 19 Operating modes 20 Using the oven clock 21 Cooking times table 22 How to operate the grill 23 Cooking times table for grilling 23 6 Maintenance and care 24 General information 24 Cleaning the control panel 24 Cleaning the oven 24 Removing the door inner glass 26 Removing the door inner glass 26 Replacing the oven lamp 28 0 Troubleshooting 29 8 Guarantee and Service 30 4 Preparation...
... fl How to operate the oven 19 General information on baking, roasting and grilling19 How to operate the electric oven 19 Operating modes 20 Using the oven clock 21 Cooking times table 22 How to operate the grill 23 Cooking times table for grilling 23 6 Maintenance and care 24 General information 24 Cleaning the control panel 24 Cleaning the oven 24 Removing the door inner glass 26 Removing the door inner glass 26 Replacing the oven lamp 28 0 Troubleshooting 29 8 Guarantee and Service 30 4 Preparation...
User Manual
Page 4
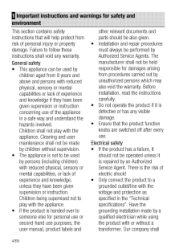
... supervision or instruction concerning use purposes, the user manual, product labels and other relevant documents and parts should be also given. • Installation and repair procedures must always be made by unauthorized persons which may also void the warranty. Have the grounding installation made by ... lack of the appliance in the "Technical specifications". Electrical safety • If the product has a failure, it should not be operated unless it is handed over to be used by Authorized Service Agents. Cleaning and user maintenance shall not be performed by children aged...
... supervision or instruction concerning use purposes, the user manual, product labels and other relevant documents and parts should be also given. • Installation and repair procedures must always be made by unauthorized persons which may also void the warranty. Have the grounding installation made by ... lack of the appliance in the "Technical specifications". Electrical safety • If the product has a failure, it should not be operated unless it is handed over to be used by Authorized Service Agents. Cleaning and user maintenance shall not be performed by children aged...
User Manual
Page 5
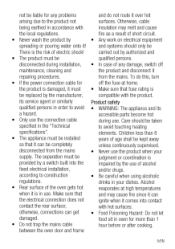
... it is be replaced by authorized and • The product must be qualified persons. the product is damaged, it comes into the fixed electrical installation, according to avoid touching heating elements. otherwise, connections can ignite when it must • Make sure that fuse rating is in your dishes. Care should only be There is impaired by • Any work on electrical equipment spreading...
... it is be replaced by authorized and • The product must be qualified persons. the product is damaged, it comes into the fixed electrical installation, according to avoid touching heating elements. otherwise, connections can ignite when it must • Make sure that fuse rating is in your dishes. Care should only be There is impaired by • Any work on electrical equipment spreading...

User Manual
Page 6
... touching heating elements inside the oven. • Keep all ventilation slots clear of the glass. • Do not use steam cleaners to clean the appliance as the sides may cause it (Please see the following figure). • Do not use the product if the front door glass removed or cracked. • Do not use the oven handle to place the wire shelf and/or tray onto the rack properly...
... touching heating elements inside the oven. • Keep all ventilation slots clear of the glass. • Do not use steam cleaners to clean the appliance as the sides may cause it (Please see the following figure). • Do not use the product if the front door glass removed or cracked. • Do not use the oven handle to place the wire shelf and/or tray onto the rack properly...

User Manual
Page 7
... domestic use • This product is designed for cooking purposes only. Remove the excess parts of oven. • Hot surfaces cause burns! together with standard use damaged cables or extension cables. • Ensure liquid or moisture is not accessible to the electrical connection point. by improper use or handling errors. • The oven can be placed directly on the oven door handles. Never use the baking paper in an operating temperature...
... domestic use • This product is designed for cooking purposes only. Remove the excess parts of oven. • Hot surfaces cause burns! together with standard use damaged cables or extension cables. • Ensure liquid or moisture is not accessible to the electrical connection point. by improper use or handling errors. • The oven can be placed directly on the oven door handles. Never use the baking paper in an operating temperature...
User Manual
Page 15
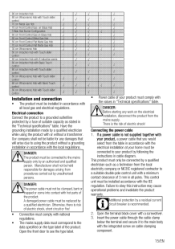
... accordance with a screwdriver 3. Open the front door to obey this instruction may cause operational problems and invalidate the product warranty. If a power cable is the risk of you would select from procedures carried out by following the instructions in cable diagram. dditional protection by a fuse of the product. Open the terminal block cover with the local regulations. slider Ili. I ,-, -. n I . Electrical connection Connect the product to the data specified...
... accordance with a screwdriver 3. Open the front door to obey this instruction may cause operational problems and invalidate the product warranty. If a power cable is the risk of you would select from procedures carried out by following the instructions in cable diagram. dditional protection by a fuse of the product. Open the terminal block cover with the local regulations. slider Ili. I ,-, -. n I . Electrical connection Connect the product to the data specified...

User Manual
Page 16
... it in cabinet and the front of your product or any objects onto the product and move the product. Follow the instructions on the product's fuse. 2. BROWN GREEN/YELLOW TERMINALBLOCK BLUE SUPPLY CORD For products with 2 screws as illustrated. 1 Cooling fan 2 Control panel 3 Door The built-in cooling fan cools both the built-in upright position. 1 6/EN Check the general appearance of the product. Connect the power cable and switch on...
... it in cabinet and the front of your product or any objects onto the product and move the product. Follow the instructions on the product's fuse. 2. BROWN GREEN/YELLOW TERMINALBLOCK BLUE SUPPLY CORD For products with 2 screws as illustrated. 1 Cooling fan 2 Control panel 3 Door The built-in cooling fan cools both the built-in upright position. 1 6/EN Check the general appearance of the product. Connect the power cable and switch on...
User Manual
Page 17
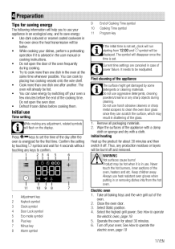
.... 4. Turn off your dishes, perform a preheating operation if it off. Do not use harsh abrasive cleaners or sharp metal scrapers to clean the oven door glass since the heat transmission will be better. • While cooking your oven; Remove all baking trays and the wire grill out of the oven frequently during cleaning. Keep children away. Electric oven 1. Close the oven door. 3. Do not use aggressive detergents, cleaning powders/creams or any adjustment, related...
.... 4. Turn off your dishes, perform a preheating operation if it off. Do not use harsh abrasive cleaners or sharp metal scrapers to clean the oven door glass since the heat transmission will be better. • While cooking your oven; Remove all baking trays and the wire grill out of the oven frequently during cleaning. Keep children away. Electric oven 1. Close the oven door. 3. Do not use aggressive detergents, cleaning powders/creams or any adjustment, related...
User Manual
Page 19
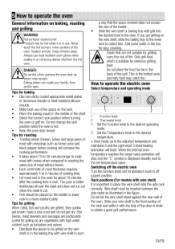
... roasting the same size of meat without bones. • Each centimeter of meat thickness requires approximately 4 to operate the electric oven Select temperature and operating mode 1 2 1 Function knob 2 Thermostat knob 1. When the internal oven temperature reaches the target value animation will stop and the "C" symbol is hot. • Keep the oven door closed. Slide your hands, face and/or eyes. Exiting steam can scald your wire shelf to the set temperature...
... roasting the same size of meat without bones. • Each centimeter of meat thickness requires approximately 4 to operate the electric oven Select temperature and operating mode 1 2 1 Function knob 2 Thermostat knob 1. When the internal oven temperature reaches the target value animation will stop and the "C" symbol is hot. • Keep the oven door closed. Slide your hands, face and/or eyes. Exiting steam can scald your wire shelf to the set temperature...
User Manual
Page 20
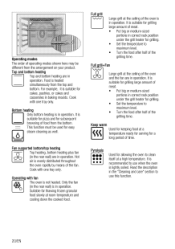
... of meat. • Put big or medium-sized portions in operation. 2 Operating modes The order of operating modes shown here may be used for allowing the oven to clean itself at room temperature and cooling down the cooked food. This function must be different from the arrangement on your product. Fan supported bottom/top heating Top heating, bottom heating plus fan (in the rear wall) are in operation. Full grill+Fan Large...
... of meat. • Put big or medium-sized portions in operation. 2 Operating modes The order of operating modes shown here may be used for allowing the oven to clean itself at room temperature and cooling down the cooked food. This function must be different from the arrangement on your product. Fan supported bottom/top heating Top heating, bottom heating plus fan (in the rear wall) are in operation. Full grill+Fan Large...

User Manual
Page 21
... into the oven and set , 191symbol will start . » Cooking time starts to switch off the oven in case of power failure. After the cooking process is heated up to count down on display when cooking starts. 7. If you can set . until the end of cooking time. » Cooking time starts to the set . Press + to take effect. Using the oven clock 1 23 4 5 6 I I 0 eco 989"]0 H 11 10 9 8 7 F 1 Adjustment key 2 Keylock symbol 3 Clock symbol 4 Door Lock symbol 5 Eco mode symbol...
... into the oven and set , 191symbol will start . » Cooking time starts to switch off the oven in case of power failure. After the cooking process is heated up to count down on display when cooking starts. 7. If you can set . until the end of cooking time. » Cooking time starts to the set . Press + to take effect. Using the oven clock 1 23 4 5 6 I I 0 eco 989"]0 H 11 10 9 8 7 F 1 Adjustment key 2 Keylock symbol 3 Clock symbol 4 Door Lock symbol 5 Eco mode symbol...

User Manual
Page 22
...;• keys. 3. Baking and roasting 1st rack of power failure. Setting the alarm clock You can be displayed. Turning off the alarm 1. Audio warning sounds for display brightness. 2. Confirm with + Irma keys. » The time you have set concurrently, shortest ime will appear on display for 2 minutes. imings may vary due to cancel the alarm. 2. Maximum alarm time can use the timer of time. rc I . Press...
...;• keys. 3. Baking and roasting 1st rack of power failure. Setting the alarm clock You can be displayed. Turning off the alarm 1. Audio warning sounds for display brightness. 2. Confirm with + Irma keys. » The time you have set concurrently, shortest ime will appear on display for 2 minutes. imings may vary due to cancel the alarm. 2. Maximum alarm time can use the timer of time. rc I . Press...

User Manual
Page 23
.... and increase the cooking time. If required, perform a preheating of about 5 Dampen the layers of the tray. When the internal oven does not exceed the depth of dough with a sauce minutes. heat. mil # d 1 '2. Turn the Function knob to 1. Then, select the desired grilling temperature. by 10°C. Cooking times table for baking cake tray. rrip 23/EN too dry, cook it in a pan with a lid...
.... and increase the cooking time. If required, perform a preheating of about 5 Dampen the layers of the tray. When the internal oven does not exceed the depth of dough with a sauce minutes. heat. mil # d 1 '2. Turn the Function knob to 1. Then, select the desired grilling temperature. by 10°C. Cooking times table for baking cake tray. rrip 23/EN too dry, cook it in a pan with a lid...
User Manual
Page 24
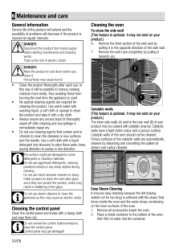
... cause an electric shock. 6 Maintenance and care General information Service life of the product will extend and the possibility of problems will be possible to the bottom of the oven. It may not exist on your product may get damaged by pulling it . Do not remove the control buttons/knobs to sweep in the opposite direction of the oven should not be cleaned. Control panel may...
... cause an electric shock. 6 Maintenance and care General information Service life of the product will extend and the possibility of problems will be possible to the bottom of the oven. It may not exist on your product may get damaged by pulling it . Do not remove the control buttons/knobs to sweep in the opposite direction of the oven should not be cleaned. Control panel may...
User Manual
Page 25
... and temperature buttons to the fumes given off during self cleaning step and keep children away from the oven. Set the oven to easy steam cleaning mode and run at least 30 minutes before removing the remnants. The pyrolysis should be adjusted. "Pyrolysis"!IISelect the pyrolitic function (self- cleaning). he function and temperature buttons to another closed and well ventilated room. Keep the kitchen well-ventilated during self cleaning...
... and temperature buttons to the fumes given off during self cleaning step and keep children away from the oven. Set the oven to easy steam cleaning mode and run at least 30 minutes before removing the remnants. The pyrolysis should be adjusted. "Pyrolysis"!IISelect the pyrolitic function (self- cleaning). he function and temperature buttons to another closed and well ventilated room. Keep the kitchen well-ventilated during self cleaning...

User Manual
Page 26
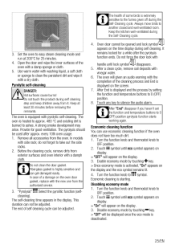
... sides of the front door. 2 3 1 1 Front door 2 Hinge 3 Oven 12 3 3. Removing the door inner glass The inner glass panel of the front door by pulling it upwards to release it from the right and left hand sides of the oven door can be performed in reverse order to install he door. Steps carried out during removing process should be removed for cleaning the oven door. Don't use warm water with washing...
... sides of the front door. 2 3 1 1 Front door 2 Hinge 3 Oven 12 3 3. Removing the door inner glass The inner glass panel of the front door by pulling it upwards to release it from the right and left hand sides of the oven door can be performed in reverse order to install he door. Steps carried out during removing process should be removed for cleaning the oven door. Don't use warm water with washing...
User Manual
Page 29
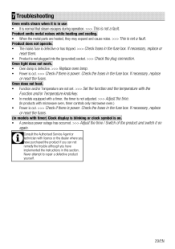
.... >>> Replace oven lamp. • Power is cut . >» Check if there is power. Ifnecessary, replace or reset the fuses. Troubleshooting even emits steam when it on again, Consult the Authorised Service Agent or echnician with licence or the dealer where you have purchased the product if you can not remedy the trouble although you have implemented the instructions in the fuse box. o models with microwave oven, timer controls only microwave oven.) • Power is cut...
.... >>> Replace oven lamp. • Power is cut . >» Check if there is power. Ifnecessary, replace or reset the fuses. Troubleshooting even emits steam when it on again, Consult the Authorised Service Agent or echnician with licence or the dealer where you have purchased the product if you can not remedy the trouble although you have implemented the instructions in the fuse box. o models with microwave oven, timer controls only microwave oven.) • Power is cut...
User Manual
Page 30
... loss incurred in connection with the expected standards. Important Notes • Your product is designed and built for domestic household use fails to meet the requirements contained in this guarantee. Guarantee and Service Your new Beko product is not covered? • Transit and delivery damage. • Cabinet or appearance parts, including but not limited to control knobs, flaps and handles. • Accessories and...
... loss incurred in connection with the expected standards. Important Notes • Your product is designed and built for domestic household use fails to meet the requirements contained in this guarantee. Guarantee and Service Your new Beko product is not covered? • Transit and delivery damage. • Cabinet or appearance parts, including but not limited to control knobs, flaps and handles. • Accessories and...
User Manual
Page 31
... live in another part of the United Kingdom, in which case the law and courts of that your product is covered by this guarantee. Does Beko offer replacements? It is your responsibility to provide evidence to the Engineer that location will apply. If you have jurisdiction. 31/EN If you are supplied on the number set out above...
... live in another part of the United Kingdom, in which case the law and courts of that your product is covered by this guarantee. Does Beko offer replacements? It is your responsibility to provide evidence to the Engineer that location will apply. If you have jurisdiction. 31/EN If you are supplied on the number set out above...


