
User Manual
Page 3
... 6.12 Child lock 24 6.13 Changing the Programme after it has started 24 6.14 Cancelling the Programme...........24 6.15 Programme end 25 7 Maintenance and cleaning 26 7.1 Cleaning lint filter / Loading door inner surface 26 7.2 Cleaning the sensor 26 7.3 Draining the water tank 27 7.4 Cleaning the condenser 27 8 Troubleshooting 29 4 Electrical Connection 16 4.1 Attention 16 4.2 Electrical requirements 16 4.3 Fitting a different plug 16 4.4 Washer/dryer combination 16 5 Preparations 17 5.1 Laundry suitable for drying in the dryer 17...
... 6.12 Child lock 24 6.13 Changing the Programme after it has started 24 6.14 Cancelling the Programme...........24 6.15 Programme end 25 7 Maintenance and cleaning 26 7.1 Cleaning lint filter / Loading door inner surface 26 7.2 Cleaning the sensor 26 7.3 Draining the water tank 27 7.4 Cleaning the condenser 27 8 Troubleshooting 29 4 Electrical Connection 16 4.1 Attention 16 4.2 Electrical requirements 16 4.3 Fitting a different plug 16 4.4 Washer/dryer combination 16 5 Preparations 17 5.1 Laundry suitable for drying in the dryer 17...
User Manual
Page 4
... Service. 1 Important safety and environmental instructions This section contains safety instructions that will cause problems with materials such as carpet, wood and tape. Cleaning and maintenance works should not be removed. (See 2.1 Overview) The gap between the dryer and the floor should not play with the product. Children should not be reduced with the dryer. • Always have the installation and repairing...
... Service. 1 Important safety and environmental instructions This section contains safety instructions that will cause problems with materials such as carpet, wood and tape. Cleaning and maintenance works should not be removed. (See 2.1 Overview) The gap between the dryer and the floor should not play with the product. Children should not be reduced with the dryer. • Always have the installation and repairing...
User Manual
Page 5
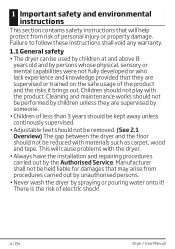
...) Have the grounding installation performed by an authorised service agent! B If the dryer is faulty, it is repaired by a qualified electrician. B Damaged mains cable should be followed while electrical connection is made during installation, maintenance, cleaning and repair works. • Do not touch the plug with the local regulations. • The voltage and allowed fuse protection is stated on the type label plate. (See...
...) Have the grounding installation performed by an authorised service agent! B If the dryer is faulty, it is repaired by a qualified electrician. B Damaged mains cable should be followed while electrical connection is made during installation, maintenance, cleaning and repair works. • Do not touch the plug with the local regulations. • The voltage and allowed fuse protection is stated on the type label plate. (See...
User Manual
Page 7
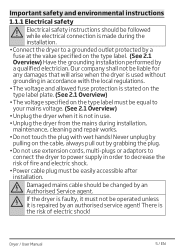
... operating with industrial chemicals. Clothes that are washed inadequately may ignite on their own and even may lead to functional problems. Therefore check pockets off the laundry that you must do this, remove all laundry quickly and lay them out to dissipate the heat. Important safety and environmental instructions Below specified laundry or items must not be dried...
... operating with industrial chemicals. Clothes that are washed inadequately may ignite on their own and even may lead to functional problems. Therefore check pockets off the laundry that you must do this, remove all laundry quickly and lay them out to dissipate the heat. Important safety and environmental instructions Below specified laundry or items must not be dried...
User Manual
Page 8
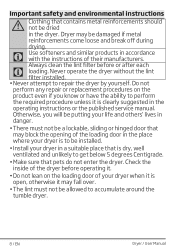
... metal reinforcements should not be dried in the dryer. Never operate the dryer without the lint filter installed. • Never attempt to accumulate around the tumble dryer. 8 / EN Dryer / User Manual Important safety and environmental instructions A Clothing that pets do not enter the dryer. C Use softeners and similar products in the operating instructions or the published service manual. Do not perform any repair or replacement procedures on the loading door of their manufacturers.
... metal reinforcements should not be dried in the dryer. Never operate the dryer without the lint filter installed. • Never attempt to accumulate around the tumble dryer. 8 / EN Dryer / User Manual Important safety and environmental instructions A Clothing that pets do not enter the dryer. C Use softeners and similar products in the operating instructions or the published service manual. Do not perform any repair or replacement procedures on the loading door of their manufacturers.
User Manual
Page 10
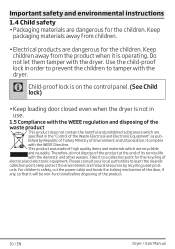
... environmental instructions 1.4 Child safety • Packaging materials are dangerous for the children. C Child-proof lock is on the control panel. (See Child lock) • Keep loading door closed even when the dryer is operating. Therefore, do not dispose of the product at the end of Environment and Urbanization. Help protect the environment and natural resources by Republic of Turkey Ministry of its service life...
... environmental instructions 1.4 Child safety • Packaging materials are dangerous for the children. C Child-proof lock is on the control panel. (See Child lock) • Keep loading door closed even when the dryer is operating. Therefore, do not dispose of the product at the end of Environment and Urbanization. Help protect the environment and natural resources by Republic of Turkey Ministry of its service life...
User Manual
Page 11
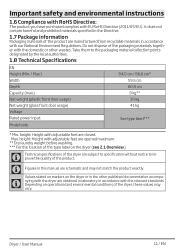
... and environmental instructions 1.6 Compliance with RoHS Directive: The product you have purchased complies with adjustable feet are subject to specification without notice to the packaging material collection points designated by the local authorities. 1.8 Technical Specifications EN Height (Min. / Max.) Width Depth Capacity (max.) Net weight (plastic front door usage) Net weight (glass front door usage) Voltage Rated power input Model code 84...
... and environmental instructions 1.6 Compliance with RoHS Directive: The product you have purchased complies with adjustable feet are subject to specification without notice to the packaging material collection points designated by the local authorities. 1.8 Technical Specifications EN Height (Min. / Max.) Width Depth Capacity (max.) Net weight (plastic front door usage) Net weight (glass front door usage) Voltage Rated power input Model code 84...
User Manual
Page 14
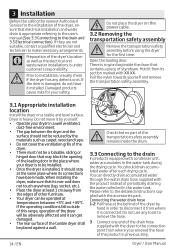
...; Your dryer can directly drain accumulated water through the water drain hose supplied with the accessories pack. Connecting the water drain hose 1-2 Pull hose at temperatures between the dryer and the surface should drain accumulated water after each drying cycle. 3 Installation Before the calling the nearest Authorized Service for the installation of the dryer, ensure that electrical installation and water drain is heavy. Damaged products cause risks for the first time. Open the loading door...
...; Your dryer can directly drain accumulated water through the water drain hose supplied with the accessories pack. Connecting the water drain hose 1-2 Pull hose at temperatures between the dryer and the surface should drain accumulated water after each drying cycle. 3 Installation Before the calling the nearest Authorized Service for the installation of the dryer, ensure that electrical installation and water drain is heavy. Damaged products cause risks for the first time. Open the loading door...
User Manual
Page 15
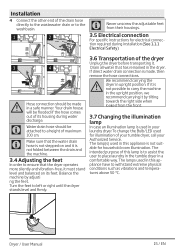
... looked from their housings. 3.5 Electrical connection For specific instructions for household room illumination. If direct water drain connection is used in your laundry dryer.To change the Bulb/LED used for illumination of your tumble dryer, call your Authorized Service. If it is not possible to left or right until the dryer stands level and firmly. 3.6 Transportation of the dryer Unplug the dryer before transporting it by adjusti...
... looked from their housings. 3.5 Electrical connection For specific instructions for household room illumination. If direct water drain connection is used in your laundry dryer.To change the Bulb/LED used for illumination of your tumble dryer, call your Authorized Service. If it is not possible to left or right until the dryer stands level and firmly. 3.6 Transportation of the dryer Unplug the dryer before transporting it by adjusti...

User Manual
Page 16
... electrical store. A Do not operate without using a suitable and approved stacking kit obtained from the manufacturer of the appliances. • A special stacking kit is required as follows: 1 Connect the green - yellow or green (earth) wire to the terminal in the plug marked 'E' or with the coloured markings identifying the terminals on your socket, then the plug should be used in the rating label corresponds to be replaced...
... electrical store. A Do not operate without using a suitable and approved stacking kit obtained from the manufacturer of the appliances. • A special stacking kit is required as follows: 1 Connect the green - yellow or green (earth) wire to the terminal in the plug marked 'E' or with the coloured markings identifying the terminals on your socket, then the plug should be used in the rating label corresponds to be replaced...

User Manual
Page 17
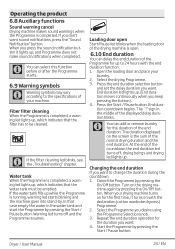
... not open for a long time. • Do not add wet laundry while the dryer is reduced.Sort out the laundry depending on the garment tags. LAUNDRY DRYING SYMBOLS Drying Suitable for Symbols dryer No Iron Sensitive / Delicate dry Do not dry with each other after each drying cycle Dryer / User Manual 17 / EN Thus, the drying time is shortened and energy consumption is in operation • Clean the lint filter before...
... not open for a long time. • Do not add wet laundry while the dryer is reduced.Sort out the laundry depending on the garment tags. LAUNDRY DRYING SYMBOLS Drying Suitable for Symbols dryer No Iron Sensitive / Delicate dry Do not dry with each other after each drying cycle Dryer / User Manual 17 / EN Thus, the drying time is shortened and energy consumption is in operation • Clean the lint filter before...
User Manual
Page 22
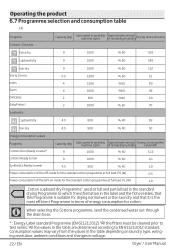
... the condensed water out through the drain hose. * : Energy Label standard Programme (EN 61121:2012) "All the filters must be cleaned prior to test series."All the values in the table are determined according to which the information in the label and the fiche relates, that it is the most efficient Programme in voltage. 22 / EN Dryer / User Manual Consumption...
... the condensed water out through the drain hose. * : Energy Label standard Programme (EN 61121:2012) "All the filters must be cleaned prior to test series."All the values in the table are determined according to which the information in the label and the fiche relates, that it is the most efficient Programme in voltage. 22 / EN Dryer / User Manual Consumption...
User Manual
Page 23
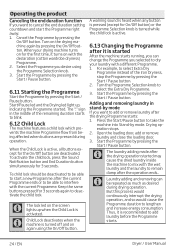
... using the Programme Selection knob. 3. If the water tank fills up , which indicates that the filter has to change the duration during the countdown: 1. Select the drying Programme. 3. Changing the end duration If you want . 4. Turn on for up . Select the Programme you want . Open the loading door and place your drying machine turns on the drying machine again by pressing the Start / Pause button...
... using the Programme Selection knob. 3. If the water tank fills up , which indicates that the filter has to change the duration during the countdown: 1. Select the drying Programme. 3. Changing the end duration If you want . 4. Turn on for up . Select the Programme you want . Open the loading door and place your drying machine turns on the drying machine again by pressing the Start / Pause button...
User Manual
Page 24
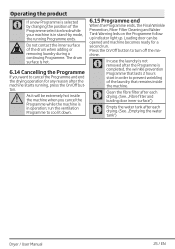
... the Programme by mode. Open the loading door, add or remove laundry and close the loading door. 3. Te child lock should be deactivated to be able to start the Programme right away: 1. Operating the product Canceling the end duration function If you want to add laundry before the Programme starts. 24 / EN Dryer / User Manual For example, to select Extra Dry Programme instead of the remaining...
... the Programme by mode. Open the loading door, add or remove laundry and close the loading door. 3. Te child lock should be deactivated to be able to start the Programme right away: 1. Operating the product Canceling the end duration function If you want to add laundry before the Programme starts. 24 / EN Dryer / User Manual For example, to select Extra Dry Programme instead of the remaining...
User Manual
Page 25
... you want to cool it will be opened and machine becomes ready for a second run the ventilation Programme to cancel the Programme and end the drying operation for any reason after the machine starts running Programme ends. Loading door can be extremely hot inside the machine. Press the On/Off button to prevent wrinkling of the drum when adding or removing laundry during a continuing...
... you want to cool it will be opened and machine becomes ready for a second run the ventilation Programme to cancel the Programme and end the drying operation for any reason after the machine starts running Programme ends. Loading door can be extremely hot inside the machine. Press the On/Off button to prevent wrinkling of the drum when adding or removing laundry during a continuing...
User Manual
Page 26
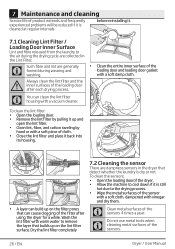
.... 7.2 Cleaning the sensor There are dampness sensors in the Lint Filter. before reinstalling it. 7.1 Cleaning Lint Filter / Loading Door Inner Surface Lint and fibre released from the laundry to the air during the drying cycle are generally formed during wearing and washing. • Clean the entire inner surface of the loading door and loading door gasket with a soft piece of cloth. • Close the lint filter and place it is still hot due to cool...
.... 7.2 Cleaning the sensor There are dampness sensors in the Lint Filter. before reinstalling it. 7.1 Cleaning Lint Filter / Loading Door Inner Surface Lint and fibre released from the laundry to the air during the drying cycle are generally formed during wearing and washing. • Clean the entire inner surface of the loading door and loading door gasket with a soft piece of cloth. • Close the lint filter and place it is still hot due to cool...
User Manual
Page 27
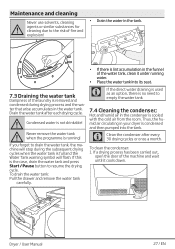
A Never remove the water tank when the programme is the case, drain the water tank and press Start / Pause button to resume the drying cycle. If this is running water. • Place the water tank into the tank. C If the direct water draining is used as an option, there is not drinkable! C Clean the condenser after each drying cycle. If a drying process has been carried out, open the door of...
A Never remove the water tank when the programme is the case, drain the water tank and press Start / Pause button to resume the drying cycle. If this is running water. • Place the water tank into the tank. C If the direct water draining is used as an option, there is not drinkable! C Clean the condenser after each drying cycle. If a drying process has been carried out, open the door of...
User Manual
Page 29
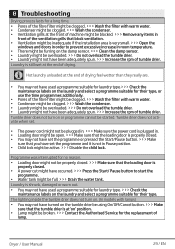
... closed. >>> Make sure that the loading door is properly closed . • You may not have used a programme suitable for laundry type.>>> Check the maintenance labels on the tumble drier be using On/Off/Cancel button. >>> Make sure that the tumble drier is not in Pause position. • Child lock might be active. >>> Disable the child lock. 8 Troubleshooting Drying process lasts for a long time. • Pores of the fibre...
... closed. >>> Make sure that the loading door is properly closed . • You may not have used a programme suitable for laundry type.>>> Check the maintenance labels on the tumble drier be using On/Off/Cancel button. >>> Make sure that the tumble drier is not in Pause position. • Child lock might be active. >>> Disable the child lock. 8 Troubleshooting Drying process lasts for a long time. • Pores of the fibre...
User Manual
Page 30
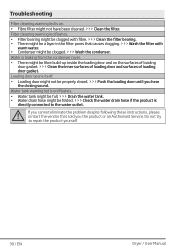
... an Authorised Service. Loading door opens itself. • Loading door might be full. >>> Drain the water tank. • Water drain hose might not have been cleaned. >>> Clean the filter. A If you cannot eliminate the problem despite following these instructions, please contact the vendor that causes clogging. >>> Wash the filter with warm water. • Condenser might not be folded. >>> Check the water drain hose if the product is directly connected to repair the...
... an Authorised Service. Loading door opens itself. • Loading door might be full. >>> Drain the water tank. • Water drain hose might not have been cleaned. >>> Clean the filter. A If you cannot eliminate the problem despite following these instructions, please contact the vendor that causes clogging. >>> Wash the filter with warm water. • Condenser might not be folded. >>> Check the water drain hose if the product is directly connected to repair the...

User Manual
Page 32
... light bulbs. • Repairs required as a result of faulty materials, defective components or manufacturing defect. • The cost of functional replacement parts, but excluding consumable items. • The labour costs of the original purchase. What is covered? • Repairs necessary as a result of unauthorised repair or inexpert installation that fails to meet the requirements contained in the user instruction book. • Repairs to products used...
... light bulbs. • Repairs required as a result of faulty materials, defective components or manufacturing defect. • The cost of functional replacement parts, but excluding consumable items. • The labour costs of the original purchase. What is covered? • Repairs necessary as a result of unauthorised repair or inexpert installation that fails to meet the requirements contained in the user instruction book. • Repairs to products used...


