
Owners Manual
Page 2
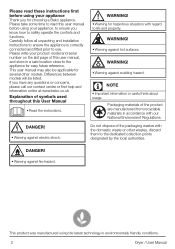
... authorities. Carefully follow all unpacking and installation instructions to ensure the appliance is correctly connected and fitted prior to read these instructions first before using the latest technology in environmentally friendly conditions. 2 Dryer / User Manual C NOTE • Important information or useful hints about usage. DANGER! • Warning against hot surfaces. B DANGER! • Warning against scalding hazard. WARNING! • Warning against electric shock...
... authorities. Carefully follow all unpacking and installation instructions to ensure the appliance is correctly connected and fitted prior to read these instructions first before using the latest technology in environmentally friendly conditions. 2 Dryer / User Manual C NOTE • Important information or useful hints about usage. DANGER! • Warning against hot surfaces. B DANGER! • Warning against scalding hazard. WARNING! • Warning against electric shock...

Owners Manual
Page 3
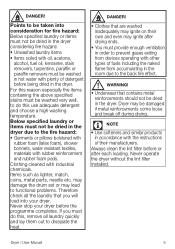
... machine in steam programs. Do not use any dry cleaning sets or additional materials in a steam program or in steam (odour removal) program. • Do not use mains water or additives. Failure to follow these instructions shall void any program. Dryer / User Manual 3 The gap between the dryer and the floor should be removed. • You may be reduced with unpleasant odour in any warranty. 1.1 General safety A WARNING...
... machine in steam programs. Do not use any dry cleaning sets or additional materials in a steam program or in steam (odour removal) program. • Do not use mains water or additives. Failure to follow these instructions shall void any program. Dryer / User Manual 3 The gap between the dryer and the floor should be removed. • You may be reduced with unpleasant odour in any warranty. 1.1 General safety A WARNING...

Owners Manual
Page 4
.... • Unplug the dryer when it is running, this concentration of heat can occur if you cancel the programme or in the event of fire and electric shock. • Power cable plug must be easily accessible after installation. • Damaged mains cable should be followed while electrical connection is made during installation, maintenance, cleaning and repair works. • Do not touch the plug with wet hands!
.... • Unplug the dryer when it is running, this concentration of heat can occur if you cancel the programme or in the event of fire and electric shock. • Power cable plug must be easily accessible after installation. • Damaged mains cable should be followed while electrical connection is made during installation, maintenance, cleaning and repair works. • Do not touch the plug with wet hands!
Owners Manual
Page 5
... choose a high washing temperature. may damage the drum set or may ignite on their manufacturers. C NOTE • Use softeners and similar products in hot water with industrial chemicals. DANGER! • Clothes that are washed inadequately may lead to functional problems. Therefore check all laundry quickly and lay them out to the back fire effect. Always clean the lint filter before or after...
... choose a high washing temperature. may damage the drum set or may ignite on their manufacturers. C NOTE • Use softeners and similar products in hot water with industrial chemicals. DANGER! • Clothes that are washed inadequately may lead to functional problems. Therefore check all laundry quickly and lay them out to the back fire effect. Always clean the lint filter before or after...

Owners Manual
Page 6
... repair or replacement procedures on a solid floor that may block the opening of the loading door in the operating instructions or the published service manual. A WARNING! • Never attempt to operate the dryer properly. 6 Dryer / User Manual During this period, original spare parts will be putting your life and others' lives in danger. • There must not be installed 1.3 Intended use • Dryer has been designed for domestic use . • Use...
... repair or replacement procedures on a solid floor that may block the opening of the loading door in the operating instructions or the published service manual. A WARNING! • Never attempt to operate the dryer properly. 6 Dryer / User Manual During this period, original spare parts will be putting your life and others' lives in danger. • There must not be installed 1.3 Intended use • Dryer has been designed for domestic use . • Use...

Owners Manual
Page 7
... by the local authorities. 1.8 Technical Specifications EN Height (Min. / Max.) 84,6 cm / 86,6 cm* Width 59,7 cm Depth 65,4 cm Capacity (max.) 8 kg** Net weight (± 4 kg) 51 kg Width Voltage See type label*** Rated power input * Min. height: Height with EU RoHS Directive (2011/65/EU). Depending on the control panel. (See Child lock) • Keep loading door closed . Do not dispose...
... by the local authorities. 1.8 Technical Specifications EN Height (Min. / Max.) 84,6 cm / 86,6 cm* Width 59,7 cm Depth 65,4 cm Capacity (max.) 8 kg** Net weight (± 4 kg) 51 kg Width Voltage See type label*** Rated power input * Min. height: Height with EU RoHS Directive (2011/65/EU). Depending on the control panel. (See Child lock) • Keep loading door closed . Do not dispose...
Owners Manual
Page 8
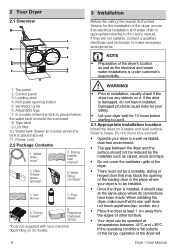
... before starting to make sure that may block the opening button 5. If the operating conditions fall outside of this range, operation of the loading door in models where the tank is appropriate referring to installation, visually check if the dryer has any defects on a stable and level surface. If the drier is heavy. A WARNING! • Prior to the user's manual. Loading door 4. Pure Water* 4. Filter drawer spare sponge* 6. Water drain hose...
... before starting to make sure that may block the opening button 5. If the operating conditions fall outside of this range, operation of the loading door in models where the tank is appropriate referring to installation, visually check if the dryer has any defects on a stable and level surface. If the drier is heavy. A WARNING! • Prior to the user's manual. Loading door 4. Pure Water* 4. Filter drawer spare sponge* 6. Water drain hose...
Owners Manual
Page 9
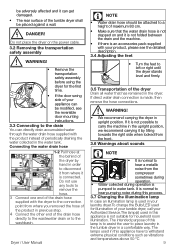
... the power cable. 3.2 Removing the transportation safety assembly A WARNING! • Remove the transportation safety assembly before using the dryer for illumination of your tumble dryer, call your product, please see the reversible door mounting instructions. 3.3 Connecting to the drain You can directly drain accumulated water through the water drain hose supplied with the dryer to the connection point from the compressor sometimes during operation. • Water collected during this process. 3.7 Changing...
... the power cable. 3.2 Removing the transportation safety assembly A WARNING! • Remove the transportation safety assembly before using the dryer for illumination of your tumble dryer, call your product, please see the reversible door mounting instructions. 3.3 Connecting to the drain You can directly drain accumulated water through the water drain hose supplied with the dryer to the connection point from the compressor sometimes during operation. • Water collected during this process. 3.7 Changing...

Owners Manual
Page 10
... accessories such as examples. Thus, the drying time is shortened and energy consumption is visible air collection on their type and thickness. Do not load more than thick bathroom towels. • Follow the instructions in the user manual for a long time. • Do not add wet laundry while the dryer is in operation • For models with a condenser unit: clean the condenser once in a month...
... accessories such as examples. Thus, the drying time is shortened and energy consumption is visible air collection on their type and thickness. Do not load more than thick bathroom towels. • Follow the instructions in the user manual for a long time. • Do not add wet laundry while the dryer is in operation • For models with a condenser unit: clean the condenser once in a month...

Owners Manual
Page 11
... 5.1 Control Panel 1 2 3 1. Display 3. Dryness Settings Selection button Tank full Filter Filter drawer / Child-proof cleaning Heat exchanger cleaning lock Mute Volume up Express Delicates 14' Shirts Sport Freshen Up Cottons Mix Daily Exspress Shirts 30 End/anti- End Time button 6. On/O creasing Timer Delay Drying Cupboard Iron Dry Dry Jeans BabyProtect Extra dry Cupboard dry plus Start pause cancel Synthetics Drying Rack/ Express Wool Refresh TimeDry 30' 5.3 Preparing the dryer Plug in a slight loosely. Dryer / User Manual...
... 5.1 Control Panel 1 2 3 1. Display 3. Dryness Settings Selection button Tank full Filter Filter drawer / Child-proof cleaning Heat exchanger cleaning lock Mute Volume up Express Delicates 14' Shirts Sport Freshen Up Cottons Mix Daily Exspress Shirts 30 End/anti- End Time button 6. On/O creasing Timer Delay Drying Cupboard Iron Dry Dry Jeans BabyProtect Extra dry Cupboard dry plus Start pause cancel Synthetics Drying Rack/ Express Wool Refresh TimeDry 30' 5.3 Preparing the dryer Plug in a slight loosely. Dryer / User Manual...

Owners Manual
Page 16
... normal drying time and end time. 16 Dryer / User Manual C NOTE • For detailed information, See 6 Maintenance and cleaning. End time You can add or remove laundry within end time. ":" Separator in the middle of displayed delay time flashes. Cleaning the filter drawer Warning symbol flashes to remind that the filter drawer needs to 24 hours with end time function. • Open the loading door and place the laundry. • Select drying program, spin cycle...
... normal drying time and end time. 16 Dryer / User Manual C NOTE • For detailed information, See 6 Maintenance and cleaning. End time You can add or remove laundry within end time. ":" Separator in the middle of displayed delay time flashes. Cleaning the filter drawer Warning symbol flashes to remind that the filter drawer needs to 24 hours with end time function. • Open the loading door and place the laundry. • Select drying program, spin cycle...

Owners Manual
Page 18
... drum while adding or removing clothes during a continuing program. C NOTE • Adding laundry after the machine starts running program terminates and new program information is hot. 5.13 Cancelling the program If you want to add or remove clothes to/from the machine after you remove or add laundry. • Press the Start/Stand-by button to start the program. The drying operation stops. • Open the loading door...
... drum while adding or removing clothes during a continuing program. C NOTE • Adding laundry after the machine starts running program terminates and new program information is hot. 5.13 Cancelling the program If you want to add or remove clothes to/from the machine after you remove or add laundry. • Press the Start/Stand-by button to start the program. The drying operation stops. • Open the loading door...

Owners Manual
Page 19
... with a soft cloth. • Remove the second part (outer filter) by the Fibre Filter. A WARNING! • After each drying cycle, clean the fibre filter and the inner surface of the loading door. • Open both fibre filters (inner and outer filters) remove the hair, fibre, cotton balls with your damp hand or a vacuum cleaner or a cloth. • Clean both filters under water running in its washer with a soft damp cloth. C NOTE •...
... with a soft cloth. • Remove the second part (outer filter) by the Fibre Filter. A WARNING! • After each drying cycle, clean the fibre filter and the inner surface of the loading door. • Open both fibre filters (inner and outer filters) remove the hair, fibre, cotton balls with your damp hand or a vacuum cleaner or a cloth. • Clean both filters under water running in its washer with a soft damp cloth. C NOTE •...

Owners Manual
Page 20
... dryer. • Allow the machine to cool down if it under running ! To clean the sensors: • Open the loading door of the sensor with a soft cloth, dampened with vinegar and dry them. A WARNING! • Never use metal tools when cleaning metal surfaces of the laundry is removed and condensed during the subsequent drying cycles when the water tank is flashing or in 6 month periods, clean the evaporator. • Open...
... dryer. • Allow the machine to cool down if it under running ! To clean the sensors: • Open the loading door of the sensor with a soft cloth, dampened with vinegar and dry them. A WARNING! • Never use metal tools when cleaning metal surfaces of the laundry is removed and condensed during the subsequent drying cycles when the water tank is flashing or in 6 month periods, clean the evaporator. • Open...

Owners Manual
Page 22
... a power outage. >>> Press the Start / Pause / Cancel button to Off position. Fibre filter cleaning icon is properly closed . >>> Remove any part on . Clothes come out damp after following the instructions in Pause position.. Loading door might be closed . Loading door might be full. >>> Empty the water tank. Fibres might not have been used . >>> Check the maintenance labels on the washing machine. the light turns on the washing machine. Water drips from using...
... a power outage. >>> Press the Start / Pause / Cancel button to Off position. Fibre filter cleaning icon is properly closed . >>> Remove any part on . Clothes come out damp after following the instructions in Pause position.. Loading door might be closed . Loading door might be full. >>> Empty the water tank. Fibres might not have been used . >>> Check the maintenance labels on the washing machine. the light turns on the washing machine. Water drips from using...
Owners Manual
Page 23
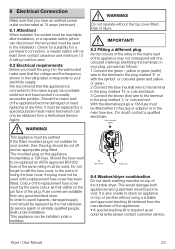
... or need to refit the fuse cover. Dryer / User Manual 23 Should the fuse need replacing at 13 amps (minimum). 8.1 Attention! A IMPORTANT! 8.3 Fitting a different plug As the colours of the wires in the mains lead of the same rating must be used until a replacement fuse cover has been fitted. If in the main fuse box. Fuse covers are available from any time, it must be replaced by the manufacturer, its service agent...
... or need to refit the fuse cover. Dryer / User Manual 23 Should the fuse need replacing at 13 amps (minimum). 8.1 Attention! A IMPORTANT! 8.3 Fitting a different plug As the colours of the wires in the mains lead of the same rating must be used until a replacement fuse cover has been fitted. If in the main fuse box. Fuse covers are available from any time, it must be replaced by the manufacturer, its service agent...

Owners Manual
Page 25
.... 3. The guarantee will be correctly installed, located and operated in accordance with the instructions contained in the User Instructions Booklet provided with your statutory rights in connection with the expected standards. Gas Cookers must be void if the product is purchased as a consumer. This guarantee is used within the United Kingdom and the Republic of repairing the product). 5. What is designed...
.... 3. The guarantee will be correctly installed, located and operated in accordance with the instructions contained in the User Instructions Booklet provided with your statutory rights in connection with the expected standards. Gas Cookers must be void if the product is purchased as a consumer. This guarantee is used within the United Kingdom and the Republic of repairing the product). 5. What is designed...
Owners Manual
Page 26
... in our Standard Guarantee Terms and Conditions. 26 Dryer / User Manual We will endeavour to minimize inconvenience and to disconnecting the faulty product and installing the replacement product will apply. Will there be guaranteed. The Manufacturer reserves the right to charge for specific timed appointments, this guarantee. • Where a service call has been made and the engineer finds that...
... in our Standard Guarantee Terms and Conditions. 26 Dryer / User Manual We will endeavour to minimize inconvenience and to disconnecting the faulty product and installing the replacement product will apply. Will there be guaranteed. The Manufacturer reserves the right to charge for specific timed appointments, this guarantee. • Where a service call has been made and the engineer finds that...

Owners Manual
Page 27
... and conditions detailed in accordance with Beko plc using the procedure outlined below. 1. Beko Free standing appliances come with a 12 month parts and labour guarantee as proof of guarantee validation by following the online instructions. You do not need to Beko products that feature the ProSmart Inverter Motor. It is exclusive of selected washing machines, washer-dryers, tumble dryers and dishwashers. The guarantee is...
... and conditions detailed in accordance with Beko plc using the procedure outlined below. 1. Beko Free standing appliances come with a 12 month parts and labour guarantee as proof of guarantee validation by following the online instructions. You do not need to Beko products that feature the ProSmart Inverter Motor. It is exclusive of selected washing machines, washer-dryers, tumble dryers and dishwashers. The guarantee is...
Owners Manual
Page 28
... your Model number and Serial number available when you call our Contact centre Before requesting service please check the troubleshooting guide in a safe place; A valid proof of purchase is your responsibility to ensure our Engineers have a clean and safe environment to the Engineer, without the need for the Republic of Ireland visit beko.ie/register. 28 Dryer / User Manual It is required for requesting service under...
... your Model number and Serial number available when you call our Contact centre Before requesting service please check the troubleshooting guide in a safe place; A valid proof of purchase is your responsibility to ensure our Engineers have a clean and safe environment to the Engineer, without the need for the Republic of Ireland visit beko.ie/register. 28 Dryer / User Manual It is required for requesting service under...


