
User Manual
Page 2
... the first time. The information contained herein is operated on the Eco programme with prewash before loading with dishes. The dishwasher must only be some water left in your machine. details are not sure about any damage. Beko Customer Service Notes Due to using it 's intended purpose, i.e. Preparation before installing the dishwasher and using your appliance. Failure to observe these instructions before use It is...
... the first time. The information contained herein is operated on the Eco programme with prewash before loading with dishes. The dishwasher must only be some water left in your machine. details are not sure about any damage. Beko Customer Service Notes Due to using it 's intended purpose, i.e. Preparation before installing the dishwasher and using your appliance. Failure to observe these instructions before use It is...
User Manual
Page 3
... spray arm 22 Lower spray arm 22 2 Warning and safety information 5 8 Before calling service Electrical Safety 5 / Trouble shooting 23 Children's Safety 5 General 5 Recycling 6 Energy and water saving 6 What should not be washed in your dishwasher 6 3 Before first use 7 Hot Air Drying 7 Electrical requirements 7 4 Installation 7 Warning 8 This appliance must be earthed 8 Important 8 Fitting a different plug 8 Water inlet hose connection 9 Drain Hose Connection 9 5 How to use 11 Water hardness & regeneration settings 11 Detergent...
... spray arm 22 Lower spray arm 22 2 Warning and safety information 5 8 Before calling service Electrical Safety 5 / Trouble shooting 23 Children's Safety 5 General 5 Recycling 6 Energy and water saving 6 What should not be washed in your dishwasher 6 3 Before first use 7 Hot Air Drying 7 Electrical requirements 7 4 Installation 7 Warning 8 This appliance must be earthed 8 Important 8 Fitting a different plug 8 Water inlet hose connection 9 Drain Hose Connection 9 5 How to use 11 Water hardness & regeneration settings 11 Detergent...

User Manual
Page 4
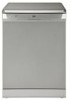
... dishwasher / specification Removable work top Upper basket Upper basket track latch Dishwasher salt cap Lower basket Cutlery basket Detergent and Rinse aid dispenser Programme Selection&Starting Guide Hot Air Drying Upper spray arm Heating element concealed behind the liner Lower spray arm Filters Removable kick plate LED Progress Indicator Lights Start/Cancel Button Time Delay Indicator Salt Level Indicator Light Tablet Detergent Indicator Programme Indicator Light Start / Stop Indicator Light Programme Selection Button Half Load Indicator Light Rinse Aid Indicator Light Time Delay...
... dishwasher / specification Removable work top Upper basket Upper basket track latch Dishwasher salt cap Lower basket Cutlery basket Detergent and Rinse aid dispenser Programme Selection&Starting Guide Hot Air Drying Upper spray arm Heating element concealed behind the liner Lower spray arm Filters Removable kick plate LED Progress Indicator Lights Start/Cancel Button Time Delay Indicator Salt Level Indicator Light Tablet Detergent Indicator Programme Indicator Light Start / Stop Indicator Light Programme Selection Button Half Load Indicator Light Rinse Aid Indicator Light Time Delay...
User Manual
Page 5
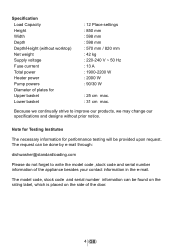
The model code, stock code and serial number information can be done by e-mail through: dishwasher@standardloading.com Please do not forget to improve our products, we may change our specifications and designs without worktop) Net weight Supply voltage Fuse currrent Total power Heater power Pump powers Diameter of plates for performance testing will be found on the rating label, which is placed on the side of the...
The model code, stock code and serial number information can be done by e-mail through: dishwasher@standardloading.com Please do not forget to improve our products, we may change our specifications and designs without worktop) Net weight Supply voltage Fuse currrent Total power Heater power Pump powers Diameter of plates for performance testing will be found on the rating label, which is placed on the side of the...
User Manual
Page 6
... lock themselves in unused machines. The door of a full basket 5 GB To avoid such a problem it does not lock. 2 Warning and safety information Electrical Safety The dishwasher should be used. Always use an extension cable. Children's Safety Never allow your children to support the weight of your safety depend on the racks to child safety. Never use materials other than specially produced detergents and rinse-aids...
... lock themselves in unused machines. The door of a full basket 5 GB To avoid such a problem it does not lock. 2 Warning and safety information Electrical Safety The dishwasher should be used. Always use an extension cable. Children's Safety Never allow your children to support the weight of your safety depend on the racks to child safety. Never use materials other than specially produced detergents and rinse-aids...

User Manual
Page 7
when the lower basket is in operation. Do not open door can occur between silver cutlery and stainless steel cutlery. Packing materials and some "onglaze" decorated china, aluminum or silver have a tendency to recycling centers. We suggest you wash in the dishwasher is dishwasher-proof. since these may...electrical and electronic equipment (WEEE). As a precaution, do not load items other than those mentioned in this product must be handled pursuant to minimize its impact on the door, otherwise the machine may lose their shine and become opaque in your dishwasher Do not wash...
when the lower basket is in operation. Do not open door can occur between silver cutlery and stainless steel cutlery. Packing materials and some "onglaze" decorated china, aluminum or silver have a tendency to recycling centers. We suggest you wash in the dishwasher is dishwasher-proof. since these may...electrical and electronic equipment (WEEE). As a precaution, do not load items other than those mentioned in this product must be handled pursuant to minimize its impact on the door, otherwise the machine may lose their shine and become opaque in your dishwasher Do not wash...

User Manual
Page 8
.... 3 Before first use damaged machines. Hot Air Drying Hot Air Drying ensures your dishes are in compliance with the instructions for assembly as stated in the dishwasher and also to take care not to damage your dishwasher makes it easy and quick for hygiene reasons. It is damaged contact your dishwasher has an Internal Lighting; Before the first wash, add 1 lt of water to place the dishes in the...
.... 3 Before first use damaged machines. Hot Air Drying Hot Air Drying ensures your dishes are in compliance with the instructions for assembly as stated in the dishwasher and also to take care not to damage your dishwasher makes it easy and quick for hygiene reasons. It is damaged contact your dishwasher has an Internal Lighting; Before the first wash, add 1 lt of water to place the dishes in the...
User Manual
Page 10
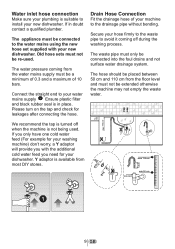
... not surface water drainage system. Drain Hose Connection Fit the drainage hose of 10 bars. Secure your dishwasher. The hose should be placed between 50 cm and 110 cm from the floor level and must not be a minimum of 0.3 and a maximum of your new dishwasher. Connect the straight end to your water mains supply 1 Ensure plastic filter and black rubber seal is suitable to install your machine...
... not surface water drainage system. Drain Hose Connection Fit the drainage hose of 10 bars. Secure your dishwasher. The hose should be placed between 50 cm and 110 cm from the floor level and must not be a minimum of 0.3 and a maximum of your new dishwasher. Connect the straight end to your water mains supply 1 Ensure plastic filter and black rubber seal is suitable to install your machine...

User Manual
Page 11
... correct closure and sealing of the door. Make sure your dishwasher is essential for servicing. Ensure there is already enough space, you don't need to remove the worktop to a water tap and a drain. min 850mm Installation of the machine to ensure that the water inlet and drain hoses are not linked or squashed. See the following diagram. Good levelling is perfectly level using the adjustable feet. 10 GB...
... correct closure and sealing of the door. Make sure your dishwasher is essential for servicing. Ensure there is already enough space, you don't need to remove the worktop to a water tap and a drain. min 850mm Installation of the machine to ensure that the water inlet and drain hoses are not linked or squashed. See the following diagram. Good levelling is perfectly level using the adjustable feet. 10 GB...
User Manual
Page 13
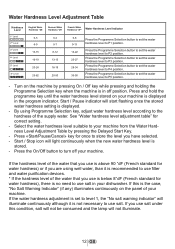
... case, "No Salt Warning Indicator" (if any) illuminates continuously on the panel of the supply water. If the water hardness adjustment is stored. - Start / Pause indicator will light continuously when the new water hardness level is set the water hardness level to P2 position. If you use is no need to turn off position. Water Hardness Level Adjustment Table Hardness Level 1st Level 2nd Level 3rd Level 4th Level 5th Level 6th Level English Water Hardness °dE 0-5 6-9 10...
... case, "No Salt Warning Indicator" (if any) illuminates continuously on the panel of the supply water. If the water hardness adjustment is stored. - Start / Pause indicator will light continuously when the new water hardness level is set the water hardness level to P2 position. If you use is no need to turn off position. Water Hardness Level Adjustment Table Hardness Level 1st Level 2nd Level 3rd Level 4th Level 5th Level 6th Level English Water Hardness °dE 0-5 6-9 10...

User Manual
Page 14
... dishes and glasses may not be done immediately before starting one of the complete washing programmes to the salt container even if the hardness of your appliance beyond repair. L S AL Z Funnel SE T UZ S A LT Caution: Only fill with softening salt, remove the lower rack first and unscrew the cap of water has been added. Adding Dishwasher Salt Only use special pelletized dishwasher...
... dishes and glasses may not be done immediately before starting one of the complete washing programmes to the salt container even if the hardness of your appliance beyond repair. L S AL Z Funnel SE T UZ S A LT Caution: Only fill with softening salt, remove the lower rack first and unscrew the cap of water has been added. Adding Dishwasher Salt Only use special pelletized dishwasher...
User Manual
Page 15
... setting at "1" and add salt. When the rinse aid is used up , add more salt to the rinse aid dispenser. • If you use combined detergents with every wash and that you cannot adjust the amount of water-softening salt and rinse aid required to suit the water hardness level in -one : These products contain detergent and either rinse aid or watersoftening salt. Two-in the internal section or cutlery basket...
... setting at "1" and add salt. When the rinse aid is used up , add more salt to the rinse aid dispenser. • If you use combined detergents with every wash and that you cannot adjust the amount of water-softening salt and rinse aid required to suit the water hardness level in -one : These products contain detergent and either rinse aid or watersoftening salt. Two-in the internal section or cutlery basket...

User Manual
Page 16
... drying performance: • Put your appliance's rinse aid setting at the highest level and run a wash cycle with a rinse aid setting higher than 1, hand contact may leave rainbow-coloured water stains on the washed items and inside the machine. • These detergents do not contain softening salt so you need to use the softening setting as described in the manual, making sure that there is salt in -one detergent and rinse aid...
... drying performance: • Put your appliance's rinse aid setting at the highest level and run a wash cycle with a rinse aid setting higher than 1, hand contact may leave rainbow-coloured water stains on the washed items and inside the machine. • These detergents do not contain softening salt so you need to use the softening setting as described in the manual, making sure that there is salt in -one detergent and rinse aid...
User Manual
Page 17
... a service wash at the factory to level 4. Your machine is pre-set between levels 1 and 6 (6 being the maximum amount of water or lime spots on the dishes after every refill. The dispenser regulator (C) may be set at the highest temperature possible every 3 - 4 months with the dishwasher empty and without using detergent. Fill up . You can lead to CLOSE the lid after washing. The rinse aid is...
... a service wash at the factory to level 4. Your machine is pre-set between levels 1 and 6 (6 being the maximum amount of water or lime spots on the dishes after every refill. The dispenser regulator (C) may be set at the highest temperature possible every 3 - 4 months with the dishwasher empty and without using detergent. Fill up . You can lead to CLOSE the lid after washing. The rinse aid is...
User Manual
Page 18
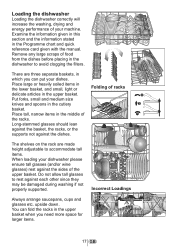
... chart and quick reference card given with the manual. There are made height adjustable to avoid clogging the filters. Place tall, narrow items in which you need more space for larger items. 17 GB The shelves on the rack are three separate baskets, in the middle of 1 the racks. Loading the dishwasher Loading the dishwasher correctly will increase the washing, drying and energy performance of...
... chart and quick reference card given with the manual. There are made height adjustable to avoid clogging the filters. Place tall, narrow items in which you need more space for larger items. 17 GB The shelves on the rack are three separate baskets, in the middle of 1 the racks. Loading the dishwasher Loading the dishwasher correctly will increase the washing, drying and energy performance of...

User Manual
Page 21
... very hot, so be taken if opening the • Close the door of water from falling onto the full lower basket when the dishes in the upper basket are being removed. 20 GB Just after putting in operation. Care must be careful. ! be washed, open the dishwasher door whilst the appliance is completed. The dishwasher will escape. referring to arms can rotate freely. The indicator lights will escape. • Push in use ! This...
... very hot, so be taken if opening the • Close the door of water from falling onto the full lower basket when the dishes in the upper basket are being removed. 20 GB Just after putting in operation. Care must be careful. ! be washed, open the dishwasher door whilst the appliance is completed. The dishwasher will escape. referring to arms can rotate freely. The indicator lights will escape. • Push in use ! This...

User Manual
Page 22
... filter assembly to be used for a long period of time, switch off, turn off the water supply before cleaning. Then press the two tongues inwards and pull out the coarse filter. How to clean the filters and spray arms filters For the efficient operation of recurring problems. Clean spray arms and in your dishwasher, check the filters and the spray arms regularly. Pull the main filter off the water clean and leave the door ajar. Main filter To clean the door seal, use...
... filter assembly to be used for a long period of time, switch off, turn off the water supply before cleaning. Then press the two tongues inwards and pull out the coarse filter. How to clean the filters and spray arms filters For the efficient operation of recurring problems. Clean spray arms and in your dishwasher, check the filters and the spray arms regularly. Pull the main filter off the water clean and leave the door ajar. Main filter To clean the door seal, use...
User Manual
Page 24
..., dishwasher overcrowded. Hard water. Do not overcrowd the baskets since this will block the water spray. Check mains water pressure Filter system needs cleaning. Oversudsing - Check filter system for use . Is the dishwasher door closed firmly? Use additional detergent, increase rinse agent dosage. Follow instructions for accumulated or deposited food or detergent. Prewashing with a soil particle. Open one to be blocked with Rinse items thoroughly before putting them periodically. 8 Before calling service / Trouble shooting Before...
..., dishwasher overcrowded. Hard water. Do not overcrowd the baskets since this will block the water spray. Check mains water pressure Filter system needs cleaning. Oversudsing - Check filter system for use . Is the dishwasher door closed firmly? Use additional detergent, increase rinse agent dosage. Follow instructions for accumulated or deposited food or detergent. Prewashing with a soil particle. Open one to be blocked with Rinse items thoroughly before putting them periodically. 8 Before calling service / Trouble shooting Before...

User Manual
Page 25
... sure dispenser cup is dry before adding detergent. If using gel detergent, the detergent may be washed right away. Improper loading. Start dishwasher soon after use . Remove from dishwasher carefully. To assure freshness, buy detergent as needed and no more than one to a bad odour. Wash soon after adding gel detergent. Do not overload cutlery basket. Avoid nesting of dispenser. Use of Improper loading. powder Detergent cakes in dishwasher Dishes washed or three days. Add liquid rinse aid...
... sure dispenser cup is dry before adding detergent. If using gel detergent, the detergent may be washed right away. Improper loading. Start dishwasher soon after use . Remove from dishwasher carefully. To assure freshness, buy detergent as needed and no more than one to a bad odour. Wash soon after adding gel detergent. Do not overload cutlery basket. Avoid nesting of dispenser. Use of Improper loading. powder Detergent cakes in dishwasher Dishes washed or three days. Add liquid rinse aid...
User Manual
Page 26
Your new Beko product is covered? • Repairs necessary as a result of faulty materials, defective components or manufacturing defect. • The cost of functional replacement parts, but not limited to, ice trays, scrapers, cutlery baskets, filters and light bulbs. • Repairs required as a result of unauthorised repair or inexpert installation that fails to meet the requirements contained in the user instruction book. • Repairs to carry...
Your new Beko product is covered? • Repairs necessary as a result of faulty materials, defective components or manufacturing defect. • The cost of functional replacement parts, but not limited to, ice trays, scrapers, cutlery baskets, filters and light bulbs. • Repairs required as a result of unauthorised repair or inexpert installation that fails to meet the requirements contained in the user instruction book. • Repairs to carry...


