User Manual
Page 3
... specifications 11 2 Your Dryer 2.1 Overview 12 2.2 Package contents 13 3 Installation 14 3.1 Appropriate installation location.......... 14 3.2 Ventilation hose and connection (for products equipped with an outlet vent)... 14 3.3 Adjusting feet 15 3.4 First use 15 3.5 Transportation of the machine 15 3.6 Changing the illumination lamp 15 4 Electrical Connection 16 4.1 Attention 16 4.2 Electrical requirements 16 4.3 Fitting a different plug 16 4.4 Washer/dryer combination 16 5 Initial Preparations For Drying 17 5.1 Things to be done for energy...
... specifications 11 2 Your Dryer 2.1 Overview 12 2.2 Package contents 13 3 Installation 14 3.1 Appropriate installation location.......... 14 3.2 Ventilation hose and connection (for products equipped with an outlet vent)... 14 3.3 Adjusting feet 15 3.4 First use 15 3.5 Transportation of the machine 15 3.6 Changing the illumination lamp 15 4 Electrical Connection 16 4.1 Attention 16 4.2 Electrical requirements 16 4.3 Fitting a different plug 16 4.4 Washer/dryer combination 16 5 Initial Preparations For Drying 17 5.1 Things to be done for energy...

User Manual
Page 4
... someone. • Children of electric shock! 4 / EN Dryer / User Manual Cleaning and maintenance works should not be performed by children unless they are supervised by spraying or pouring water onto it brings out. The gap between the dryer and the floor should not play with the product. 1 Important safety and environmental instructions This section contains safety instructions that they are supervised...
... someone. • Children of electric shock! 4 / EN Dryer / User Manual Cleaning and maintenance works should not be performed by children unless they are supervised by spraying or pouring water onto it brings out. The gap between the dryer and the floor should not play with the product. 1 Important safety and environmental instructions This section contains safety instructions that they are supervised...

User Manual
Page 5
... external switching device, such as a timer,or connected to a circuit that will arise when the dryer is used without grounding in use. • Unplug the dryer from the mains during the installation. 1.1.1 Electrical safety A Electrical safety instructions should be changed by an Authorised Service agent. A The appliance must be liable for any damages that is made during installation, maintenance, cleaning and repair works. • Do not touch the plug with...
... external switching device, such as a timer,or connected to a circuit that will arise when the dryer is used without grounding in use. • Unplug the dryer from the mains during the installation. 1.1.1 Electrical safety A Electrical safety instructions should be changed by an Authorised Service agent. A The appliance must be liable for any damages that is made during installation, maintenance, cleaning and repair works. • Do not touch the plug with...

User Manual
Page 6
... of a power failure whilst the dryer is running, this , remove all laundry from the dryer in order to hang them out to dissipate the heat. 6 / EN Dryer / User Manual Items such as lighters, matches, coins, metal parts, needle etc. may damage the drum set or may lead to functional problems. Therefore check pockets off the laundry that you must not be washed in hot water with...
... of a power failure whilst the dryer is running, this , remove all laundry from the dryer in order to hang them out to dissipate the heat. 6 / EN Dryer / User Manual Items such as lighters, matches, coins, metal parts, needle etc. may damage the drum set or may lead to functional problems. Therefore check pockets off the laundry that you must not be washed in hot water with...

User Manual
Page 7
... operating instructions or the published service manual. Dryer may be damaged if metal reinforcements come loose and break off during drying. Do not perform any repair or replacement procedures on the product even if you will be putting your life and others' lives in danger. • There must not be a lockable, sliding or hinged door that may block the opening of the loading door...
... operating instructions or the published service manual. Dryer may be damaged if metal reinforcements come loose and break off during drying. Do not perform any repair or replacement procedures on the product even if you will be putting your life and others' lives in danger. • There must not be a lockable, sliding or hinged door that may block the opening of the loading door...

User Manual
Page 8
... be stacked Cannot be stacked Cannot be stacked 1.3 Intended use • Dryer has been designed for domestic use and it must not be used between the two machines when installing the dryer above warnings during the installation on the dryer. 1.2 Mounting over a washing machine • A fixing device should be used out of its intended use. • Use the dryer only for drying laundry that has sufficient load carrying capacity...
... be stacked Cannot be stacked Cannot be stacked 1.3 Intended use • Dryer has been designed for domestic use and it must not be used between the two machines when installing the dryer above warnings during the installation on the dryer. 1.2 Mounting over a washing machine • A fixing device should be used out of its intended use. • Use the dryer only for drying laundry that has sufficient load carrying capacity...

User Manual
Page 11
... the location of the type label on operational and environmental conditions of the dryer are closed. Depending on the dryer (see 2.1 Overview.) C Technical specifications of the dryer, these values may not match the product exactly. 1.8 Technical Specifications EN 2 Height (Min. / Max.) 85,0 cm / 86,6 cm* Width 59,5 cm Depth 54 cm Capacity (max.) 6 kg** Weight (net) 31 kg Voltage Rated power input Model code Check the rating...
... the location of the type label on operational and environmental conditions of the dryer are closed. Depending on the dryer (see 2.1 Overview.) C Technical specifications of the dryer, these values may not match the product exactly. 1.8 Technical Specifications EN 2 Height (Min. / Max.) 85,0 cm / 86,6 cm* Width 59,5 cm Depth 54 cm Capacity (max.) 6 kg** Weight (net) 31 kg Voltage Rated power input Model code Check the rating...
User Manual
Page 14
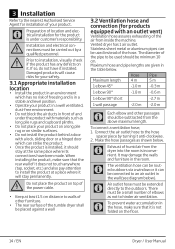
... maximum length. C Air outlet hose must be extended directly to install the product at the same place where its connections have it does not touch anywhere (tap, socket, etc.) and also pay attention to the outdoors. C Preparation of location and electrical installation for installation of your product on a long pile rug or on top of the tumble dryer shall be carried out by turning...
... maximum length. C Air outlet hose must be extended directly to install the product at the same place where its connections have it does not touch anywhere (tap, socket, etc.) and also pay attention to the outdoors. C Preparation of location and electrical installation for installation of your product on a long pile rug or on top of the tumble dryer shall be carried out by turning...
User Manual
Page 15
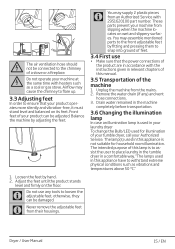
... for illumination of your tumble dryer, call your laundry dryer To change the Bulb/LED used in your Authorized Service. Loosen the feet by adjusting the feet. 1. B Do not operate your machine from an Authorized Service with the instructions given in this appliance is used in this manual. 3.5 Transportation of your product operates more silently and vibration-free, it must stand level and...
... for illumination of your tumble dryer, call your laundry dryer To change the Bulb/LED used in your Authorized Service. Loosen the feet by adjusting the feet. 1. B Do not operate your machine from an Authorized Service with the instructions given in this appliance is used in this manual. 3.5 Transportation of your product operates more silently and vibration-free, it must stand level and...
User Manual
Page 16
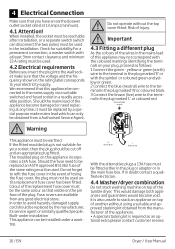
... the terminal in the plug marked 'L' or coloured red. Colour of the replacement fuse cover must be used . When installed, the socket must be reachable after installation, or a separate switch (which can disconnect the two poles) must be the same colour as an optional extra please contact customer service. 16 / EN Dryer / User Manual Should the mains lead of the appliance become void. 4 Electrical Connection...
... the terminal in the plug marked 'L' or coloured red. Colour of the replacement fuse cover must be used . When installed, the socket must be reachable after installation, or a separate switch (which can disconnect the two poles) must be the same colour as an optional extra please contact customer service. 16 / EN Dryer / User Manual Should the mains lead of the appliance become void. 4 Electrical Connection...
User Manual
Page 17
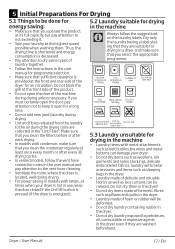
... attention to dry same types of laundry together. • Follow the instructions in the machine C Always follow the vent hose connection rules in the user manual and pay attention to not exceeding it open for a long time. • Do not add new (wet) laundry during drying. • Lint and fibres released from the laundry to the air during the drying cycle are washed beforehand. Dryer / User Manual 17 / EN...
... attention to dry same types of laundry together. • Follow the instructions in the machine C Always follow the vent hose connection rules in the user manual and pay attention to not exceeding it open for a long time. • Do not add new (wet) laundry during drying. • Lint and fibres released from the laundry to the air during the drying cycle are washed beforehand. Dryer / User Manual 17 / EN...

User Manual
Page 18
... may bunch-up laundry. 18 / EN Dryer / User Manual Drying performance will not get tangled. in their pockets or on any part of them. • Fabric softeners and similar products must be used in accordance with the instructions of the manufacturer of the relevant products. • All laundry must be washed in hot water with plenty of laundry together.
... may bunch-up laundry. 18 / EN Dryer / User Manual Drying performance will not get tangled. in their pockets or on any part of them. • Fabric softeners and similar products must be used in accordance with the instructions of the manufacturer of the relevant products. • All laundry must be washed in hot water with plenty of laundry together.
User Manual
Page 23
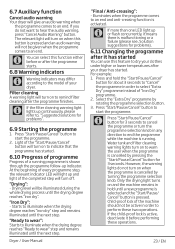
... the drying light turns on to hear the audio warning, press "Cancel Audio Warning" button. C You can use this feature to select "Extra Dry" programme instead of a running . However, the warning lights do not want to indicate that the programme has started . "Drying": - 6.7 Auxiliary function Cancel audio warning Your dryer will give an audio warning when the programme comes to start the programme. 2. Dryer / User Manual...
... the drying light turns on to hear the audio warning, press "Cancel Audio Warning" button. C You can use this feature to select "Extra Dry" programme instead of a running . However, the warning lights do not want to indicate that the programme has started . "Drying": - 6.7 Auxiliary function Cancel audio warning Your dryer will give an audio warning when the programme comes to start the programme. 2. Dryer / User Manual...

User Manual
Page 24
... will be terminated since the drying will extend the programme duration and increase energy consumption since the position of button while the programme is pressed. 24 / EN Dryer / User Manual C Any laundry added after the drying process has started . 6.12 Child-proof lock There is a child-proof lock to prevent any button or turn the programme selection knob when the machine is running . A double beep will be...
... will be terminated since the drying will extend the programme duration and increase energy consumption since the position of button while the programme is pressed. 24 / EN Dryer / User Manual C Any laundry added after the drying process has started . 6.12 Child-proof lock There is a child-proof lock to prevent any button or turn the programme selection knob when the machine is running . A double beep will be...

User Manual
Page 25
... drying (please see , Water tank) Dryer / User Manual 25 / EN Press "On/Off" button to an end. C Clean the filter after the programme has come to turn on the programme follow up indicator will be excessively hot when you cancel the programme while the dryer is complete. C If you do not stop the dryer before the drying process is running, activate the ventilation programme to cool...
... drying (please see , Water tank) Dryer / User Manual 25 / EN Press "On/Off" button to an end. C Clean the filter after the programme has come to turn on the programme follow up indicator will be excessively hot when you cancel the programme while the dryer is complete. C If you do not stop the dryer before the drying process is running, activate the ventilation programme to cool...

User Manual
Page 26
... of this feature after your clothes under higher or lower temperatures. 7 Quick instructions for daily use this period for reminding purposes. 7.3 Adding laundry In order to change the programme. The "Filter cleaning and "0/ Anticreasing" warning LEDs will light up when the programme comes to an end. Change the programme and press "Start/ Pause/Cancel" button to start it. 7.5 After the programme is activated...
... of this feature after your clothes under higher or lower temperatures. 7 Quick instructions for daily use this period for reminding purposes. 7.3 Adding laundry In order to change the programme. The "Filter cleaning and "0/ Anticreasing" warning LEDs will light up when the programme comes to an end. Change the programme and press "Start/ Pause/Cancel" button to start it. 7.5 After the programme is activated...

User Manual
Page 27
...! C Clean metal sensors 4 times a year. A Never use solvents, cleaning agents or substances alike when cleaning as shown in Figure 1, remove the filter by vacuum cleaner. Dryer / User Manual 27 / EN C Clogging may arise on the filter and in the "Fluff Filter". C Such fibre and lint are collected in the filter housing by pulling it back into its seat. 1 Open the cover of cloth. 4. C Always clean the filter after using again. 8.2 Sensor (models equipped...
...! C Clean metal sensors 4 times a year. A Never use solvents, cleaning agents or substances alike when cleaning as shown in Figure 1, remove the filter by vacuum cleaner. Dryer / User Manual 27 / EN C Clogging may arise on the filter and in the "Fluff Filter". C Such fibre and lint are collected in the filter housing by pulling it back into its seat. 1 Open the cover of cloth. 4. C Always clean the filter after using again. 8.2 Sensor (models equipped...
User Manual
Page 28
... the laundry type to dry your machine after checking the labels on the models with a condenser might have not been started by using the On/Off button. Press «Start/Pause/Cancel» button to replace the bulb. • The condenser cover on your clothes. • Select a programme with water. Call the authorized service to start . Dry only the laundry which is plugged in. • The loading door may be...
... the laundry type to dry your machine after checking the labels on the models with a condenser might have not been started by using the On/Off button. Press «Start/Pause/Cancel» button to replace the bulb. • The condenser cover on your clothes. • Select a programme with water. Call the authorized service to start . Dry only the laundry which is plugged in. • The loading door may be...
User Manual
Page 30
... when requesting service. (The model number is printed on the Instruction Booklet and the serial number is found even though your purchase receipt or other proof of Ireland All Refrigeration, 01 862 3411 All Cookers Washing Machines & Dryers, Tumble Dryers Dishwashers Before requesting service please check the trouble-shooting guide in obtaining service please contact the Customer Help-Line. You should the product require attention under...
... when requesting service. (The model number is printed on the Instruction Booklet and the serial number is found even though your purchase receipt or other proof of Ireland All Refrigeration, 01 862 3411 All Cookers Washing Machines & Dryers, Tumble Dryers Dishwashers Before requesting service please check the trouble-shooting guide in obtaining service please contact the Customer Help-Line. You should the product require attention under...

User Manual
Page 32
... as a result of unauthorised repair or inexpert installation that fails to meet the requirements contained in the user instruction book. • Repairs to products used in anyway diminish your statutory or legal rights. What is not covered? • Transit, delivery or accidental damage or misuse and abuse. • Cabinet or appearance parts, including knobs, flaps, handles or container lids. •...
... as a result of unauthorised repair or inexpert installation that fails to meet the requirements contained in the user instruction book. • Repairs to products used in anyway diminish your statutory or legal rights. What is not covered? • Transit, delivery or accidental damage or misuse and abuse. • Cabinet or appearance parts, including knobs, flaps, handles or container lids. •...


