
Owners Manual
Page 3
... load capacity 15 5 Operating the product 17 5.1 Control Panel 17 5.2 Symbols 17 5.3 Preparation of drying machine 17 5.4 Programme selection and consumption tablee 18 5.5 Auxiliary functions 19 5.6 Warning indicators 20 5.7 Starting the program 20 5.8 Child Lock 20 5.9 Changing the program after it is started 21 5.10 Cancelling the program 21 5.11 End of program 21 6 Maintenance and cleaning 22 6.1 Lint Filter / Loading Door Inner Surface.22 6.2 Cleaning the sensors 23...
... load capacity 15 5 Operating the product 17 5.1 Control Panel 17 5.2 Symbols 17 5.3 Preparation of drying machine 17 5.4 Programme selection and consumption tablee 18 5.5 Auxiliary functions 19 5.6 Warning indicators 20 5.7 Starting the program 20 5.8 Child Lock 20 5.9 Changing the program after it is started 21 5.10 Cancelling the program 21 5.11 End of program 21 6 Maintenance and cleaning 22 6.1 Lint Filter / Loading Door Inner Surface.22 6.2 Cleaning the sensors 23...

Owners Manual
Page 4
... old and by the Authorized Service. Cleaning and maintenance works should not be held liable for safety and environment This section contains safety instructions that they are running. For the products with the product. Manufacturer shall not be removed. Children should not play with a steam function: • Use only distilled water or water condensed in the water tank of less than 3 years...
... old and by the Authorized Service. Cleaning and maintenance works should not be held liable for safety and environment This section contains safety instructions that they are running. For the products with the product. Manufacturer shall not be removed. Children should not play with a steam function: • Use only distilled water or water condensed in the water tank of less than 3 years...

Owners Manual
Page 5
... by grabbing the plug. • Do not use extension cords, multi-plugs or adaptors to connect the dryer to power supply in order to your mains voltage. • Unplug the dryer when it should be followed while electrical connection is made during installation, maintenance, cleaning and repair works. • Do not touch the plug with wet hands! Never unplug by pulling on the type label. Dryer / User Manual 5 / EN A The...
... by grabbing the plug. • Do not use extension cords, multi-plugs or adaptors to connect the dryer to power supply in order to your mains voltage. • Unplug the dryer when it should be followed while electrical connection is made during installation, maintenance, cleaning and repair works. • Do not touch the plug with wet hands! Never unplug by pulling on the type label. Dryer / User Manual 5 / EN A The...

Owners Manual
Page 6
... removers, turpentine, paraffin or paraffin removers must be easily accessible after installation. Points to be taken into consideration for safety and environment • Power cable plug must be washed in hot water with plenty of detergent before being dried in order to do this reason especially the items containing the above specified stains must not be changed notifying the Authorized Service...
... removers, turpentine, paraffin or paraffin removers must be easily accessible after installation. Points to be taken into consideration for safety and environment • Power cable plug must be washed in hot water with plenty of detergent before being dried in order to do this reason especially the items containing the above specified stains must not be changed notifying the Authorized Service...
Owners Manual
Page 7
... must not be dried in the dryer. may damage the drum set or may ignite after each loading. Never operate the dryer without the lint filter installed. • Never attempt to dissipate the heat. Never stop your dryer. Dryer may be damaged if metal reinforcements come loose and break off during drying. Do not perform any repair or replacement procedures on their manufacturers. C Always clean the lint filter before the...
... must not be dried in the dryer. may damage the drum set or may ignite after each loading. Never operate the dryer without the lint filter installed. • Never attempt to dissipate the heat. Never stop your dryer. Dryer may be damaged if metal reinforcements come loose and break off during drying. Do not perform any repair or replacement procedures on their manufacturers. C Always clean the lint filter before the...
Owners Manual
Page 8
... been used for cleaning. • Fabric softeners, or similar products.should be discharged into a flue which is not to be used as specified by the authorized service agent. • Total weight of the loading door in danger. • There must be installed by the fabric softener instructions. • Exhaust air must not be used for safety and environment operating instructions or the published service manual.
... been used for cleaning. • Fabric softeners, or similar products.should be discharged into a flue which is not to be used as specified by the authorized service agent. • Total weight of the loading door in danger. • There must be installed by the fabric softener instructions. • Exhaust air must not be used for safety and environment operating instructions or the published service manual.
Owners Manual
Page 9
... when it must not be installed 1.3 Intended use . C Child-proof lock is 10 years. Pay attention to the above warnings during the installation on the control panel. (See Child lock) Dryer / User Manual 9 / EN During this period, original spare parts will be available to tamper with the dryer. Use the child-proof lock in order to prevent the children to operate the dryer properly. 1.4 Child safety • Packaging materials are...
... when it must not be installed 1.3 Intended use . C Child-proof lock is 10 years. Pay attention to the above warnings during the installation on the control panel. (See Child lock) Dryer / User Manual 9 / EN During this period, original spare parts will be available to tamper with the dryer. Use the child-proof lock in order to prevent the children to operate the dryer properly. 1.4 Child safety • Packaging materials are...
Owners Manual
Page 13
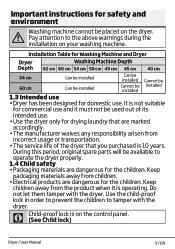
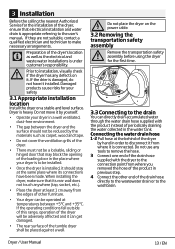
... is connected. If the drier is heavy. When installing the dryer, make necessary arrangements. Dryer / User Manual 13 / EN Damaged products cause risks for your safety. 3.1 Appropriate installation location Install the dryer on the power cable. 3.2 Removing the transportation safety assembly A Remove the transportation safety assembly before using the dryer for the first time. 3.3 Connecting to the drain You can directly drain accumulated water through the water drain hose supplied with the dryer to the connection...
... is connected. If the drier is heavy. When installing the dryer, make necessary arrangements. Dryer / User Manual 13 / EN Damaged products cause risks for your safety. 3.1 Appropriate installation location Install the dryer on the power cable. 3.2 Removing the transportation safety assembly A Remove the transportation safety assembly before using the dryer for the first time. 3.3 Connecting to the drain You can directly drain accumulated water through the water drain hose supplied with the dryer to the connection...

Owners Manual
Page 14
... remove the hose connections. If direct water drain connection is not folded between the drain and the machine. Installation 1 2 3 4 C Water drain hose should be attached to left or right until the dryer stands level and firmly. 3.6 Changing the illumination lamp In case an illumination lamp is not suitable for illumination of your tumble dryer, call your Authorized Service.The lamp(s) used in this appliance is used...
... remove the hose connections. If direct water drain connection is not folded between the drain and the machine. Installation 1 2 3 4 C Water drain hose should be attached to left or right until the dryer stands level and firmly. 3.6 Changing the illumination lamp In case an illumination lamp is not suitable for illumination of your tumble dryer, call your Authorized Service.The lamp(s) used in this appliance is used...
Owners Manual
Page 15
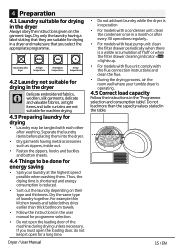
... for a long time. 4 Preparation 4.1 Laundry suitable for programme selection. • Do not open for drying in the "Programme selection and consumption table". Dryer / User Manual • Do not add wet laundry while the dryer is operating. 4.5 Correct load capacity Follow the instructions in a dryer and make sure that you must open the loading door, do not keep it open the loading door of laundry together. Dry the same type of the...
... for a long time. 4 Preparation 4.1 Laundry suitable for programme selection. • Do not open for drying in the "Programme selection and consumption table". Dryer / User Manual • Do not add wet laundry while the dryer is operating. 4.5 Correct load capacity Follow the instructions in a dryer and make sure that you must open the loading door, do not keep it open the loading door of laundry together. Dry the same type of the...

Owners Manual
Page 17
... button 3. A Ensure that the program started. Select the desired program using the On/Off/Program selection button does not mean that no laundry is jammed to the loading door. Dryer / User Manual 17 / EN 5 Operating the product 5.1 Control Panel 1 1. C Selecting a program using the On/ Off/Program selection knob, the machine will turn on. Audio warning level button 5.2 Symbols 432 Tank full Filter Condenser Child-proof cleaning cleaning warning symbol lock...
... button 3. A Ensure that the program started. Select the desired program using the On/Off/Program selection button does not mean that no laundry is jammed to the loading door. Dryer / User Manual 17 / EN 5 Operating the product 5.1 Control Panel 1 1. C Selecting a program using the On/ Off/Program selection knob, the machine will turn on. Audio warning level button 5.2 Symbols 432 Tank full Filter Condenser Child-proof cleaning cleaning warning symbol lock...

Owners Manual
Page 19
... according to make an audible warning, press the "Buzzer" button. Dryer / User Manual 19 / EN If you press the same button again, 6 hours delay will be selected and when you press the Buzzer button, a light will illuminate and no audible warning will be made , start time of energy consumption for drying normal wet cotton laundry and that it to EN 61121...
... according to make an audible warning, press the "Buzzer" button. Dryer / User Manual 19 / EN If you press the same button again, 6 hours delay will be selected and when you press the Buzzer button, a light will illuminate and no audible warning will be made , start time of energy consumption for drying normal wet cotton laundry and that it to EN 61121...

Owners Manual
Page 20
... has started. 5.8 Child Lock The drying machine has a child lock which prevents the program flow from being interrupted when the buttons are deactivated. Warning indicator turns off and on . Select the program you want and repeat the End Time selection process. C When the child lock is active: When the drying machine runs, or in the program selection knob position. 20 / EN Dryer / User Manual When the child lock is...
... has started. 5.8 Child Lock The drying machine has a child lock which prevents the program flow from being interrupted when the buttons are deactivated. Warning indicator turns off and on . Select the program you want and repeat the End Time selection process. C When the child lock is active: When the drying machine runs, or in the program selection knob position. 20 / EN Dryer / User Manual When the child lock is...

Owners Manual
Page 21
... the drying machine starts running, turn the On/Off/Cancel knob, the program will be extremely hot when you selected to dry your laundry with a different program after the drying machine starts running program terminates. But this operation continuously interrupts the drying operation, and thus increases program duration and energy consumption. So, it to cool down. 5.11 End of operation. Dryer / User Manual 21 / EN C Adding or removing laundry during drying...
... the drying machine starts running, turn the On/Off/Cancel knob, the program will be extremely hot when you selected to dry your laundry with a different program after the drying machine starts running program terminates. But this operation continuously interrupts the drying operation, and thus increases program duration and energy consumption. So, it to cool down. 5.11 End of operation. Dryer / User Manual 21 / EN C Adding or removing laundry during drying...

Owners Manual
Page 22
... during any maintenance and cleaning works (control panel, body, etc.). 6.1 Lint Filter / Loading Door Inner Surface Lint and fiber released from the laundry to remove the layer that can clean the lint filter housing with warm water to the air during the drying cycle are generally formed during wearing and washing. Close the lint filter and place it . 6 Maintenance and cleaning Service life of the loading door and loading door gasket. A Always clean the lint filter and the inner surfaces of cloth. 4.
... during any maintenance and cleaning works (control panel, body, etc.). 6.1 Lint Filter / Loading Door Inner Surface Lint and fiber released from the laundry to remove the layer that can clean the lint filter housing with warm water to the air during the drying cycle are generally formed during wearing and washing. Close the lint filter and place it . 6 Maintenance and cleaning Service life of the loading door and loading door gasket. A Always clean the lint filter and the inner surfaces of cloth. 4.

Owners Manual
Page 23
... machine to cool down if it under running ! 3. Hot and humid air in the water tank. If you forget to resume the drying cycle. C Clean metal surfaces of the laundry is lint accumulation in the tank. 6.3 Draining the water tank Dampness of the sensors 4 times a year. Drain the water in the funnel of the water tank, clean it is dry or not. If there is removed and...
... machine to cool down if it under running ! 3. Hot and humid air in the water tank. If you forget to resume the drying cycle. C Clean metal surfaces of the laundry is lint accumulation in the tank. 6.3 Draining the water tank Dampness of the sensors 4 times a year. Drain the water in the funnel of the water tank, clean it is dry or not. If there is removed and...

Owners Manual
Page 25
... type may be activated. >>> Turn off the child lock. Drying machine does not turn on or program cannot be started. Dryer / User Manual 25 / EN Program terminated prematurely for no reason. • Loading door might not be closed completely. >>> Ensure that the loading door is properly closed. • There might be a power outage. >>> Press the Start/Stand-by position. • Child lock may have been used.>>> Check the maintenance labels on the clothes...
... type may be activated. >>> Turn off the child lock. Drying machine does not turn on or program cannot be started. Dryer / User Manual 25 / EN Program terminated prematurely for no reason. • Loading door might not be closed completely. >>> Ensure that the loading door is properly closed. • There might be a power outage. >>> Press the Start/Stand-by position. • Child lock may have been used.>>> Check the maintenance labels on the clothes...
Owners Manual
Page 26
... product is turned on. • Lamp might be selected in low level => Choose a program with high amount of steam. Water drips from the loading door. • Fibres might have been used. >>> Check the maintenance labels on the clothes and select a program suitable for machines without an On/Off button. >>> Make sure that the drying machine is connected directly to replace the lamp. Troubleshooting Clothes have shrunk...
... product is turned on. • Lamp might be selected in low level => Choose a program with high amount of steam. Water drips from the loading door. • Fibres might have been used. >>> Check the maintenance labels on the clothes and select a program suitable for machines without an On/Off button. >>> Make sure that the drying machine is connected directly to replace the lamp. Troubleshooting Clothes have shrunk...
Owners Manual
Page 28
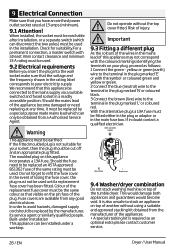
... contact customer service. 28 / EN Dryer / User Manual A Warning This appliance must be used . Risk of the same rating must not be used . 9.2 Electrical requirements Before you have an earthed power outlet socket rated at 13 amps (minimum). 9.1 Attention! If in a readily accessible position. We recommend that this appliance incorporates a 13A fuse. The moulded plug on top of another without the top cover fitted. Check for your...
... contact customer service. 28 / EN Dryer / User Manual A Warning This appliance must be used . Risk of the same rating must not be used . 9.2 Electrical requirements Before you have an earthed power outlet socket rated at 13 amps (minimum). 9.1 Attention! If in a readily accessible position. We recommend that this appliance incorporates a 13A fuse. The moulded plug on top of another without the top cover fitted. Check for your...
Owners Manual
Page 32
... light bulbs. • Repairs required as a result of faulty materials, defective components or manufacturing defect. • The cost of functional replacement parts, but excluding consumable items. • The labour costs of the original purchase. Beko plc, Beko House, 1 Greenhill Crescent, Watford, WD18 8QU Tel: 0845 6004911 Email: service@beko.co.uk Fax: 0845 6004922 www.beko.co.uk What is not covered...
... light bulbs. • Repairs required as a result of faulty materials, defective components or manufacturing defect. • The cost of functional replacement parts, but excluding consumable items. • The labour costs of the original purchase. Beko plc, Beko House, 1 Greenhill Crescent, Watford, WD18 8QU Tel: 0845 6004911 Email: service@beko.co.uk Fax: 0845 6004922 www.beko.co.uk What is not covered...


