
Owners Manual
Page 2
... manufactured using your product model and serial number on the last page of this user manual before using your appliance Thank you have any questions or concerns, please call our contact centre or find help and information online at www.beko.co.uk Explanation of the packaging wastes with our National Environment Regulations. Please take some time to safely operate the controls...
... manufactured using your product model and serial number on the last page of this user manual before using your appliance Thank you have any questions or concerns, please call our contact centre or find help and information online at www.beko.co.uk Explanation of the packaging wastes with our National Environment Regulations. Please take some time to safely operate the controls...
Owners Manual
Page 3
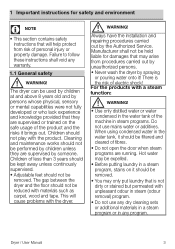
... Service. Dryer / User Manual 3 When using condensed water in a steam program, stains on the safe usage of fibres. • Do not open the door when steam programs are supervised by spraying or pouring water onto it brings out. The gap between the dryer and the floor should be removed. • You may only put laundry that may arise from risk of electric shock! Cleaning and maintenance works...
... Service. Dryer / User Manual 3 When using condensed water in a steam program, stains on the safe usage of fibres. • Do not open the door when steam programs are supervised by spraying or pouring water onto it brings out. The gap between the dryer and the floor should be removed. • You may only put laundry that may arise from risk of electric shock! Cleaning and maintenance works...
Owners Manual
Page 4
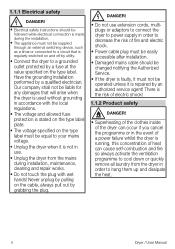
... an external switching device, such as a timer,or connected to a circuit that will arise when the dryer is used without grounding in order to decrease the risk of fire and electric shock. • Power cable plug must be easily accessible after installation. • Damaged mains cable should be followed while electrical connection is made during installation, maintenance, cleaning and repair works. • Do not touch the plug with wet...
... an external switching device, such as a timer,or connected to a circuit that will arise when the dryer is used without grounding in order to decrease the risk of fire and electric shock. • Power cable plug must be easily accessible after installation. • Damaged mains cable should be followed while electrical connection is made during installation, maintenance, cleaning and repair works. • Do not touch the plug with wet...
Owners Manual
Page 5
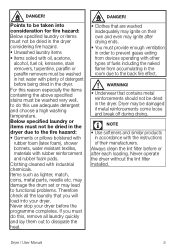
... or items must do this , remove all the laundry that contains metal reinforcements should not be damaged if metal reinforcements come loose and break off during drying. Never stop your dryer. Dryer may ignite on their manufacturers. Never operate the dryer without the lint filter installed. may damage the drum set or may ignite after each loading. Dryer / User Manual 5 Clothing cleaned with plenty of their own and...
... or items must do this , remove all the laundry that contains metal reinforcements should not be damaged if metal reinforcements come loose and break off during drying. Never stop your dryer. Dryer may ignite on their manufacturers. Never operate the dryer without the lint filter installed. may damage the drum set or may ignite after each loading. Dryer / User Manual 5 Clothing cleaned with plenty of their own and...

Owners Manual
Page 6
... • A fixing device should be used between the two machines when installing the dryer above warnings during the installation on the dryer. During this period, original spare parts will be putting your dryer at places suitable for cleaning. • Fabric softeners, or similar products. Pay attention to operate the dryer properly. 6 Dryer / User Manual A WARNING! • Never attempt to repair the dryer by the authorized service agent...
... • A fixing device should be used between the two machines when installing the dryer above warnings during the installation on the dryer. During this period, original spare parts will be putting your dryer at places suitable for cleaning. • Fabric softeners, or similar products. Pay attention to operate the dryer properly. 6 Dryer / User Manual A WARNING! • Never attempt to repair the dryer by the authorized service agent...
Owners Manual
Page 7
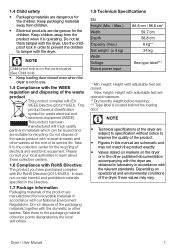
.... 1.8 Technical Specifications EN Height (Min. / Max.) Width Depth Capacity (max.) Net weight (± 4 kg) Width Voltage Rated power input 84,6 cm / 86,6 cm* 59,7 cm 56,8 cm 8 kg** 34 kg See type label*** * Min. Keep children away from recyclable materials in the Directive. 1.7 Package information Packaging materials of the product are schematic and may vary. Use the childproof lock in use...
.... 1.8 Technical Specifications EN Height (Min. / Max.) Width Depth Capacity (max.) Net weight (± 4 kg) Width Voltage Rated power input 84,6 cm / 86,6 cm* 59,7 cm 56,8 cm 8 kg** 34 kg See type label*** * Min. Keep children away from recyclable materials in the Directive. 1.7 Package information Packaging materials of the product are schematic and may vary. Use the childproof lock in use...
Owners Manual
Page 8
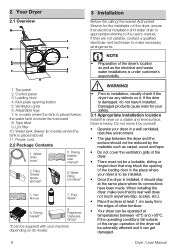
... the electrical and waste water installations is placed above) 11. Water drain hose * 5. Drying basket user manual* 2. If they are not suitable, contact a qualified electrician and technician to installation, visually check if the dryer has any defects on it installed. If the drier is inside the toe board 8. Kick plate opening of the loading door in the place where your safety. 3.1 Appropriate installation location Install the dryer on its model. 8 3 Installation Before...
... the electrical and waste water installations is placed above) 11. Water drain hose * 5. Drying basket user manual* 2. If they are not suitable, contact a qualified electrician and technician to installation, visually check if the dryer has any defects on it installed. If the drier is inside the toe board 8. Kick plate opening of the loading door in the place where your safety. 3.1 Appropriate installation location Install the dryer on its model. 8 3 Installation Before...
Owners Manual
Page 9
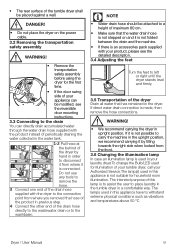
If direct water drain connection is connected. The intended purpose of this appliance have to withstand extreme physical conditions such as vibrations and temperatures above 50 °C Dryer / User Manual 9 The lamps used in this appliance is not suitable for the first time. • If the door swing side of your product, please see the reversible door mounting instructions. 3.3 Connecting to the drain You can be...
If direct water drain connection is connected. The intended purpose of this appliance have to withstand extreme physical conditions such as vibrations and temperatures above 50 °C Dryer / User Manual 9 The lamps used in this appliance is not suitable for the first time. • If the door swing side of your product, please see the reversible door mounting instructions. 3.3 Connecting to the drain You can be...
Owners Manual
Page 10
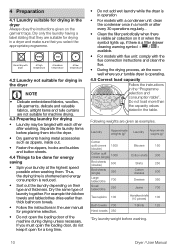
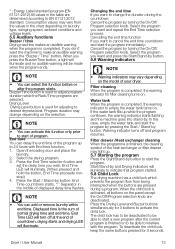
... the instructions in the user manual for a long time. • Do not add wet laundry while the dryer is in operation • For models with a condenser unit: clean the condenser once in a month or after washing. Thus, the drying time is shortened and energy consumption is reduced. • Sort out the laundry depending on it open for programme selection. • Do not open the loading door...
... the instructions in the user manual for a long time. • Do not add wet laundry while the dryer is in operation • For models with a condenser unit: clean the condenser once in a month or after washing. Thus, the drying time is shortened and energy consumption is reduced. • Sort out the laundry depending on it open for programme selection. • Do not open the loading door...

Owners Manual
Page 11
...-by button to start the program. Preparation of drying machine • Plug the drying machine. • Open the loading door. • Place the laundry to the loading door. C NOTE • Selecting a program using the On/Off/ Program selection knob, the machine will turn on. 5 Operating the product 5.1 Control Panel 1 1. Drying Level Button 5. Press the Start / Stand-by button 3. End Time button 5.2 Symbols 5 4 3 2 4. Buzzer volume/Time programs selection button Tank full Filter Filter drawer / Child-proof cleaning Heat exchanger cleaning lock...
...-by button to start the program. Preparation of drying machine • Plug the drying machine. • Open the loading door. • Place the laundry to the loading door. C NOTE • Selecting a program using the On/Off/ Program selection knob, the machine will turn on. 5 Operating the product 5.1 Control Panel 1 1. Drying Level Button 5. Press the Start / Stand-by button 3. End Time button 5.2 Symbols 5 4 3 2 4. Buzzer volume/Time programs selection button Tank full Filter Filter drawer / Child-proof cleaning Heat exchanger cleaning lock...
Owners Manual
Page 12
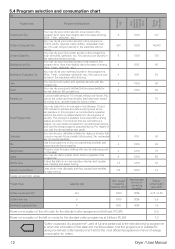
....) You can put your synthetic laundry in low temperature. You may select from time programmes between 10 and 160 minutes to be ironed in this programme. 4 It just provides airing for drying or laundry that are appropriate for the set time independently from an authorized service and use , see the drying basket user guide. basket as towels, bathrobe, etc. For details...
....) You can put your synthetic laundry in low temperature. You may select from time programmes between 10 and 160 minutes to be ironed in this programme. 4 It just provides airing for drying or laundry that are appropriate for the set time independently from an authorized service and use , see the drying basket user guide. basket as towels, bathrobe, etc. For details...
Owners Manual
Page 13
... Time selection process. When the child lock is completed. Press the Start / Stand-by button. End Time countdown starts. End Time LED will illuminate. Start/Stand-by turning the On/Off/ Program selection knob. C NOTE • You can add or remove laundry within end time. Open the loading door and place the laundry. 2. Warning indicator turns off at the end of normal drying time and end time. Press the Drying...
... Time selection process. When the child lock is completed. Press the Start / Stand-by button. End Time countdown starts. End Time LED will illuminate. Start/Stand-by turning the On/Off/ Program selection knob. C NOTE • You can add or remove laundry within end time. Open the loading door and place the laundry. 2. Warning indicator turns off at the end of normal drying time and end time. Press the Drying...

Owners Manual
Page 14
... many times as you want to add or remove clothes to/from wrinkling. 14 Dryer / User Manual The drum surface is hot. 5.10 Cancelling the program If you wish. But this operation continuously interrupts the drying operation, and thus increases program duration and energy consumption. Adding and removing clothes during drying may cause the dried laundry inside the machine to cancel the program and terminate the drying operation for another run...
... many times as you want to add or remove clothes to/from wrinkling. 14 Dryer / User Manual The drum surface is hot. 5.10 Cancelling the program If you wish. But this operation continuously interrupts the drying operation, and thus increases program duration and energy consumption. Adding and removing clothes during drying may cause the dried laundry inside the machine to cancel the program and terminate the drying operation for another run...
Owners Manual
Page 15
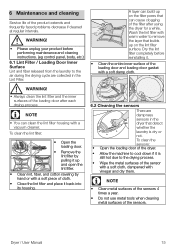
.... 6 Maintenance and cleaning Service life of the sensors. To clean the lint filter: • Open the loading door. • Remove the lint filter by pulling it up and open the lint filter. • Clean lint, fiber, and cotton raveling by hand or with vinegar and dry them. Wash the lint filter with warm water to remove the layer that builds up on the lint filter surface. Dry the lint filter completely before performing maintenance and cleaning instructions. (eg control panel, body, etc.) 6.1 Lint Filter / Loading Door Inner...
.... 6 Maintenance and cleaning Service life of the sensors. To clean the lint filter: • Open the loading door. • Remove the lint filter by pulling it up and open the lint filter. • Clean lint, fiber, and cotton raveling by hand or with vinegar and dry them. Wash the lint filter with warm water to remove the layer that builds up on the lint filter surface. Dry the lint filter completely before performing maintenance and cleaning instructions. (eg control panel, body, etc.) 6.1 Lint Filter / Loading Door Inner...

Owners Manual
Page 16
... cleaning due to the risk of fire and explosion! 6.3 Draining the water tank Dampness of the water tank, clean it cools down • Unlock the 2 condenser locks after opening the kick plate • Pull out the condenser. 2. Drain the water in the tank. • If there is lint accumulation in the drawer or container carefully. Close the kick plate cover. 16 Dryer / User Manual...
... cleaning due to the risk of fire and explosion! 6.3 Draining the water tank Dampness of the water tank, clean it cools down • Unlock the 2 condenser locks after opening the kick plate • Pull out the condenser. 2. Drain the water in the tank. • If there is lint accumulation in the drawer or container carefully. Close the kick plate cover. 16 Dryer / User Manual...
Owners Manual
Page 17
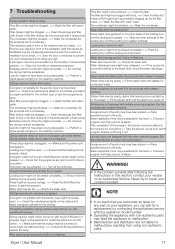
... condensed water. A WARNING! • If the problem persists after following the instructions in the filter drawer. (for malfunctions resulting from using non-authentic parts. Drying machine does not run after drying. Filter drawer might be blocked. >>> Wash the condenser.(for no reason. Loading door opens by button might be clogged. >>> Clean the sponge and filter cloth (if any part on /flashing. Drying machine does not turn on. (For models with warm water. Water discharge hose might...
... condensed water. A WARNING! • If the problem persists after following the instructions in the filter drawer. (for malfunctions resulting from using non-authentic parts. Drying machine does not run after drying. Filter drawer might be blocked. >>> Wash the condenser.(for no reason. Loading door opens by button might be clogged. >>> Clean the sponge and filter cloth (if any part on /flashing. Drying machine does not turn on. (For models with warm water. Water discharge hose might...
Owners Manual
Page 18
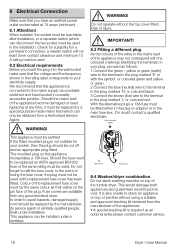
This appliance must be connected to the mains supply via a suitable switched and fused socket in a readily accessible position. Should the fuse need replacing at any good electrical store. Fuse covers are available from a Authorised Service Agent. A WARNING! If in the mains lead of the same rating must be the same colour as an optional extra please contact customer service. 18 Dryer / User Manual This would damage...
This appliance must be connected to the mains supply via a suitable switched and fused socket in a readily accessible position. Should the fuse need replacing at any good electrical store. Fuse covers are available from a Authorised Service Agent. A WARNING! If in the mains lead of the same rating must be the same colour as an optional extra please contact customer service. 18 Dryer / User Manual This would damage...

Owners Manual
Page 20
... manufacturing defects. • Functional replacement parts to repair a product. • The costs of a Beko Approved Engineer to the installation environment. 3. The guarantee will not be correctly installed, located and operated in accordance with the expected standards. Gas Cookers must be held liable for domestic household use fails to meet the requirements contained in accordance with the instructions contained in commercial or non...
... manufacturing defects. • Functional replacement parts to repair a product. • The costs of a Beko Approved Engineer to the installation environment. 3. The guarantee will not be correctly installed, located and operated in accordance with the expected standards. Gas Cookers must be held liable for domestic household use fails to meet the requirements contained in accordance with the instructions contained in commercial or non...
Owners Manual
Page 21
... have jurisdiction. This is not possible, a model of the Manufacturer but when this is a repair-only guarantee. On occasion, the Manufacturer may be possible at its staff or representatives are supplied on the number set out above. 10. The Manufacturer reserves the right to the Engineer that location will cover the costs and arrange for the delivery...
... have jurisdiction. This is not possible, a model of the Manufacturer but when this is a repair-only guarantee. On occasion, the Manufacturer may be possible at its staff or representatives are supplied on the number set out above. 10. The Manufacturer reserves the right to the Engineer that location will cover the costs and arrange for the delivery...

Owners Manual
Page 23
... call our Contact centre Before requesting service please check the troubleshooting guide in a safe place; Complete the required details and click send message. Should you may still be removed or moved. Model number Serial number Purchased from ) and Date of purchase details in the Operating Instructions booklet, as you will need for cabinets or furniture to geographic numbers 01 or 02, and are included...
... call our Contact centre Before requesting service please check the troubleshooting guide in a safe place; Complete the required details and click send message. Should you may still be removed or moved. Model number Serial number Purchased from ) and Date of purchase details in the Operating Instructions booklet, as you will need for cabinets or furniture to geographic numbers 01 or 02, and are included...


