User Manual
Page 2
... purchasing this Beko product. Explanation of hot surfaces. If you handover the product to life and property. Differences between models will be identified in the manual. Therefore, please read this user manual first! We hope that this user manual is also applicable for future use. Please read this entire user manual and all warnings and information in environmentally friendly conditions. Dear Customer, Thank...
... purchasing this Beko product. Explanation of hot surfaces. If you handover the product to life and property. Differences between models will be identified in the manual. Therefore, please read this user manual first! We hope that this user manual is also applicable for future use. Please read this entire user manual and all warnings and information in environmentally friendly conditions. Dear Customer, Thank...
User Manual
Page 3
... cleaning of the appliance 13 5 Initial heating 13 Intended use Safety for children 6 6 El How to use the hob 14 Disposing of the old product 7 General information about cooking 14 Package information 7 Using the hobs 16 Future Transportation 7 Control panel 17 Ei General information 8 M Maintenance and care 24 Overview 8 General information 24 Technical specifications 8 Cleaning the hob 24 El Installation Before installation Installation and connection 9 0 Troubleshooting 25 9 9 M Guarantee and Service...
... cleaning of the appliance 13 5 Initial heating 13 Intended use Safety for children 6 6 El How to use the hob 14 Disposing of the old product 7 General information about cooking 14 Package information 7 Using the hobs 16 Future Transportation 7 Control panel 17 Ei General information 8 M Maintenance and care 24 Overview 8 General information 24 Technical specifications 8 Cleaning the hob 24 El Installation Before installation Installation and connection 9 0 Troubleshooting 25 9 9 M Guarantee and Service...
User Manual
Page 4
... installation, maintenance, cleaning and repairing procedures. • If the power connection cable for the product is repaired by the manufacturer, its service agent or similarly 4/EN Children shall not play with the local regulations. • Never wash the product by spreading or pouring water onto it is the risk of electric shock! • Only connect the product to follow these instructions...
... installation, maintenance, cleaning and repairing procedures. • If the power connection cable for the product is repaired by the manufacturer, its service agent or similarly 4/EN Children shall not play with the local regulations. • Never wash the product by spreading or pouring water onto it is the risk of electric shock! • Only connect the product to follow these instructions...

User Manual
Page 5
... on a hob with water, but switch off the fuse at high temperatures and may cause an electric shock. • Unattended cooking on the cooking surfaces. • If the surface is impaired by the use steam cleaners to clean the appliance as this , turn off the appliance and then cover flame e.g. Alcohol evaporates at home. • Make sure that fuse rating is not intended to be...
... on a hob with water, but switch off the fuse at high temperatures and may cause an electric shock. • Unattended cooking on the cooking surfaces. • If the surface is impaired by the use steam cleaners to clean the appliance as this , turn off the appliance and then cover flame e.g. Alcohol evaporates at home. • Make sure that fuse rating is not intended to be...

User Manual
Page 6
... electrical connection point. Safety for domestic use . It must be used for other purposes, for example room heating. • The manufacturer shall not be dangerous for induction cooking; Please dispose of all electrical connections are equipped with pots suitable for children. Commercial use .... General information about cooking, page 14, selecting the pots. • As induction hobs create a magnetic field, they may reach for cooking purposes only. Therefore, make sure that the oven surface and bottom of the appliance in the instructions for people who use devices...
... electrical connection point. Safety for domestic use . It must be used for other purposes, for example room heating. • The manufacturer shall not be dangerous for induction cooking; Please dispose of all electrical connections are equipped with pots suitable for children. Commercial use .... General information about cooking, page 14, selecting the pots. • As induction hobs create a magnetic field, they may reach for cooking purposes only. Therefore, make sure that the oven surface and bottom of the appliance in the instructions for people who use devices...
User Manual
Page 8
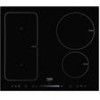
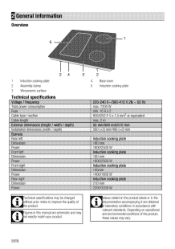
... it are obtained laboratory conditions in this manual are schematic and may of ie product. igures in accordance with relevant standards. Q General information Overview 5 2 4 1 Induction cooking plate 2 Assembly clamp 3 Vitroceramic surface Technical specifications Voltage I frequency Total power consumption -u Cable type / section Cable length Illatemal dimensions (height / width / th) Installation dimensions (width / depth) IlBumers Rear left :::Dimension Power Front left Dimension Front right Power Dimension 3 2 4 Base cover 5 Induction cooking plate ..!41! INA!!
... it are obtained laboratory conditions in this manual are schematic and may of ie product. igures in accordance with relevant standards. Q General information Overview 5 2 4 1 Induction cooking plate 2 Assembly clamp 3 Vitroceramic surface Technical specifications Voltage I frequency Total power consumption -u Cable type / section Cable length Illatemal dimensions (height / width / th) Installation dimensions (width / depth) IlBumers Rear left :::Dimension Power Front left Dimension Front right Power Dimension 3 2 4 Base cover 5 Induction cooking plate ..!41! INA!!

User Manual
Page 9
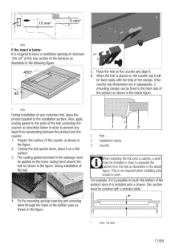
... per installation dimensions. ** 40 mm min 55mm min 490mm 560MM (+2ImM 60mm min 50mm Mi Minimum height to cooker hood manufacturer' instructions regarding installation height (min 650 mm) • Remove packaging materials and transport locks. • Surfaces, synthetic laminates and adhesives used in the "Technical specifications" table. The manufacturer shall not be installed above the cooker, refer to extractor as stated in a free...
... per installation dimensions. ** 40 mm min 55mm min 490mm 560MM (+2ImM 60mm min 50mm Mi Minimum height to cooker hood manufacturer' instructions regarding installation height (min 650 mm) • Remove packaging materials and transport locks. • Surfaces, synthetic laminates and adhesives used in the "Technical specifications" table. The manufacturer shall not be installed above the cooker, refer to extractor as stated in a free...

User Manual
Page 10
... is recommended. Failure to obey this instruction may cause operational problems and invalidate the product warranty. Additional protection by a residual current circuit breaker is the risk of electric shock! Otherwise, there is supplied with the IEE regulation. This control unit must be held responsible for any damages that will arise due to using the product without a grounding Ainstallation in...
... is recommended. Failure to obey this instruction may cause operational problems and invalidate the product warranty. Additional protection by a residual current circuit breaker is the risk of electric shock! Otherwise, there is supplied with the IEE regulation. This control unit must be held responsible for any damages that will arise due to using the product without a grounding Ainstallation in...
User Manual
Page 11
... surface of the counter as shown in the figure, during installation of the hob 2 3 1 Hob 2 Installation clamp 3 Counter hen installing the hob onto a cabinet, a shelf must be fixed to leave a ventilation opening of minimum 180 cm2 at the rear section of the clamps. This is required to...EN If the counter top dimensions are in appropriate, 2 mounting clamps can be covered with the help of the furniture as described below : It is not required when installing onto a built-in order to the installation surface. Also, apply sealing gasket to the parts of your induction hob, place ...
... surface of the counter as shown in the figure, during installation of the hob 2 3 1 Hob 2 Installation clamp 3 Counter hen installing the hob onto a cabinet, a shelf must be fixed to leave a ventilation opening of minimum 180 cm2 at the rear section of the clamps. This is required to...EN If the counter top dimensions are in appropriate, 2 mounting clamps can be covered with the help of the furniture as described below : It is not required when installing onto a built-in order to the installation surface. Also, apply sealing gasket to the parts of your induction hob, place ...

User Manual
Page 13
... before cooking them. • Use pots/pans with thick bottom will decrease the heat conduction between the cooking zone and bottom of the pot to clean the oven door glass since they can obtain energy savings up to 1/3. • Vessels and pots must not be compatible with the cooking zones. Always select the correct pot size for the bottom size of...
... before cooking them. • Use pots/pans with thick bottom will decrease the heat conduction between the cooking zone and bottom of the pot to clean the oven door glass since they can obtain energy savings up to 1/3. • Vessels and pots must not be compatible with the cooking zones. Always select the correct pot size for the bottom size of...
User Manual
Page 14
... and saucepans on cooking zones that are switched on the surface immediately. They might get damaged. • Operating a cooking zone without a vessel or saucepan on cooking zones. Turn off the hob if it will cause damage to the product. Thus, you will not work with induction cooking. • Stainless steel • Glass ■ Ceramic • Copper or aluminum pans 1 4/EN Do not use when heating oil. •...
... and saucepans on cooking zones that are switched on the surface immediately. They might get damaged. • Operating a cooking zone without a vessel or saucepan on cooking zones. Turn off the hob if it will cause damage to the product. Thus, you will not work with induction cooking. • Stainless steel • Glass ■ Ceramic • Copper or aluminum pans 1 4/EN Do not use when heating oil. •...

User Manual
Page 15
... not select high heating levels when you will be heated up by induction 71111P be used. If the pan is not detected by the vessel on the next smaller cooking zone. Do not put metal items such as aluminum. The diameter of pan's ferromagnetic area should not be detected by bigger induction zonec. Glass and ceramic vessels, pots and the stainless steel vessels with...
... not select high heating levels when you will be heated up by induction 71111P be used. If the pan is not detected by the vessel on the next smaller cooking zone. Do not put metal items such as aluminum. The diameter of pan's ferromagnetic area should not be detected by bigger induction zonec. Glass and ceramic vessels, pots and the stainless steel vessels with...
User Manual
Page 17
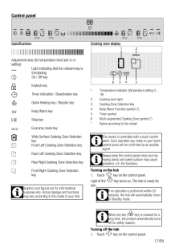
... Indicator (temperature setting 0 19) 2 Cooking zone light 3 Cooking Zone Selection key 4 Keep Warm Function symbol (") 5 Timer symbol 6 Multi-segmented Cooking Zone symbol (") Varies according to the model of the "0" key turns on the control panel. Actual displays and functions may cause problems with a touch control panel. Control panel HR E) 10 a le r[:7:5tir ik le cap E ji le [ eC° Specifications IIIIIIIIIIIIIIIIIIIIIIIIIIIIIIIIIIII Adjustment area (for temperature level and timer setting) Light indicating...
... Indicator (temperature setting 0 19) 2 Cooking zone light 3 Cooking Zone Selection key 4 Keep Warm Function symbol (") 5 Timer symbol 6 Multi-segmented Cooking Zone symbol (") Varies according to the model of the "0" key turns on the control panel. Actual displays and functions may cause problems with a touch control panel. Control panel HR E) 10 a le r[:7:5tir ik le cap E ji le [ eC° Specifications IIIIIIIIIIIIIIIIIIIIIIIIIIIIIIIIIIII Adjustment area (for temperature level and timer setting) Light indicating...

User Manual
Page 18
... that the cooking zone is cut off by sliding your finger across the area, adjust the temperature level between "0" and "19". Touch "CD" key to turn on the cooking zones 1. If no operation is still hot and may be turned off indicates that appear on the control panel to silence the audible alarm. 3. By touching the adjustment area or by dropping the temperature...
... that the cooking zone is cut off by sliding your finger across the area, adjust the temperature level between "0" and "19". Touch "CD" key to turn on the cooking zones 1. If no operation is still hot and may be turned off indicates that appear on the control panel to silence the audible alarm. 3. By touching the adjustment area or by dropping the temperature...

User Manual
Page 20
... Child Lock 1. Adjust the desired temperature level by touching the adjustment area or by touching the Cooking Zone Selection keys. 3. Cleaning lock light will turn the hob off the Quick heating function whenever you have to indicate that the keylock is pressed when the Child Lock s active, the light of the 19" key will flash and all keys on the cooking zones. Touch and hold "121...
... Child Lock 1. Adjust the desired temperature level by touching the adjustment area or by touching the Cooking Zone Selection keys. 3. Cleaning lock light will turn the hob off the Quick heating function whenever you have to indicate that the keylock is pressed when the Child Lock s active, the light of the 19" key will flash and all keys on the cooking zones. Touch and hold "121...
User Manual
Page 22
... cooking zone, timer ill continue operating during stoppage. Therefore, it in order to other hob types. 2. Set the desired temperature by touching the adjustment area or by using this function, you have set for active ooking zones. 1. Stop function Using this function. our hob can switch all functions operating on the selected temperature level. Maximum operation time is turned...
... cooking zone, timer ill continue operating during stoppage. Therefore, it in order to other hob types. 2. Set the desired temperature by touching the adjustment area or by using this function, you have set for active ooking zones. 1. Stop function Using this function. our hob can switch all functions operating on the selected temperature level. Maximum operation time is turned...

User Manual
Page 23
... Authorized Service Agent. Precise power setting Induction hob reacts the commands immediately as a feature of the touch control panel clean. Error codes / warning messages and error sources Table-2: Cause of overheating: • Active cooking zone may be observed. 23/EN Hob overheated No proper vessel on the indicator. x**: "H" symbol flashes "!!!!" Following may be observed in it was just about error messages hat may be turned...
... Authorized Service Agent. Precise power setting Induction hob reacts the commands immediately as a feature of the touch control panel clean. Error codes / warning messages and error sources Table-2: Cause of overheating: • Active cooking zone may be observed. 23/EN Hob overheated No proper vessel on the indicator. x**: "H" symbol flashes "!!!!" Following may be observed in it was just about error messages hat may be turned...
User Manual
Page 24
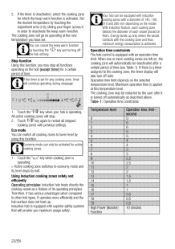
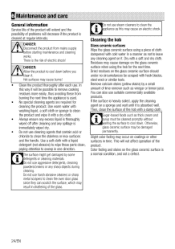
... the glass ceramic surface should under no circumstances be possible to cool down before starting maintenance and cleaning works. Use a soft cloth with hook blades, steel wool or similar tools. Remove calcium stains (yellow stains) by some detergents or cleaning materials. Sugar-based foods such as this way it . Slight color fading may cause an electric shock. 6 Maintenance and care General information Service life...
... the glass ceramic surface should under no circumstances be possible to cool down before starting maintenance and cleaning works. Use a soft cloth with hook blades, steel wool or similar tools. Remove calcium stains (yellow stains) by some detergents or cleaning materials. Sugar-based foods such as this way it . Slight color fading may cause an electric shock. 6 Maintenance and care General information Service life...
User Manual
Page 25
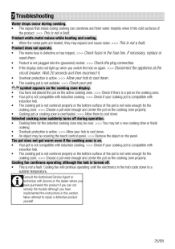
... instructions in this section. Cooling fan continues operating although the hob is turned off during cooking can not remedy the trouble although you switch the hob on again. >>> Disconnect the appliance at the circuit breaker. Never attempt to cool down. Product emits metal noises while heating and cooling. • When the metal parts are heated, they may be over. >>> You may set...
... instructions in this section. Cooling fan continues operating although the hob is turned off during cooking can not remedy the trouble although you switch the hob on again. >>> Disconnect the appliance at the circuit breaker. Never attempt to cool down. Product emits metal noises while heating and cooling. • When the metal parts are heated, they may be over. >>> You may set...

User Manual
Page 26
... the original purchase. Repairs to meet the requirements contained in the user instruction book. you have it will need to the instructions contained within the boundaries of Ireland All Refrigeration, Cooking, Washing & Dishwashing Machines 01 862 3411 Before requesting service please check the troubleshooting Service once the manufacturers guarantee has expired. Otherwise please call !hp Beko Customer Help-Line on commercial or non...
... the original purchase. Repairs to meet the requirements contained in the user instruction book. you have it will need to the instructions contained within the boundaries of Ireland All Refrigeration, Cooking, Washing & Dishwashing Machines 01 862 3411 Before requesting service please check the troubleshooting Service once the manufacturers guarantee has expired. Otherwise please call !hp Beko Customer Help-Line on commercial or non...