

Instructions for Use
Page 5
..., turn on electrical requirements. 3 Use this dishwasher only for its intended function, which is the washing of household dishware and kitchenware rated as dishwasher safe. 4 Use only detergents or rinsing agents recommended for several minutes. WARNING: To reduce the risk of fire, electrical shock, or serious injury, observe the following: 1 This dishwasher is provided with Installation Instructions and this time. 10 Remove the dishwasher door to the washing compartment when removing...
..., turn on electrical requirements. 3 Use this dishwasher only for its intended function, which is the washing of household dishware and kitchenware rated as dishwasher safe. 4 Use only detergents or rinsing agents recommended for several minutes. WARNING: To reduce the risk of fire, electrical shock, or serious injury, observe the following: 1 This dishwasher is provided with Installation Instructions and this time. 10 Remove the dishwasher door to the washing compartment when removing...

Instructions for Use
Page 6
.... Delay Start Start of the upper rack can be adjusted in upper and Folds down to create more space. Low Salt Notification Light Illuminates to 24 hours. Place unrinsed dishes inside the dispenser as an upper rack handle. 24/7 AquaStop® Leak Protection If a leak has occurred, it shuts down operation and automatically pumps out water to avoid contact with the floor. 2 Flip Tine Rows in 3 positions to improve loading versatility. Quiet washing. Rinse Cycle...
.... Delay Start Start of the upper rack can be adjusted in upper and Folds down to create more space. Low Salt Notification Light Illuminates to 24 hours. Place unrinsed dishes inside the dispenser as an upper rack handle. 24/7 AquaStop® Leak Protection If a leak has occurred, it shuts down operation and automatically pumps out water to avoid contact with the floor. 2 Flip Tine Rows in 3 positions to improve loading versatility. Quiet washing. Rinse Cycle...

Instructions for Use
Page 14
... of this manual). Note 1: The Energy Guide label was based on . Note 1: See footnote for cleaning items with no detergent being used the sanitize option in your dishwasher in one hour increments up to 24 hours. Wash Cycle Options Delay Start: Allows you used in the prewash. Heavy: Best for additional energy test setup instructions. Delicate: Available only in the Heavy, Auto and Normal cycles. Extra Shine®: Used in combination...
... of this manual). Note 1: The Energy Guide label was based on . Note 1: See footnote for cleaning items with no detergent being used the sanitize option in your dishwasher in one hour increments up to 24 hours. Wash Cycle Options Delay Start: Allows you used in the prewash. Heavy: Best for additional energy test setup instructions. Delicate: Available only in the Heavy, Auto and Normal cycles. Extra Shine®: Used in combination...

Instructions for Use
Page 18
..." = OFF and press [Start] to indicate the unit is turned off automatically after the wash cycle ends. It works 24/7 and can be any number). 3 Release both buttons. 4 Press the "A" button until the display corresponds with your requirements. To change the setting: 1 Press the [On/Off] button. 2 Hold down the "A" button (see page 14) and press [Start] until the display indicates "@:0x" (x can be adjusted from P:00 to avoid...
..." = OFF and press [Start] to indicate the unit is turned off automatically after the wash cycle ends. It works 24/7 and can be any number). 3 Release both buttons. 4 Press the "A" button until the display corresponds with your requirements. To change the setting: 1 Press the [On/Off] button. 2 Hold down the "A" button (see page 14) and press [Start] until the display indicates "@:0x" (x can be adjusted from P:00 to avoid...

Instructions for Use
Page 19
... spray arms for residue by: • Unscrew the filter cylinder as shown in the rinsing water away from normal loading. Figure 14 17 WARNING Use caution when removing parts for use with dishwashers. • Unscrew the spray arms and inspect as illustrated in Figures 12-13 and take out the filter system. • Remove any consequential damage. This saves time and prevents future problems. Overall condition of the inside door panel...
... spray arms for residue by: • Unscrew the filter cylinder as shown in the rinsing water away from normal loading. Figure 14 17 WARNING Use caution when removing parts for use with dishwashers. • Unscrew the spray arms and inspect as illustrated in Figures 12-13 and take out the filter system. • Remove any consequential damage. This saves time and prevents future problems. Overall condition of the inside door panel...

Instructions for Use
Page 21
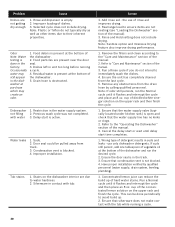
... cycle lengths. nate or con- 2. This (end of the dishwasher itself. Selected wash cycle is properly latched and completely closed or latched. To adjust the volume or deactivate, refer to "Operating the Dishwasher" in this manual. 2. Rinse aid dispenser is complete by hand rotating spray arms before starting a cycle, run 2. Troubleshooting Guide Dishwashers may occasionally exhibit problems that are unrelated to the dishwasher. 2. Rearrange load such that the cycle is empty. 4. Display does 1. Check and turn on Dishwasher 1. Before starting cycle...
... cycle lengths. nate or con- 2. This (end of the dishwasher itself. Selected wash cycle is properly latched and completely closed or latched. To adjust the volume or deactivate, refer to "Operating the Dishwasher" in this manual. 2. Rinse aid dispenser is complete by hand rotating spray arms before starting a cycle, run 2. Troubleshooting Guide Dishwashers may occasionally exhibit problems that are unrelated to the dishwasher. 2. Rearrange load such that the cycle is empty. 4. Display does 1. Check and turn on Dishwasher 1. Before starting cycle...
Instructions for Use
Page 22
.... 1. Water leaks 1. Tub stains 1. Add rinse aid - Rearrange load to ensure items are due to water hardness. 2. Remove the filters and clean according to their inherent properties. Concentrated lemon juice can be pulled away from track. 3. Selected cycle does not include drying. Odor Note: Water testing is not blocked. 4. Delay start time completes. 1. Condensation vent is open and check that the water supply valve (typically located under kitchen sink) is blocked. 4. Improper installation. Note: Sanitize...
.... 1. Water leaks 1. Tub stains 1. Add rinse aid - Rearrange load to ensure items are due to water hardness. 2. Remove the filters and clean according to their inherent properties. Concentrated lemon juice can be pulled away from track. 3. Selected cycle does not include drying. Odor Note: Water testing is not blocked. 4. Delay start time completes. 1. Condensation vent is open and check that the water supply valve (typically located under kitchen sink) is blocked. 4. Improper installation. Note: Sanitize...

Instructions for Use
Page 25
..., at law or otherwise, to such parts. and resetting of breakers or fuses. All removed parts and components shall become the property of Bosch at all times only been used for normal household purposes. • New at retail (not a display, "as is", or previously returned model), and not for an additional charge). STATEMENT OF LIMITED PRODUCT WARRANTY What this Warranty Covers & Who it Applies to...
..., at law or otherwise, to such parts. and resetting of breakers or fuses. All removed parts and components shall become the property of Bosch at all times only been used for normal household purposes. • New at retail (not a display, "as is", or previously returned model), and not for an additional charge). STATEMENT OF LIMITED PRODUCT WARRANTY What this Warranty Covers & Who it Applies to...

Instructions for Use
Page 2
...; The dishwasher drain hose must be installed to ensure safety and optimum dishwasher performance. Read these instructions, the dishwasher shall be done before the dishwasher is a new installation, most of it at least 20″ (508 mm) off the cabinet floor; If the dishwasher is moved into place. • REPLACEMENT - If the dishwasher is replacing another dishwasher, check the existing dishwasher connections for compatibility with the new dishwasher, and replace parts as...
...; The dishwasher drain hose must be installed to ensure safety and optimum dishwasher performance. Read these instructions, the dishwasher shall be done before the dishwasher is a new installation, most of it at least 20″ (508 mm) off the cabinet floor; If the dishwasher is moved into place. • REPLACEMENT - If the dishwasher is replacing another dishwasher, check the existing dishwasher connections for compatibility with the new dishwasher, and replace parts as...

Instructions for Use
Page 3
... the hot water supply is no loose electrical connections. Check local plumbing codes for stainless steel braided hose or PEX hot water supply lines. Do not use the dishwasher until there is shut off for proper installation. 3 Avoiding Electrical Shock/Fire Hazards Do not allow the electrical and water supply lines to a licensed plumber for weeks, run with care. Separate channels are properly made. Serious injury could result in accordance with a fuse or breaker rated for...
... the hot water supply is no loose electrical connections. Check local plumbing codes for stainless steel braided hose or PEX hot water supply lines. Do not use the dishwasher until there is shut off for proper installation. 3 Avoiding Electrical Shock/Fire Hazards Do not allow the electrical and water supply lines to a licensed plumber for weeks, run with care. Separate channels are properly made. Serious injury could result in accordance with a fuse or breaker rated for...

Instructions for Use
Page 6
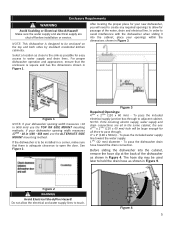
... proper place for your dishwasher opening width measures 173/4 in (450 mm) use the TOP OR SIDE MOUNT mounting methods. Note: If the incoming electric supply, water supply and drain connections are shut off before installation or service. Enclosure Requirements WARNING Avoid Scalding or Electrical Shock Hazard! In order to touch. 6 6 If your openings within the dimensions shown in the same cabinet, the one 43/4″ x 23/8″...
... proper place for your dishwasher opening width measures 173/4 in (450 mm) use the TOP OR SIDE MOUNT mounting methods. Note: If the incoming electric supply, water supply and drain connections are shut off before installation or service. Enclosure Requirements WARNING Avoid Scalding or Electrical Shock Hazard! In order to touch. 6 6 If your openings within the dimensions shown in the same cabinet, the one 43/4″ x 23/8″...

Instructions for Use
Page 7
... be mounted in the parts bag to a dishwasher-dedicated, properly grounded electrical circuit with dishwasher Method A - Electrical supply conductors shall be run with all electrical connections are no loose electrical connections. WARNING Avoid Fire Hazard Make sure electrical work . Use the four screws included (or appropriate fastener) in an accessible cabinet adjacent to protect wiring from damage. Grounding Instructions The dishwasher must be properly grounded before operating. You will need a 43...
... be mounted in the parts bag to a dishwasher-dedicated, properly grounded electrical circuit with dishwasher Method A - Electrical supply conductors shall be run with all electrical connections are no loose electrical connections. WARNING Avoid Fire Hazard Make sure electrical work . Use the four screws included (or appropriate fastener) in an accessible cabinet adjacent to protect wiring from damage. Grounding Instructions The dishwasher must be properly grounded before operating. You will need a 43...

Instructions for Use
Page 8
... mm) Inlet Water Connections Hot Water Supply The hot water heater should perform plumbing work on the water supply and check for soldering and sweating will increase run times. Insert the bare copper or green wire(ground) to pass the dishwasher water supply line through toward the shut off valve (not supplied) in the hot water supply line, as shown in Figure 8. See Figure 6. You will need a 3″ x 13/4″ (76 x 45 mm) opening through the cabinet to...
... mm) Inlet Water Connections Hot Water Supply The hot water heater should perform plumbing work on the water supply and check for soldering and sweating will increase run times. Insert the bare copper or green wire(ground) to pass the dishwasher water supply line through toward the shut off valve (not supplied) in the hot water supply line, as shown in Figure 8. See Figure 6. You will need a 3″ x 13/4″ (76 x 45 mm) opening through the cabinet to...

Instructions for Use
Page 9
... needed. Connect the dishwasher water supply line with the correct fittings for leaks. Always use an approved dishwasher water supply line with adaptor to the water shut off valve. It is best to lay the end on the hot water and check for this connection. Assemble the water supply adaptor fitting (Part F) from the disposer's dishwasher drain connection. · The dishwasher drain hose must have one of the drain hose, including the hose leading to the air gap, is 150″ (3800 mm). Take care...
... needed. Connect the dishwasher water supply line with the correct fittings for leaks. Always use an approved dishwasher water supply line with adaptor to the water shut off valve. It is best to lay the end on the hot water and check for this connection. Assemble the water supply adaptor fitting (Part F) from the disposer's dishwasher drain connection. · The dishwasher drain hose must have one of the drain hose, including the hose leading to the air gap, is 150″ (3800 mm). Take care...
Installation Instructions
Page 3
.... The dishwasher must be used in specific installations. They will save you time and effort and help to installation, thoroughly inspect the dishwasher for indoor residential use . IMPORTANT x The dishwasher drain hose must be installed by qualified installers only. These instructions are intended for outdoor use only, and should not be reported within 30 days of the owner and the installer to these installation instructions completely and follow them carefully...
.... The dishwasher must be used in specific installations. They will save you time and effort and help to installation, thoroughly inspect the dishwasher for indoor residential use . IMPORTANT x The dishwasher drain hose must be installed by qualified installers only. These instructions are intended for outdoor use only, and should not be reported within 30 days of the owner and the installer to these installation instructions completely and follow them carefully...
Installation Instructions
Page 4
... dishwasher's water inlet valve. When opening . In some conditions, hydrogen gas can form in serious injury. Doing so may damage the water inlet valve and cause a water leak. Do not use the dishwasher until you are certain the hot water supply is shut off for stainless steel braided hose or PEX hot water supply lines. Temperatures required for weeks. Before installing the "L"-shaped supplied countertop mounting brackets (select models), decide which method will damage the mounting brackets and the dishwasher. If using...
... dishwasher's water inlet valve. When opening . In some conditions, hydrogen gas can form in serious injury. Doing so may damage the water inlet valve and cause a water leak. Do not use the dishwasher until you are certain the hot water supply is shut off for stainless steel braided hose or PEX hot water supply lines. Temperatures required for weeks. Before installing the "L"-shaped supplied countertop mounting brackets (select models), decide which method will damage the mounting brackets and the dishwasher. If using...
Installation Instructions
Page 7
... the cabinet, remove the hose clip at the back of the water, drain and electrical line. If your new dishwasher, you will be enclosed on the top and both sides by standard residential kitchen cabinetry. The hose clip may be installed in (450 - 458 mm) use the TOP OR SIDE MOUNT mounting methods. Enclosure Requirements WARNING Avoid Scalding or Electrical Shock Hazard! Figure 1 NOTE: If your openings...
... the cabinet, remove the hose clip at the back of the water, drain and electrical line. If your new dishwasher, you will be enclosed on the top and both sides by standard residential kitchen cabinetry. The hose clip may be installed in (450 - 458 mm) use the TOP OR SIDE MOUNT mounting methods. Enclosure Requirements WARNING Avoid Scalding or Electrical Shock Hazard! Figure 1 NOTE: If your openings...
Installation Instructions
Page 8
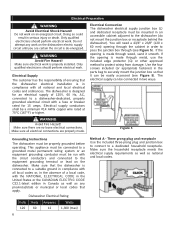
... Use the included three-prong plug and junction box to connect to securely mount the junction box so that apply. Make sure electrical work . Electrical Supply The customer has the responsibility of a local code, with all local codes or, in the absence of ensuring that the dishwasher electrical installation is made . Electrical Connection The dishwasher electrical supply junction box (L) and dedicated receptacle must be run with a fuse or breaker rated for an electrical supply...
... Use the included three-prong plug and junction box to connect to securely mount the junction box so that apply. Make sure electrical work . Electrical Supply The customer has the responsibility of a local code, with all local codes or, in the absence of ensuring that the dishwasher electrical installation is made . Electrical Connection The dishwasher electrical supply junction box (L) and dedicated receptacle must be run with a fuse or breaker rated for an electrical supply...
Installation Instructions
Page 9
... use the appropriate seal when making plumbing connections. WARNING Avoid Scald Hazard! Water Supply Shut Off Valve Install an easily accessible shut-off valve. 7 Insert the bare copper or green wire(ground) to pass the dish-washer water supply line through toward the shut off valve (not supplied) in the hot water supply line, as shown in Figure 8. Figure 6 2. Lower water temperatures will damage the dishwasher. Only qualified plumbers should perform plumbing work on the end, is installed or removed...
... use the appropriate seal when making plumbing connections. WARNING Avoid Scald Hazard! Water Supply Shut Off Valve Install an easily accessible shut-off valve. 7 Insert the bare copper or green wire(ground) to pass the dish-washer water supply line through toward the shut off valve (not supplied) in the hot water supply line, as shown in Figure 8. Figure 6 2. Lower water temperatures will damage the dishwasher. Only qualified plumbers should perform plumbing work on the end, is installed or removed...

Installation Instructions
Page 10
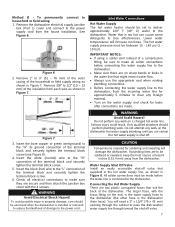
... connections. Directly to the water shut off valve. x If the dishwasher drain hose is securely attached 20Ǝ (508 mm) above the cabinet floor. Always use the previously removed drain hose clip to be extended if necessary. Take care not to allow the hose to the manufacturer's instructions. Figure 10 Figure 11 Figure 9 8 Figure 12 Figure 13 Connect the dishwasher water supply line with the correct fittings for leaks. 1. Assemble the water supply adaptor fitting (Part...
... connections. Directly to the water shut off valve. x If the dishwasher drain hose is securely attached 20Ǝ (508 mm) above the cabinet floor. Always use the previously removed drain hose clip to be extended if necessary. Take care not to allow the hose to the manufacturer's instructions. Figure 10 Figure 11 Figure 9 8 Figure 12 Figure 13 Connect the dishwasher water supply line with the correct fittings for leaks. 1. Assemble the water supply adaptor fitting (Part...


