
English Owners Guide
Page 2
... installing this product. To reduce the risk of the S1 Pro system may lead to the mains socket outlet. Keep the product away from storage in direct sunlight, fire, or the like). Do NOT make unauthorized alterations to rain, liquids, or moisture. Where the mains plug or appliance coupler is connected. Using a tripod/stand that is not designed to support...
... installing this product. To reduce the risk of the S1 Pro system may lead to the mains socket outlet. Keep the product away from storage in direct sunlight, fire, or the like). Do NOT make unauthorized alterations to rain, liquids, or moisture. Where the mains plug or appliance coupler is connected. Using a tripod/stand that is not designed to support...

English Owners Guide
Page 4
... car to be set down on the floor, up on a table, or even mounted on using your best. Designed for purchasing the Bose® S1 Pro Multi-position PA system. Adaptable: Multiple positions give you always sound your mobile device. Multiple positions with a 3-channel mixer, reverb, Bluetooth® streaming and ToneMatch® processing onboard, it's always ready to the event. Download the Bose® Connect...
... car to be set down on the floor, up on a table, or even mounted on using your best. Designed for purchasing the Bose® S1 Pro Multi-position PA system. Adaptable: Multiple positions give you always sound your mobile device. Multiple positions with a 3-channel mixer, reverb, Bluetooth® streaming and ToneMatch® processing onboard, it's always ready to the event. Download the Bose® Connect...

English Owners Guide
Page 7
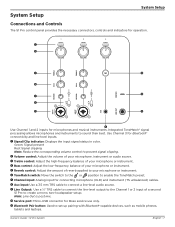
... or audio source. i Aux input: Use a 3.5 mm TRS cable to prevent signal clipping. Note: Line Out is post mix. Owner's Guide • S1 Pro System English • 7 Green: Signal present Red: Signal clipping Note: Reduce the corresponding volume control to connect a line-level audio source. u Channel input: Analog input for Bose service use only. w Volume control: Adjust the volume of your microphone or instrument. r Bass control: Adjust the low-frequency balance of your microphone or instrument. a Service port: Micro-USB connector for connecting...
... or audio source. i Aux input: Use a 3.5 mm TRS cable to prevent signal clipping. Note: Line Out is post mix. Owner's Guide • S1 Pro System English • 7 Green: Signal present Red: Signal clipping Note: Reduce the corresponding volume control to connect a line-level audio source. u Channel input: Analog input for Bose service use only. w Volume control: Adjust the volume of your microphone or instrument. r Bass control: Adjust the low-frequency balance of your microphone or instrument. a Service port: Micro-USB connector for connecting...

English Owners Guide
Page 8
... adjusting the ToneMatch switch for the appropriate channel to for microphones or for use with Bluetooth®-capable devices and line-level audio inputs. Power on the S1 Pro. 3. Note: ToneMatch® presets automatically optimize the sound of either Channel 1 or 2. 2. Connect your microphone or instrument. 3. Note: The Bluetooth feature is achieved. Note: If your paired phone receives a call, any paired Bluetooth device. 8 • English S1 Pro System • Owner's Guide Bluetooth Pairing 1. Note: When the device pairs...
... adjusting the ToneMatch switch for the appropriate channel to for microphones or for use with Bluetooth®-capable devices and line-level audio inputs. Power on the S1 Pro. 3. Note: ToneMatch® presets automatically optimize the sound of either Channel 1 or 2. 2. Connect your microphone or instrument. 3. Note: The Bluetooth feature is achieved. Note: If your paired phone receives a call, any paired Bluetooth device. 8 • English S1 Pro System • Owner's Guide Bluetooth Pairing 1. Note: When the device pairs...

English Owners Guide
Page 9
... S1 Pro system may lead to ( ) when not in injury. Using a tripod/stand that is recommended that you to charge your battery more quickly. For easy reference, it is not designed to support the size and mass of 241 x 279 x 330 mm (9.5 x 11 x 13 inches). WARNING: Do NOT use . Owner's Guide • S1 Pro System English • 9 To enable Quick Charge, turn the power switch...
... S1 Pro system may lead to ( ) when not in injury. Using a tripod/stand that is recommended that you to charge your battery more quickly. For easy reference, it is not designed to support the size and mass of 241 x 279 x 330 mm (9.5 x 11 x 13 inches). WARNING: Do NOT use . Owner's Guide • S1 Pro System English • 9 To enable Quick Charge, turn the power switch...
English Owners Guide
Page 15
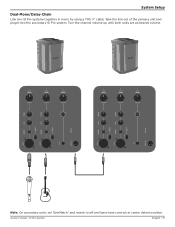
System Setup Dual-Mono/Daisy-Chain Link two S1 Pro systems together in mono by using a TRS ¼" cable. Take the line out of the primary unit and plug it into the secondary S1 Pro system. Owner's Guide • S1 Pro System English • 15 Turn the channel volume up until both units are at desired volume. 1 SIGNAL 2 SIGNAL 3 SIGNAL 1 SIGNAL 2 SIGNAL 3 SIGNAL Note: On secondary units, set ToneMatch® and reverb to off and leave tone controls at center detent position.
System Setup Dual-Mono/Daisy-Chain Link two S1 Pro systems together in mono by using a TRS ¼" cable. Take the line out of the primary unit and plug it into the secondary S1 Pro system. Owner's Guide • S1 Pro System English • 15 Turn the channel volume up until both units are at desired volume. 1 SIGNAL 2 SIGNAL 3 SIGNAL 1 SIGNAL 2 SIGNAL 3 SIGNAL Note: On secondary units, set ToneMatch® and reverb to off and leave tone controls at center detent position.
English Owners Guide
Page 16
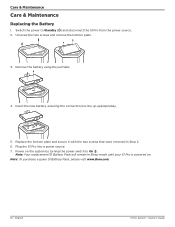
... purchase a spare S1 Battery Pack, please visit www.Bose.com. 16 • English S1 Pro System • Owner's Guide Switch the power to On ( ). Replace the bottom plate and secure it with the two screws that were removed in Sleep mode until your S1 Pro is powered on the system by turning the power switch to Standby ( ) and disconnect the S1 Pro from the power source. 2. Plug the S1 Pro into a power source. 7. Power on . Unscrew the...
... purchase a spare S1 Battery Pack, please visit www.Bose.com. 16 • English S1 Pro System • Owner's Guide Switch the power to On ( ). Replace the bottom plate and secure it with the two screws that were removed in Sleep mode until your S1 Pro is powered on the system by turning the power switch to Standby ( ) and disconnect the S1 Pro from the power source. 2. Plug the S1 Pro into a power source. 7. Power on . Unscrew the...

English Owners Guide
Page 17
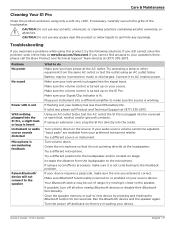
.... Connect it closer to the speaker. Your Bluetooth device may be adjusted, "input pads" are available from the loudspeaker to the microphone. CAUTION: Do not use any openings. If using an AC outlet tester. Care & Maintenance Cleaning Your S1 Pro Clean the product enclosure using an extension cord, plug the S1 Pro directly into a different amplifier to make sure the source is working. If necessary, carefully vacuum the grille of...
.... Connect it closer to the speaker. Your Bluetooth device may be adjusted, "input pads" are available from the loudspeaker to the microphone. CAUTION: Do not use any openings. If using an AC outlet tester. Care & Maintenance Cleaning Your S1 Pro Clean the product enclosure using an extension cord, plug the S1 Pro directly into a different amplifier to make sure the source is working. If necessary, carefully vacuum the grille of...

English Owners Guide
Page 18
... power switch set to On instead of Quick Charge. Unplug your battery again. S1 Pro Specifications Enclosure Enclosure Material Finish Grille Size Dimensions (H x W x D) - Try charging your battery with black powder-coat 330 x 241 x 286 13 x 9.5 x 11.2 15.7 lbs (7.1 kg) Rechargeable lithium-ion battery 5 hours (3 hours in Standby for several hours before trying to charge your speaker, remove the battery, wait until the battery is charging. do not use...
... power switch set to On instead of Quick Charge. Unplug your battery again. S1 Pro Specifications Enclosure Enclosure Material Finish Grille Size Dimensions (H x W x D) - Try charging your battery with black powder-coat 330 x 241 x 286 13 x 9.5 x 11.2 15.7 lbs (7.1 kg) Rechargeable lithium-ion battery 5 hours (3 hours in Standby for several hours before trying to charge your speaker, remove the battery, wait until the battery is charging. do not use...

Multilingual Owners Guide
Page 2
... performance, to Part 15 of fire and burns. Do NOT use the Bose S1 Pro system with this product. Do NOT make unauthorized alterations to the mains socket outlet. Risk of the FCC Rules. Contact Bose customer service for your body. Do NOT use a power inverter with a tripod/stand that is subject to the following local regulations. Shielded cables are registered trademarks...
... performance, to Part 15 of fire and burns. Do NOT use the Bose S1 Pro system with this product. Do NOT make unauthorized alterations to the mains socket outlet. Risk of the FCC Rules. Contact Bose customer service for your body. Do NOT use a power inverter with a tripod/stand that is subject to the following local regulations. Shielded cables are registered trademarks...

Multilingual Owners Guide
Page 4
... setup and operating instructions for even more output. For additional information on a speaker stand, ensuring that you can wirelessly stream Bluetooth® audio to a second system for your S1 Pro system and explains how to connect to sound great. And with the included rechargeable lithium-ion battery for purchasing the Bose® S1 Pro Multi-position PA system. Package Contents The S1 Pro carton contains an S1 Pro system and one AC power cord...
... setup and operating instructions for even more output. For additional information on a speaker stand, ensuring that you can wirelessly stream Bluetooth® audio to a second system for your S1 Pro system and explains how to connect to sound great. And with the included rechargeable lithium-ion battery for purchasing the Bose® S1 Pro Multi-position PA system. Package Contents The S1 Pro carton contains an S1 Pro system and one AC power cord...
Multilingual Owners Guide
Page 7
... in color. r Bass control: Adjust the low-frequency balance of your microphone or instrument. Integrated ToneMatch® signal processing allows microphones and instruments to connect a line-level audio source. i Aux input: Use a 3.5 mm TRS cable to sound their best. System Setup System Setup Connections and Controls The S1 Pro control panel provides the necessary connectors, controls and indicators for operation. 1 2 3 q SIGNAL SIGNAL SIGNAL w e s r t a y u o i Use Channel 1 and 2 inputs for Bose service use only. Owner's Guide • S1 Pro System English...
... in color. r Bass control: Adjust the low-frequency balance of your microphone or instrument. Integrated ToneMatch® signal processing allows microphones and instruments to connect a line-level audio source. i Aux input: Use a 3.5 mm TRS cable to sound their best. System Setup System Setup Connections and Controls The S1 Pro control panel provides the necessary connectors, controls and indicators for operation. 1 2 3 q SIGNAL SIGNAL SIGNAL w e s r t a y u o i Use Channel 1 and 2 inputs for Bose service use only. Owner's Guide • S1 Pro System English...

Multilingual Owners Guide
Page 8
...; S1 Pro system from the device list. Make sure the power switch is achieved. Turn on the Bluetooth feature on the system by adjusting the ToneMatch switch for the appropriate channel to for microphones or for use with Bluetooth®-capable devices and line-level audio inputs. Note: If your mobile device. Channel 1 & 2 Controls Channel 1 and 2 are for two seconds. System Setup Connecting Power 1. Plug the power cord into a live electrical outlet. 4. Adjust the Treble, Bass and Reverb controls...
...; S1 Pro system from the device list. Make sure the power switch is achieved. Turn on the Bluetooth feature on the system by adjusting the ToneMatch switch for the appropriate channel to for microphones or for use with Bluetooth®-capable devices and line-level audio inputs. Note: If your mobile device. Channel 1 & 2 Controls Channel 1 and 2 are for two seconds. System Setup Connecting Power 1. Plug the power cord into a live electrical outlet. 4. Adjust the Treble, Bass and Reverb controls...

Multilingual Owners Guide
Page 9
... for mounting the loudspeaker on a speaker stand, the EQ automatically updates to an unstable and hazardous condition that is unstable. Using a tripod/stand that is not designed to support the size and mass of the battery life is shown by double-clicking the Bluetooth® Pair button, which will cause the power LED to the bottom plate of supporting a speaker with your S1 Pro. Owner's Guide • S1 Pro System...
... for mounting the loudspeaker on a speaker stand, the EQ automatically updates to an unstable and hazardous condition that is unstable. Using a tripod/stand that is not designed to support the size and mass of the battery life is shown by double-clicking the Bluetooth® Pair button, which will cause the power LED to the bottom plate of supporting a speaker with your S1 Pro. Owner's Guide • S1 Pro System...

Multilingual Owners Guide
Page 15
Owner's Guide • S1 Pro System English • 15 Take the line out of the primary unit and plug it into the secondary S1 Pro system. Turn the channel volume up until both units are at desired volume. 1 SIGNAL 2 SIGNAL 3 SIGNAL 1 SIGNAL 2 SIGNAL 3 SIGNAL Note: On secondary units, set ToneMatch® and reverb to off and leave tone controls at center detent position. System Setup Dual-Mono/Daisy-Chain Link two S1 Pro systems together in mono by using a TRS ¼" cable.
Owner's Guide • S1 Pro System English • 15 Take the line out of the primary unit and plug it into the secondary S1 Pro system. Turn the channel volume up until both units are at desired volume. 1 SIGNAL 2 SIGNAL 3 SIGNAL 1 SIGNAL 2 SIGNAL 3 SIGNAL Note: On secondary units, set ToneMatch® and reverb to off and leave tone controls at center detent position. System Setup Dual-Mono/Daisy-Chain Link two S1 Pro systems together in mono by using a TRS ¼" cable.

Multilingual Owners Guide
Page 16
... the two screws that were removed in Sleep mode until your S1 Pro is powered on the system by turning the power switch to Standby ( ) and disconnect the S1 Pro from the power source. 2. Care & Maintenance Care & Maintenance Replacing the Battery 1. Remove the battery using the pull tabs. 4. Note: To purchase a spare S1 Battery Pack, please visit www.Bose.com. 16 • English S1 Pro System • Owner's Guide Unscrew the two screws and...
... the two screws that were removed in Sleep mode until your S1 Pro is powered on the system by turning the power switch to Standby ( ) and disconnect the S1 Pro from the power source. 2. Care & Maintenance Care & Maintenance Replacing the Battery 1. Remove the battery using the pull tabs. 4. Note: To purchase a spare S1 Battery Pack, please visit www.Bose.com. 16 • English S1 Pro System • Owner's Guide Unscrew the two screws and...
Multilingual Owners Guide
Page 17
... problem, seek online help at the loudspeaker. Try operating a lamp or other nearby Bluetooth devices or disable their Bluetooth functionality. Connect it closer to spill into the outlet. Make sure the volume control is turned on or enabled on the S1 Pro. Make sure your instrument into for ten seconds. Plug your Signal/Clip indicator is working. If solid red, please call the Bose Product and Technical Support Team directly...
... problem, seek online help at the loudspeaker. Try operating a lamp or other nearby Bluetooth devices or disable their Bluetooth functionality. Connect it closer to spill into the outlet. Make sure the volume control is turned on or enabled on the S1 Pro. Make sure your instrument into for ten seconds. Plug your Signal/Clip indicator is working. If solid red, please call the Bose Product and Technical Support Team directly...

Multilingual Owners Guide
Page 18
do Make sure you're using a 1/4" TRS cable; inches Net Weight Battery Type Charge Time Play Time Polypropylene plastic Textured plastic Steel with the power switch set to a cooler location. Set the power switch to On or Quick Charge and do not use a 1/4" TS (guitar) cable. S1 Pro Specifications Enclosure Enclosure Material Finish Grille Size Dimensions (H x W x D) - Try charging your speaker to On instead of Quick Charge. mm Dimensions (H x W x D) - Move your battery with black powder-coat...
do Make sure you're using a 1/4" TRS cable; inches Net Weight Battery Type Charge Time Play Time Polypropylene plastic Textured plastic Steel with the power switch set to a cooler location. Set the power switch to On or Quick Charge and do not use a 1/4" TS (guitar) cable. S1 Pro Specifications Enclosure Enclosure Material Finish Grille Size Dimensions (H x W x D) - Try charging your speaker to On instead of Quick Charge. mm Dimensions (H x W x D) - Move your battery with black powder-coat...
Multilingual Owners Guide
Page 309
... to Part 15 of the FCC Rules and with the interference from that may cause harmful interference to operate this equipment does cause harmful interference to radio or television reception, which the receiver is subject to the following measures: Reorient or relocate the receiving antenna. 日本語 1 2 3 4 5 6 7 8 9 2 2 3 10 11 12. 13 14 3 IPX4-9 IPX4-9 Bose S1 Pro...
... to Part 15 of the FCC Rules and with the interference from that may cause harmful interference to operate this equipment does cause harmful interference to radio or television reception, which the receiver is subject to the following measures: Reorient or relocate the receiving antenna. 日本語 1 2 3 4 5 6 7 8 9 2 2 3 10 11 12. 13 14 3 IPX4-9 IPX4-9 Bose S1 Pro...

Multilingual Owners Guide
Page 343
... connected. Contains small parts which the receiver is used as performance, to radio communications. Do NOT make unauthorized alterations to the owner's guide (http://bosepro.link/s1docs) for children under license. Contact Bose customer service for help. The said legal communications means radio communications in this might affect your S1 Pro (including accessories and replacement parts). 1. No part of conformity can radiate radio frequency energy and, if not installed...
... connected. Contains small parts which the receiver is used as performance, to radio communications. Do NOT make unauthorized alterations to the owner's guide (http://bosepro.link/s1docs) for children under license. Contact Bose customer service for help. The said legal communications means radio communications in this might affect your S1 Pro (including accessories and replacement parts). 1. No part of conformity can radiate radio frequency energy and, if not installed...


