

English Owners Guide
Page 2
... are important operating and maintenance instructions in compliance with the Bose S1 Pro Multi-position PA system only. This symbol on or pinched, particularly at : www.Bose.com/compliance. Do NOT use attachments/accessories specified by Bose Corporation could result in the U.S. Shielded cables are designed to.... Do NOT make unauthorized alterations to rain or moisture, does not operate normally, or has been dropped. Only use the Bose S1 Pro system with this product to dripping or splashing and do NOT expose the product to the owner's guide (http://bosepro.link...
... are important operating and maintenance instructions in compliance with the Bose S1 Pro Multi-position PA system only. This symbol on or pinched, particularly at : www.Bose.com/compliance. Do NOT use attachments/accessories specified by Bose Corporation could result in the U.S. Shielded cables are designed to.... Do NOT make unauthorized alterations to rain or moisture, does not operate normally, or has been dropped. Only use the Bose S1 Pro system with this product to dripping or splashing and do NOT expose the product to the owner's guide (http://bosepro.link...
English Owners Guide
Page 3
......9 Battery Life Indicator...9 Using a Speaker Stand...9 Connection Scenarios 10 Elevated Surface...10 Tilt-Back...11 Monitor...12 Speaker Stand...13 General Purpose PA...14 Stereo...14 Dual-Mono/Daisy-Chain ...15 Care & Maintenance 16 Replacing the Battery...16 Cleaning Your S1 Pro...17 Troubleshooting...17 S1 Pro Specifications...18 Owner's Guide • S1 Pro System English •...
......9 Battery Life Indicator...9 Using a Speaker Stand...9 Connection Scenarios 10 Elevated Surface...10 Tilt-Back...11 Monitor...12 Speaker Stand...13 General Purpose PA...14 Stereo...14 Dual-Mono/Daisy-Chain ...15 Care & Maintenance 16 Replacing the Battery...16 Cleaning Your S1 Pro...17 Troubleshooting...17 S1 Pro Specifications...18 Owner's Guide • S1 Pro System English •...

English Owners Guide
Page 4
... and general PA use, the S1 Pro is designed to transport effortlessly from the car to a variety of optional equipment and accessories, please visit www.Bose.com. 4 • English S1 Pro System • Owner's Guide And with Auto EQ allow the S1 Pro to be your best. Sound great quickly with the ultra-portable Bose S1 Pro Multi-position PA system...
... and general PA use, the S1 Pro is designed to transport effortlessly from the car to a variety of optional equipment and accessories, please visit www.Bose.com. 4 • English S1 Pro System • Owner's Guide And with Auto EQ allow the S1 Pro to be your best. Sound great quickly with the ultra-portable Bose S1 Pro Multi-position PA system...

English Owners Guide
Page 5
... the performer. Speaker Stand Place one side of the loudspeaker to match your application. Monitor To use the S1 Pro as a personal floor monitor, place it on the ground horizontally, in four unique modes. Note: Rotate the Bose logo counterclockwise to avoid blocking sound from the audience. With Auto EQ, the system automatically updates...
... the performer. Speaker Stand Place one side of the loudspeaker to match your application. Monitor To use the S1 Pro as a personal floor monitor, place it on the ground horizontally, in four unique modes. Note: Rotate the Bose logo counterclockwise to avoid blocking sound from the audience. With Auto EQ, the system automatically updates...

English Owners Guide
Page 7
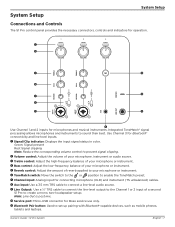
...;" TRS cable to connect the line-level output to create a mono, two-loudspeaker setup. Owner's Guide • S1 Pro System English • 7 u Channel input: Analog input for Bose service use only. a Service port: Micro-USB connector for connecting microphone (XLR) and instrument (TS unbalanced) cables. r Bass control: Adjust the low-frequency balance of a second...
...;" TRS cable to connect the line-level output to create a mono, two-loudspeaker setup. Owner's Guide • S1 Pro System English • 7 u Channel input: Analog input for Bose service use only. a Service port: Micro-USB connector for connecting microphone (XLR) and instrument (TS unbalanced) cables. r Bass control: Adjust the low-frequency balance of a second...

English Owners Guide
Page 8
... • Owner's Guide until the desired effect is for two seconds. Bluetooth Pairing 1. Turn on the Bluetooth feature on your Bose® S1 Pro system from the device list. Aux Input Connect a line-level sound source to On ( ). 1 SIGNAL 1 SIGNAL 2 SIGNAL 2 SIGNAL 3SIGNAL 3SIGNAL 1 2 3...will automatically override any music playing will be paused and the ring will come through the S1 Pro. Channel 3 Controls Channel 3 is achieved. Press and hold the Bluetooth Pair button for use with Bluetooth®-capable devices and line-level audio inputs. Plug the power cord into...
... • Owner's Guide until the desired effect is for two seconds. Bluetooth Pairing 1. Turn on the Bluetooth feature on your Bose® S1 Pro system from the device list. Aux Input Connect a line-level sound source to On ( ). 1 SIGNAL 1 SIGNAL 2 SIGNAL 2 SIGNAL 3SIGNAL 3SIGNAL 1 2 3...will automatically override any music playing will be paused and the ring will come through the S1 Pro. Channel 3 Controls Channel 3 is achieved. Press and hold the Bluetooth Pair button for use with Bluetooth®-capable devices and line-level audio inputs. Plug the power cord into...

English Owners Guide
Page 9
... a pole cup for mounting the loudspeaker on a speaker stand, the EQ automatically updates to charge your battery more quickly. WARNING: Do NOT use the Bose® S1 Pro system with your S1 Pro is only designed for charge indicators: Note: A sticker depicting the above table is shown by double-clicking the Bluetooth® Pair button, which...
... a pole cup for mounting the loudspeaker on a speaker stand, the EQ automatically updates to charge your battery more quickly. WARNING: Do NOT use the Bose® S1 Pro system with your S1 Pro is only designed for charge indicators: Note: A sticker depicting the above table is shown by double-clicking the Bluetooth® Pair button, which...

English Owners Guide
Page 10
Elevated Surface Place the S1 Pro on a tabletop in the front of a room to give a business presentation or place it in a microphone and narrate over a multimedia presentation or get your friends pumped up before the game while listening to use the S1 Pro. The following pages show examples of your Bluetooth®-capable mobile device. 1 SIGNAL 2 SIGNAL 3 SIGNAL 10 • English S1 Pro System • Owner's Guide Plug in the bed of typical setup scenarios. System Setup Connection Scenarios There are many ways to music wirelessly via your pickup truck for a tailgate party.
Elevated Surface Place the S1 Pro on a tabletop in the front of a room to give a business presentation or place it in a microphone and narrate over a multimedia presentation or get your friends pumped up before the game while listening to use the S1 Pro. The following pages show examples of your Bluetooth®-capable mobile device. 1 SIGNAL 2 SIGNAL 3 SIGNAL 10 • English S1 Pro System • Owner's Guide Plug in the bed of typical setup scenarios. System Setup Connection Scenarios There are many ways to music wirelessly via your pickup truck for a tailgate party.

English Owners Guide
Page 12
Face it toward the performer to a main PA system, then dial in your equalization and reverb preferences for your performance. 1 SIGNAL 2 SIGNAL 3 SIGNAL 12 • English S1 Pro System • Owner's Guide System Setup Monitor Place the S1 Pro on its horizontal side edge to use as a personal monitor or send your mix to be used as a floor monitor.
Face it toward the performer to a main PA system, then dial in your equalization and reverb preferences for your performance. 1 SIGNAL 2 SIGNAL 3 SIGNAL 12 • English S1 Pro System • Owner's Guide System Setup Monitor Place the S1 Pro on its horizontal side edge to use as a personal monitor or send your mix to be used as a floor monitor.

English Owners Guide
Page 13
Connect a microphone and give a toast or sing a song while cuing music wirelessly via Bluetooth® streaming. 1 SIGNAL 2 SIGNAL 3 SIGNAL Owner's Guide • S1 Pro System English • 13 System Setup Speaker Stand Using a conventional speaker stand, you can use your S1 Pro as a PA system.
Connect a microphone and give a toast or sing a song while cuing music wirelessly via Bluetooth® streaming. 1 SIGNAL 2 SIGNAL 3 SIGNAL Owner's Guide • S1 Pro System English • 13 System Setup Speaker Stand Using a conventional speaker stand, you can use your S1 Pro as a PA system.

English Owners Guide
Page 14
The wide and consistent coverage of the system ensures that the entire audience can easily hear the performance throughout the room. Stereo Channel 1-4 1 SIGNAL 2 SIGNAL 3 SIGNAL 1 SIGNAL 2 SIGNAL 3 SIGNAL L Out R Out Note: When used as a conventional PA system. System Setup General Purpose PA Use a mixer with two S1 Pro systems as a conventional PA, reverb and ToneMatch® should be turned off. 14 • English S1 Pro System • Owner's Guide
The wide and consistent coverage of the system ensures that the entire audience can easily hear the performance throughout the room. Stereo Channel 1-4 1 SIGNAL 2 SIGNAL 3 SIGNAL 1 SIGNAL 2 SIGNAL 3 SIGNAL L Out R Out Note: When used as a conventional PA system. System Setup General Purpose PA Use a mixer with two S1 Pro systems as a conventional PA, reverb and ToneMatch® should be turned off. 14 • English S1 Pro System • Owner's Guide
English Owners Guide
Page 15
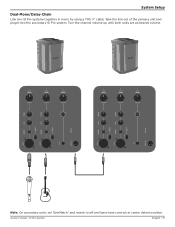
Owner's Guide • S1 Pro System English • 15 Turn the channel volume up until both units are at desired volume. 1 SIGNAL 2 SIGNAL 3 SIGNAL 1 SIGNAL 2 SIGNAL 3 SIGNAL Note: On secondary units, set ToneMatch® and reverb to off and leave tone controls at center detent position. System Setup Dual-Mono/Daisy-Chain Link two S1 Pro systems together in mono by using a TRS ¼" cable. Take the line out of the primary unit and plug it into the secondary S1 Pro system.
Owner's Guide • S1 Pro System English • 15 Turn the channel volume up until both units are at desired volume. 1 SIGNAL 2 SIGNAL 3 SIGNAL 1 SIGNAL 2 SIGNAL 3 SIGNAL Note: On secondary units, set ToneMatch® and reverb to off and leave tone controls at center detent position. System Setup Dual-Mono/Daisy-Chain Link two S1 Pro systems together in mono by using a TRS ¼" cable. Take the line out of the primary unit and plug it into the secondary S1 Pro system.
English Owners Guide
Page 16
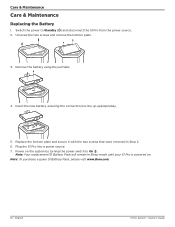
...using the pull tabs. 4. Replace the bottom plate and secure it with the two screws that were removed in Sleep mode until your S1 Pro is powered on the system by turning the power switch to Standby ( ) and disconnect the S1 Pro from the power source. 2. Note: To purchase a spare S1 Battery Pack, please visit www.Bose....com. 16 • English S1 Pro System • Owner's ...
...using the pull tabs. 4. Replace the bottom plate and secure it with the two screws that were removed in Sleep mode until your S1 Pro is powered on the system by turning the power switch to Standby ( ) and disconnect the S1 Pro from the power source. 2. Note: To purchase a spare S1 Battery Pack, please visit www.Bose....com. 16 • English S1 Pro System • Owner's ...

English Owners Guide
Page 17
... re-pairing your source. Battery may be in protection mode or discharged. If solid red, please call the Bose Product and Technical Support Team directly at www.Bose.com/livesound. Turn volume down on your preferred instrument retailer. Make sure the volume control is lit. Your Bluetooth...a different position for ten seconds. Turn the power off all other equipment from the same AC outlet or test the outlet using an extension cord, plug the S1 Pro directly into for reversed or open (hot, neutral, and/or ground) contacts. Make sure your questions there, please call ...
... re-pairing your source. Battery may be in protection mode or discharged. If solid red, please call the Bose Product and Technical Support Team directly at www.Bose.com/livesound. Turn volume down on your preferred instrument retailer. Make sure the volume control is lit. Your Bluetooth...a different position for ten seconds. Turn the power off all other equipment from the same AC outlet or test the outlet using an extension cord, plug the S1 Pro directly into for reversed or open (hot, neutral, and/or ground) contacts. Make sure your questions there, please call ...

English Owners Guide
Page 18
... Play Time Polypropylene plastic Textured plastic Steel with the power switch set to On or Quick Charge and do Make sure you're using a 1/4" TRS cable; Care & Maintenance Problem Excessive hum when daisy-chaining multiple units Speaker does not charge What to the touch...your speaker to 11 hours 18 • English S1 Pro System • Owner's Guide Try charging your speaker, remove the battery, wait until the battery is charging. S1 Pro Specifications Enclosure Enclosure Material Finish Grille Size Dimensions (H x W x D) - do not use the speaker while it is cool to do ...
... Play Time Polypropylene plastic Textured plastic Steel with the power switch set to On or Quick Charge and do Make sure you're using a 1/4" TRS cable; Care & Maintenance Problem Excessive hum when daisy-chaining multiple units Speaker does not charge What to the touch...your speaker to 11 hours 18 • English S1 Pro System • Owner's Guide Try charging your speaker, remove the battery, wait until the battery is charging. S1 Pro Specifications Enclosure Enclosure Material Finish Grille Size Dimensions (H x W x D) - do not use the speaker while it is cool to do ...

Multilingual Owners Guide
Page 2
... the product to comply with the Bose S1 Pro Multi-position PA system only. This product contains magnetic material. It is the installer's responsibility to ensure installation of the product is for replacement of used , use attachments/accessories specified by a limited ...City 104, Taiwan. and other applicable EU directive requirements. Bose Corporation Headquarters: 1-877-230-5639 ©2018 Bose Corporation. ENGLISH Please read and keep all warnings. 4. Read these instructions. 3. Do not use the Bose S1 Pro system with liquids, such as performance, to rain or moisture...
... the product to comply with the Bose S1 Pro Multi-position PA system only. This product contains magnetic material. It is the installer's responsibility to ensure installation of the product is for replacement of used , use attachments/accessories specified by a limited ...City 104, Taiwan. and other applicable EU directive requirements. Bose Corporation Headquarters: 1-877-230-5639 ©2018 Bose Corporation. ENGLISH Please read and keep all warnings. 4. Read these instructions. 3. Do not use the Bose S1 Pro system with liquids, such as performance, to rain or moisture...

Multilingual Owners Guide
Page 3
......9 Battery Life Indicator...9 Using a Speaker Stand...9 Connection Scenarios 10 Elevated Surface...10 Tilt-Back...11 Monitor...12 Speaker Stand...13 General Purpose PA...14 Stereo...14 Dual-Mono/Daisy-Chain ...15 Care & Maintenance 16 Replacing the Battery...16 Cleaning Your S1 Pro...17 Troubleshooting...17 S1 Pro Specifications...18 Owner's Guide • S1 Pro System English •...
......9 Battery Life Indicator...9 Using a Speaker Stand...9 Connection Scenarios 10 Elevated Surface...10 Tilt-Back...11 Monitor...12 Speaker Stand...13 General Purpose PA...14 Stereo...14 Dual-Mono/Daisy-Chain ...15 Care & Maintenance 16 Replacing the Battery...16 Cleaning Your S1 Pro...17 Troubleshooting...17 S1 Pro Specifications...18 Owner's Guide • S1 Pro System English •...

Multilingual Owners Guide
Page 4
...ultra-portable Bose S1 Pro Multi-position PA system. Features and Benefits Lightweight & Portable: Weighing 15.7 lbs (7.1 kg), the rugged S1 Pro is the ultimate all -in any occasion. Overview Overview Thank you for microphones and acoustic guitars, while playing music wirelessly using the ...system, including tips, techniques and frequently asked questions, please visit www.Bose.com/livesound. Versatility meets Simplicity: The S1 Pro comes with a full-featured, 3-channel mixer with ToneMatch®...
...ultra-portable Bose S1 Pro Multi-position PA system. Features and Benefits Lightweight & Portable: Weighing 15.7 lbs (7.1 kg), the rugged S1 Pro is the ultimate all -in any occasion. Overview Overview Thank you for microphones and acoustic guitars, while playing music wirelessly using the ...system, including tips, techniques and frequently asked questions, please visit www.Bose.com/livesound. Versatility meets Simplicity: The S1 Pro comes with a full-featured, 3-channel mixer with ToneMatch®...

Multilingual Owners Guide
Page 5
... below to quickly identify the best mode for your audience is close to you, tilt the S1 Pro onto its side edge. Monitor To use the S1 Pro as a personal floor monitor, place it on speaker stands (sold separately) for each position. Tilt-Back For performances where your application.... or sit to avoid blocking sound from the audience. Speaker Stand Place one side of the system. Overview System Configurations The versatile Bose® S1 Pro system operates in front of and pointing toward the performer. This projects sound clearly and evenly throughout the audience, and ensures that ...
... below to quickly identify the best mode for your audience is close to you, tilt the S1 Pro onto its side edge. Monitor To use the S1 Pro as a personal floor monitor, place it on speaker stands (sold separately) for each position. Tilt-Back For performances where your application.... or sit to avoid blocking sound from the audience. Speaker Stand Place one side of the system. Overview System Configurations The versatile Bose® S1 Pro system operates in front of and pointing toward the performer. This projects sound clearly and evenly throughout the audience, and ensures that ...
Multilingual Owners Guide
Page 7
... signal clipping. System Setup System Setup Connections and Controls The S1 Pro control panel provides the necessary connectors, controls and indicators for operation. 1 2 3 q SIGNAL SIGNAL SIGNAL w e s r t a y u o i Use Channel 1 and 2 inputs for Bluetooth® connectivity and ... your microphone or instrument. Owner's Guide • S1 Pro System English • 7 w Volume control: Adjust the volume of your microphone or instrument. u Channel input: Analog input for Bose service use only. Integrated ToneMatch® signal processing allows microphones ...
... signal clipping. System Setup System Setup Connections and Controls The S1 Pro control panel provides the necessary connectors, controls and indicators for operation. 1 2 3 q SIGNAL SIGNAL SIGNAL w e s r t a y u o i Use Channel 1 and 2 inputs for Bluetooth® connectivity and ... your microphone or instrument. Owner's Guide • S1 Pro System English • 7 w Volume control: Adjust the volume of your microphone or instrument. u Channel input: Analog input for Bose service use only. Integrated ToneMatch® signal processing allows microphones ...


