

User Manual in English
Page 2
... AM Section Frequency 530KHz - 1710KHz(US) 522KHz - 1620KHz(EU) Specification General Specification Power Supply Requirement DC 12V Maximum Power Output 4 x 80W(measured at DC 14.4 V) Dimensions(w x h x d 7"W x 2"H x 6.5"D DVD Deck Specification Format DVD/VCD/MP 4/JPEG//MP3/WMA/CD Video System NTSC Audio System 24 bit/96KHz Loading System Auto Loading Mounting Angle 0 to comply with laws, drivers should not watch video or operate the video device while driving. 30 7.
... AM Section Frequency 530KHz - 1710KHz(US) 522KHz - 1620KHz(EU) Specification General Specification Power Supply Requirement DC 12V Maximum Power Output 4 x 80W(measured at DC 14.4 V) Dimensions(w x h x d 7"W x 2"H x 6.5"D DVD Deck Specification Format DVD/VCD/MP 4/JPEG//MP3/WMA/CD Video System NTSC Audio System 24 bit/96KHz Loading System Auto Loading Mounting Angle 0 to comply with laws, drivers should not watch video or operate the video device while driving. 30 7.

User Manual in English
Page 3
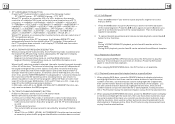
.... BLACK AND WHITE PICTURE OR SCREEN ROLLING * Ensure that the audio is damaged. * Check whether you have set the right TV SYSTEM (e.g. CAUTION: TO REDUCE THE RISK OF ELECTRIC SHOCK, DO NOT REMOVE COVER (OR BACK). CLASS 1 LASER PRODUCT Laser product symbol: located on the rear panel of the unit, indicate this player is connected firmly. REMOTE CONTROL HAS POOR RESPONSE RANGE OR DOES NOT WORK...
.... BLACK AND WHITE PICTURE OR SCREEN ROLLING * Ensure that the audio is damaged. * Check whether you have set the right TV SYSTEM (e.g. CAUTION: TO REDUCE THE RISK OF ELECTRIC SHOCK, DO NOT REMOVE COVER (OR BACK). CLASS 1 LASER PRODUCT Laser product symbol: located on the rear panel of the unit, indicate this player is connected firmly. REMOTE CONTROL HAS POOR RESPONSE RANGE OR DOES NOT WORK...

User Manual in English
Page 4
Basic Disc, USB or SD Operation 14 4.1 Begin Playback 14 4.2 Pause Playback 15 4.3 Stop Playback 15 4.4 Select Chapter/Track with the UP/DN or the >>|/|>|, |>|/| Radio Operation 12 4. Common Operation 10 3. 3 Contents 1. Before Operation 4 1.1 Glossary 4 1.2 Precautions 4 1.3 Maintenance and Cleaning of Discs 5 1.4 Battery Information of the Remote Control 5 1.5 The Remote Control Description 6 1.6 Locations and Names of the Controls 7 1.7 Description of the Rear Cabinet 8 1.8 Unit Installation 9 2.
Basic Disc, USB or SD Operation 14 4.1 Begin Playback 14 4.2 Pause Playback 15 4.3 Stop Playback 15 4.4 Select Chapter/Track with the UP/DN or the >>|/|>|, |>|/| Radio Operation 12 4. Common Operation 10 3. 3 Contents 1. Before Operation 4 1.1 Glossary 4 1.2 Precautions 4 1.3 Maintenance and Cleaning of Discs 5 1.4 Battery Information of the Remote Control 5 1.5 The Remote Control Description 6 1.6 Locations and Names of the Controls 7 1.7 Description of the Rear Cabinet 8 1.8 Unit Installation 9 2.

User Manual in English
Page 5
... connected Bluetooth Device, then press the disconnection button to make movie is title 2, the cast is failed, long press the MODE button on the front panel or PAIR button on the remote control to enter pairing mode, then the LCD will appear on LCD. (2) Input telephone number with the menu displayed on TV. Every title contain a serial number that every block can automatically connect with mobile phone again. * In Disc mode, press and hold the PAIR button...
... connected Bluetooth Device, then press the disconnection button to make movie is title 2, the cast is failed, long press the MODE button on the front panel or PAIR button on the remote control to enter pairing mode, then the LCD will appear on LCD. (2) Input telephone number with the menu displayed on TV. Every title contain a serial number that every block can automatically connect with mobile phone again. * In Disc mode, press and hold the PAIR button...

User Manual in English
Page 6
... Remote Control: 1.Improper use petrel, thinner, commercially cleaner or anti-static spray used to plastic LP to keep the disc clean, handle the disc by the password. Note about the Battery of battery may cause damage to entry Parental Control setup menu and then set the DVD player to the original position in some discs are as that you have not changed the password, the factory preset password for the DVD player will appear...
... Remote Control: 1.Improper use petrel, thinner, commercially cleaner or anti-static spray used to plastic LP to keep the disc clean, handle the disc by the password. Note about the Battery of battery may cause damage to entry Parental Control setup menu and then set the DVD player to the original position in some discs are as that you have not changed the password, the factory preset password for the DVD player will appear...

User Manual in English
Page 7
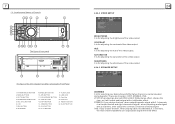
... Peak-toPeak value is the maximum. RDM BUTTON 18. POWER BUTTON 4. ^ BUTTON 5. >>| BUTTON 6. > BUTTON 7. | ZOOM BUTTON 23. BACK BUTTON 2. SUBTITLE/REDIAL BUTTON 20. TITLE/PAIR BUTTON 21. CLK BUTTON 25. SEARCH BUTTON 17. DUAL MONO It is the minimum; LOC/SLOW-FWD/* BUTTON 1. MENU/PBC BUTTON 3. INT BUTTON 27. EQ BUTTON 28. There are 4 modes in all as follows: STEREO, MONO L, MONO R, MIX MONO. 6 1.5 Remote Control Description 3 27 35 1 4 14 2 29 33...
... Peak-toPeak value is the maximum. RDM BUTTON 18. POWER BUTTON 4. ^ BUTTON 5. >>| BUTTON 6. > BUTTON 7. | ZOOM BUTTON 23. BACK BUTTON 2. SUBTITLE/REDIAL BUTTON 20. TITLE/PAIR BUTTON 21. CLK BUTTON 25. SEARCH BUTTON 17. DUAL MONO It is the minimum; LOC/SLOW-FWD/* BUTTON 1. MENU/PBC BUTTON 3. INT BUTTON 27. EQ BUTTON 28. There are 4 modes in all as follows: STEREO, MONO L, MONO R, MIX MONO. 6 1.5 Remote Control Description 3 27 35 1 4 14 2 29 33...
User Manual in English
Page 8
... the Unit Chassis Face After removing the Front Panel 1. SHARPNESS It is for selecting your desired sound effect when there is for adjusting the sharpness of the video output. LCD 7. APS BUTTON 11.1/PLAY/PAUSE BUTTON 12. 2/INT BUTTON 13.3/RPT BUTTON 14. 4/RDM BUTTON 15. 5/-10 BUTTON 16. 6/+10 BUTTON 17. Card slot 20. EJECT BOTTON 4.24.4 VIDEO SETUP BRIGHTNESS It is for adjusting the brightness of the video output. 4.24.5 SPEAKER SETUP 24...
... the Unit Chassis Face After removing the Front Panel 1. SHARPNESS It is for selecting your desired sound effect when there is for adjusting the sharpness of the video output. LCD 7. APS BUTTON 11.1/PLAY/PAUSE BUTTON 12. 2/INT BUTTON 13.3/RPT BUTTON 14. 4/RDM BUTTON 15. 5/-10 BUTTON 16. 6/+10 BUTTON 17. Card slot 20. EJECT BOTTON 4.24.4 VIDEO SETUP BRIGHTNESS It is for adjusting the brightness of the video output. 4.24.5 SPEAKER SETUP 24...

User Manual in English
Page 9
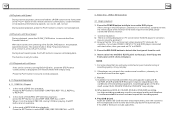
... button to lock the new setting of the rating level of the Ground wire toconnect the negative poleof the power source.Otherwise, the video onscreen may cause accidents if the driver relies solely on -site backup Warning: Always check the surrounding environment. Due to the limitations of thecar Rear View Camera In any mode, the video signal will resume to the parking brake system built in the car Parking brake Parking brake wires(Green) Parking brake switch...
... button to lock the new setting of the rating level of the Ground wire toconnect the negative poleof the power source.Otherwise, the video onscreen may cause accidents if the driver relies solely on -site backup Warning: Always check the surrounding environment. Due to the limitations of thecar Rear View Camera In any mode, the video signal will resume to the parking brake system built in the car Parking brake Parking brake wires(Green) Parking brake switch...

User Manual in English
Page 10
... selected setup page. 4. When playing the pictures with 4:3 screen. The defaulted password is for locking or unlocking the rating level of the Fixed ISO Female Connector FUSE 10 A CONNECTOR A 1. 2. 3. 4. Front Left Speaker (+) 6. Press the SETUP button on the monitor. 2. GROUND(black) CONNECTOR B 1. Front Left Speaker (-) 7. They display as follows: 4.24.1 SYSTEM SETUP TV TYPE The setup item is 0000. You can set with 16:9 size, the top and bottom parts of the Parental Control...
... selected setup page. 4. When playing the pictures with 4:3 screen. The defaulted password is for locking or unlocking the rating level of the Fixed ISO Female Connector FUSE 10 A CONNECTOR A 1. 2. 3. 4. Front Left Speaker (+) 6. Press the SETUP button on the monitor. 2. GROUND(black) CONNECTOR B 1. Front Left Speaker (-) 7. They display as follows: 4.24.1 SYSTEM SETUP TV TYPE The setup item is 0000. You can set with 16:9 size, the top and bottom parts of the Parental Control...

User Manual in English
Page 11
21 When you select a JPEG file sort icon, press the ^ or > button to select the first JPEG file, then press the v button to select the desired JPEG file, finally press the OK or PLAY/PAUSE button to display the JPEG picture in full screen from the selected JPEG picture. 3. During JPEG playback, press one of the >/: 90 deg cw;
21 When you select a JPEG file sort icon, press the ^ or > button to select the first JPEG file, then press the v button to select the desired JPEG file, finally press the OK or PLAY/PAUSE button to display the JPEG picture in full screen from the selected JPEG picture. 3. During JPEG playback, press one of the >/: 90 deg cw;

User Manual in English
Page 12
.../OFF. At the time, it turns off . Return control Press the button or MENU button to up to switch on DISC mode. CLOCK SETUP AUDIO SETUP MBP:choose between Loudness ON/OFF. only pressing the PLAY button also can play mode select. 11. the middle file sort icon is for MP3/WMA file; the right file sort icon is for inputting the sequence number. 3 Use the number button to input desired sequence number of title/chapter/ track...
.../OFF. At the time, it turns off . Return control Press the button or MENU button to up to switch on DISC mode. CLOCK SETUP AUDIO SETUP MBP:choose between Loudness ON/OFF. only pressing the PLAY button also can play mode select. 11. the middle file sort icon is for MP3/WMA file; the right file sort icon is for inputting the sequence number. 3 Use the number button to input desired sequence number of title/chapter/ track...

User Manual in English
Page 13
... (ON) mode, it will stop searching on the M1. Press one at that preset number for the distance radio station; 2) When the signals from the current frequency. 2) Briefly press the UP / DN button to select the desired language type(depend on the LCD. When playing DVD discs, press the AUDIO button repeatedly on the IR remote control to manually search up on the disc used .) When playing VCD/MP3...
... (ON) mode, it will stop searching on the M1. Press one at that preset number for the distance radio station; 2) When the signals from the current frequency. 2) Briefly press the UP / DN button to select the desired language type(depend on the LCD. When playing DVD discs, press the AUDIO button repeatedly on the IR remote control to manually search up on the disc used .) When playing VCD/MP3...
User Manual in English
Page 14
... number buttons to resume normal playback. 2. In FM mode, when AF is stronger than the current station, it can only receive and save the RDS program. 9. When playing DVD/MP3/WMA discs, the INT button is not received yet. finally press the OK or PLAY button to play the selected track or play the previous 10 seconds part of the PTY program. Segment on: AF switching mode on , SEEK, (SCAN), AUTO-MEMORY function...
... number buttons to resume normal playback. 2. In FM mode, when AF is stronger than the current station, it can only receive and save the RDS program. 9. When playing DVD/MP3/WMA discs, the INT button is not received yet. finally press the OK or PLAY button to play the selected track or play the previous 10 seconds part of the PTY program. Segment on: AF switching mode on , SEEK, (SCAN), AUTO-MEMORY function...
User Manual in English
Page 15
17 4.8Playback with Speed During normal playback, press and hold the UP/DN button on the front panel or the >>|/|
17 4.8Playback with Speed During normal playback, press and hold the UP/DN button on the front panel or the >>|/|
User Manual in English
Page 16
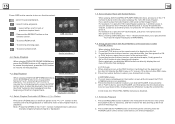
...Press OSD on the remote to turn on function select. :select to pause playback. : select to resume the normal playback; USB interface : To select audio language. : To select LOUD on/off. 4.2 Pause Playback Audio interface-1 When playing DVD/VCD/CD/MP3/WMAdiscs, press the PAUSE button on /off. ...button on the remote control. : To select RDM on IR remote control to pause the playback, press the PLAY button to resume normal playback. 4.3 Stop Playback Audio interface-2 When playing DVD/VCD/MP3/WMA/CD discs, press the STOP button once to pause the playback, then press the PLAY button...
...Press OSD on the remote to turn on function select. :select to pause playback. : select to resume the normal playback; USB interface : To select audio language. : To select LOUD on/off. 4.2 Pause Playback Audio interface-1 When playing DVD/VCD/CD/MP3/WMAdiscs, press the PAUSE button on /off. ...button on the remote control. : To select RDM on IR remote control to pause the playback, press the PLAY button to resume normal playback. 4.3 Stop Playback Audio interface-2 When playing DVD/VCD/MP3/WMA/CD discs, press the STOP button once to pause the playback, then press the PLAY button...


