Command Reference Guide for Software Developers
Page 270
...Future printers may send a response of the status of the specified PJL Default setting (PJL Current Environment) set by @PJL SET or @PJL RESET command DINQUIRE ... requests a specified category of the specified User Default setting (User Default Environment) set by @PJL DEFAULT or @PJL... will help you to program the application to learn how to send back unsolicited information. USTATUSOFF ... turns off -line state, toner empty, displayed prompt message on the LCD and other in a readable ASCII format. Each line in the PJL status responses is in programming...
...Future printers may send a response of the status of the specified PJL Default setting (PJL Current Environment) set by @PJL SET or @PJL RESET command DINQUIRE ... requests a specified category of the specified User Default setting (User Default Environment) set by @PJL DEFAULT or @PJL... will help you to program the application to learn how to send back unsolicited information. USTATUSOFF ... turns off -line state, toner empty, displayed prompt message on the LCD and other in a readable ASCII format. Each line in the PJL status responses is in programming...

Online Users Guide HTML
Page 4
... Brother Machine Cannot Print over the Network 295 I Want to Check that My Network Devices are Working Correctly 297 Google Cloud Print Problems...298 AirPrint Problems ...299 Other Problems ...300 Check the Machine Information ...302 Reset Functions ...303 Machine Reset ...304 Network Reset ...305 Factory Reset ...306 Routine Maintenance ...307 Replace Supplies ...308 Replace the Toner...
... Brother Machine Cannot Print over the Network 295 I Want to Check that My Network Devices are Working Correctly 297 Google Cloud Print Problems...298 AirPrint Problems ...299 Other Problems ...300 Check the Machine Information ...302 Reset Functions ...303 Machine Reset ...304 Network Reset ...305 Factory Reset ...306 Routine Maintenance ...307 Replace Supplies ...308 Replace the Toner...
Online Users Guide HTML
Page 5
... ...334 Clean the Paper Pick-up Rollers ...342 Calibrate Color Output ...343 Reset the Machine's Calibration Settings 344 Correct Color Print Alignment (Color Registration 345 Check the Remaining Part Life ...346 Pack and Ship Your Brother Machine ...347 Replace Periodic Maintenance Parts ...349 Machine Settings...350 Change Machine Settings... from Your Computer 381 Change Machine Settings Using Web Based Management 382 Appendix...386 Specifications ...387 How to Enter Text on Your Brother Machine 392 Supplies ...394 Important Information About Toner Cartridge Life 396 Accessories...397...
... ...334 Clean the Paper Pick-up Rollers ...342 Calibrate Color Output ...343 Reset the Machine's Calibration Settings 344 Correct Color Print Alignment (Color Registration 345 Check the Remaining Part Life ...346 Pack and Ship Your Brother Machine ...347 Replace Periodic Maintenance Parts ...349 Machine Settings...350 Change Machine Settings... from Your Computer 381 Change Machine Settings Using Web Based Management 382 Appendix...386 Specifications ...387 How to Enter Text on Your Brother Machine 392 Supplies ...394 Important Information About Toner Cartridge Life 396 Accessories...397...

Online Users Guide HTML
Page 264
... on the LCD and set the tray for the tray. Remove the printed pages, and then press Go. Pull out the drum unit. Reset the drum unit counter. See the instructions included with the new drum unit. The fuser unit is time to replace the belt unit. Press.... Perform the color registration using the control panel. • Install a new belt unit. • If the problem continues, contact Brother Customer Service or your local Brother dealer. Error Message Registration Replace Belt Replace Drum Replace Toner Replace WT Box Self-Diagnostic Short paper Size Error Size Error DX Size Mismatch...
... on the LCD and set the tray for the tray. Remove the printed pages, and then press Go. Pull out the drum unit. Reset the drum unit counter. See the instructions included with the new drum unit. The fuser unit is time to replace the belt unit. Press.... Perform the color registration using the control panel. • Install a new belt unit. • If the problem continues, contact Brother Customer Service or your local Brother dealer. Error Message Registration Replace Belt Replace Drum Replace Toner Replace WT Box Self-Diagnostic Short paper Size Error Size Error DX Size Mismatch...

Online Users Guide HTML
Page 269
.... Order a new belt unit before the LCD you can still print. Replace the drum unit with a new one . Reset the drum unit counter. One or more toner cartridges are not installed or not installed correctly. Reduce the number of paper for the tray. Unplug the device from the... size. The drum unit counter was not reset when a new drum was installed. If the LCD displays this message, Order a new toner cartridge before the LCD displays Replace Belt. Order a new waste toner box before the LCD its life. Remove all the toner cartridges, and then put them back into...
.... Order a new belt unit before the LCD you can still print. Replace the drum unit with a new one . Reset the drum unit counter. One or more toner cartridges are not installed or not installed correctly. Reduce the number of paper for the tray. Unplug the device from the... size. The drum unit counter was not reset when a new drum was installed. If the LCD displays this message, Order a new toner cartridge before the LCD displays Replace Belt. Order a new waste toner box before the LCD its life. Remove all the toner cartridges, and then put them back into...
Online Users Guide HTML
Page 290
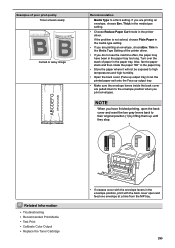
... • If creases occur with the envelope levers in the envelope position, print with the back cover open the back cover and reset the two gray levers back to their original position (1) by lifting them up output tray. • Make sure the envelope levers inside the back cover ... solved, choose Plain Paper in the media type setting. • If you are printing an envelope, chooseEnv. Turn over the stack of poor print quality Toner smears easily Curled or wavy image Envelope creases Recommendation Media Type to the envelope position when you have been in the paper tray too long...
... • If creases occur with the envelope levers in the envelope position, print with the back cover open the back cover and reset the two gray levers back to their original position (1) by lifting them up output tray. • Make sure the envelope levers inside the back cover ... solved, choose Plain Paper in the media type setting. • If you are printing an envelope, chooseEnv. Turn over the stack of poor print quality Toner smears easily Curled or wavy image Envelope creases Recommendation Media Type to the envelope position when you have been in the paper tray too long...

Online Users Guide HTML
Page 314
Belt unit Waste toner box Related Information • Routine Maintenance • Replace the Toner Cartridge • Replace the Drum Unit • Replace the Belt Unit • Replace the Waste Toner Box • Reset the Drum Counter • Reset the Belt Unit Counter • Error and Maintenance Messages • Supplies 309
Belt unit Waste toner box Related Information • Routine Maintenance • Replace the Toner Cartridge • Replace the Drum Unit • Replace the Belt Unit • Replace the Waste Toner Box • Reset the Drum Counter • Reset the Belt Unit Counter • Error and Maintenance Messages • Supplies 309

Online Users Guide HTML
Page 320
Turn the green lock lever clockwise to function; See Related Information: Reset the Drum Counter. however, print quality may not be optimal. 315 In designing this product, Brother decided to replace the drum. Close the machine's front cover. Using the green handle, push the drum unit...reaches the factoryestablished rotation limit corresponding to use the number of rotations of the drum as a reasonable determinant of the drum and interaction with paper, toner and other materials in place. 13. 2 2 2 1 10. NOTE • Drum wear and tear occurs due to the rated page ...
Turn the green lock lever clockwise to function; See Related Information: Reset the Drum Counter. however, print quality may not be optimal. 315 In designing this product, Brother decided to replace the drum. Close the machine's front cover. Using the green handle, push the drum unit...reaches the factoryestablished rotation limit corresponding to use the number of rotations of the drum as a reasonable determinant of the drum and interaction with paper, toner and other materials in place. 13. 2 2 2 1 10. NOTE • Drum wear and tear occurs due to the rated page ...
Online Users Guide HTML
Page 321
... many factors that determine the actual drum life, we have no control over the many factors that will be printed by the use only genuine Brother toner. • The machine should be affected due to media type and media size. Under ideal conditions, the average drum life is placed in a clean, dust..., humidity, type of paper, type of the machine itself. Related Information • Replace Supplies • Error and Maintenance Messages • Improve the Print Quality • Reset the Drum Counter 316
... many factors that determine the actual drum life, we have no control over the many factors that will be printed by the use only genuine Brother toner. • The machine should be affected due to media type and media size. Under ideal conditions, the average drum life is placed in a clean, dust..., humidity, type of paper, type of the machine itself. Related Information • Replace Supplies • Error and Maintenance Messages • Improve the Print Quality • Reset the Drum Counter 316

Online Users Guide HTML
Page 348
... OK. Select [Calibrate]. Press Cancel. Press [Yes]. Press . Related Information • Routine Maintenance • Reset the Machine's Calibration Settings • Improve the Print Quality • Monitor the Status of the Machine from Your ... data manually, you are using Brother's Status Monitor. >> HL-L8260CDW >> HL-L8360CDW/HL-L8360CDWT HL-L8260CDW 1. c. Calibration starts automatically, and will take a few minutes. 3. Select [Color Correction]. d. b. Select [Calibration]. Press a to select the following: a. Press [Toner] > [Calibration] > [Calibrate...
... OK. Select [Calibrate]. Press Cancel. Press [Yes]. Press . Related Information • Routine Maintenance • Reset the Machine's Calibration Settings • Improve the Print Quality • Monitor the Status of the Machine from Your ... data manually, you are using Brother's Status Monitor. >> HL-L8260CDW >> HL-L8360CDW/HL-L8360CDWT HL-L8260CDW 1. c. Calibration starts automatically, and will take a few minutes. 3. Select [Color Correction]. d. b. Select [Calibration]. Press a to select the following: a. Press [Toner] > [Calibration] > [Calibrate...

Online Users Guide HTML
Page 349
... Machine's Calibration Settings If the output color differs from what you see on your monitor, try resetting your machine's calibration parameters. >> HL-L8260CDW >> HL-L8360CDW/HL-L8360CDWT HL-L8260CDW 1. Select [Color Correction]. c. Select [Reset]. Press a to select the following: a. Press [Toner] > [Calibration] > [Reset]. 2. Press . HL-L8360CDW/HL-L8360CDWT 1. Press a or b to select the [Yes] option. 3. Press OK. Press OK. b. Press OK. d. Press...
... Machine's Calibration Settings If the output color differs from what you see on your monitor, try resetting your machine's calibration parameters. >> HL-L8260CDW >> HL-L8360CDW/HL-L8360CDWT HL-L8260CDW 1. Select [Color Correction]. c. Select [Reset]. Press a to select the following: a. Press [Toner] > [Calibration] > [Reset]. 2. Press . HL-L8360CDW/HL-L8360CDWT 1. Press a or b to select the [Yes] option. 3. Press OK. Press OK. b. Press OK. d. Press...

Online Users Guide HTML
Page 373
...the total monochrome printed pages. Fuser - Display the remaining life of your network administrator before changing this setting. PF Kit 1 - Reset Level 4 - - Restore all network settings of the laser unit. If a boot server cannot be found, an APIPA IP ... 3 Level 4 Description Serial No. - - Display the machine's serial number. Sub1 Version - Page Counter Total - Color - Parts Life 1 Toner Black(BK) Display the remaining life of data saved in the memory. Cyan(C) Magenta(M) Yellow(Y) Drum - Belt - Display the remaining life of the...
...the total monochrome printed pages. Fuser - Display the remaining life of your network administrator before changing this setting. PF Kit 1 - Reset Level 4 - - Restore all network settings of the laser unit. If a boot server cannot be found, an APIPA IP ... 3 Level 4 Description Serial No. - - Display the machine's serial number. Sub1 Version - Page Counter Total - Color - Parts Life 1 Toner Black(BK) Display the remaining life of data saved in the memory. Cyan(C) Magenta(M) Yellow(Y) Drum - Belt - Display the remaining life of the...

Online Users Guide HTML
Page 376
... - - Select the tray that matches the paper in the standard paper tray. View the approximate remaining toner life. Reset Reset the calibration parameters to display a message telling you that the paper tray is nearly empty. Access the ...Settings from the Control Panel > Settings and Features Tables > Settings Tables (HL-L8360CDW/HL-L8360CDWT) Settings Tables (HL-L8360CDW/HL-L8360CDWT) Related Models: HL-L8360CDW/HL-L8360CDWT [Settings] Level 2 Level 3 Level 4 Descriptions Toner Toner Life - Select the paper type that matches the paper in the Optional ...
... - - Select the tray that matches the paper in the standard paper tray. View the approximate remaining toner life. Reset Reset the calibration parameters to display a message telling you that the paper tray is nearly empty. Access the ...Settings from the Control Panel > Settings and Features Tables > Settings Tables (HL-L8360CDW/HL-L8360CDWT) Settings Tables (HL-L8360CDW/HL-L8360CDWT) Related Models: HL-L8360CDW/HL-L8360CDWT [Settings] Level 2 Level 3 Level 4 Descriptions Toner Toner Life - Select the paper type that matches the paper in the Optional ...

Online Users Guide HTML
Page 383
...an Internet service. Print the test page. Align the print position of the machine. Reset Reset the calibration parameters to check and correct colors. WPS Configure your wireless network settings using...HL-L8360CDW/HL-L8360CDWT) Related Models: HL-L8360CDW/HL-L8360CDWT (Toner) Level 2 Level 3 Level 4 Descriptions (Toner) Toner Life Test Print - View the approximate remaining toner life for each color. (Wi-Fi Setup) Level 2 Level 3 (Wi-Fi Setup) TCP/IP 1 Descriptions Change the TCP/IP settings. Setup Wizard Configure the wireless network settings using the Brother...
...an Internet service. Print the test page. Align the print position of the machine. Reset Reset the calibration parameters to check and correct colors. WPS Configure your wireless network settings using...HL-L8360CDW/HL-L8360CDWT) Related Models: HL-L8360CDW/HL-L8360CDWT (Toner) Level 2 Level 3 Level 4 Descriptions (Toner) Toner Life Test Print - View the approximate remaining toner life for each color. (Wi-Fi Setup) Level 2 Level 3 (Wi-Fi Setup) TCP/IP 1 Descriptions Change the TCP/IP settings. Setup Wizard Configure the wireless network settings using the Brother...


