
Users Manual - English and Spanish
Page 3
... manual. • Keep fingers away from all moving parts. Special care is required around the machine needle. • Switch the machine to the symbol "O" position to turn it must be supervised to break. • Do not push or pull the fabric when sewing, and follow the troubleshooting table in should be replaced by authorized dealer. • In the event a malfunction occurs or adjustment...
... manual. • Keep fingers away from all moving parts. Special care is required around the machine needle. • Switch the machine to the symbol "O" position to turn it must be supervised to break. • Do not push or pull the fabric when sewing, and follow the troubleshooting table in should be replaced by authorized dealer. • In the event a malfunction occurs or adjustment...
Users Manual - English and Spanish
Page 4
...20 Sewing stretch fabrics 20 Stitching cylindrical pieces 20 Sewing with a twin needle (Option 20 Thread tension 22 3. KNOWING YOUR SEWING MACHINE 4 ACCESSORIES 4 Optional accessories 4 THE MAIN PARTS 5 Flat bed attachment 5 USING YOUR SEWING MACHINE 6 Connecting plugs 6 Main power and sewing light switch 7 Foot controller 7 Checking the needle 7 Replacing the needle 7 Changing the presser foot 8 THE CONTROLS 9 Pattern selection dial 9 Patterns and stitch names 9 Reverse sewing lever 10 THREADING THE MACHINE 11 Winding the bobbin 11 Lower threading 13 Upper threading 14...
...20 Sewing stretch fabrics 20 Stitching cylindrical pieces 20 Sewing with a twin needle (Option 20 Thread tension 22 3. KNOWING YOUR SEWING MACHINE 4 ACCESSORIES 4 Optional accessories 4 THE MAIN PARTS 5 Flat bed attachment 5 USING YOUR SEWING MACHINE 6 Connecting plugs 6 Main power and sewing light switch 7 Foot controller 7 Checking the needle 7 Replacing the needle 7 Changing the presser foot 8 THE CONTROLS 9 Pattern selection dial 9 Patterns and stitch names 9 Reverse sewing lever 10 THREADING THE MACHINE 11 Winding the bobbin 11 Lower threading 13 Upper threading 14...

Users Manual - English and Spanish
Page 5
... Extra spool pin 2 Twin needle (2.0/75 needle) 3 Walking Foot 4 Quilting Foot Part Code Americas Others XE2241-001 X57521-021 SA107 SA129 F034N: XC2165-002 F005N: XC1948-002 No. Part Name 5 1/4-inch Quilting Foot 6 Narrow Hemmer Foot 7 Blind Stitch Foot 8 Quilting guide Part Code Americas Others SA125 F001N: XC1944-052 SA127 F003N: XC1945-002 SA134 F018N: XC1976-052 SA132 F016N: XC2215-002 4 No. Depending on the machine model. Part Name 1 Zigzag foot "J" (on machine) 2 Buttonhole foot "A" 3 Zipper foot "I" 4 Darning Plate 5 Button sewing foot "M" Part Code...
... Extra spool pin 2 Twin needle (2.0/75 needle) 3 Walking Foot 4 Quilting Foot Part Code Americas Others XE2241-001 X57521-021 SA107 SA129 F034N: XC2165-002 F005N: XC1948-002 No. Part Name 5 1/4-inch Quilting Foot 6 Narrow Hemmer Foot 7 Blind Stitch Foot 8 Quilting guide Part Code Americas Others SA125 F001N: XC1944-052 SA127 F003N: XC1945-002 SA134 F018N: XC1976-052 SA132 F016N: XC2215-002 4 No. Depending on the machine model. Part Name 1 Zigzag foot "J" (on machine) 2 Buttonhole foot "A" 3 Zipper foot "I" 4 Darning Plate 5 Button sewing foot "M" Part Code...
Users Manual - English and Spanish
Page 6
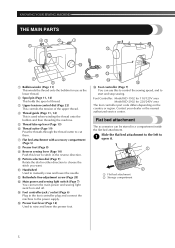
E Presser foot lever (Page 14) Used to manually raise and lower the needle. Foot Controller: Model KD-1902 for 110/120V area Model KD-2902 for use this lever to stitch in the reverse direction. 0 Pattern selection dial (Page 9) Rotate the dial in a compartment inside the flat bed attachment. Contact your dealer or the nearest authorized service center. KNOWING YOUR SEWING MACHINE THE MAIN PARTS 43 2 1 5 A 6 0 7 9 8 1 Bobbin winder (Page 11) This winds the thread onto the bobbin for 220/240V...
E Presser foot lever (Page 14) Used to manually raise and lower the needle. Foot Controller: Model KD-1902 for 110/120V area Model KD-2902 for use this lever to stitch in the reverse direction. 0 Pattern selection dial (Page 9) Rotate the dial in a compartment inside the flat bed attachment. Contact your dealer or the nearest authorized service center. KNOWING YOUR SEWING MACHINE THE MAIN PARTS 43 2 1 5 A 6 0 7 9 8 1 Bobbin winder (Page 11) This winds the thread onto the bobbin for 220/240V...
Users Manual - English and Spanish
Page 9
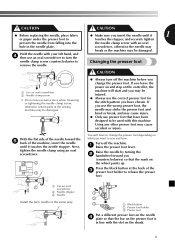
... 2 Needle clamp screw • Do not use an oval screwdriver to release the presser foot. 1 1 Use an oval screwdriver 2 Needle stopper 3 Needle Install the twin needle in the needle plate. Turn off the machine before you (counterclockwise) so that the bar on the presser foot is in line with an oval hole in the same way. 1 2 3 1 Black button 2 Presser foot holder 3 Presser foot Put a different presser foot on the needle 4 plate so that the mark on the shank. 8 Raise the needle...
... 2 Needle clamp screw • Do not use an oval screwdriver to release the presser foot. 1 1 Use an oval screwdriver 2 Needle stopper 3 Needle Install the twin needle in the needle plate. Turn off the machine before you (counterclockwise) so that the bar on the presser foot is in line with an oval hole in the same way. 1 2 3 1 Black button 2 Presser foot holder 3 Presser foot Put a different presser foot on the needle 4 plate so that the mark on the shank. 8 Raise the needle...
Users Manual - English and Spanish
Page 10
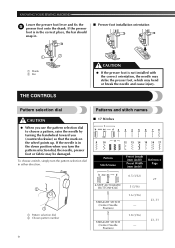
... needle, presser foot or fabric may bend or break the needle and cause injury. Pattern selection dial Patterns and stitch names CAUTION ● When you use the pattern selection dial to choose a pattern, raise the needle by turning the handwheel toward you turn the pattern selection dial in either direction. 2 1 1 Pattern selection dial 2 Chosen pattern number ■ 17 Stitches 1 2 3 4 5 6 78 9 10 11 12 13 14 15 16 17 Pattern Stitch Name 1 4-STEP AUTOMATIC BUTTONHOLE 2 STRAIGHT STITCH (Center Needle Position) 3 STRAIGHT STITCH (Center Needle Position) Preset Length...
... needle, presser foot or fabric may bend or break the needle and cause injury. Pattern selection dial Patterns and stitch names CAUTION ● When you use the pattern selection dial to choose a pattern, raise the needle by turning the handwheel toward you turn the pattern selection dial in either direction. 2 1 1 Pattern selection dial 2 Chosen pattern number ■ 17 Stitches 1 2 3 4 5 6 78 9 10 11 12 13 14 15 16 17 Pattern Stitch Name 1 4-STEP AUTOMATIC BUTTONHOLE 2 STRAIGHT STITCH (Center Needle Position) 3 STRAIGHT STITCH (Center Needle Position) Preset Length...
Users Manual - English and Spanish
Page 14
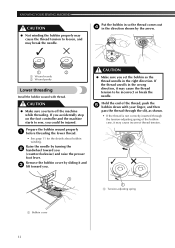
... break the needle. CAUTION ● Make sure you turn off the machine while threading. Remove the bobbin cover by turning the 2 handwheel toward you (counterclockwise) and raise the presser foot lever. If the thread unrolls in the wrong direction, it and 3 lift toward you . KNOWING YOUR SEWING MACHINE CAUTION ● Not winding the bobbin properly may cause the thread tension to loosen, and may cause incorrect thread tension. 1 1 1 Tension-adjusting spring 1 Bobbin cover 13 Put the bobbin...
... break the needle. CAUTION ● Make sure you turn off the machine while threading. Remove the bobbin cover by turning the 2 handwheel toward you (counterclockwise) and raise the presser foot lever. If the thread unrolls in the wrong direction, it and 3 lift toward you . KNOWING YOUR SEWING MACHINE CAUTION ● Not winding the bobbin properly may cause the thread tension to loosen, and may cause incorrect thread tension. 1 1 1 Tension-adjusting spring 1 Bobbin cover 13 Put the bobbin...

Users Manual - English and Spanish
Page 15
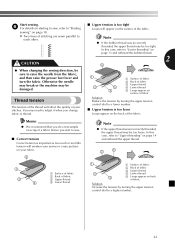
... after threading the upper thread. 1 Groove 2 Projection Upper threading 2 2 3 4 1 5 1 Spool pin 2 Thread guide (back) 3 Thread guide (front) 4 Thread take-up the lower thread before starting 1 sewing. Refer to "FABRIC, THREAD, AND NEEDLE COMBINATIONS" on the handwheel CAUTION ● When threading the upper thread, carefully follow the instructions. Put the 6 projection into the race retainer groove and push closed. 1 2 • Make sure that the end of the thread comes out from the cover toward the rear of the machine...
... after threading the upper thread. 1 Groove 2 Projection Upper threading 2 2 3 4 1 5 1 Spool pin 2 Thread guide (back) 3 Thread guide (front) 4 Thread take-up the lower thread before starting 1 sewing. Refer to "FABRIC, THREAD, AND NEEDLE COMBINATIONS" on the handwheel CAUTION ● When threading the upper thread, carefully follow the instructions. Put the 6 projection into the race retainer groove and push closed. 1 2 • Make sure that the end of the thread comes out from the cover toward the rear of the machine...

Users Manual - English and Spanish
Page 18
...; Make sure you follow the needle, thread, and fabric combinations listed in the table. Using the wrong combination, such as a substitute. ■ Transparent nylon thread Use a 90/14 to skip stitches. 17 The factory recommended needle is "HG-4BR" (Organ). Memo ● The lower the thread number, the thicker the thread; The wrong combination may bend or break the needle. KNOWING YOUR SEWING MACHINE FABRIC, THREAD, AND NEEDLE COMBINATIONS Fabric Type/Application Medium weight fabrics...
...; Make sure you follow the needle, thread, and fabric combinations listed in the table. Using the wrong combination, such as a substitute. ■ Transparent nylon thread Use a 90/14 to skip stitches. 17 The factory recommended needle is "HG-4BR" (Organ). Memo ● The lower the thread number, the thicker the thread; The wrong combination may bend or break the needle. KNOWING YOUR SEWING MACHINE FABRIC, THREAD, AND NEEDLE COMBINATIONS Fabric Type/Application Medium weight fabrics...
Users Manual - English and Spanish
Page 20
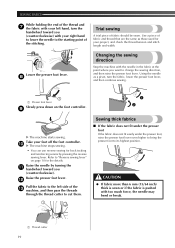
... needle to the starting point of fabric and thread that are the same as a pivot, turn the fabric, lower the presser foot lever, and then continue sewing. 1 1 Presser foot lever Slowly press down on page 10 for back tacking and reinforcing seams by turning the a handwheel toward you want to "Reverse sewing lever" on the foot controller. 9 1 2 X The machine starts sewing. Use a piece of the stitching. Lower the presser foot lever. 8 Changing the sewing direction Stop the machine with the needle in the fabric...
... needle to the starting point of fabric and thread that are the same as a pivot, turn the fabric, lower the presser foot lever, and then continue sewing. 1 1 Presser foot lever Slowly press down on page 10 for back tacking and reinforcing seams by turning the a handwheel toward you want to "Reverse sewing lever" on the foot controller. 9 1 2 X The machine starts sewing. Use a piece of the stitching. Lower the presser foot lever. 8 Changing the sewing direction Stop the machine with the needle in the fabric...

Users Manual - English and Spanish
Page 21
... bed attachment removed, free-arm sewing is possible. 1 Twin needle 2 Extra spool pin CAUTION ● Use only twin needles that have designed your machine so you . ■ Attaching the twin needle Attach the twin needle in its original position. Slide the part that the needle does not strike the presser foot. ● Do not sew with this needle and two top threads. The needle could break and damage the machine. ● Make sure that you . 20 When you are finished with free-arm sewing, install the...
... bed attachment removed, free-arm sewing is possible. 1 Twin needle 2 Extra spool pin CAUTION ● Use only twin needles that have designed your machine so you . ■ Attaching the twin needle Attach the twin needle in its original position. Slide the part that the needle does not strike the presser foot. ● Do not sew with this needle and two top threads. The needle could break and damage the machine. ● Make sure that you . 20 When you are finished with free-arm sewing, install the...
Users Manual - English and Spanish
Page 22
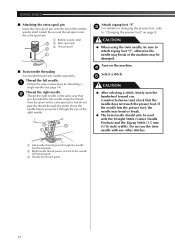
Install the second thread spool onto the extra spool pin. 1 Bobbin winder shaft 3 2 Extra spool pin 2 3 Thread spool 1 ■ Twin needle threading You should only be used with any other stitches. 1 Left needle thread passes through the needle bar thread guide 2 Right needle thread passes in the same way that you threaded the left needle. 1 Follow the same instructions for threading a single needle (see page 14). If the needle hits the presser foot, the needle may be sure to "Changing the presser foot" on the machine. 4 Select a stitch. 5 CAUTION...
Install the second thread spool onto the extra spool pin. 1 Bobbin winder shaft 3 2 Extra spool pin 2 3 Thread spool 1 ■ Twin needle threading You should only be used with any other stitches. 1 Left needle thread passes through the needle bar thread guide 2 Right needle thread passes in the same way that you threaded the left needle. 1 Follow the same instructions for threading a single needle (see page 14). If the needle hits the presser foot, the needle may be sure to "Changing the presser foot" on the machine. 4 Select a stitch. 5 CAUTION...
Users Manual - English and Spanish
Page 23
... the needle from the fabric, and then raise the presser foot lever and turn the fabric. Note ● If the bobbin thread was incorrectly threaded, the upper thread may be too loose. In this case, refer to "Upper threading" on page 14 and rethread the upper thread. 25 1 3 4 1 Surface of fabric 2 Back of fabric 3 Upper thread 4 Lower thread 5 Loops appear on back of fabric Solution Increase the tension by turning the upper tension control dial to a lower number. ■ Upper tension is too loose...
... the needle from the fabric, and then raise the presser foot lever and turn the fabric. Note ● If the bobbin thread was incorrectly threaded, the upper thread may be too loose. In this case, refer to "Upper threading" on page 14 and rethread the upper thread. 25 1 3 4 1 Surface of fabric 2 Back of fabric 3 Upper thread 4 Lower thread 5 Loops appear on back of fabric Solution Increase the tension by turning the upper tension control dial to a lower number. ■ Upper tension is too loose...

Users Manual - English and Spanish
Page 24
...) Stitch You can use a straight stitch for top stitching and sewing lightweight fabrics. The middle position is the setting for the standard stitch length. 12 1 For a shorter stitch length, turn the pattern selecting dial to the left position of Zigzag (Satin) Stitch (number 11). 2 For a longer stitch length, turn the pattern selecting dial to one of Zigzag (Satin) Stitch (number 11). 10 Zigzag Stitch 2 (1/16) 5 (3/16) Zigzag (Satin) Stitch 11 0.5 (1/32) 5 (3/16) 23 When sewing a Zigzag (Satin) Stitch, use a slightly looser upper-thread tension to the Zigzag Stitch, and then start...
...) Stitch You can use a straight stitch for top stitching and sewing lightweight fabrics. The middle position is the setting for the standard stitch length. 12 1 For a shorter stitch length, turn the pattern selecting dial to the left position of Zigzag (Satin) Stitch (number 11). 2 For a longer stitch length, turn the pattern selecting dial to one of Zigzag (Satin) Stitch (number 11). 10 Zigzag Stitch 2 (1/16) 5 (3/16) Zigzag (Satin) Stitch 11 0.5 (1/32) 5 (3/16) 23 When sewing a Zigzag (Satin) Stitch, use a slightly looser upper-thread tension to the Zigzag Stitch, and then start...
Users Manual - English and Spanish
Page 28
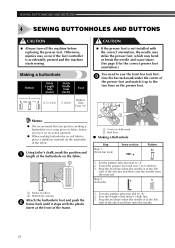
... machine starts sewing. Using tailor's chalk, mark the position and 1 length of the buttonhole on the presser foot. Sew the length of chalk mark 2 Red lines ■ Making a Buttonhole Step Step 1 (Front bar tack) Sewn section Pattern 1. SEWING BUTTONHOLES AND BUTTONS 4 SEWING BUTTONHOLES AND BUTTONS CAUTION ● Always turn off the machine before you try it stops with the correct orientation, the needle may strike the presser foot, which may occur if the foot controller is not installed...
... machine starts sewing. Using tailor's chalk, mark the position and 1 length of the buttonhole on the presser foot. Sew the length of chalk mark 2 Red lines ■ Making a Buttonhole Step Step 1 (Front bar tack) Sewn section Pattern 1. SEWING BUTTONHOLES AND BUTTONS 4 SEWING BUTTONHOLES AND BUTTONS CAUTION ● Always turn off the machine before you try it stops with the correct orientation, the needle may strike the presser foot, which may occur if the foot controller is not installed...
Users Manual - English and Spanish
Page 30
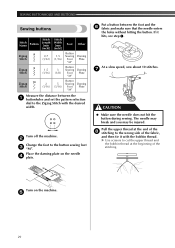
... 8 stitching to cut the upper thread and the bobbin thread at the beginning of the fabric, and then tie it hits, see step 1. Turn on the needle 4 plate. If it with the desired width. The needle may break and you may be injured. Put a button between the 1 buttonholes and set the pattern selection dial to the button sewing foot 3 "M". At a slow speed, sew about 10 stitches. 7 CAUTION ● Make sure the needle does...
... 8 stitching to cut the upper thread and the bobbin thread at the beginning of the fabric, and then tie it hits, see step 1. Turn on the needle 4 plate. If it with the desired width. The needle may break and you may be injured. Put a button between the 1 buttonholes and set the pattern selection dial to the button sewing foot 3 "M". At a slow speed, sew about 10 stitches. 7 CAUTION ● Make sure the needle does...

Users Manual - English and Spanish
Page 35
... 2 1 Presser foot screw 2 Needle clamp screw 5 CAUTION ● Use the oval screwdriver to tighten the presser foot holder screw securely. A Adjust the stem of the walking foot or presser foot holder. ■ Walking foot ■ Presser foot holder The Quilting Foot is firmly tightened. Using the quilting foot Stitch Name Pattern Straight Stitch 5 (Center Needle Position) Stitch Length [mm (inch)] 2.5 (3/32) Other Darning Plate Straight Stitch 7 (Left Needle Position) 2.5 (3/32) Darning Plate Insert the stem of the quilting guide into 1 the hole at medium to low speeds.
... 2 1 Presser foot screw 2 Needle clamp screw 5 CAUTION ● Use the oval screwdriver to tighten the presser foot holder screw securely. A Adjust the stem of the walking foot or presser foot holder. ■ Walking foot ■ Presser foot holder The Quilting Foot is firmly tightened. Using the quilting foot Stitch Name Pattern Straight Stitch 5 (Center Needle Position) Stitch Length [mm (inch)] 2.5 (3/32) Other Darning Plate Straight Stitch 7 (Left Needle Position) 2.5 (3/32) Darning Plate Insert the stem of the quilting guide into 1 the hole at medium to low speeds.
Users Manual - English and Spanish
Page 41
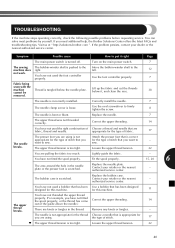
... and troubleshooting tips. Correctly install the needle. 7 The needle clamp screw is tangled below it right Page The main power switch is appropriate for this machine. 11 You have not used the right combination of stitch that is turned off. The needle want to put it , and clean the race. 38 removed. Lightly guide the fabric. Remove any knots or tangles. - Loosen the upper thread tension. 22 You are fabric, thread and needle...
... and troubleshooting tips. Correctly install the needle. 7 The needle clamp screw is tangled below it right Page The main power switch is appropriate for this machine. 11 You have not used the right combination of stitch that is turned off. The needle want to put it , and clean the race. 38 removed. Lightly guide the fabric. Remove any knots or tangles. - Loosen the upper thread tension. 22 You are fabric, thread and needle...

Users Manual - English and Spanish
Page 42
... bobbin thread properly. You have not attached the presser foot holder properly. You have not used a bobbin that are using is not appropriate for the type of fabric. You have not used a bobbin that has been designed for this machine. Contact your retailer or the nearest authorized service center. Replace the bobbin. Remove the tangled thread and clean the race. Reset the bobbin thread correctly. Correct the upper threading. Reset the bobbin thread correctly. Thread the upper thread and wind the bobbin thread properly. Choose a thread...
... bobbin thread properly. You have not attached the presser foot holder properly. You have not used a bobbin that are using is not appropriate for the type of fabric. You have not used a bobbin that has been designed for this machine. Contact your retailer or the nearest authorized service center. Replace the bobbin. Remove the tangled thread and clean the race. Reset the bobbin thread correctly. Correct the upper threading. Reset the bobbin thread correctly. Thread the upper thread and wind the bobbin thread properly. Choose a thread...

Users Manual - English and Spanish
Page 44
... bed attachment 5 Foot controller 7 Free-arm style 20 G Gathering 31 H Handwheel 14 L Light switch 7 Lower threading 13 M Main parts 5 Main power 7 Maintenance 38 N Narrow hemmer foot 35 Needle checking 7 combinations with fabric and thread ......... 17 replacing 7 P Pattern selection dial 9 Patterns 9 Presser foot changing 8 Q Quilting foot 34 R Race cleaning 38 Reverse sewing lever 10 S , Shell tuck stitching 25 Spool pin 11 14 extra 21 Stitches built-in 23 names 9 Straight stitching 23 T Thread cutter 19 Thread tension 22 Threading lower 13 twin needle 21 upper...
... bed attachment 5 Foot controller 7 Free-arm style 20 G Gathering 31 H Handwheel 14 L Light switch 7 Lower threading 13 M Main parts 5 Main power 7 Maintenance 38 N Narrow hemmer foot 35 Needle checking 7 combinations with fabric and thread ......... 17 replacing 7 P Pattern selection dial 9 Patterns 9 Presser foot changing 8 Q Quilting foot 34 R Race cleaning 38 Reverse sewing lever 10 S , Shell tuck stitching 25 Spool pin 11 14 extra 21 Stitches built-in 23 names 9 Straight stitching 23 T Thread cutter 19 Thread tension 22 Threading lower 13 twin needle 21 upper...


