

Users Manual - English
Page 2
... shock, or injury to the symbol "O" position which represents off, then remove plug from the electrical outlet when removing covers, lubricating, or when making any air openings blocked. Always unplug before cleaning. 2. Replace bulb with any adjustments in this embroidery machine if it has a damaged cord or plug, if it is intended for its intended use as threading needle, changing needle, threading bobbin, or changing presser foot, and the like. 15. Do not...
... shock, or injury to the symbol "O" position which represents off, then remove plug from the electrical outlet when removing covers, lubricating, or when making any air openings blocked. Always unplug before cleaning. 2. Replace bulb with any adjustments in this embroidery machine if it has a damaged cord or plug, if it is intended for its intended use as threading needle, changing needle, threading bobbin, or changing presser foot, and the like. 15. Do not...
Users Manual - English
Page 5
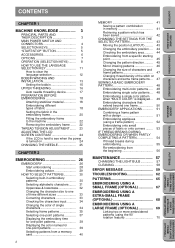
... 5 "START/STOP" BUTTON 5 ACCESSORIES 6 OPTIONS 7 OPERATION (SELECTION KEYS) ........ 8 HOW TO USE THE LANGUAGE SELECTION KEY 11 How to clear the language selection 12 BOBBIN WINDING AND INSTALLATION 13 Setting the bobbin 15 UPPER THREADING 16 Auto needle threading device 17 PREPARATION BEFORE EMBROIDERING 18 Attaching stabilizer material 18 Embroidering different types of fabric 18 Setting the fabric in the embroidery frame 20 Fitting the embroidery frame to the machine 22 Removing the embroidery frame ...... 22 THREAD TENSION ADJUSTMENT....... 23 ADJUSTING...
... 5 "START/STOP" BUTTON 5 ACCESSORIES 6 OPTIONS 7 OPERATION (SELECTION KEYS) ........ 8 HOW TO USE THE LANGUAGE SELECTION KEY 11 How to clear the language selection 12 BOBBIN WINDING AND INSTALLATION 13 Setting the bobbin 15 UPPER THREADING 16 Auto needle threading device 17 PREPARATION BEFORE EMBROIDERING 18 Attaching stabilizer material 18 Embroidering different types of fabric 18 Setting the fabric in the embroidery frame 20 Fitting the embroidery frame to the machine 22 Removing the embroidery frame ...... 22 THREAD TENSION ADJUSTMENT....... 23 ADJUSTING...

Users Manual - English
Page 6
...TROUBLESHOOTING PATTERNS EMBROIDERING USING A SMALL FRAME (OPTIONAL) 9 10 1- Handle 2- Presser foot 9- Hole for extra spool pin 16- Carriage (Embroidery arm) 16 A- "START/STOP" BUTTON EMBROIDERING USING A EXTRA-SMALL FRAME (OPTIONAL) EMBROIDERING USING A LARGE FRAME (OPTIONAL) 3 Needle plate 11- SELECTION KEYS C- Upper thread tension dial 5- Balance wheel 14- LCD (Liquid Crystal Display) 15- Spool felt 13- Bobbin winding guide 4- Bobbin winding device 12- Face plate 6- Presser foot lever 7- Bobbin cover 10- Needle threader 8- Spool cap 3- MAIN POWER...
...TROUBLESHOOTING PATTERNS EMBROIDERING USING A SMALL FRAME (OPTIONAL) 9 10 1- Handle 2- Presser foot 9- Hole for extra spool pin 16- Carriage (Embroidery arm) 16 A- "START/STOP" BUTTON EMBROIDERING USING A EXTRA-SMALL FRAME (OPTIONAL) EMBROIDERING USING A LARGE FRAME (OPTIONAL) 3 Needle plate 11- SELECTION KEYS C- Upper thread tension dial 5- Balance wheel 14- LCD (Liquid Crystal Display) 15- Spool felt 13- Bobbin winding guide 4- Bobbin winding device 12- Face plate 6- Presser foot lever 7- Bobbin cover 10- Needle threader 8- Spool cap 3- MAIN POWER...

Users Manual - English
Page 8
CONTENTS MACHINE KNOWLEDGE SELECTION KEYS 1 2 4 1 "CHARACTERS & DESIGNS" KEY Use this key for embroidering characters and patterns. 2 "CARD" KEY Use this key to select a memory card for embroidery patterns. 3 3 "MEMORY" KEY Use this key for more to remember. appears on how to stop at its highest position. * If "Raise the needle." EMBROIDERING MAINTENANCE ERROR MESSAGE TROUBLESHOOTING PATTERNS EMBROIDERING USING A SMALL FRAME (OPTIONAL) EMBROIDERING USING A EXTRA-SMALL FRAME (OPTIONAL) "START/STOP" BUTTON 1 Press this button to start the machine, and...
CONTENTS MACHINE KNOWLEDGE SELECTION KEYS 1 2 4 1 "CHARACTERS & DESIGNS" KEY Use this key for embroidering characters and patterns. 2 "CARD" KEY Use this key to select a memory card for embroidery patterns. 3 3 "MEMORY" KEY Use this key for more to remember. appears on how to stop at its highest position. * If "Raise the needle." EMBROIDERING MAINTENANCE ERROR MESSAGE TROUBLESHOOTING PATTERNS EMBROIDERING USING A SMALL FRAME (OPTIONAL) EMBROIDERING USING A EXTRA-SMALL FRAME (OPTIONAL) "START/STOP" BUTTON 1 Press this button to start the machine, and...

Users Manual - English
Page 16
... on the spool post. * The spool cap should come from the thread on the spool before using. 1 Cross wound thread 2 Spool cap (small) 3 Separate slightly 4 No spool felt 13 EMBROIDERING USING A EXTRA-SMALL FRAME (OPTIONAL) EMBROIDERING USING A LARGE FRAME (OPTIONAL) Connect the machine to wind a bobbin and set the lower thread. 1 1 "BASIC OPERATION" key 3 2 6 7 4 5 1 ERROR MESSAGE TROUBLESHOOTING PATTERNS EMBROIDERING USING A SMALL FRAME (OPTIONAL) 1 2 1 2 3 1. CONTENTS MACHINE KNOWLEDGE EMBROIDERING MAINTENANCE BOBBIN WINDING AND INSTALLATION How to the power supply and...
... on the spool post. * The spool cap should come from the thread on the spool before using. 1 Cross wound thread 2 Spool cap (small) 3 Separate slightly 4 No spool felt 13 EMBROIDERING USING A EXTRA-SMALL FRAME (OPTIONAL) EMBROIDERING USING A LARGE FRAME (OPTIONAL) Connect the machine to wind a bobbin and set the lower thread. 1 1 "BASIC OPERATION" key 3 2 6 7 4 5 1 ERROR MESSAGE TROUBLESHOOTING PATTERNS EMBROIDERING USING A SMALL FRAME (OPTIONAL) 1 2 1 2 3 1. CONTENTS MACHINE KNOWLEDGE EMBROIDERING MAINTENANCE BOBBIN WINDING AND INSTALLATION How to the power supply and...

Users Manual - English
Page 17
... "START/STOP" button. Press the "START/STOP" button to stop automatically when the bobbin is full. Guide the thread through the machine and the bobbin winding guide as shown on page 15. Wind the thread a few times around the bobbin and press the "START/STOP" button again. Press the "START/STOP" button. Remove the bobbin and continue sewing. 8. CONTENTS MACHINE KNOWLEDGE EMBROIDERING MAINTENANCE ERROR MESSAGE 2 3 3. Guide the thread through the small hole in the bobbin 5. Holding the thread end, push the bobbin winder shaft...
... "START/STOP" button. Press the "START/STOP" button to stop automatically when the bobbin is full. Guide the thread through the machine and the bobbin winding guide as shown on page 15. Wind the thread a few times around the bobbin and press the "START/STOP" button again. Press the "START/STOP" button. Remove the bobbin and continue sewing. 8. CONTENTS MACHINE KNOWLEDGE EMBROIDERING MAINTENANCE ERROR MESSAGE 2 3 3. Guide the thread through the small hole in the bobbin 5. Holding the thread end, push the bobbin winder shaft...

Users Manual - English
Page 19
... "0" position. * When setting the thread spool, set it so that the thread winds off the spool pin. 16 EMBROIDERING USING A EXTRA-SMALL FRAME (OPTIONAL) EMBROIDERING USING A LARGE FRAME (OPTIONAL) Raise the presser foot lever (If the presser foot is behind the spool. (shown above *) ** You do not need to pull the lower thread up before removing the upper thread to prevent damage to raise the presser foot before you use a 90/14 home sewing machine needle. 1 Insert the extra spool pin into the hole on...
... "0" position. * When setting the thread spool, set it so that the thread winds off the spool pin. 16 EMBROIDERING USING A EXTRA-SMALL FRAME (OPTIONAL) EMBROIDERING USING A LARGE FRAME (OPTIONAL) Raise the presser foot lever (If the presser foot is behind the spool. (shown above *) ** You do not need to pull the lower thread up before removing the upper thread to prevent damage to raise the presser foot before you use a 90/14 home sewing machine needle. 1 Insert the extra spool pin into the hole on...

Users Manual - English
Page 26
To tighten the upper thread tension, adjust the dial to the left. * The standard position is between "4" and "6". Thread tension may need to check for the proper thread tension. Decrease the upper thread tension. 1 Top surface of the fabric 2 Reverse side of different thread, fabric or stabilizer fabric. Increase the upper thread tension. 1 Top surface of fabric 2 Reverse side of the total width. B- B ERROR MESSAGE TROUBLESHOOTING PATTERNS EMBROIDERING USING A SMALL FRAME (OPTIONAL) Correct thread tension Adjust so that the lower thread stitch width on top surface...
To tighten the upper thread tension, adjust the dial to the left. * The standard position is between "4" and "6". Thread tension may need to check for the proper thread tension. Decrease the upper thread tension. 1 Top surface of the fabric 2 Reverse side of different thread, fabric or stabilizer fabric. Increase the upper thread tension. 1 Top surface of fabric 2 Reverse side of the total width. B- B ERROR MESSAGE TROUBLESHOOTING PATTERNS EMBROIDERING USING A SMALL FRAME (OPTIONAL) Correct thread tension Adjust so that the lower thread stitch width on top surface...

Users Manual - English
Page 28
... damage to its highest position. 2. ERROR MESSAGE TROUBLESHOOTING PATTERNS EMBROIDERING USING A SMALL FRAME (OPTIONAL) EMBROIDERING USING A EXTRA-SMALL FRAME (OPTIONAL) EMBROIDERING USING A LARGE FRAME (OPTIONAL) 1 2 Checking for a bent needle 1 Place the needle on . Turn the power switch off and lower the presser foot lever. Slide the needle out. 2 3 4 4. Turn the balance wheel to raise the needle to your project or the machine. 25 CONTENTS MACHINE KNOWLEDGE EMBROIDERING MAINTENANCE CHANGING THE NEEDLE Set the needle securely. 1 1 "BASIC OPERATION" key 1 1.
... damage to its highest position. 2. ERROR MESSAGE TROUBLESHOOTING PATTERNS EMBROIDERING USING A SMALL FRAME (OPTIONAL) EMBROIDERING USING A EXTRA-SMALL FRAME (OPTIONAL) EMBROIDERING USING A LARGE FRAME (OPTIONAL) 1 2 Checking for a bent needle 1 Place the needle on . Turn the power switch off and lower the presser foot lever. Slide the needle out. 2 3 4 4. Turn the balance wheel to raise the needle to your project or the machine. 25 CONTENTS MACHINE KNOWLEDGE EMBROIDERING MAINTENANCE CHANGING THE NEEDLE Set the needle securely. 1 1 "BASIC OPERATION" key 1 1.

Users Manual - English
Page 29
Thread the lower (bobbin) thread. (See page 15) 26 EMBROIDERING USING A LARGE FRAME (OPTIONAL) CONTENTS MACHINE KNOWLEDGE EMBROIDERING MAINTENANCE EMBROIDERING EMBROIDERY CHAPTER 2 1 1 "BASIC OPERATION" key 6 1 5 3 4 2 ERROR MESSAGE TROUBLESHOOTING PATTERNS EMBROIDERING USING A SMALL FRAME (OPTIONAL) EMBROIDERING USING A EXTRA-SMALL FRAME (OPTIONAL) 1. Be sure to attach the spool felt as shown in the illustration. 1 Spool felt (See page 16 - 17) 2. Thread the upper thread following the solidline and numerical sequence marked on your machine.
Thread the lower (bobbin) thread. (See page 15) 26 EMBROIDERING USING A LARGE FRAME (OPTIONAL) CONTENTS MACHINE KNOWLEDGE EMBROIDERING MAINTENANCE EMBROIDERING EMBROIDERY CHAPTER 2 1 1 "BASIC OPERATION" key 6 1 5 3 4 2 ERROR MESSAGE TROUBLESHOOTING PATTERNS EMBROIDERING USING A SMALL FRAME (OPTIONAL) EMBROIDERING USING A EXTRA-SMALL FRAME (OPTIONAL) 1. Be sure to attach the spool felt as shown in the illustration. 1 Spool felt (See page 16 - 17) 2. Thread the upper thread following the solidline and numerical sequence marked on your machine.

Users Manual - English
Page 35
... like to use the Help function: (Refer to page 54) 8 Touch this key to clear the selected characters one by touching "A/a". 1. TROUBLESHOOTING PATTERNS EMBROIDERING USING A SMALL FRAME (OPTIONAL) EMBROIDERING USING A EXTRA-SMALL FRAME (OPTIONAL) EMBROIDERING USING A LARGE FRAME (OPTIONAL) 32 CONTENTS MACHINE KNOWLEDGE EMBROIDERING MAINTENANCE ERROR MESSAGE Screen A 1 2 3 4 6 5 7 8 1 Touch this key to have the machine sew a reinforcement stitch and stop for the changing of thread each time a new character is embroidered. (Refer...
... like to use the Help function: (Refer to page 54) 8 Touch this key to clear the selected characters one by touching "A/a". 1. TROUBLESHOOTING PATTERNS EMBROIDERING USING A SMALL FRAME (OPTIONAL) EMBROIDERING USING A EXTRA-SMALL FRAME (OPTIONAL) EMBROIDERING USING A LARGE FRAME (OPTIONAL) 32 CONTENTS MACHINE KNOWLEDGE EMBROIDERING MAINTENANCE ERROR MESSAGE Screen A 1 2 3 4 6 5 7 8 1 Touch this key to have the machine sew a reinforcement stitch and stop for the changing of thread each time a new character is embroidered. (Refer...

Users Manual - English
Page 46
... like to set the embroidering position. (Refer to page 45) 9 If you touch this key, the embroidery frame will be used with some patterns. (Refer to the sewing start position. B 8 This moves the needle position to the middle of the pattern or to page 46) 43 EMBROIDERING USING A EXTRA-SMALL FRAME (OPTIONAL) EMBROIDERING USING A LARGE FRAME (OPTIONAL) Character One point Frame pattern Memory card (No.2 Flower) EMBROIDERING MAINTENANCE ERROR MESSAGE TROUBLESHOOTING PATTERNS EMBROIDERING USING A SMALL...
... like to set the embroidering position. (Refer to page 45) 9 If you touch this key, the embroidery frame will be used with some patterns. (Refer to the sewing start position. B 8 This moves the needle position to the middle of the pattern or to page 46) 43 EMBROIDERING USING A EXTRA-SMALL FRAME (OPTIONAL) EMBROIDERING USING A LARGE FRAME (OPTIONAL) Character One point Frame pattern Memory card (No.2 Flower) EMBROIDERING MAINTENANCE ERROR MESSAGE TROUBLESHOOTING PATTERNS EMBROIDERING USING A SMALL...

Users Manual - English
Page 51
... "START/STOP" button. ERROR MESSAGE TROUBLESHOOTING PATTERNS EMBROIDERING USING A SMALL FRAME (OPTIONAL) EMBROIDERING USING A EXTRA-SMALL FRAME (OPTIONAL) Embroidering single color patterns 1. Install the embroidery frame. (See page 20 - 22) 3. Raise the presser foot. 6. Replace the upper thread with the next color and press the "START/STOP" button. The second part of the pattern (3) will be embroidered and the machine will then stop automatically. 3. The third part of the pattern (2) will be sewn and then the machine will automatically...
... "START/STOP" button. ERROR MESSAGE TROUBLESHOOTING PATTERNS EMBROIDERING USING A SMALL FRAME (OPTIONAL) EMBROIDERING USING A EXTRA-SMALL FRAME (OPTIONAL) Embroidering single color patterns 1. Install the embroidery frame. (See page 20 - 22) 3. Raise the presser foot. 6. Replace the upper thread with the next color and press the "START/STOP" button. The second part of the pattern (3) will be embroidered and the machine will then stop automatically. 3. The third part of the pattern (2) will be sewn and then the machine will automatically...

Users Manual - English
Page 57
... this key to move back stitch by stitch without embroidering. (If touched continuously, the stitch will change to begin. CONTENTS IF THREAD BREAKS DURING EMBROIDERING OR WHEN PARTLY COMPLETING A PATTERN Before embroidering MACHINE KNOWLEDGE EMBROIDERING MAINTENANCE ERROR MESSAGE TROUBLESHOOTING PATTERNS EMBROIDERING USING A SMALL FRAME (OPTIONAL) While embroidering * When embroidering starts, "SET" will be advanced in 9-stitch jumps starting from the 6th single stitch) 54 5 Touch this key to return to the previous screen and allow embroidery to "HELP".
... this key to move back stitch by stitch without embroidering. (If touched continuously, the stitch will change to begin. CONTENTS IF THREAD BREAKS DURING EMBROIDERING OR WHEN PARTLY COMPLETING A PATTERN Before embroidering MACHINE KNOWLEDGE EMBROIDERING MAINTENANCE ERROR MESSAGE TROUBLESHOOTING PATTERNS EMBROIDERING USING A SMALL FRAME (OPTIONAL) While embroidering * When embroidering starts, "SET" will be advanced in 9-stitch jumps starting from the 6th single stitch) 54 5 Touch this key to return to the previous screen and allow embroidery to "HELP".
Users Manual - English
Page 58
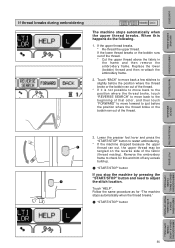
...MACHINE KNOWLEDGE EMBROIDERING MAINTENANCE ERROR MESSAGE If thread breaks during embroidering The machine stops automatically when the upper thread breaks. If the lower thread breaks or the bobbin runs out of the thread. 3. Touch "HELP". Replace the lower (bobbin) thread and then re-attach the embroidery frame. 2. If the upper thread breaks. * Re-thread the upper thread. Lower the presser foot lever and press the "START/STOP" button to adjust the stitch location. Remove the embroidery frame to just before the position where the thread broke or the bobbin ran out of the thread...
...MACHINE KNOWLEDGE EMBROIDERING MAINTENANCE ERROR MESSAGE If thread breaks during embroidering The machine stops automatically when the upper thread breaks. If the lower thread breaks or the bobbin runs out of the thread. 3. Touch "HELP". Replace the lower (bobbin) thread and then re-attach the embroidery frame. 2. If the upper thread breaks. * Re-thread the upper thread. Lower the presser foot lever and press the "START/STOP" button to adjust the stitch location. Remove the embroidery frame to just before the position where the thread broke or the bobbin ran out of the thread...

Users Manual - English
Page 60
... * The power cord plug must be removed from the socket outlet prior to changing the bulb. 3 2 4 2. Loosen the screw in light bulb with a new one of the machine. 3. CONTENTS MACHINE KNOWLEDGE EMBROIDERING MAINTENANCE MAINTENANCE CHANGING THE LIGHT BULB 1 When replacing the light bulb 1. Replace the snap-in the end cap at the left side of the same type. * Light bulbs are available through your dealer. (8 V, 2.4 W/ Parts code X50228-001 or item #SA105.) ERROR MESSAGE TROUBLESHOOTING PATTERNS EMBROIDERING USING A SMALL FRAME (OPTIONAL) EMBROIDERING USING...
... * The power cord plug must be removed from the socket outlet prior to changing the bulb. 3 2 4 2. Loosen the screw in light bulb with a new one of the machine. 3. CONTENTS MACHINE KNOWLEDGE EMBROIDERING MAINTENANCE MAINTENANCE CHANGING THE LIGHT BULB 1 When replacing the light bulb 1. Replace the snap-in the end cap at the left side of the same type. * Light bulbs are available through your dealer. (8 V, 2.4 W/ Parts code X50228-001 or item #SA105.) ERROR MESSAGE TROUBLESHOOTING PATTERNS EMBROIDERING USING A SMALL FRAME (OPTIONAL) EMBROIDERING USING...

Users Manual - English
Page 62
... no upper thread is raised. This message is displayed when the "START/STOP" button is pressed while the presser foot lever is threaded or the bobbin runs out of the thread. This could be displayed after the display warns you with a bent needle. This message is displayed when the machine senses that memory space. 59 PATTERNS EMBROIDERING USING A SMALL FRAME (OPTIONAL) EMBROIDERING USING A EXTRA-SMALL FRAME (OPTIONAL) EMBROIDERING USING...
... no upper thread is raised. This message is displayed when the "START/STOP" button is pressed while the presser foot lever is threaded or the bobbin runs out of the thread. This could be displayed after the display warns you with a bent needle. This message is displayed when the machine senses that memory space. 59 PATTERNS EMBROIDERING USING A SMALL FRAME (OPTIONAL) EMBROIDERING USING A EXTRA-SMALL FRAME (OPTIONAL) EMBROIDERING USING...

Users Manual - English
Page 65
... rotary hook. 3. Set the spool of the problem without worrying. Replace with 3. The upper thread is not correctly inserted. 1. Change to the proper needle. Attach stabilizer fabric. Thin or stretch fabric is being used with the designated upper per embroidery thread is not correctly set. 3. Place the fabric in the shuttle. 2. Upper thread breaks 2. The upper threading is too strong. 1. The bobbin is being used . 2. A thread other than the designated 3. Set the needle properly. 2. Thread the upper and lower threads correctly. 3. Trouble with 5. Clean the...
... rotary hook. 3. Set the spool of the problem without worrying. Replace with 3. The upper thread is not correctly inserted. 1. Change to the proper needle. Attach stabilizer fabric. Thin or stretch fabric is being used with the designated upper per embroidery thread is not correctly set. 3. Place the fabric in the shuttle. 2. Upper thread breaks 2. The upper threading is too strong. 1. The bobbin is being used . 2. A thread other than the designated 3. Set the needle properly. 2. Thread the upper and lower threads correctly. 3. Trouble with 5. Clean the...

Users Manual - English
Page 67
... when the power comes back on . 3. Lower the presser foot. 4. Remove the needle and reset a new needle properly. 2. This sound is normal and is off, plug the unit in the off . Check Error messages. 1. Machine operation is pressed. Accordingly, if the upper thread is not threaded, the machine will not operate even if the "START/STOP" button is slow and noisy 2. Change to the point where the machine went off position. 3. Thread scraps and...
... when the power comes back on . 3. Lower the presser foot. 4. Remove the needle and reset a new needle properly. 2. This sound is normal and is off, plug the unit in the off . Check Error messages. 1. Machine operation is pressed. Accordingly, if the upper thread is not threaded, the machine will not operate even if the "START/STOP" button is slow and noisy 2. Change to the point where the machine went off position. 3. Thread scraps and...

Users Manual - English
Page 71
... EMBROIDERING MAINTENANCE ERROR MESSAGE TROUBLESHOOTING EMBROIDERING USING A EXTRA-SMALL FRAME (OPTIONAL) An extra-small frame which is smaller than the small frame mentioned on pockets or cuffs. Before touching "TRIAL", raise the needle and the presser foot lever to their highest positions. * The extra-small frame can be used to change the attachment position. * Use the horizontal attachment sheet when the frame is attached horizontally. 1 Frame fixing plate 2 Screws (x 2) 3 Washers (x 2) 4 Nuts (x 2) 5 Embroidery...
... EMBROIDERING MAINTENANCE ERROR MESSAGE TROUBLESHOOTING EMBROIDERING USING A EXTRA-SMALL FRAME (OPTIONAL) An extra-small frame which is smaller than the small frame mentioned on pockets or cuffs. Before touching "TRIAL", raise the needle and the presser foot lever to their highest positions. * The extra-small frame can be used to change the attachment position. * Use the horizontal attachment sheet when the frame is attached horizontally. 1 Frame fixing plate 2 Screws (x 2) 3 Washers (x 2) 4 Nuts (x 2) 5 Embroidery...


