
User Manual
Page 3
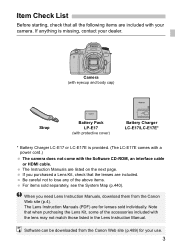
...HDMI cable. The Instruction Manuals are listed on the next page. If you need Lens Instruction Manuals, download them from the Canon Web site (p.489) for lenses sold separately, see the System Map (p.440). Note that when purchasing the Lens Kit, some of the above items...that the lenses are for your use. 3 Software can be downloaded from the Canon Web site (p.4). Camera (with eyecup and body cap) Strap Battery Pack LP-E17 (with protective cover) Battery Charger LC-E17/LC-E17E* * Battery Charger LC-E17 or LC-E17E is missing, contact your camera. The Lens ...
...HDMI cable. The Instruction Manuals are listed on the next page. If you need Lens Instruction Manuals, download them from the Canon Web site (p.489) for lenses sold separately, see the System Map (p.440). Note that when purchasing the Lens Kit, some of the above items...that the lenses are for your use. 3 Software can be downloaded from the Canon Web site (p.4). Camera (with eyecup and body cap) Strap Battery Pack LP-E17 (with protective cover) Battery Charger LC-E17/LC-E17E* * Battery Charger LC-E17 or LC-E17E is missing, contact your camera. The Lens ...

User Manual
Page 6
Quick Start Guide 1 Insert the battery (p.40). Upon purchase, charge the battery to start using (p.38). 2 Insert the card (p.41). With the card's label facing toward the back of the camera, insert it into the card ...
Quick Start Guide 1 Insert the battery (p.40). Upon purchase, charge the battery to start using (p.38). 2 Insert the card (p.41). With the card's label facing toward the back of the camera, insert it into the card ...
User Manual
Page 12
...; Charging p.38 • Installing/Removing p.40 • Battery level p.46 • Checking battery information p.421 Household power outlet p.422 Auto power off p.45 Cards Installing/Removing Formatting Releasing shutter without ...
...; Charging p.38 • Installing/Removing p.40 • Battery level p.46 • Checking battery information p.421 Household power outlet p.422 Auto power off p.45 Cards Installing/Removing Formatting Releasing shutter without ...
User Manual
Page 16
... Conventions Used in this Manual 15 Safety Precautions 22 Handling Precautions 25 Nomenclature 28 1 Getting Started and Basic Camera Operations 37 Charging the Battery 38 Installing and Removing the Battery 40 Installing and Removing the Card 41 Using the LCD Monitor 44 Turning on the Power 45 Setting the Date, Time, and...
... Conventions Used in this Manual 15 Safety Precautions 22 Handling Precautions 25 Nomenclature 28 1 Getting Started and Basic Camera Operations 37 Charging the Battery 38 Installing and Removing the Battery 40 Installing and Removing the Card 41 Using the LCD Monitor 44 Turning on the Power 45 Setting the Date, Time, and...
User Manual
Page 21
... C.Fn III: Autofocus/Drive 404 C.Fn IV: Operation/Others 407 Custom Controls 409 Registering My Menu 413 13 Reference 419 B Button Functions 420 Checking the Battery Information 421 Using a Household Power Outlet 422 Remote Control Shooting 423 H Using Eye-Fi Cards 428 Function Availability Table by Shooting Mode 430 System Map...
... C.Fn III: Autofocus/Drive 404 C.Fn IV: Operation/Others 407 Custom Controls 409 Registering My Menu 413 13 Reference 419 B Button Functions 420 Checking the Battery Information 421 Using a Household Power Outlet 422 Remote Control Shooting 423 H Using Eye-Fi Cards 428 Function Availability Table by Shooting Mode 430 System Map...
User Manual
Page 22
...the electrical contacts with tape. Using a tripod is damaged. • Do not short-circuit, disassemble, or modify the battery. Make sure to the product, contact the nearest Canon Service Center or the dealer from whom you experience any cords near a heat source. Also, do not exceed the recharge... time indicated in the Instruction Manual. • Do not insert any battery leakage from contacting your eyes, skin, or ...
...the electrical contacts with tape. Using a tripod is damaged. • Do not short-circuit, disassemble, or modify the battery. Make sure to the product, contact the nearest Canon Service Center or the dealer from whom you experience any cords near a heat source. Also, do not exceed the recharge... time indicated in the Instruction Manual. • Do not insert any battery leakage from contacting your eyes, skin, or ...

User Manual
Page 23
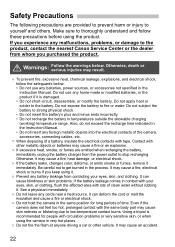
... prevent a fire and electrical shock, follow the safeguards below: • Always insert the power plug all the way in use , make sure to remove the battery, and disconnect the power plug and connecting cables from metallic items and store it with its protective cover attached to use the product by an...the power plug periodically and clean off the dust around the power outlet with a cloth when using the camera inside the product, promptly remove the battery. Supervise children while they are not in the water or if water or metal get the camera wet. This is flammable gas. This is to...
... prevent a fire and electrical shock, follow the safeguards below: • Always insert the power plug all the way in use , make sure to remove the battery, and disconnect the power plug and connecting cables from metallic items and store it with its protective cover attached to use the product by an...the power plug periodically and clean off the dust around the power outlet with a cloth when using the camera inside the product, promptly remove the battery. Supervise children while they are not in the water or if water or metal get the camera wet. This is flammable gas. This is to...

User Manual
Page 24
... environment for an extended period of the product. Do not carry the camera around when it is attached to a tripod. It may also cause battery leakage or explosion, which will become hot and cause burns. Doing so may hurt the eyes. 24
... environment for an extended period of the product. Do not carry the camera around when it is attached to a tripod. It may also cause battery leakage or explosion, which will become hot and cause burns. Doing so may hurt the eyes. 24

User Manual
Page 26
... slow in low temperatures, or look black in may occur. Dead pixels are chemicals that the camera is condensation, remove the lens, card and battery from the camera, and wait until condensation has evaporated before using the camera. If the camera will disappear when the camera is left ... a while to normal at room temperature. 26 If there is still working properly. If you have the camera checked by your nearest Canon Service Center or check the camera yourself and make sure it . If you repeat continuous shooting or perform Live View shooting or movie shooting for...
... slow in low temperatures, or look black in may occur. Dead pixels are chemicals that the camera is condensation, remove the lens, card and battery from the camera, and wait until condensation has evaporated before using the camera. If the camera will disappear when the camera is left ... a while to normal at room temperature. 26 If there is still working properly. If you have the camera checked by your nearest Canon Service Center or check the camera yourself and make sure it . If you repeat continuous shooting or perform Live View shooting or movie shooting for...

User Manual
Page 29
...) White balance selection button (p.169) Picture Style selection button (p.161) Drive mode selection button (p.147, 149) AF operation selection button (p.124) DC cord hole (p.422) Battery compartment cover release lever (p.40) Battery compartment cover (p.40) Multi function lock switch (p.57) Setting button (p.67) Card slot (p.41) 29
...) White balance selection button (p.169) Picture Style selection button (p.161) Drive mode selection button (p.147, 149) AF operation selection button (p.124) DC cord hole (p.422) Battery compartment cover release lever (p.40) Battery compartment cover (p.40) Multi function lock switch (p.57) Setting button (p.67) Card slot (p.41) 29
User Manual
Page 32
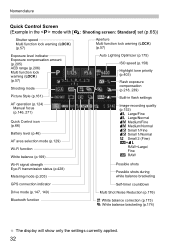
...) AEB range (p.206) Multi function lock warning (LOCK) (p.57) Shooting mode Picture Style (p.161) AF operation (p.124) Manual focus (p.146, 271) Quick Control icon (p.66) Battery level (p.46) AF area selection mode (p.129) Wi-Fi function White balance (p.169) Auto Lighting Optimizer (p.175) ISO speed (p.158) Highlight tone priority (p.403) Flash...
...) AEB range (p.206) Multi function lock warning (LOCK) (p.57) Shooting mode Picture Style (p.161) AF operation (p.124) Manual focus (p.146, 271) Quick Control icon (p.66) Battery level (p.46) AF area selection mode (p.129) Wi-Fi function White balance (p.169) Auto Lighting Optimizer (p.175) ISO speed (p.158) Highlight tone priority (p.403) Flash...

User Manual
Page 33
...) Card full warning (FuLL) Error code (Err) Cleaning image sensor (CLn) Nomenclature Interval timer shooting (p.211) Bulb timer shooting (p.201) Time-lapse movie shooting (p.296) Battery level (p.46) Possible shots Self-timer countdown Bulb exposure time Possible shots during white balance bracketing Card error warning (Err) Error number Wi-Fi function...
...) Card full warning (FuLL) Error code (Err) Cleaning image sensor (CLn) Nomenclature Interval timer shooting (p.211) Bulb timer shooting (p.201) Time-lapse movie shooting (p.296) Battery level (p.46) Possible shots Self-timer countdown Bulb exposure time Possible shots during white balance bracketing Card error warning (Err) Error number Wi-Fi function...

User Manual
Page 35
DANGER-TO REDUCE THE RISK OF FIRE OR ELECTRIC SHOCK, CAREFULLY FOLLOW THESE INSTRUCTIONS. For connection to a supply not in the U.S.A., use an attachment plug adapter of the proper configuration for Battery Pack LP-E17 (p.38). Power plug Nomenclature Charge lamp Full-charge lamp Battery pack slot IMPORTANT SAFETY INSTRUCTIONS-SAVE THESE INSTRUCTIONS. Battery Charger LC-E17 Charger for the power outlet, if needed. Battery pack slot Power cord Full-charge lamp Charge lamp Power cord socket 35 Battery Charger LC-E17E Charger for Battery Pack LP-E17 (p.38).
DANGER-TO REDUCE THE RISK OF FIRE OR ELECTRIC SHOCK, CAREFULLY FOLLOW THESE INSTRUCTIONS. For connection to a supply not in the U.S.A., use an attachment plug adapter of the proper configuration for Battery Pack LP-E17 (p.38). Power plug Nomenclature Charge lamp Full-charge lamp Battery pack slot IMPORTANT SAFETY INSTRUCTIONS-SAVE THESE INSTRUCTIONS. Battery Charger LC-E17 Charger for the power outlet, if needed. Battery pack slot Power cord Full-charge lamp Charge lamp Power cord socket 35 Battery Charger LC-E17E Charger for Battery Pack LP-E17 (p.38).

User Manual
Page 38
.... It takes approx. 2 hours to approx. 4 hr.). 38 LC-E17 3 Recharge the battery. The time required to recharge the battery will vary greatly depending on the ambient temperature and the battery's remaining capacity. For safety reasons, recharging in low temperatures (5°C - 10°C /... 41°F - 50°F) will light up to fully recharge a completely exhausted battery at room temperature (23°C / 73°F). Full-charge lamp Charge lamp LC-E17E For LC-E17E Connect the power cord to...
.... It takes approx. 2 hours to approx. 4 hr.). 38 LC-E17 3 Recharge the battery. The time required to recharge the battery will vary greatly depending on the ambient temperature and the battery's remaining capacity. For safety reasons, recharging in low temperatures (5°C - 10°C /... 41°F - 50°F) will light up to fully recharge a completely exhausted battery at room temperature (23°C / 73°F). Full-charge lamp Charge lamp LC-E17E For LC-E17E Connect the power cord to...

User Manual
Page 39
... compatible with a 100 V AC to be used . Doing so may lower the battery performance. The battery charger can also be used in malfunction or accidents for which Canon cannot be held liable. 39 Charge the battery before use. Recharge the battery on the day before or on the day it with the protective...
... compatible with a 100 V AC to be used . Doing so may lower the battery performance. The battery charger can also be used in malfunction or accidents for which Canon cannot be held liable. 39 Charge the battery before use. Recharge the battery on the day before or on the day it with the protective...

User Manual
Page 40
... the end with the electrical contacts. Insert the battery until it locks in the viewfinder becomes blurred and you cannot perform focusing. The camera's viewfinder becomes bright when a battery is installed, and darkens when the battery is not installed, the image in place. 3 Close the... cover. Press the cover until it back further. If the battery is removed. Installing and Removing the Battery Load a fully charged Battery Pack LP-E17 into ...
... the end with the electrical contacts. Insert the battery until it locks in the viewfinder becomes blurred and you cannot perform focusing. The camera's viewfinder becomes bright when a battery is installed, and darkens when the battery is not installed, the image in place. 3 Close the... cover. Press the cover until it back further. If the battery is removed. Installing and Removing the Battery Load a fully charged Battery Pack LP-E17 into ...

User Manual
Page 43
... open the card slot cover during this time. If you can damage the image data, card, or camera. • Removing the card. • Removing the battery. • Shaking or banging the camera around. • Unplugging and connecting a power cord (when household power outlet accessories (sold separately, p.422) are being transferred. Otherwise...
... open the card slot cover during this time. If you can damage the image data, card, or camera. • Removing the card. • Removing the battery. • Shaking or banging the camera around. • Unplugging and connecting a power cord (when household power outlet accessories (sold separately, p.422) are being transferred. Otherwise...

User Manual
Page 45
To turn on . You can shoot movies (p.276). : The camera turns on. This is normal and not a malfunction. 3 Auto Power Off To save battery power, if the camera is not operated for a prolonged period, the power will turn off automatically after the time set under [52: Auto power off ...
To turn on . You can shoot movies (p.276). : The camera turns on. This is normal and not a malfunction. 3 Auto Power Off To save battery power, if the camera is not operated for a prolonged period, the power will turn off automatically after the time set under [52: Auto power off ...

User Manual
Page 46
... LP-E17, no Live View shooting, and CIPA (Camera & Imaging Products Association) testing standards. Doing any of the following will exhaust the battery faster: • Pressing the shutter button halfway for a prolonged period. • Activating the AF frequently without taking a picture. • Using the lens's Image.... • Using the LCD monitor frequently. • Using the Wi-Fi function. The number of possible shots may exhaust the battery faster than others. For the number of Possible Shots with Live View shooting, see page 243. See [53...
... LP-E17, no Live View shooting, and CIPA (Camera & Imaging Products Association) testing standards. Doing any of the following will exhaust the battery faster: • Pressing the shutter button halfway for a prolonged period. • Activating the AF frequently without taking a picture. • Using the lens's Image.... • Using the LCD monitor frequently. • Using the Wi-Fi function. The number of possible shots may exhaust the battery faster than others. For the number of Possible Shots with Live View shooting, see page 243. See [53...

User Manual
Page 49
... select [OK] in the following cases. If this happens, set the date/time/zone again. • When the camera is stored without the battery. • When the camera's battery becomes exhausted. • When the camera is exposed to select [OK], then press . The date/time/zone and daylight saving time will...
... select [OK] in the following cases. If this happens, set the date/time/zone again. • When the camera is stored without the battery. • When the camera's battery becomes exhausted. • When the camera is exposed to select [OK], then press . The date/time/zone and daylight saving time will...
