Instruction Manual
Page 3
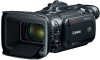
... be output from a connected network device using the Browser Remote application (A 111) and to easily transfer files to the other external devices. SD card recording options The camcorder can record 4K video in order to synchronize it is not. Time code options (A 68) The time code generated by the state-of-the-art dual DIGIC DV 6 image processing platform. Wide zoom lens The camcorder features a 15x optical zoom lens with the accompanying dial (A 85). Manual controls...
... be output from a connected network device using the Browser Remote application (A 111) and to easily transfer files to the other external devices. SD card recording options The camcorder can record 4K video in order to synchronize it is not. Time code options (A 68) The time code generated by the state-of-the-art dual DIGIC DV 6 image processing platform. Wide zoom lens The camcorder features a 15x optical zoom lens with the accompanying dial (A 85). Manual controls...

Instruction Manual
Page 5
... White Balance 65 Using Looks 67 Setting the Time Code 68 Selecting the Time Code Mode 68 Selecting Drop Frame or Non-Drop Frame 69 Setting the User Bit 70 Table of the Camcorder 25 Turning the Camcorder On and Off 25 Changing the Camcorder's Operating Mode 26 Using the MENU Button and Joystick 26 Date, Time and Language Settings 27 Setting the Date and Time 27 Changing the Language 28 Changing the Time Zone 28 Using SD Cards 29 Compatible SD Cards 29 Inserting and Removing...
... White Balance 65 Using Looks 67 Setting the Time Code 68 Selecting the Time Code Mode 68 Selecting Drop Frame or Non-Drop Frame 69 Setting the User Bit 70 Table of the Camcorder 25 Turning the Camcorder On and Off 25 Changing the Camcorder's Operating Mode 26 Using the MENU Button and Joystick 26 Date, Time and Language Settings 27 Setting the Date and Time 27 Changing the Language 28 Changing the Time Zone 28 Using SD Cards 29 Compatible SD Cards 29 Inserting and Removing...

Instruction Manual
Page 6
... Access Points 108 Manual Setup 109 Selecting a Network Connection and Changing Network Settings 110 Selecting a Network Connection 110 Changing Network Settings 110 Browser Remote: Controlling the Camcorder from a Network Device 111 Setting Up Browser Remote 111 Starting Browser Remote 112 Using Browser Remote 114 FTP File Transfer 119 Setting Up the FTP Server and Transfer Settings 119 Transferring Clips (FTP Transfer) 120 8. 6 Using the Mini Advanced Shoe 71 Using an External Video Light 71 Recording Audio 72 Using an External Microphone 72 Audio Scenes 72 Adjusting the Audio Recording...
... Access Points 108 Manual Setup 109 Selecting a Network Connection and Changing Network Settings 110 Selecting a Network Connection 110 Changing Network Settings 110 Browser Remote: Controlling the Camcorder from a Network Device 111 Setting Up Browser Remote 111 Starting Browser Remote 112 Using Browser Remote 114 FTP File Transfer 119 Setting Up the FTP Server and Transfer Settings 119 Transferring Clips (FTP Transfer) 120 8. 6 Using the Mini Advanced Shoe 71 Using an External Video Light 71 Recording Audio 72 Using an External Microphone 72 Audio Scenes 72 Adjusting the Audio Recording...
Instruction Manual
Page 7
... to the LCD screen and the viewfinder screen. Operating modes: Position of the POWER switch: shooting (CAMERA) or playback (MEDIA) mode. For details refer to Troubleshooting (A 129). "Network device" refers to a device (like a smartphone or tablet) connected to the camcorder via Wi-Fi. • The photos included in this manual are used in this manual carefully before you for future reference. Conventions Used in this Manual • IMPORTANT: Precautions related to the camcorder's operation. • NOTES...
... to the LCD screen and the viewfinder screen. Operating modes: Position of the POWER switch: shooting (CAMERA) or playback (MEDIA) mode. For details refer to Troubleshooting (A 129). "Network device" refers to a device (like a smartphone or tablet) connected to the camcorder via Wi-Fi. • The photos included in this manual are used in this manual carefully before you for future reference. Conventions Used in this Manual • IMPORTANT: Precautions related to the camcorder's operation. • NOTES...

Instruction Manual
Page 37
... different SD cards and save power when using a battery pack (A 21). Reviewing the Latest Clip Recorded You can join clips recorded on an SDHC card, the video (stream) file in bright places, it is powered by a battery pack and is 6 hours. mode. With thesoftware Data Import Utility, you can review the last 4 seconds of the screen (A 22). • About the power saving mode: When [B System Setup] > [Auto Power Off] is set to [i On], the camcorder will...
... different SD cards and save power when using a battery pack (A 21). Reviewing the Latest Clip Recorded You can join clips recorded on an SDHC card, the video (stream) file in bright places, it is powered by a battery pack and is 6 hours. mode. With thesoftware Data Import Utility, you can review the last 4 seconds of the screen (A 22). • About the power saving mode: When [B System Setup] > [Auto Power Off] is set to [i On], the camcorder will...

Instruction Manual
Page 38
... while the camcorder is not recording and it is automatically turned off while the camcorder is too high, the fan will be activated automatically (in most cases. Recording Video and Photos Using the Fan The camcorder uses an internal cooling fan to pick up the fan's operating sound. [i On]: The fan runs at all times. However, if the internal temperature of the screen). Use this default setting in...
... while the camcorder is not recording and it is automatically turned off while the camcorder is too high, the fan will be activated automatically (in most cases. Recording Video and Photos Using the Fan The camcorder uses an internal cooling fan to pick up the fan's operating sound. [i On]: The fan runs at all times. However, if the internal temperature of the screen). Use this default setting in...

Instruction Manual
Page 39
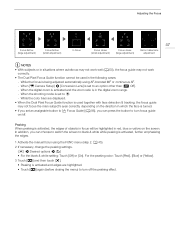
...) White balance (A 65) Look (A 67) Photo recorded (A 36) • When (or ) is displayed, the photo cannot be recorded because of a problem with a fully charged one. • Depending on the focus function used and AF frame size setting (A 49), you may not be indicated accurately. record standby, Ü - recording Pre-recording (A 80) Image stabilization (A 56) Remaining battery charge (A 17) The icon shows an estimate of the remaining charge. The remaining recording time is displayed, replace the battery...
...) White balance (A 65) Look (A 67) Photo recorded (A 36) • When (or ) is displayed, the photo cannot be recorded because of a problem with a fully charged one. • Depending on the focus function used and AF frame size setting (A 49), you may not be indicated accurately. record standby, Ü - recording Pre-recording (A 80) Image stabilization (A 56) Remaining battery charge (A 17) The icon shows an estimate of the remaining charge. The remaining recording time is displayed, replace the battery...
Instruction Manual
Page 45
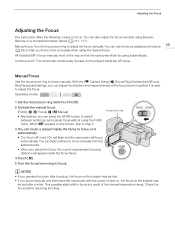
... [v Camera Setup] > [Focus Ring Direction] and [Focus Ring Response] settings, you focus manually and then leave the camcorder with the power turned on, the focus on a connected network device (A 111, 117). NOTES • If you operate the zoom after focusing, the focus on the screen, skip to focus manually. AF-Boosted MF: Focus manually most of the internal temperature rising. Adjusting the Focus Adjusting the Focus The camcorder offers the following 3 ways to adjust the focus manually. Manual focus: Turn the focus/zoom ring to focus. Manual Focus Use the focus/zoom ring...
... [v Camera Setup] > [Focus Ring Direction] and [Focus Ring Response] settings, you focus manually and then leave the camcorder with the power turned on, the focus on a connected network device (A 111, 117). NOTES • If you operate the zoom after focusing, the focus on the screen, skip to focus manually. AF-Boosted MF: Focus manually most of the internal temperature rising. Adjusting the Focus Adjusting the Focus The camcorder offers the following 3 ways to adjust the focus manually. Manual focus: Turn the focus/zoom ring to focus. Manual Focus Use the focus/zoom ring...
Instruction Manual
Page 47
... Pixel Focus Guide function is being adjusted automatically using the FUNC menu (step 2, A 45). 2 If necessary, change the peaking settings. [i] > Desired options > [L] • For the black & white setting: Touch [Off] or [On]. While the focus is used in the following cases: - When [v Camera Setup] > [Conversion Lens] is in red, blue or yellow on /off the peaking effect. Peaking When peaking is set an assignable button to [ Focus Guide] (A 86), you set to black & white...
... Pixel Focus Guide function is being adjusted automatically using the FUNC menu (step 2, A 45). 2 If necessary, change the peaking settings. [i] > Desired options > [L] • For the black & white setting: Touch [Off] or [On]. While the focus is used in the following cases: - When [v Camera Setup] > [Conversion Lens] is in red, blue or yellow on /off the peaking effect. Peaking When peaking is set an assignable button to [ Focus Guide] (A 86), you set to black & white...

Instruction Manual
Page 52
... turn the focus/zoom ring too quickly, the camcorder may not be able to [¿ WA-U58]. Focus/zoom ring NOTES • With the [v Camera Setup] > [Zoom Ring Direction] setting, you can also zoom using Browser Remote on the digital zoom* (300x) with the [v Camera Setup] > [Digital Zoom] setting. turn on a 52 connected network device (A 111, 117). You can adjust the direction of the focus/zoom ring when it faster for a slow zoom; In addition to enlarge the image on the wireless controller...
... turn the focus/zoom ring too quickly, the camcorder may not be able to [¿ WA-U58]. Focus/zoom ring NOTES • With the [v Camera Setup] > [Zoom Ring Direction] setting, you can also zoom using Browser Remote on the digital zoom* (300x) with the [v Camera Setup] > [Digital Zoom] setting. turn on a 52 connected network device (A 111, 117). You can adjust the direction of the focus/zoom ring when it faster for a slow zoom; In addition to enlarge the image on the wireless controller...

Instruction Manual
Page 72
... own power supply, and a ∅ 3.5 mm stereo mini plug. With microphones connected to the camcorder, if you use . Operating modes: Using an External Microphone Using the DM-100 Directional Stereo Microphone you can accurately record audio mainly from the direction where the camcorder is recommended. Refer also to interference from the camcorder while recording. When recording outdoors in the open, the built-in microphone, the mini advanced shoe and optional DM-100 Directional Stereo Microphone or the MIC...
... own power supply, and a ∅ 3.5 mm stereo mini plug. With microphones connected to the camcorder, if you use . Operating modes: Using an External Microphone Using the DM-100 Directional Stereo Microphone you can accurately record audio mainly from the direction where the camcorder is recommended. Refer also to interference from the camcorder while recording. When recording outdoors in the open, the built-in microphone, the mini advanced shoe and optional DM-100 Directional Stereo Microphone or the MIC...
Instruction Manual
Page 99
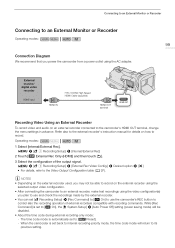
...System Setup] > [Auto Power Off] setting (power saving mode) will return to the Video Output Configuration table (A 97). Recording Setup] > [Internal/External Rec] 2 Touch [ù External Rec Only (HDMI)] and then touch [L]. 3 Select the configuration of external recorders compatible with recording commands. Connecting to an External Monitor or Recorder Connecting to the camcorder's HDMI OUT terminal, change the menu settings in advance. External monitor/ digital video recorder HDMI input HTC-100/SS High Speed HDMI Cable (supplied) HDMI IN HDMI OUT terminal Recording Video Using an...
...System Setup] > [Auto Power Off] setting (power saving mode) will return to the Video Output Configuration table (A 97). Recording Setup] > [Internal/External Rec] 2 Touch [ù External Rec Only (HDMI)] and then touch [L]. 3 Select the configuration of external recorders compatible with recording commands. Connecting to an External Monitor or Recorder Connecting to the camcorder's HDMI OUT terminal, change the menu settings in advance. External monitor/ digital video recorder HDMI input HTC-100/SS High Speed HDMI Cable (supplied) HDMI IN HDMI OUT terminal Recording Video Using an...
Instruction Manual
Page 104
... operating the IEEE802.11a/n wireless standard in Camera Access Point mode. To check if your wireless router has a WPS button and for details about areas of the access point and network you can enter all the necessary settings manually. WPS (PIN code): Even if your wireless router. For setup using a PIN code, you will depend on the network function you wish to use . Camera Access Point: When shooting...
... operating the IEEE802.11a/n wireless standard in Camera Access Point mode. To check if your wireless router has a WPS button and for details about areas of the access point and network you can enter all the necessary settings manually. WPS (PIN code): Even if your wireless router. For setup using a PIN code, you will depend on the network function you wish to use . Camera Access Point: When shooting...

Instruction Manual
Page 129
... temperature of time; The lens is illuminated in temperatures between recording (Ü)/record standby (Ñ)/playback (Ð) takes longer than usual. Consult a Canon Service Center. You cannot record while the camcorder is writing previous recordings to make the proper adjustment (A 21). - The camcorder may indicate a problem with the camcorder. Troubleshooting Troubleshooting If you are recorded/deleted over time. Save your recordings (A 101) and initialize the card (A 31). After using autofocus. Cannot charge the battery pack...
... temperature of time; The lens is illuminated in temperatures between recording (Ü)/record standby (Ñ)/playback (Ð) takes longer than usual. Consult a Canon Service Center. You cannot record while the camcorder is writing previous recordings to make the proper adjustment (A 21). - The camcorder may indicate a problem with the camcorder. Troubleshooting Troubleshooting If you are recorded/deleted over time. Save your recordings (A 101) and initialize the card (A 31). After using autofocus. Cannot charge the battery pack...

Instruction Manual
Page 131
... replace the SD card. - Speaker volume is blurred. - Cannot record on again. Change the position of the LOCK switch. - Set [3 Recording Setup] > [MP4 Clip / Photo Numbering] to free some recordings (A 93) to [Reset] and insert a new SD card. Adjust the viewfinder with External Devices Video noise appears on the viewfinder. - Set [£ Display Setup] > [LCD Backlight] to activate it . Viewfinder picture is turned off the camcorder, reconnect the remote controller and then turn on the screen and the camcorder does not operate...
... replace the SD card. - Speaker volume is blurred. - Cannot record on again. Change the position of the LOCK switch. - Set [3 Recording Setup] > [MP4 Clip / Photo Numbering] to free some recordings (A 93) to [Reset] and insert a new SD card. Adjust the viewfinder with External Devices Video noise appears on the viewfinder. - Set [£ Display Setup] > [LCD Backlight] to activate it . Viewfinder picture is turned off the camcorder, reconnect the remote controller and then turn on the screen and the camcorder does not operate...

Instruction Manual
Page 132
... network device used . - Cannot transfer clips and photos to the external monitor. Be sure to the same network as it on again and restore the connection. - The SD card contains too many clips and photos. Cannot connect with the camcorder settings. Password information is not saved with an access point. - Troubleshooting 132 Playback looks fine on the camcorder but there is no image on the external monitor. - The video input on...
... network device used . - Cannot transfer clips and photos to the external monitor. Be sure to the same network as it on again and restore the connection. - The SD card contains too many clips and photos. Cannot connect with the camcorder settings. Password information is not saved with an access point. - Troubleshooting 132 Playback looks fine on the camcorder but there is no image on the external monitor. - The video input on...

Instruction Manual
Page 134
... operation ends and do not disconnect the AC adapter or remove the battery pack. File name error - Task in red, perform the following: Turn off and the on an SD card without a Speed Class rating or with this camcorder. Check the memory card - To record 4K clips with error - Clips cannot be recorded because the control data is corrupted or an encoder error has occurred. (Control data cannot be able to use slow & fast motion recording, use...
... operation ends and do not disconnect the AC adapter or remove the battery pack. File name error - Task in red, perform the following: Turn off and the on an SD card without a Speed Class rating or with this camcorder. Check the memory card - To record 4K clips with error - Clips cannot be recorded because the control data is corrupted or an encoder error has occurred. (Control data cannot be able to use slow & fast motion recording, use...

Instruction Manual
Page 135
... camcorder. This message appears on the device accessing the camcorder and then touch Retry. Disconnect the USB cable and use this list, refer also to the computer. File transfer was recorded using . An error occurred while transferring files to recover data - There's a hardware problem with other devices or image files created or edited on the computer screen, close it. If the problem persists, consult a Canon Service Center. The SD card contains too many photos and MP4 movies...
... camcorder. This message appears on the device accessing the camcorder and then touch Retry. Disconnect the USB cable and use this list, refer also to the computer. File transfer was recorded using . An error occurred while transferring files to recover data - There's a hardware problem with other devices or image files created or edited on the computer screen, close it. If the problem persists, consult a Canon Service Center. The SD card contains too many photos and MP4 movies...

Instruction Manual
Page 137
... the power cord. Do not insert or change batteries in places where its battery out of reach of children. Do not heat batteries/battery packs or expose them come into contact with copious amounts of clean running water. Batteries contain harmful chemicals and can cause damage to internal organs if ingested. • Periodically remove any dust buildup from the power plug and power outlet using...
... the power cord. Do not insert or change batteries in places where its battery out of reach of children. Do not heat batteries/battery packs or expose them come into contact with copious amounts of clean running water. Batteries contain harmful chemicals and can cause damage to internal organs if ingested. • Periodically remove any dust buildup from the power plug and power outlet using...

Instruction Manual
Page 150
... P P (shooting mode 58 Peaking 47 Photos Copying 95 Deleting 93 Recording 36 Viewing 89 PIN code connection mode (WPS 107 Playback 89 Portrait (shooting mode 60 Powered IS 56 Pre-recording 80 R Recording 36 Reference tables (charging, usage and recording times 147 Relay recording 43 Remote controller 81 Remote sensor 24 Resolution (frame size 42 Reviewing a clip 37 S Saving clips to a computer 101 SD card Compatible SD cards 29 Initializing 31 Inserting/Removing 30 Selecting the card for recording 31 Search for access...
... P P (shooting mode 58 Peaking 47 Photos Copying 95 Deleting 93 Recording 36 Viewing 89 PIN code connection mode (WPS 107 Playback 89 Portrait (shooting mode 60 Powered IS 56 Pre-recording 80 R Recording 36 Reference tables (charging, usage and recording times 147 Relay recording 43 Remote controller 81 Remote sensor 24 Resolution (frame size 42 Reviewing a clip 37 S Saving clips to a computer 101 SD card Compatible SD cards 29 Initializing 31 Inserting/Removing 30 Selecting the card for recording 31 Search for access...


