
XA11 XA15 Instruction Manual
Page 2
... granted or implied for any other countries. • macOS is licensed under license from Microsoft. • "Full HD 1080" refers to Canon camcorders compliant with high-definition video composed of 1,080 vertical pixels (scanning lines). • This product is a trademark of Apple Inc., ...trademarks or registered trademarks of Panasonic Corporation and Sony Corporation. • Manufactured under AT&T patents for the MPEG-4 standard and may be used for encoding MPEG-4 compliant video and/or decoding MPEG-4 compliant video that was encoded only (1) for MPEG-4 standard. • THIS ...
... granted or implied for any other countries. • macOS is licensed under license from Microsoft. • "Full HD 1080" refers to Canon camcorders compliant with high-definition video composed of 1,080 vertical pixels (scanning lines). • This product is a trademark of Apple Inc., ...trademarks or registered trademarks of Panasonic Corporation and Sony Corporation. • Manufactured under AT&T patents for the MPEG-4 standard and may be used for encoding MPEG-4 compliant video and/or decoding MPEG-4 compliant video that was encoded only (1) for MPEG-4 standard. • THIS ...

XA11 XA15 Instruction Manual
Page 3
Highlights of the Camcorder The Canon XA15 / XA11 HD Camcorder is a high-performance camcorder whose compact size makes ...and DIGIC DV 4 image processor The camcorder is removable so you can appreciate the improved detail when using Dynamic IS. Furthermore, you want You can have the camcorder in manual focus but is then processed.... Shooting video with ease (A 91). Operability 3 Emphasis on the handle unit, you can assign certain frequently used functions to a customizable button and adjust those were not enough, the camcorder also features 5 assignable buttons to make...
Highlights of the Camcorder The Canon XA15 / XA11 HD Camcorder is a high-performance camcorder whose compact size makes ...and DIGIC DV 4 image processor The camcorder is removable so you can appreciate the improved detail when using Dynamic IS. Furthermore, you want You can have the camcorder in manual focus but is then processed.... Shooting video with ease (A 91). Operability 3 Emphasis on the handle unit, you can assign certain frequently used functions to a customizable button and adjust those were not enough, the camcorder also features 5 assignable buttons to make...

XA11 XA15 Instruction Manual
Page 4
... card when one becomes full, and converting scenes to MP4 (A 114). You can make recordings, you capture those important shots. When using different formats. Audio scene select With the audio scene select function (A 76), you can change the recording frame rate to achieve a... which gives you additional range and versatility while you want them. The viewfinder can be tilted 45 degrees upward, which allows you can use microphones that your recording. Other Features Versatile audio connectivity You can choose between AVCHD and MP4 formats (A 33). Special recording modes (A 43...
... card when one becomes full, and converting scenes to MP4 (A 114). You can make recordings, you capture those important shots. When using different formats. Audio scene select With the audio scene select function (A 76), you can change the recording frame rate to achieve a... which gives you additional range and versatility while you want them. The viewfinder can be tilted 45 degrees upward, which allows you can use microphones that your recording. Other Features Versatile audio connectivity You can choose between AVCHD and MP4 formats (A 33). Special recording modes (A 43...
XA11 XA15 Instruction Manual
Page 5
... Tele-Converter 55 Advanced Image Stabilization 56 Automatic Gain Control (AGC) Limit 57 Automatic Exposure Recording Programs 58 Exposure Adjustment 60 Using the Manual Exposure Recording Program 60 Exposure Compensation 61 White Balance 63 Special Scene Recording Programs 65 Looks and Other Image Effects... Audio 72 Audio Settings and Recorded Audio Channels 72 Connecting an External Microphone or External Audio Input Source to the Camcorder 73 Using Line Input or an External Microphone Connected to an INPUT Terminal 73 Recording Audio to Channel 2 (CH2) 74 Audio Recording ...
... Tele-Converter 55 Advanced Image Stabilization 56 Automatic Gain Control (AGC) Limit 57 Automatic Exposure Recording Programs 58 Exposure Adjustment 60 Using the Manual Exposure Recording Program 60 Exposure Compensation 61 White Balance 63 Special Scene Recording Programs 65 Looks and Other Image Effects... Audio 72 Audio Settings and Recorded Audio Channels 72 Connecting an External Microphone or External Audio Input Source to the Camcorder 73 Using Line Input or an External Microphone Connected to an INPUT Terminal 73 Recording Audio to Channel 2 (CH2) 74 Audio Recording ...
XA11 XA15 Instruction Manual
Page 6
...Built-in Microphone) 79 Microphone Attenuator (Built-in Microphone) 80 Low Cut Filter (MIC Terminal) 80 Microphone Attenuator (MIC Terminal) 81 Using Headphones 82 Color Bars/Audio Reference Signal 83 Recording Color Bars 83 Recording an Audio Reference Signal 83 Video Snapshot 84 Pre-Recording 85 ...Onscreen Displays and Data Code 86 Infrared Recording 87 Activating Infrared Mode 87 Using the GP-E2 GPS Receiver 88 Connecting the GPS Receiver 88 4 Customization 90 CUSTOM Dial and Button 90 Assignable Buttons 91 ...
...Built-in Microphone) 79 Microphone Attenuator (Built-in Microphone) 80 Low Cut Filter (MIC Terminal) 80 Microphone Attenuator (MIC Terminal) 81 Using Headphones 82 Color Bars/Audio Reference Signal 83 Recording Color Bars 83 Recording an Audio Reference Signal 83 Video Snapshot 84 Pre-Recording 85 ...Onscreen Displays and Data Code 86 Infrared Recording 87 Activating Infrared Mode 87 Using the GP-E2 GPS Receiver 88 Connecting the GPS Receiver 88 4 Customization 90 CUSTOM Dial and Button 90 Assignable Buttons 91 ...
XA11 XA15 Instruction Manual
Page 7
... Pack 142 Memory Card 142 Built-in Rechargeable Lithium Battery 143 Disposal 143 Maintenance/Others 144 Cleaning 144 Condensation 144 Viewing the Certification Logo 144 Using the Camcorder Abroad 145 Optional Accessories 146 Specifications 149 Reference Tables 152 Approximate recording times 152 Approximate number of photos 152 Charging, Recording and Playback...
... Pack 142 Memory Card 142 Built-in Rechargeable Lithium Battery 143 Disposal 143 Maintenance/Others 144 Cleaning 144 Condensation 144 Viewing the Certification Logo 144 Using the Camcorder Abroad 145 Optional Accessories 146 Specifications 149 Reference Tables 152 Approximate recording times 152 Approximate number of photos 152 Charging, Recording and Playback...

XA11 XA15 Instruction Manual
Page 8
... cable is on or flashing. Unless indicated otherwise, illustrations and menu icons refer to the o. • Some screenshots in this manual. • o: Used as an abbreviation for purchasing the Canon XA15 / XA11. Do not open the double memory card slot cover. - Do not disconnect the power source or turn off the camcorder. - Please...
... cable is on or flashing. Unless indicated otherwise, illustrations and menu icons refer to the o. • Some screenshots in this manual. • o: Used as an abbreviation for purchasing the Canon XA15 / XA11. Do not open the double memory card slot cover. - Do not disconnect the power source or turn off the camcorder. - Please...
XA11 XA15 Instruction Manual
Page 9
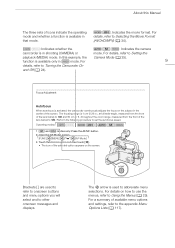
... the screen. In this Manual The three sets of the selected option appears on how to use the menus, refer to Using the Menus (A 29). For 9 details, refer to Setting the playback (MEDIA) mode. Brackets [ ] are used to the appendix Menu Options Lists (A 117). For a summary of the screen. About this ...G. The > arrow is in mode. For details, refer to Selecting the Movie Format (AVCHD/MP4) (A 34). : Indicates whether the : Indicates the camera camcorder is used to refer to onscreen buttons and menu options you will select and to set the autofocus speed.
... the screen. In this Manual The three sets of the selected option appears on how to use the menus, refer to Using the Menus (A 29). For 9 details, refer to Setting the playback (MEDIA) mode. Brackets [ ] are used to the appendix Menu Options Lists (A 117). For a summary of the screen. About this ...G. The > arrow is in mode. For details, refer to Selecting the Movie Format (AVCHD/MP4) (A 34). : Indicates whether the : Indicates the camera camcorder is used to refer to onscreen buttons and menu options you will select and to set the autofocus speed.

XA11 XA15 Instruction Manual
Page 16
... battery attachment unit and slide it forward until it clicks in .) from the DC plug (the plug to be powered with a battery pack or directly using the compact power adapter. 1 Connect the power cord to the compact power adapter. 2 Plug the power cord into a power outlet. 3 Connect the compact power adapter...
... battery attachment unit and slide it forward until it clicks in .) from the DC plug (the plug to be powered with a battery pack or directly using the compact power adapter. 1 Connect the power cord to the compact power adapter. 2 Plug the power cord into a power outlet. 3 Connect the compact power adapter...

XA11 XA15 Instruction Manual
Page 18
... fully charge it permanently to one place as this camcorder. • To prevent equipment breakdowns and excessive heating, do not fix it and then use with this may cause a malfunction. 18 • Do not connect to the camcorder's DC IN terminal or to the compact power adapter any electrical...CHG indicator has gone out before restoring the power supply. • If remaining battery time is an issue, you can power the camcorder using the compact power adapter, do not connect the supplied compact power adapter to voltage converters for overseas travels or special power sources such as ...
... fully charge it permanently to one place as this camcorder. • To prevent equipment breakdowns and excessive heating, do not fix it and then use with this may cause a malfunction. 18 • Do not connect to the camcorder's DC IN terminal or to the compact power adapter any electrical...CHG indicator has gone out before restoring the power supply. • If remaining battery time is an issue, you can power the camcorder using the compact power adapter, do not connect the supplied compact power adapter to voltage converters for overseas travels or special power sources such as ...
XA11 XA15 Instruction Manual
Page 19
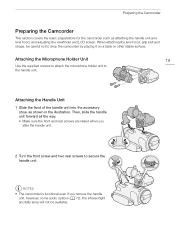
... all the way. • Make sure the front and rear screws are raised when you remove the handle unit. Attaching the Microphone Holder Unit 19 Use the supplied screws to attach the microphone holder unit to drop the camcorder by placing it on a table or other stable surface. NOTES • The...
... all the way. • Make sure the front and rear screws are raised when you remove the handle unit. Attaching the Microphone Holder Unit 19 Use the supplied screws to attach the microphone holder unit to drop the camcorder by placing it on a table or other stable surface. NOTES • The...
XA11 XA15 Instruction Manual
Page 20
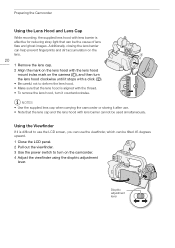
... clockwise until it stops with lens barrier cannot be the cause of lens flare and ghost images. NOTES • Use the supplied lens cap when carrying the camcorder or storing it counterclockwise. Using the Viewfinder If it is effective for reducing stray light that the lens cap and the lens hood with... a click (ባ). • Be careful not to turn on the camera (ቢ), and then turn it after use. • Note that can help prevent fingerprints and dirt accumulation on the lens. 20 1 Remove the lens cap. 2 Align the mark on the lens hood...
... clockwise until it stops with lens barrier cannot be the cause of lens flare and ghost images. NOTES • Use the supplied lens cap when carrying the camcorder or storing it counterclockwise. Using the Viewfinder If it is effective for reducing stray light that the lens cap and the lens hood with... a click (ባ). • Be careful not to turn on the camera (ቢ), and then turn it after use. • Note that can help prevent fingerprints and dirt accumulation on the lens. 20 1 Remove the lens cap. 2 Align the mark on the lens hood...
XA11 XA15 Instruction Manual
Page 21
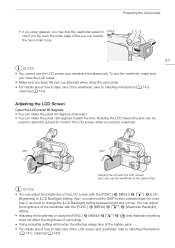
...seconds to change the [LCD Backlight] setting between bright and normal. Rotating the LCD toward the lens can be useful to allow the subject to monitor the LCD screen while you use the viewfinder. 180° 180° 90° Subject can monitor the LCD screen (you can adjust ...the brightness of the LCD screen with the [FUNC.] > [MENU] > q > [Viewfinder Backlight] setting. • Adjusting the brightness or using the camcorder. • For details about how to take care of the viewfinder, refer to Handling Precautions (A 141), Cleaning (A 144). Also, you can...
...seconds to change the [LCD Backlight] setting between bright and normal. Rotating the LCD toward the lens can be useful to allow the subject to monitor the LCD screen while you use the viewfinder. 180° 180° 90° Subject can monitor the LCD screen (you can adjust ...the brightness of the LCD screen with the [FUNC.] > [MENU] > q > [Viewfinder Backlight] setting. • Adjusting the brightness or using the camcorder. • For details about how to take care of the viewfinder, refer to Handling Precautions (A 141), Cleaning (A 144). Also, you can...
XA11 XA15 Instruction Manual
Page 22
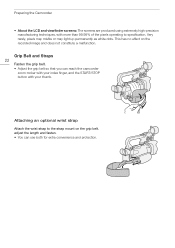
... permanently as white dots. Grip Belt and Straps 22 Fasten the grip belt. • Adjust the grip belt so that you can use both for extra convenience and protection. Attaching an optional wrist strap Attach the wrist strap to specification. Preparing the Camcorder • About ...the LCD and viewfinder screens: The screens are produced using extremely high-precision manufacturing techniques, with your index finger, and the START/STOP button with more than 99.99% of the pixels operating...
... permanently as white dots. Grip Belt and Straps 22 Fasten the grip belt. • Adjust the grip belt so that you can use both for extra convenience and protection. Attaching an optional wrist strap Attach the wrist strap to specification. Preparing the Camcorder • About ...the LCD and viewfinder screens: The screens are produced using extremely high-precision manufacturing techniques, with your index finger, and the START/STOP button with more than 99.99% of the pixels operating...
XA11 XA15 Instruction Manual
Page 24
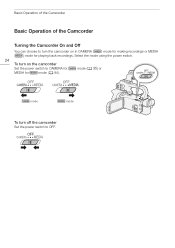
Select the mode using the power switch. 24 To turn on in CAMERA ( ) mode for making recordings or MEDIA ( ) mode for mode (A 94). mode mode To turn off the camcorder Set the power switch to CAMERA for mode (A 35) or MEDIA for playing back recordings. Basic Operation of the Camcorder Basic Operation of the Camcorder Turning the Camcorder On and Off You can choose to turn the camcorder on the camcorder Set the power switch to OFF.
Select the mode using the power switch. 24 To turn on in CAMERA ( ) mode for making recordings or MEDIA ( ) mode for mode (A 94). mode mode To turn off the camcorder Set the power switch to CAMERA for mode (A 35) or MEDIA for playing back recordings. Basic Operation of the Camcorder Basic Operation of the Camcorder Turning the Camcorder On and Off You can choose to turn the camcorder on the camcorder Set the power switch to OFF.
XA11 XA15 Instruction Manual
Page 25
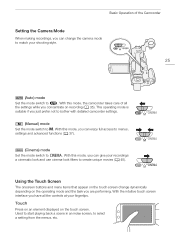
... advanced functions (A 37). (Cinema) mode Set the mode switch to select a setting from the menus, etc. With this mode, you are performing. Used to start playing back a scene in an index screen, to E. This operating mode is suitable if you concentrate on the touch screen change the camera... mode to match your recordings a cinematic look and use cinema-look filters to n. With the intuitive touch screen interface you have all the settings while you just prefer not to bother with detailed ...
... advanced functions (A 37). (Cinema) mode Set the mode switch to select a setting from the menus, etc. With this mode, you are performing. Used to start playing back a scene in an index screen, to E. This operating mode is suitable if you concentrate on the touch screen change the camera... mode to match your recordings a cinematic look and use cinema-look filters to n. With the intuitive touch screen interface you have all the settings while you just prefer not to bother with detailed ...
XA11 XA15 Instruction Manual
Page 26
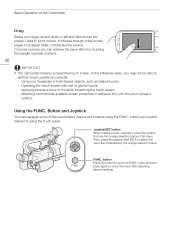
...) to close the menu after adjusting desired settings. FUNC. In the following cases, you can navigate some of the camcorder's menus and screens using the touch panel. Button and Joystick You can achieve the same effect by the orange selection frame. Joystick/SET button When making a menu selection... of the Camcorder Drag Swipe your fingernails or hard-tipped objects, such as ballpoint pens. - Using your finger up and down or left and right across the screen. Basic Operation of using the FUNC. Used to scroll menus, to browse through index screen pages or to open the FUNC.
...) to close the menu after adjusting desired settings. FUNC. In the following cases, you can navigate some of the camcorder's menus and screens using the touch panel. Button and Joystick You can achieve the same effect by the orange selection frame. Joystick/SET button When making a menu selection... of the Camcorder Drag Swipe your fingernails or hard-tipped objects, such as ballpoint pens. - Using your finger up and down or left and right across the screen. Basic Operation of using the FUNC. Used to scroll menus, to browse through index screen pages or to open the FUNC.
XA11 XA15 Instruction Manual
Page 27
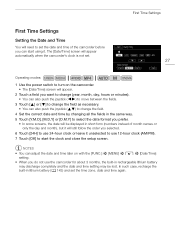
...Time] screen will appear automatically when the camcorder's clock is not set. 27 Operating modes: 1 Use the power switch to turn on with the [FUNC.] > [MENU] > q > [Date/Time] setting. • When you do not use the camcorder for about 3 months, the built-in rechargeable lithium battery may discharge completely and the... the date will be lost. In such case, recharge the built-in short form (numbers instead of the camcorder before you can start using it unselected to use 12-hour clock (AM/PM). 7 Touch [OK] to start the clock and close the setup screen. First Time Settings First Time ...
...Time] screen will appear automatically when the camcorder's clock is not set. 27 Operating modes: 1 Use the power switch to turn on with the [FUNC.] > [MENU] > q > [Date/Time] setting. • When you do not use the camcorder for about 3 months, the built-in rechargeable lithium battery may discharge completely and the... the date will be lost. In such case, recharge the built-in short form (numbers instead of the camcorder before you can start using it unselected to use 12-hour clock (AM/PM). 7 Touch [OK] to start the clock and close the setup screen. First Time Settings First Time ...
XA11 XA15 Instruction Manual
Page 29
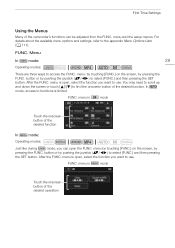
FUNC. button or by pushing the joystick (Ý/Þ) to use . You may need to scroll up and down the screen or touch [Í]/[Î] to access the FUNC. FUNC...mode: Operating modes: Just like during mode, you can be adjusted from the FUNC. button or by pushing the joystick (Ý/Þ) to use . menu is limited. In mode, access to the appendix Menu Options Lists (A 117). menu: by touching [FUNC.] on the screen,...is open the FUNC. menu by touching [FUNC.] on the screen, by pressing the FUNC. First Time Settings Using the Menus Many of the desired operation
FUNC. button or by pushing the joystick (Ý/Þ) to use . You may need to scroll up and down the screen or touch [Í]/[Î] to access the FUNC. FUNC...mode: Operating modes: Just like during mode, you can be adjusted from the FUNC. button or by pushing the joystick (Ý/Þ) to use . menu is limited. In mode, access to the appendix Menu Options Lists (A 117). menu: by touching [FUNC.] on the screen,...is open the FUNC. menu by touching [FUNC.] on the screen, by pressing the FUNC. First Time Settings Using the Menus Many of the desired operation

XA11 XA15 Instruction Manual
Page 30
...selection bar, touch [æ]. 6 Touch the desired option and then touch [X]. • You can touch [X] to close the menu at any time. To use the joystick 1 mode only: Push the joystick (Ý/Þ) to select [FUNC.] and then press the SET button. • Alternatively, you can touch ... joystick and other buttons. First Time Settings Setup Menus In this section for settings in the FUNC. Operating modes: 30 To use both methods. If necessary, refer back to use touch panel controls 1 mode only: Touch [FUNC.]. 2 Touch [MENU]. 3 Touch the tab of the desired menu. 4 Drag ...
...selection bar, touch [æ]. 6 Touch the desired option and then touch [X]. • You can touch [X] to close the menu at any time. To use the joystick 1 mode only: Push the joystick (Ý/Þ) to select [FUNC.] and then press the SET button. • Alternatively, you can touch ... joystick and other buttons. First Time Settings Setup Menus In this section for settings in the FUNC. Operating modes: 30 To use both methods. If necessary, refer back to use touch panel controls 1 mode only: Touch [FUNC.]. 2 Touch [MENU]. 3 Touch the tab of the desired menu. 4 Drag ...


