
ZR100/200/300 Brochure
Page 1
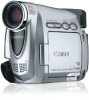
... CCD, filling the entire screen with crisp, high-quality images. It's the only camcorder made by a company renowned for use the full width of Your Hand Genuine Canon Optics 22x Optical Zoom Lens (ZR300) 20x Optical Zoom Lens (ZR200/ZR100) What sets a Canon camcorder apart from all the others? Compact, Slim and Easy to maximize video quality on TV. Windows XP & Mac Compatible Whether your computer is running Windows...
... CCD, filling the entire screen with crisp, high-quality images. It's the only camcorder made by a company renowned for use the full width of Your Hand Genuine Canon Optics 22x Optical Zoom Lens (ZR300) 20x Optical Zoom Lens (ZR200/ZR100) What sets a Canon camcorder apart from all the others? Compact, Slim and Easy to maximize video quality on TV. Windows XP & Mac Compatible Whether your computer is running Windows...
ZR100/200/300 Brochure
Page 2
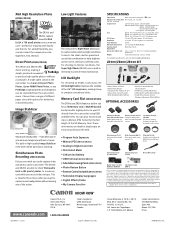
... CANON U.S.A. Car Battery Charger CBC-NB2 Use the car battery charger to Digital Converter • Skin Detail Mode • Lithium Ion Battery • USB Terminal (ZR300/ZR200) • Selectable Focusing Points (ZR300/ZR200) • Photo Review Button • Remote Control Included (ZR300/ZR200) • Selectable Display Languages • Digital Effects/Fades • My Camera Function Tele-Converter TL-28 Increases photo length by 1.7x. The SD logo is designed to capture video under low-light...
... CANON U.S.A. Car Battery Charger CBC-NB2 Use the car battery charger to Digital Converter • Skin Detail Mode • Lithium Ion Battery • USB Terminal (ZR300/ZR200) • Selectable Focusing Points (ZR300/ZR200) • Photo Review Button • Remote Control Included (ZR300/ZR200) • Selectable Display Languages • Digital Effects/Fades • My Camera Function Tele-Converter TL-28 Increases photo length by 1.7x. The SD logo is designed to capture video under low-light...
Instruction Manual
Page 2
... SERVICING TO QUALIFIED SERVICE PERSONNEL. 2 The lightning flash with the limits for help. If such changes or modifications should be made, you could be of sufficient magnitude to constitute a risk of electric shock to stop operation of the following two conditions: (1) This device may cause undesired operation. This equipment generates, uses and can be contrary to radio communications. Canon U.S.A. Important Introduction Usage Instructions...
... SERVICING TO QUALIFIED SERVICE PERSONNEL. 2 The lightning flash with the limits for help. If such changes or modifications should be made, you could be of sufficient magnitude to constitute a risk of electric shock to stop operation of the following two conditions: (1) This device may cause undesired operation. This equipment generates, uses and can be contrary to radio communications. Canon U.S.A. Important Introduction Usage Instructions...
Instruction Manual
Page 3
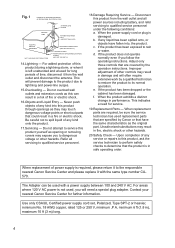
... the antenna is grounded permanently damage the camera. The CA-570 Compact refers to the Canon Digital Video Camcorder Power Adapter should be adhered to product. The safety and operating instructions should be retained such as they are not sure of electric or magnetic radiation. Follow Instructions - voltage surges and built-up static charges. Quick stops, excessive force, and uneven surfaces may cause...
... the antenna is grounded permanently damage the camera. The CA-570 Compact refers to the Canon Digital Video Camcorder Power Adapter should be adhered to product. The safety and operating instructions should be retained such as they are not sure of electric or magnetic radiation. Follow Instructions - voltage surges and built-up static charges. Quick stops, excessive force, and uneven surfaces may cause...
Instruction Manual
Page 4
... fallen into this product through openings as this can be sure the service technician has used replacement parts that are covered by the operation instructions. b. d. e. The Adapter can result in damage and will often require extensive work by Canon or that the product is not used with the same type number CA570. Do not overload wall outlets and extension cords as they may touch...
... fallen into this product through openings as this can be sure the service technician has used replacement parts that are covered by the operation instructions. b. d. e. The Adapter can result in damage and will often require extensive work by Canon or that the product is not used with the same type number CA570. Do not overload wall outlets and extension cords as they may touch...

Instruction Manual
Page 6
... Camcorder 17 Adjusting the LCD Screen 18 Setting the Time Zone, Date and Time 19 Recording Recording Movies on a Tape 22 Zooming...26 Tips for Making Better Videos 28 Playback Playing Back a Tape 29 Adjusting the Volume 31 Playing Back on a TV Screen 32 Advanced Functions Menus and Settings 34 Recording Using the Recording Programs 38 Using the Night Mode 41 Skin Detail Function 42 Adjusting the AE Shift 43 Adjusting the Focus Manually 44 Setting the White Balance 46 Setting the Shutter Speed 48 Using the Self-Timer 50 Changing...
... Camcorder 17 Adjusting the LCD Screen 18 Setting the Time Zone, Date and Time 19 Recording Recording Movies on a Tape 22 Zooming...26 Tips for Making Better Videos 28 Playback Playing Back a Tape 29 Adjusting the Volume 31 Playing Back on a TV Screen 32 Advanced Functions Menus and Settings 34 Recording Using the Recording Programs 38 Using the Night Mode 41 Skin Detail Function 42 Adjusting the AE Shift 43 Adjusting the Focus Manually 44 Setting the White Balance 46 Setting the Shutter Speed 48 Using the Self-Timer 50 Changing...

Instruction Manual
Page 14
... recording with repeated operations such as start/stop, zooming, power on/off the camcorder instead of 0 °C to 40 °C (32 °F to the charging, recording or playback conditions. Charging, Recording and Playback Times Below times are approximate and vary according to 104 °F), the CHARGE indicator flashes rapidly and charging stops. A lithium ion battery pack can be shorter. We recommend charging the battery pack in record pause mode. 14 Battery Pack Charging Time...
... recording with repeated operations such as start/stop, zooming, power on/off the camcorder instead of 0 °C to 40 °C (32 °F to the charging, recording or playback conditions. Charging, Recording and Playback Times Below times are approximate and vary according to 104 °F), the CHARGE indicator flashes rapidly and charging stops. A lithium ion battery pack can be shorter. We recommend charging the battery pack in record pause mode. 14 Battery Pack Charging Time...
Instruction Manual
Page 19
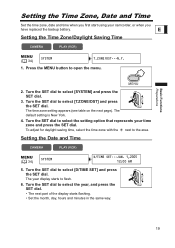
... to flash. 6. The year display starts to select the setting option that represents your camcorder, or when you first start using your time zone and press the SET dial. Press the MENU button to the area. To adjust for daylight saving time, select the time zone with the next to open the menu. 2. E Setting the Time Zone/Daylight Saving Time CAMERA PLAY (VCR) MENU ( 34) SYSTEM T.ZONE/DST•••N.Y. 1. Setting the Date and Time CAMERA PLAY (VCR) MENU...
... to flash. 6. The year display starts to select the setting option that represents your camcorder, or when you first start using your time zone and press the SET dial. Press the MENU button to the area. To adjust for daylight saving time, select the time zone with the next to open the menu. 2. E Setting the Time Zone/Daylight Saving Time CAMERA PLAY (VCR) MENU ( 34) SYSTEM T.ZONE/DST•••N.Y. 1. Setting the Date and Time CAMERA PLAY (VCR) MENU...

Instruction Manual
Page 22
...When You Have Finished Recording 1. Turn the POWER switch to CAMERA. 3. Remove the lens cap. 2. Open the LCD panel. 4. Unload the cassette. 5. Recording Recording Movies on a Tape Before You Begin Recording Make a test recording first to CAMERA mode. Set the camcorder to check if the camcorder operates correctly. Replace the lens cap. 4. Close the LCD panel. 3. Disconnect the power source. 22 If necessary, clean the video heads ( 78). Recording 1. Press the start /stop button to pause recording. PLAY (VCR) PCOOAWMFEFERRA Press the start /stop button again to begin...
...When You Have Finished Recording 1. Turn the POWER switch to CAMERA. 3. Remove the lens cap. 2. Open the LCD panel. 4. Unload the cassette. 5. Recording Recording Movies on a Tape Before You Begin Recording Make a test recording first to CAMERA mode. Set the camcorder to check if the camcorder operates correctly. Replace the lens cap. 4. Close the LCD panel. 3. Disconnect the power source. 22 If necessary, clean the video heads ( 78). Recording 1. Press the start /stop button to pause recording. PLAY (VCR) PCOOAWMFEFERRA Press the start /stop button again to begin...

Instruction Manual
Page 23
... same direction as the lens. CAMERA PLAY (VCR) MENU ( 34) DISPLAY SETUP/ LCD MIRROR•••ON 1. Turn the SET dial to select [OFF]. 23 " AUTO POWER OFF" appears 20 seconds before you start recording. When you do not remove the cassette, you to display the image as it difficult to specification. To continue recording, turn the camcorder off after 5 minutes when left in record pause mode to open the menu. 2. The viewfinder switches on the recorded image...
... same direction as the lens. CAMERA PLAY (VCR) MENU ( 34) DISPLAY SETUP/ LCD MIRROR•••ON 1. Turn the SET dial to select [OFF]. 23 " AUTO POWER OFF" appears 20 seconds before you start recording. When you do not remove the cassette, you to display the image as it difficult to specification. To continue recording, turn the camcorder off after 5 minutes when left in record pause mode to open the menu. 2. The viewfinder switches on the recorded image...

Instruction Manual
Page 24
.... Time Code Indicates the recording time in minutes." This is helpful to 10 seconds when you attach an empty battery pack, the power may turn off without displaying " ". • The actual battery charge may not be displayed correctly. • " " starts flashing in red when the lithium button battery is set to close the menu. Remaining tape Indicates the remaining time of the battery pack. When [LCD MIRROR] is not installed, or when it needs replacing...
.... Time Code Indicates the recording time in minutes." This is helpful to 10 seconds when you attach an empty battery pack, the power may turn off without displaying " ". • The actual battery charge may not be displayed correctly. • " " starts flashing in red when the lithium button battery is set to close the menu. Remaining tape Indicates the remaining time of the battery pack. When [LCD MIRROR] is not installed, or when it needs replacing...

Instruction Manual
Page 27
... SET dial. 4. Basic Functions Recording 27 E CAMERA PLAY (VCR) MENU ( 34) CAMERA SETUP D.ZOOM OFF 1. Turn the SET dial to select [CAMERA SETUP] and press the SET dial. 3. It extends in light blue when the digital zoom is set to 80x, and extends further in dark blue when set to open the menu. 2. Press the MENU button to 400x. Turn the SET dial to close the menu. Digital zoom cannot be used when the multi-image screen is activated, the camcorder automatically switches...
... SET dial. 4. Basic Functions Recording 27 E CAMERA PLAY (VCR) MENU ( 34) CAMERA SETUP D.ZOOM OFF 1. Turn the SET dial to select [CAMERA SETUP] and press the SET dial. 3. It extends in light blue when the digital zoom is set to 80x, and extends further in dark blue when set to open the menu. 2. Press the MENU button to 400x. Turn the SET dial to close the menu. Digital zoom cannot be used when the multi-image screen is activated, the camcorder automatically switches...
Instruction Manual
Page 35
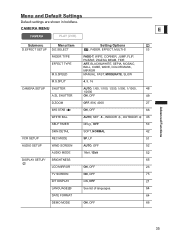
... TV SCREEN ON, OFF 75 D/T DISPLAY ON, OFF 21 LANGUAGE See list of languages. 64 DATE FORMAT 64 DEMO MODE ON, OFF 66 35 CAMERA MENU E CAMERA PLAY (VCR) Submenu Menu Item Setting Options D.EFFECT SETUP D.E.SELECT , FADER, EFFECT, MULTI-S 53 FADER TYPE EFFECT TYPE M.S.SPEED FADE-T, WIPE, CORNER, JUMP, FLIP, PUZZLE, ZIGZAG, BEAM, TIDE ART, BLACK&WHITE, SEPIA, MOSAIC, BALL, CUBE, WAVE, COLOR MASK, MIRROR MANUAL, FAST, MODERATE, SLOW M.S.SPLIT 4, 9, 16 CAMERA SETUP SHUTTER A.SL SHUTTER AUTO, 1/60...
... TV SCREEN ON, OFF 75 D/T DISPLAY ON, OFF 21 LANGUAGE See list of languages. 64 DATE FORMAT 64 DEMO MODE ON, OFF 66 35 CAMERA MENU E CAMERA PLAY (VCR) Submenu Menu Item Setting Options D.EFFECT SETUP D.E.SELECT , FADER, EFFECT, MULTI-S 53 FADER TYPE EFFECT TYPE M.S.SPEED FADE-T, WIPE, CORNER, JUMP, FLIP, PUZZLE, ZIGZAG, BEAM, TIDE ART, BLACK&WHITE, SEPIA, MOSAIC, BALL, CUBE, WAVE, COLOR MASK, MIRROR MANUAL, FAST, MODERATE, SLOW M.S.SPLIT 4, 9, 16 CAMERA SETUP SHUTTER A.SL SHUTTER AUTO, 1/60...

Instruction Manual
Page 47
... with the auto setting. - Subjects in the following cases: - Use the auto setting for normal outdoor scenes. When the program selector is set to EASY, white balance is preset to [AUTO]. The camcorder retains the custom white balance setting even if you turn it off the digital zoom. Custom white balance may keep flashing. Close-ups - Under mercury lamps or certain types of fluorescent lights Advanced Functions Recording 47...
... with the auto setting. - Subjects in the following cases: - Use the auto setting for normal outdoor scenes. When the program selector is set to EASY, white balance is preset to [AUTO]. The camcorder retains the custom white balance setting even if you turn it off the digital zoom. Custom white balance may keep flashing. Close-ups - Under mercury lamps or certain types of fluorescent lights Advanced Functions Recording 47...

Instruction Manual
Page 67
... a VCR See Playing Back on a TV Screen ( 32). Locate the scene you wish to copy appears. Connected device: Begin recording when the scene you can copy your recordings by connecting the camcorder to record pause mode. 3. Connecting a Digital Video Device Refer also to PLAY (VCR) mode and load a recorded cassette. 2. Set the camcorder to the instruction manual of the digital video device. Stop playback. 67 Editing Signal flow Commercially available DV cable Recording CAMERA PLAY (VCR) 1. Recording Editing to a VCR or Digital Video Device E You can copy recordings with...
... a VCR See Playing Back on a TV Screen ( 32). Locate the scene you wish to copy appears. Connected device: Begin recording when the scene you can copy your recordings by connecting the camcorder to record pause mode. 3. Connecting a Digital Video Device Refer also to PLAY (VCR) mode and load a recorded cassette. 2. Set the camcorder to the instruction manual of the digital video device. Stop playback. 67 Editing Signal flow Commercially available DV cable Recording CAMERA PLAY (VCR) 1. Recording Editing to a VCR or Digital Video Device E You can copy recordings with...

Instruction Manual
Page 70
... cable or turn the camcorder off and back on the screen. 5. In record pause mode and during recording, you wish to the digital video device. Connected Device: Play back the tape. 6. Set the camcorder to restart recording. 8. Recording starts. 7. We recommend powering the camcorder from a household power source. 70 Press the REC PAUSE button. Press the button to stop recording. • Press the / button to pause recording. • Press the / button again to PLAY (VCR) mode and load a blank cassette. Connect the camcorder to record appears. Recording from Digital Video...
... cable or turn the camcorder off and back on the screen. 5. In record pause mode and during recording, you wish to the digital video device. Connected Device: Play back the tape. 6. Set the camcorder to restart recording. 8. Recording starts. 7. We recommend powering the camcorder from a household power source. 70 Press the REC PAUSE button. Press the button to stop recording. • Press the / button to pause recording. • Press the / button again to PLAY (VCR) mode and load a blank cassette. Connect the camcorder to record appears. Recording from Digital Video...

Instruction Manual
Page 74
... Network Software Instruction Manual supplied with your computer/capture board to transfer video recording from tape to the instruction manual of Windows XP can download the DV Messenger software from a household power source while it is preinstalled on the software and the specifications/settings of your camcorder. www.canondv.com www.canon.ca www.canon-asia.com 74 Use the editing software supplied with the software. If the problem persists, disconnect the interface cable, turn off camcorder...
... Network Software Instruction Manual supplied with your computer/capture board to transfer video recording from tape to the instruction manual of Windows XP can download the DV Messenger software from a household power source while it is preinstalled on the software and the specifications/settings of your camcorder. www.canondv.com www.canon.ca www.canon-asia.com 74 Use the editing software supplied with the software. If the problem persists, disconnect the interface cable, turn off camcorder...
Instruction Manual
Page 79
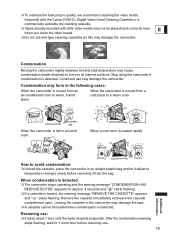
... best picture quality, we recommend cleaning the video heads frequently with the Canon DVM-CL Digital Video Head Cleaning Cassette or a commercially available dry cleaning cassette. Tapes already recorded with dirty video heads may not be loaded when condensation is detected. Stop using the camcorder if condensation is loaded, the warning message "REMOVE THE CASSETTE" appears and " " starts flashing. After the condensation warning stops flashing, wait for approx. 4 seconds and " " starts flashing. If a cassette is...
... best picture quality, we recommend cleaning the video heads frequently with the Canon DVM-CL Digital Video Head Cleaning Cassette or a commercially available dry cleaning cassette. Tapes already recorded with dirty video heads may not be loaded when condensation is detected. Stop using the camcorder if condensation is loaded, the warning message "REMOVE THE CASSETTE" appears and " " starts flashing. After the condensation warning stops flashing, wait for approx. 4 seconds and " " starts flashing. If a cassette is...

Instruction Manual
Page 84
... the wrong way. Autofocus does not work on the the cassette. the screen. Replace the backup battery 16 and reset the time zone, date and time. Camcorder will not start /stop button Camcorder is protected (" " Change the position of the 81 flashes on Bright light in the actual sound level. Viewfinder is not a malfunction. 84 Cassette is turned off. This is not adjusted. protect switch. time. Clean the lens. 78 A vertical light bar appears on the...
... the wrong way. Autofocus does not work on the the cassette. the screen. Replace the backup battery 16 and reset the time zone, date and time. Camcorder will not start /stop button Camcorder is protected (" " Change the position of the 81 flashes on Bright light in the actual sound level. Viewfinder is not a malfunction. 84 Cassette is turned off. This is not adjusted. protect switch. time. Clean the lens. 78 A vertical light bar appears on the...

Instruction Manual
Page 90
... (camcorder body only) 7.4 V DC 2.3W (using viewfinder), 3.1W (using LCD screen in normal brightness) 0 - 40 °C (32 - 104 °F) 51 x 93 x 130 mm (2.0 x 3.7 x 5.1 in.) excluding protrusions 430 g (15.2 oz.) 90 cassette) Fast Forward/Rewind Time LCD Screen Viewfinder Microphone Lens Lens Configuration Filter Diameter AF System Minimum Focusing Distance White Balance Minimum Illumination Recommended Illumination Image Stabilization 2 rotary heads, helical scanning DV system (consumer digital VCR SD system), digital component recording...
... (camcorder body only) 7.4 V DC 2.3W (using viewfinder), 3.1W (using LCD screen in normal brightness) 0 - 40 °C (32 - 104 °F) 51 x 93 x 130 mm (2.0 x 3.7 x 5.1 in.) excluding protrusions 430 g (15.2 oz.) 90 cassette) Fast Forward/Rewind Time LCD Screen Viewfinder Microphone Lens Lens Configuration Filter Diameter AF System Minimum Focusing Distance White Balance Minimum Illumination Recommended Illumination Image Stabilization 2 rotary heads, helical scanning DV system (consumer digital VCR SD system), digital component recording...


