
Instruction Manual
Page 6
...Screen 18 Setting the Time Zone, Date and Time 19 Recording Recording Movies on a Tape 22 Zooming...26 Tips for Making Better Videos 28 Playback Playing Back a Tape 29 Adjusting the Volume 31 Playing Back on a TV Screen 32 Advanced Functions Menus and Settings 34 Recording Using the ... the Self-Timer 50 Changing the Recording Mode (SP/LP 51 Audio Recording 52 Using Digital Effects 53 Widescreen TV Recording (16:9 57 Playback Magnifying the Image 58 Displaying the Data Code 59 End Search...61 Playing Back a Tape with Added Sound 62 Other Functions Customizing the Camcorder...
...Screen 18 Setting the Time Zone, Date and Time 19 Recording Recording Movies on a Tape 22 Zooming...26 Tips for Making Better Videos 28 Playback Playing Back a Tape 29 Adjusting the Volume 31 Playing Back on a TV Screen 32 Advanced Functions Menus and Settings 34 Recording Using the ... the Self-Timer 50 Changing the Recording Mode (SP/LP 51 Audio Recording 52 Using Digital Effects 53 Widescreen TV Recording (16:9 57 Playback Magnifying the Image 58 Displaying the Data Code 59 End Search...61 Playing Back a Tape with Added Sound 62 Other Functions Customizing the Camcorder...

Instruction Manual
Page 14
... between 10 °C and 30 °C (50 °F and 86 °F). Recording Time Viewfinder LCD normal bright Typical RecordingTime* Viewfinder LCD normal bright Playback Time NB-2LH NB-2L BP-2L12 BP-2L14 130 min. 115 min. 205 min. 235 min. 135 min. 95 min. 85 min. 115 min... such as start/stop, zooming, power on/off the camcorder instead of 0 °C to 40 °C (32 °F to the charging, recording or playback conditions. Unlike conventional battery packs, you do not need to completely use or discharge it before charging. We recommend that you prepare battery packs...
... between 10 °C and 30 °C (50 °F and 86 °F). Recording Time Viewfinder LCD normal bright Typical RecordingTime* Viewfinder LCD normal bright Playback Time NB-2LH NB-2L BP-2L12 BP-2L14 130 min. 115 min. 205 min. 235 min. 135 min. 95 min. 85 min. 115 min... such as start/stop, zooming, power on/off the camcorder instead of 0 °C to 40 °C (32 °F to the charging, recording or playback conditions. Unlike conventional battery packs, you do not need to completely use or discharge it before charging. We recommend that you prepare battery packs...

Instruction Manual
Page 29
... is less than 15 seconds. Open the LCD panel. You can also close the LCD panel. About the screen display: During playback, the time code gives the hours, minutes, seconds and frames. The remaining tape time may not appear when the time left is distorted, ...clean the video heads using a Canon Head Cleaning Cassette or a commercially available digital video head-cleaning cassette ( 78). Press the / button to PLAY (VCR). 2. Set the camcorder to rewind 4....
... is less than 15 seconds. Open the LCD panel. You can also close the LCD panel. About the screen display: During playback, the time code gives the hours, minutes, seconds and frames. The remaining tape time may not appear when the time left is distorted, ...clean the video heads using a Canon Head Cleaning Cassette or a commercially available digital video head-cleaning cassette ( 78). Press the / button to PLAY (VCR). 2. Set the camcorder to rewind 4....

Instruction Manual
Page 30
Press and hold the button during normal playback or fast forward. There is no sound during special playback. The picture may become distorted during normal playback. (Fast Forward Playback) / (Rewind Playback) Plays back the tape at 9.5 times normal speed (forward or reverse). Special Playback Modes / (Playback Pause) To pause playback, press the / button during some special playback modes. The camcorder stops the tape automatically after 5 minutes in playback pause mode to protect tape and video heads. 30
Press and hold the button during normal playback or fast forward. There is no sound during special playback. The picture may become distorted during normal playback. (Fast Forward Playback) / (Rewind Playback) Plays back the tape at 9.5 times normal speed (forward or reverse). Special Playback Modes / (Playback Pause) To pause playback, press the / button during some special playback modes. The camcorder stops the tape automatically after 5 minutes in playback pause mode to protect tape and video heads. 30

Instruction Manual
Page 31
Turn the SET dial up to increase the volume, and down to increase the volume again. Basic Functions Playback 31 The speaker does not sound when you use the LCD screen for 2 seconds. • You can turn off the volume completely by turning the SET dial down until [OFF] appears. Adjusting the Volume When you close the LCD panel. E Speaker SET dial CAMERA PLAY (VCR) Turn the SET dial up to lower the volume. • A volume bar appears for playback, the camcorder plays back the sound via built-in speaker.
Turn the SET dial up to increase the volume, and down to increase the volume again. Basic Functions Playback 31 The speaker does not sound when you use the LCD screen for 2 seconds. • You can turn off the volume completely by turning the SET dial down until [OFF] appears. Adjusting the Volume When you close the LCD panel. E Speaker SET dial CAMERA PLAY (VCR) Turn the SET dial up to lower the volume. • A volume bar appears for playback, the camcorder plays back the sound via built-in speaker.

Instruction Manual
Page 33
... the menu. Press the MENU button to select [OUTPUT CH] and press the SET dial. 4. Turn the SET dial to open the menu. 2. Basic Functions Playback 33 Press the MENU button to select a setting option. • L/R: Stereo: L+R channels, Bilingual: Main+Sub. • L/L: Stereo: L channel, Bilingual: Main. • R/R: Stereo: R channel, Bilingual: Sub...
... the menu. Press the MENU button to select [OUTPUT CH] and press the SET dial. 4. Turn the SET dial to open the menu. 2. Basic Functions Playback 33 Press the MENU button to select a setting option. • L/R: Stereo: L+R channels, Bilingual: Main+Sub. • L/L: Stereo: L channel, Bilingual: Main. • R/R: Stereo: R channel, Bilingual: Sub...

Instruction Manual
Page 51
... SETUP]. We recommend using the SP mode for important recordings. If you record in both SP and LP modes on the same tape, the playback picture may become distorted and the time code may not be distorted. E CAMERA PLAY (VCR) MENU ( 34) VCR SETUP REC MODE SP To change to...
... SETUP]. We recommend using the SP mode for important recordings. If you record in both SP and LP modes on the same tape, the playback picture may become distorted and the time code may not be distorted. E CAMERA PLAY (VCR) MENU ( 34) VCR SETUP REC MODE SP To change to...

Instruction Manual
Page 55
...8226; The name of the selected effect flashes. 4. Select [FADER TYPE], select a setting option and close the menu. Fade in : In playback pause mode, press the DIGITAL EFFECTS ON/OFF button and begin recording by pressing the start /stop button. Fade out: During recording, press ...2. CAMERA PLAY (VCR) 1. CAMERA PLAY (VCR) E 1. Fade in : In record pause mode, press the DIGITAL EFFECTS ON/OFF button and begin playback by pressing the / button. Advanced Functions Recording Selecting a Fader In CAMERA mode, set the program selector to [FADER]. 3. The name of the selected ...
...8226; The name of the selected effect flashes. 4. Select [FADER TYPE], select a setting option and close the menu. Fade in : In playback pause mode, press the DIGITAL EFFECTS ON/OFF button and begin recording by pressing the start /stop button. Fade out: During recording, press ...2. CAMERA PLAY (VCR) 1. CAMERA PLAY (VCR) E 1. Fade in : In record pause mode, press the DIGITAL EFFECTS ON/OFF button and begin playback by pressing the / button. Advanced Functions Recording Selecting a Fader In CAMERA mode, set the program selector to [FADER]. 3. The name of the selected ...
Instruction Manual
Page 56
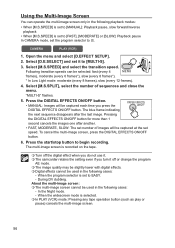
... DIGITAL EFFECTS ON/OFF button. • MANUAL: Images will be used in the following playback modes: • When [M.S.SPEED] is set to [MANUAL]: Playback pause, slow forward/reverse playback • When [M.S.SPEED] is set to [FAST], [MODERATE] or [SLOW]: Playback pause In CAMERA mode, set to begin recording. Select [D.E.SELECT] and set it off...
... DIGITAL EFFECTS ON/OFF button. • MANUAL: Images will be used in the following playback modes: • When [M.S.SPEED] is set to [MANUAL]: Playback pause, slow forward/reverse playback • When [M.S.SPEED] is set to [FAST], [MODERATE] or [SLOW]: Playback pause In CAMERA mode, set to begin recording. Select [D.E.SELECT] and set it off...

Instruction Manual
Page 58
... magnified area with the SET dial. • Turn the SET dial to move the zoom lever toward W until the frame disappears. 58 Magnifying Playback the Image The playback image can be magnified up to the right and left, or up and down. To shrink the image below 2 times magnification, move the image...
... magnified area with the SET dial. • Turn the SET dial to move the zoom lever toward W until the frame disappears. 58 Magnifying Playback the Image The playback image can be magnified up to the right and left, or up and down. To shrink the image below 2 times magnification, move the image...

Instruction Manual
Page 59
... and select the data code combination you wish to [DATE] or [TIME] and close the menu. Select [D/TIME SEL.], set it to display. Advanced Functions Playback 59 Select [DATA CODE], set it to [CAMERA DATA] or [CAM. & D/T] and close the menu. Selecting the Data Code Display Combination CAMERA PLAY (VCR) MENU...
... and select the data code combination you wish to [DATE] or [TIME] and close the menu. Select [D/TIME SEL.], set it to display. Advanced Functions Playback 59 Select [DATA CODE], set it to [CAMERA DATA] or [CAM. & D/T] and close the menu. Selecting the Data Code Display Combination CAMERA PLAY (VCR) MENU...

Instruction Manual
Page 60
Select [6SEC.DATE], set it to indicate that date or time zone has changed. Displaying the Data Code CAMERA PLAY (VCR) Press the DATA CODE button. The data code will not display the next time you begin playback, or to [ON] and close the menu. 60 Six-Second Auto Date Date and time appear for 6 seconds when you turn on the camcorder. CAMERA PLAY (VCR) MENU ( 34) DISPLAY SETUP/ 6SEC.DATE••••OFF Open the menu and select [DISPLAY SETUP/ ].
Select [6SEC.DATE], set it to indicate that date or time zone has changed. Displaying the Data Code CAMERA PLAY (VCR) Press the DATA CODE button. The data code will not display the next time you begin playback, or to [ON] and close the menu. 60 Six-Second Auto Date Date and time appear for 6 seconds when you turn on the camcorder. CAMERA PLAY (VCR) MENU ( 34) DISPLAY SETUP/ 6SEC.DATE••••OFF Open the menu and select [DISPLAY SETUP/ ].

Instruction Manual
Page 61
Advanced Functions Playback 61 End Search When you have played back a tape, you unload the cassette. End search may not work properly if a blank section exists on the tape. E END SEARCH button CAMERA PLAY (VCR) In stop mode, press the END SEARCH button. • "END SEARCH" appears. • The camcorder rewinds/fast forwards the tape, plays back the last few seconds of the recording and stops the tape. • Pressing the button again cancels the search. End search cannot be used once you can use this function to locate the end of the last recorded scene.
Advanced Functions Playback 61 End Search When you have played back a tape, you unload the cassette. End search may not work properly if a blank section exists on the tape. E END SEARCH button CAMERA PLAY (VCR) In stop mode, press the END SEARCH button. • "END SEARCH" appears. • The camcorder rewinds/fast forwards the tape, plays back the last few seconds of the recording and stops the tape. • Pressing the button again cancels the search. End search cannot be used once you can use this function to locate the end of the last recorded scene.

Instruction Manual
Page 67
... the scene. 4. Recording Editing to a VCR or Digital Video Device E You can copy recordings with virtually no generation loss in image and sound quality. Stop playback. 67 Editing Signal flow Commercially available DV cable Recording CAMERA PLAY (VCR) 1. Locate the scene you can copy your recordings by connecting the camcorder to...
... the scene. 4. Recording Editing to a VCR or Digital Video Device E You can copy recordings with virtually no generation loss in image and sound quality. Stop playback. 67 Editing Signal flow Commercially available DV cable Recording CAMERA PLAY (VCR) 1. Locate the scene you can copy your recordings by connecting the camcorder to...

Instruction Manual
Page 69
... videos or TV programs from a VCR or analog camcorder on the signal sent from the connected device, dubbing may not work properly (e.g. Connected device: Stop playback. We recommend powering the camcorder from a household power source. 69 signals that include copyright protective signals or anomalous signals such as ghost signals). See Playing...
... videos or TV programs from a VCR or analog camcorder on the signal sent from the connected device, dubbing may not work properly (e.g. Connected device: Stop playback. We recommend powering the camcorder from a household power source. 69 signals that include copyright protective signals or anomalous signals such as ghost signals). See Playing...

Instruction Manual
Page 70
... format (note that [AV DV] is set to restart recording. 8. See Connecting a Digital Video Device ( 67). 2. Connected Device: Play back the tape. 6. Connected Device: Stop playback. Blank sections may be recorded as anomalous picture. If the picture does not appear, reconnect the DV cable or turn the camcorder off...
... format (note that [AV DV] is set to restart recording. 8. See Connecting a Digital Video Device ( 67). 2. Connected Device: Play back the tape. 6. Connected Device: Stop playback. Blank sections may be recorded as anomalous picture. If the picture does not appear, reconnect the DV cable or turn the camcorder off...

Instruction Manual
Page 71
If you attempt to play back such tape, "COPYRIGHT PROTECTED PLAYBACK IS RESTRICTED" appears and you will not be able to view the contents of the tape. Editing 71 Copyright Signal Certain software tapes are copyright protected. If you attempt to record from such tape via the DV E terminal, "COPYRIGHT PROTECTED DUBBING RESTRICTED" appears and you will not be able to record the contents of the tape.
If you attempt to play back such tape, "COPYRIGHT PROTECTED PLAYBACK IS RESTRICTED" appears and you will not be able to view the contents of the tape. Editing 71 Copyright Signal Certain software tapes are copyright protected. If you attempt to record from such tape via the DV E terminal, "COPYRIGHT PROTECTED DUBBING RESTRICTED" appears and you will not be able to record the contents of the tape.

Instruction Manual
Page 75
... to [OFF ] and close the menu. • Warning messages still appear, and the data code appears if turned on the TV screen. For playback, you can select to have a clear screen for 2 seconds. The displays disappear from the TV screen. ]. Select [TV SCREEN], CAMERA PLAY (...for recording, you can show the camcorder displays on . • The displays appear while a playback image is magnified or a digital effect is activated. • Tape operation displays appear for playback. Additional Information Screen Displays Hiding the Displays on the LCD Screen E You can hide the ...
... to [OFF ] and close the menu. • Warning messages still appear, and the data code appears if turned on the TV screen. For playback, you can select to have a clear screen for 2 seconds. The displays disappear from the TV screen. ]. Select [TV SCREEN], CAMERA PLAY (...for recording, you can show the camcorder displays on . • The displays appear while a playback image is magnified or a digital effect is activated. • Tape operation displays appear for playback. Additional Information Screen Displays Hiding the Displays on the LCD Screen E You can hide the ...

Instruction Manual
Page 76
Screen Displays during Recording/Playback CAMERA Mode (see also 24) Program AE ( 38) AE Shift ( 43) Shutter speed ( 48) Manual focus ( 44) White balance ( 46) Digital effects ( 53) Date and ... (VCR) Mode 12 bit audio ( 62) End search ( 61) Data code ( 59) Volume level of speaker ( 31) REC PAUSE STOP EJECT FF REW / : Fast forward playback/rewind playback ( 30) : Playback pause ( 30) 76
Screen Displays during Recording/Playback CAMERA Mode (see also 24) Program AE ( 38) AE Shift ( 43) Shutter speed ( 48) Manual focus ( 44) White balance ( 46) Digital effects ( 53) Date and ... (VCR) Mode 12 bit audio ( 62) End search ( 61) Data code ( 59) Volume level of speaker ( 31) REC PAUSE STOP EJECT FF REW / : Fast forward playback/rewind playback ( 30) : Playback pause ( 30) 76

Instruction Manual
Page 77
...the connected digital device is received during analog line-in RESTRICTED recording, or during analog-digital conversion of a copyright protected tape. PLAYBACK NOT POSSIBLE COPYRIGHT PROTECTED You attempted to play back a tape recorded in the camcorder. 79 BEEN DETECTED TAPE END Tape reached ... DUBBING when an anomalous signal is 72 turned off. WRONG FORMAT You attempted to play back a copyright protected tape. 71 PLAYBACK IS RESTRICTED COPYRIGHT You attempted to protect the tape. Unload and 15 reload the cassette. CHANGE THE BATTERY Battery pack is ...
...the connected digital device is received during analog line-in RESTRICTED recording, or during analog-digital conversion of a copyright protected tape. PLAYBACK NOT POSSIBLE COPYRIGHT PROTECTED You attempted to play back a tape recorded in the camcorder. 79 BEEN DETECTED TAPE END Tape reached ... DUBBING when an anomalous signal is 72 turned off. WRONG FORMAT You attempted to play back a copyright protected tape. 71 PLAYBACK IS RESTRICTED COPYRIGHT You attempted to protect the tape. Unload and 15 reload the cassette. CHANGE THE BATTERY Battery pack is ...


