ZR100/200/300 Brochure
Page 2
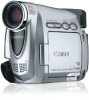
...family and friends. These mini-movies are ideal for attaching to copyright laws. Canon is a trademark. The MiniDV logo is a registered trademark of the SD...D.F. Blvd. Low-Light Features The camcorder's Night Mode allows you want to provide extra illumination. cassette) Image Sensor 1/6-inch CCD, approx. 680,000 pixels Effective pixels: tape: approx. 340,000 ...Lens ZR300: f=2.8-61.6mm, f/1.6-3.6, 22x power zoom ZR200: f=2.8-56mm, f/1.6-3.2, 20x power zoom ZR100: f=2.8-56mm, f/1.6-3.2, 20x power zoom LCD Screen 2.4-inch. Wide-Converter WD-28 Gives wide-angle...
...family and friends. These mini-movies are ideal for attaching to copyright laws. Canon is a trademark. The MiniDV logo is a registered trademark of the SD...D.F. Blvd. Low-Light Features The camcorder's Night Mode allows you want to provide extra illumination. cassette) Image Sensor 1/6-inch CCD, approx. 680,000 pixels Effective pixels: tape: approx. 340,000 ...Lens ZR300: f=2.8-61.6mm, f/1.6-3.6, 22x power zoom ZR200: f=2.8-56mm, f/1.6-3.2, 20x power zoom ZR100: f=2.8-56mm, f/1.6-3.2, 20x power zoom LCD Screen 2.4-inch. Wide-Converter WD-28 Gives wide-angle...

Instruction Manual
Page 6
Table of contents Introduction Using this Manual 5 Checking Supplied Accessories 8 Components Guide 9 Basic Functions Preparations Preparing the Power Supply 12 Loading/Unloading a Cassette 15 Installing the Backup Battery 16 Preparing the Camcorder 17 Adjusting the LCD Screen 18 Setting the Time Zone, Date and Time 19 Recording Recording ...
Table of contents Introduction Using this Manual 5 Checking Supplied Accessories 8 Components Guide 9 Basic Functions Preparations Preparing the Power Supply 12 Loading/Unloading a Cassette 15 Installing the Backup Battery 16 Preparing the Camcorder 17 Adjusting the LCD Screen 18 Setting the Time Zone, Date and Time 19 Recording Recording ...

Instruction Manual
Page 10
button ( 12) Power switch ( 5) Cassette compartment cover ( 15) Cassette compartment ( 15) OPEN/EJECT switch ( 15) Zoom lever ( 26) Finger rest Strap mount ( 88) Grip belt ( 17) Start/stop button ( 22) 10 Dioptric adjustment lever ( 17) Viewfinder ( 17) BATT.
button ( 12) Power switch ( 5) Cassette compartment cover ( 15) Cassette compartment ( 15) OPEN/EJECT switch ( 15) Zoom lever ( 26) Finger rest Strap mount ( 88) Grip belt ( 17) Start/stop button ( 22) 10 Dioptric adjustment lever ( 17) Viewfinder ( 17) BATT.

Instruction Manual
Page 15
... careful not to get your fingers caught in the cassette compartment cover. The cassette compartment opens automatically. 2. Press the mark on the cassette compartment until it straight out. 3. Loading/Unloading a Cassette Use only videocassettes marked with the cassette compartment while it is set to close the cassette compartment cover. If the camcorder is connected to a power...
... careful not to get your fingers caught in the cassette compartment cover. The cassette compartment opens automatically. 2. Press the mark on the cassette compartment until it straight out. 3. Loading/Unloading a Cassette Use only videocassettes marked with the cassette compartment while it is set to close the cassette compartment cover. If the camcorder is connected to a power...

Instruction Manual
Page 22
Close the LCD panel. 3. Unload the cassette. 5. Set the camcorder to CAMERA. 3. PLAY (VCR) PCOOAWMFEFERRA Press the start /stop button again to begin recording. Set the POWER switch to CAMERA mode. If ...
Close the LCD panel. 3. Unload the cassette. 5. Set the camcorder to CAMERA. 3. PLAY (VCR) PCOOAWMFEFERRA Press the start /stop button again to begin recording. Set the POWER switch to CAMERA mode. If ...

Instruction Manual
Page 23
" AUTO POWER OFF" appears 20 seconds before you start recording. When you do not remove the cassette, you can record the next scene without producing any noise or blank sections between the recordings even if you turn the POWER switch to OFF ...
" AUTO POWER OFF" appears 20 seconds before you start recording. When you do not remove the cassette, you can record the next scene without producing any noise or blank sections between the recordings even if you turn the POWER switch to OFF ...

Instruction Manual
Page 29
... screen facing outward. 3. The remaining tape time may not appear when the time left is distorted, clean the video heads using a Canon Head Cleaning Cassette or a commercially available digital video head-cleaning cassette ( 78). E 1. You can also close the LCD panel. About the screen display: During playback, the time code gives the...
... screen facing outward. 3. The remaining tape time may not appear when the time left is distorted, clean the video heads using a Canon Head Cleaning Cassette or a commercially available digital video head-cleaning cassette ( 78). E 1. You can also close the LCD panel. About the screen display: During playback, the time code gives the...

Instruction Manual
Page 61
End Search When you have played back a tape, you can use this function to locate the end of the recording and stops the tape. • Pressing the button again cancels the search. End search cannot be used once you unload the cassette. End search may not work properly if a blank section exists on the tape. Advanced Functions Playback 61 E END SEARCH button CAMERA PLAY (VCR) In stop mode, press the END SEARCH button. • "END SEARCH" appears. • The camcorder rewinds/fast forwards the tape, plays back the last few seconds of the last recorded scene.
End Search When you have played back a tape, you can use this function to locate the end of the recording and stops the tape. • Pressing the button again cancels the search. End search cannot be used once you unload the cassette. End search may not work properly if a blank section exists on the tape. Advanced Functions Playback 61 E END SEARCH button CAMERA PLAY (VCR) In stop mode, press the END SEARCH button. • "END SEARCH" appears. • The camcorder rewinds/fast forwards the tape, plays back the last few seconds of the last recorded scene.

Instruction Manual
Page 67
Editing Signal flow Commercially available DV cable Recording CAMERA PLAY (VCR) 1. Connected device: Load a blank cassette and set the device to copy appears. Play back the tape. 5. Connected device: Begin recording when the scene you wish to record pause mode. 3. Stop ... digital video device. Connecting the Devices Connecting a VCR See Playing Back on a TV Screen ( 32). Set the camcorder to PLAY (VCR) mode and load a recorded cassette. 2. Recording Editing to a VCR or Digital Video Device E You can copy recordings with virtually no generation loss in image and sound quality.
Editing Signal flow Commercially available DV cable Recording CAMERA PLAY (VCR) 1. Connected device: Load a blank cassette and set the device to copy appears. Play back the tape. 5. Connected device: Begin recording when the scene you wish to record pause mode. 3. Stop ... digital video device. Connecting the Devices Connecting a VCR See Playing Back on a TV Screen ( 32). Set the camcorder to PLAY (VCR) mode and load a recorded cassette. 2. Recording Editing to a VCR or Digital Video Device E You can copy recordings with virtually no generation loss in image and sound quality.

Instruction Manual
Page 69
...Playing Back on the screen. 5. In record pause mode and during recording, you wish to PLAY (VCR) mode and load a blank cassette. 3. Press the button to stop recording. • Press the / button to pause recording. • Press the / button again ... We recommend powering the camcorder from the connected device, dubbing may not work properly (e.g. Set the camcorder to record appears. Connected device: Load the recorded cassette. 4. Recording starts. Editing 7. Recording from Analog Video Devices (VCR, TV or Camcorder) E You can check the picture on a TV Screen ( ...
...Playing Back on the screen. 5. In record pause mode and during recording, you wish to PLAY (VCR) mode and load a blank cassette. 3. Press the button to stop recording. • Press the / button to pause recording. • Press the / button again ... We recommend powering the camcorder from the connected device, dubbing may not work properly (e.g. Set the camcorder to record appears. Connected device: Load the recorded cassette. 4. Recording starts. Editing 7. Recording from Analog Video Devices (VCR, TV or Camcorder) E You can check the picture on a TV Screen ( ...

Instruction Manual
Page 70
...Press the button to stop recording. • Press the / button to pause recording. • Press the / button again to PLAY (VCR) mode and load a blank cassette. Set the camcorder to restart recording. 8. Make sure that signals from devices with virtually no loss in SP or LP format (note that [AV DV...] is set to [OFF] ( 72). 3. Connected device: Load the recorded cassette. 4. Press the / button when the scene you can check the picture on again. You can record from a household power source. 70 Connect the...
...Press the button to stop recording. • Press the / button to pause recording. • Press the / button again to PLAY (VCR) mode and load a blank cassette. Set the camcorder to restart recording. 8. Make sure that signals from devices with virtually no loss in SP or LP format (note that [AV DV...] is set to [OFF] ( 72). 3. Connected device: Load the recorded cassette. 4. Press the / button when the scene you can check the picture on again. You can record from a household power source. 70 Connect the...

Instruction Manual
Page 77
...IS RESTRICTED COPYRIGHT You attempted to protect the tape. Additional Information 77 Unload and 15 reload the cassette. REMOVE THE CASSETTE Camcorder stopped operating to dub a copyright protected tape. Rewind the tape or replace the cassette. - CHANGE THE BATTERY Battery pack is received during analog line-in the camcorder. 79 BEEN ... on until you set the time zone, date and time. Replace or charge the battery pack. 12 PACK THE TAPE IS SET FOR Cassette is 72 turned off. CHECK THE INPUT DV cable is not connected, or the connected digital device is protected.
...IS RESTRICTED COPYRIGHT You attempted to protect the tape. Additional Information 77 Unload and 15 reload the cassette. REMOVE THE CASSETTE Camcorder stopped operating to dub a copyright protected tape. Rewind the tape or replace the cassette. - CHANGE THE BATTERY Battery pack is received during analog line-in the camcorder. 79 BEEN ... on until you set the time zone, date and time. Replace or charge the battery pack. 12 PACK THE TAPE IS SET FOR Cassette is 72 turned off. CHECK THE INPUT DV cable is not connected, or the connected digital device is protected.

Instruction Manual
Page 78
...not point the lens or viewfinder at strong light sources. Dust and sand can also damage the lens. Water, mud or salt getting inside the cassette or camcorder may cause damage. Avoid sudden changes in dusty or sandy places. Wipe it in a place free of your camcorder to ... the LCD screen using a blower brush or a commercially available cleaning cloth for a long time, store it with care. Dust or sand getting inside the cassette or camcorder may be cleaned. 78 The screen returns to shocks or vibration as this may cause damage. Be careful of the screen when...
...not point the lens or viewfinder at strong light sources. Dust and sand can also damage the lens. Water, mud or salt getting inside the cassette or camcorder may cause damage. Avoid sudden changes in dusty or sandy places. Wipe it in a place free of your camcorder to ... the LCD screen using a blower brush or a commercially available cleaning cloth for a long time, store it with care. Dust or sand getting inside the cassette or camcorder may be cleaned. 78 The screen returns to shocks or vibration as this may cause damage. Be careful of the screen when...
Instruction Manual
Page 79
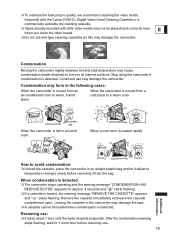
... detected. Continued use . 79 Additional Information Remove the cassette immediately and leave the cassette compartment open. To maintain the best picture quality, we recommend cleaning the video heads frequently with the Canon DVM-CL Digital Video Head Cleaning Cassette or a commercially available dry cleaning cassette. Tapes already recorded with dirty video heads may...
... detected. Continued use . 79 Additional Information Remove the cassette immediately and leave the cassette compartment open. To maintain the best picture quality, we recommend cleaning the video heads frequently with the Canon DVM-CL Digital Video Head Cleaning Cassette or a commercially available dry cleaning cassette. Tapes already recorded with dirty video heads may...

Instruction Manual
Page 81
... function, metal plated terminals may become dirty. Do not insert anything into the small holes of loading/ unloading. If you load a protected cassette in water to ensure proper contact. Keep the battery out of reach of explosion. If it may cause picture and sound distortion. ...to avoid the risk of children. The battery case may break and the battery fluids may become dirty with use spliced tapes or nonstandard cassettes as video heads may damage stomach and intestines. Do not disassemble, heat or immerse the battery in CAMERA REC REC SAVE SAVE...
... function, metal plated terminals may become dirty. Do not insert anything into the small holes of loading/ unloading. If you load a protected cassette in water to ensure proper contact. Keep the battery out of reach of explosion. If it may cause picture and sound distortion. ...to avoid the risk of children. The battery case may break and the battery fluids may become dirty with use spliced tapes or nonstandard cassettes as video heads may damage stomach and intestines. Do not disassemble, heat or immerse the battery in CAMERA REC REC SAVE SAVE...

Instruction Manual
Page 83
...;F). °F and 104 °F). Troubleshooting If you have a problem with use and may not charge. Condensation is exhausted. Battery pack will not work. Consult a Canon Service - Load a cassette. 15 " " flashes on the screen. Replace or charge the battery 12 pack. LCD/viewfinder switches on . temperature is not set to Set the camcorder...
...;F). °F and 104 °F). Troubleshooting If you have a problem with use and may not charge. Condensation is exhausted. Battery pack will not work. Consult a Canon Service - Load a cassette. 15 " " flashes on the screen. Replace or charge the battery 12 pack. LCD/viewfinder switches on . temperature is not set to Set the camcorder...

Instruction Manual
Page 84
... inserted the wrong way. mode. Camcorder will not start /stop button Camcorder is turned off. Autofocus does not work on the the cassette. Adjust the viewfinder with the 17 dioptric adjustment lever. may - - - drums or concerts), sound may become distorted or may cause a vertical light bar (smear) to ...
... inserted the wrong way. mode. Camcorder will not start /stop button Camcorder is turned off. Autofocus does not work on the the cassette. Adjust the viewfinder with the 17 dioptric adjustment lever. may - - - drums or concerts), sound may become distorted or may cause a vertical light bar (smear) to ...

Instruction Manual
Page 85
... is turned off . Editing Problem Dubbing via the AV - terminal. Refer also to [OFF]. 72 TV screen. dub copyright protected tape. Wrong signal format. E Cassette is Set the camcorder to [ON]. Set [AV DV] to the instruction manual of the connected device. No sound from the built-in Speaker volume... to [ON]. Cause [AV DV] is running, but image will not appear on the [AV DV] is turned off , or is not loaded. Load a cassette. 15 Tape reached the end Rewind the tape. 29 (" END" flashes on the TV screen. Tape is set to VIDEO. 32 not appear on the...
... is turned off . Editing Problem Dubbing via the AV - terminal. Refer also to [OFF]. 72 TV screen. dub copyright protected tape. Wrong signal format. E Cassette is Set the camcorder to [ON]. Set [AV DV] to the instruction manual of the connected device. No sound from the built-in Speaker volume... to [ON]. Cause [AV DV] is running, but image will not appear on the [AV DV] is turned off , or is not loaded. Load a cassette. 15 Tape reached the end Rewind the tape. 29 (" END" flashes on the TV screen. Tape is set to VIDEO. 32 not appear on the...

Instruction Manual
Page 90
...90 SP: 18.81 mm/s (0.74 ips), LP: 12.56 mm/s (0.49 ips) SP: 80 min., LP: 120 min. cassette) 2.4-inch. cassette) Fast Forward/Rewind Time LCD Screen Viewfinder Microphone Lens Lens Configuration Filter Diameter AF System Minimum Focusing Distance White Balance Minimum Illumination Recommended Illumination ...1/6-inch CCD, approx. 680,000 pixels Effective pixels: approx. 340,000 pixels Videocassettes bearing the "MiniDV" mark. Specifications ZR100 System Video Recording System Audio Recording System Television System Image Sensor Tape Format Tape Speed Maximum Recording Time (80 min.
...90 SP: 18.81 mm/s (0.74 ips), LP: 12.56 mm/s (0.49 ips) SP: 80 min., LP: 120 min. cassette) 2.4-inch. cassette) Fast Forward/Rewind Time LCD Screen Viewfinder Microphone Lens Lens Configuration Filter Diameter AF System Minimum Focusing Distance White Balance Minimum Illumination Recommended Illumination ...1/6-inch CCD, approx. 680,000 pixels Effective pixels: approx. 340,000 pixels Videocassettes bearing the "MiniDV" mark. Specifications ZR100 System Video Recording System Audio Recording System Television System Image Sensor Tape Format Tape Speed Maximum Recording Time (80 min.
Instruction Manual
Page 95
...UNITED STATES E The warranty set forward below is used for your Bill of Sale or other commercial, industrial, or institutional applications. CANON U.S.A., INC. 95 Additional Information The sole warranty with respect to you. (shipping charges apply). This Limited Warranty covers all defects encountered... THE ABOVE LIMITATION OR EXCLUSION MAY NOT APPLY TO YOU). This Limited Warranty does not cover cabinet (exterior finish), video cassette tape, head cleanings, nor does it is only effective upon presentation of Sale or other than our authorized agent; This warranty...
...UNITED STATES E The warranty set forward below is used for your Bill of Sale or other commercial, industrial, or institutional applications. CANON U.S.A., INC. 95 Additional Information The sole warranty with respect to you. (shipping charges apply). This Limited Warranty covers all defects encountered... THE ABOVE LIMITATION OR EXCLUSION MAY NOT APPLY TO YOU). This Limited Warranty does not cover cabinet (exterior finish), video cassette tape, head cleanings, nor does it is only effective upon presentation of Sale or other than our authorized agent; This warranty...


