Owners Manual
Page 4
... 19 QUICK START GUIDE First, charge the battery 19 To configure display language and clock settings ..... 21 To record an image 22 To view a recorded image 23 To delete an image 23 24 GETTING READY About This Manual 24 General Guide 25 Camera 25 Lithium Ion Battery Charger (EX-Z60) 27 USB Cradle (EX-Z60DX) 27 Monitor Screen Contents 29 REC Mode 29 PLAY Mode 31 Changing the Contents of the Monitor Screen 33 Attaching the Strap 34 Power Requirements 35 EX-Z60...
... 19 QUICK START GUIDE First, charge the battery 19 To configure display language and clock settings ..... 21 To record an image 22 To view a recorded image 23 To delete an image 23 24 GETTING READY About This Manual 24 General Guide 25 Camera 25 Lithium Ion Battery Charger (EX-Z60) 27 USB Cradle (EX-Z60DX) 27 Monitor Screen Contents 29 REC Mode 29 PLAY Mode 31 Changing the Contents of the Monitor Screen 33 Attaching the Strap 34 Power Requirements 35 EX-Z60...

Owners Manual
Page 6
... Turning Image Review On and Off 122 Using Icon Help 122 Specifying Power On Default Settings 123 Specifying ISO Sensitivity 125 Selecting the Metering Mode 126 Using the Filter Function 128 Specifying Outline Sharpness 128 Specifying Color Saturation 129 Specifying Contrast 129 Date Stamping Snapshots 130 Resetting the Camera 131 132 PLAYBACK Basic Playback Operation 132 Playing an Audio Snapshot 133 Zooming the Display Image 134 Resizing an Image 135 Cropping an Image 136 Keystone Correction 138 Using Color...
... Turning Image Review On and Off 122 Using Icon Help 122 Specifying Power On Default Settings 123 Specifying ISO Sensitivity 125 Selecting the Metering Mode 126 Using the Filter Function 128 Specifying Outline Sharpness 128 Specifying Color Saturation 129 Specifying Contrast 129 Date Stamping Snapshots 130 Resetting the Camera 131 132 PLAYBACK Basic Playback Operation 132 Playing an Audio Snapshot 133 Zooming the Display Image 134 Resizing an Image 135 Cropping an Image 136 Keystone Correction 138 Using Color...
Owners Manual
Page 8
...Snapshot 226 Playing a Movie 228 Viewing User Documentation (PDF Files) 229 User Registration 229 Exiting the Menu Application 229 Using the Camera with a Macintosh Computer ....... 230 Selecting the Software You Need 230 Computer System Requirements 231 Managing Images on a Macintosh 232 Playing a Movie 233 Viewing User Documentation (PDF Files) 233 To register as a camera user 234 235 APPENDIX Menu Reference 235 Indicator Lamp Reference 238 Troubleshooting Guide 241 If you have problems installing the USB driver... 246 Display Messages 247 Specifications 249...
...Snapshot 226 Playing a Movie 228 Viewing User Documentation (PDF Files) 229 User Registration 229 Exiting the Menu Application 229 Using the Camera with a Macintosh Computer ....... 230 Selecting the Software You Need 230 Computer System Requirements 231 Managing Images on a Macintosh 232 Playing a Movie 233 Viewing User Documentation (PDF Files) 233 To register as a camera user 234 235 APPENDIX Menu Reference 235 Indicator Lamp Reference 238 Troubleshooting Guide 241 If you have problems installing the USB driver... 246 Display Messages 247 Specifications 249...
Owners Manual
Page 9
... for any damage or loss caused by deletion of data as stipulated above, all important data on other media to protect against its loss. • Note that the example screens and product illustrations shown in the United States and/or other related rights to these applications revert to the use of the EX-Z60/EX-Z60DX. • CASIO COMPUTER CO., LTD.
... for any damage or loss caused by deletion of data as stipulated above, all important data on other media to protect against its loss. • Note that the example screens and product illustrations shown in the United States and/or other related rights to these applications revert to the use of the EX-Z60/EX-Z60DX. • CASIO COMPUTER CO., LTD.

Owners Manual
Page 16
... direct sunlight - Inside of data in the sun - Removing the battery, removing the memory card, or placing the camera onto the USB cradle (EX-Z60DX) while the operation lamp is performing a record or memory access operation - Low battery power - In areas subject to temperature extremes - In areas subject to high humidity or dust - Other abnormal operations Any of the error. I Data Error Precautions • Your digital camera is manufactured using precision digital components. INTRODUCTION I Operating...
... direct sunlight - Inside of data in the sun - Removing the battery, removing the memory card, or placing the camera onto the USB cradle (EX-Z60DX) while the operation lamp is performing a record or memory access operation - Low battery power - In areas subject to temperature extremes - In areas subject to high humidity or dust - Other abnormal operations Any of the error. I Data Error Precautions • Your digital camera is manufactured using precision digital components. INTRODUCTION I Operating...
Owners Manual
Page 27
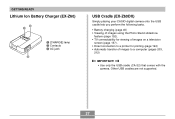
... Battery Charger (EX-Z60) 2 1 1 [CHARGE] lamp 2 Contacts 3 AC jack 3 USB Cradle (EX-Z60DX) Simply placing your CASIO digital camera onto the USB cradle lets you perform the following tasks. • Battery charging (page 40) • Viewing of images using the Photo Stand slideshow feature (page 152). • TV connectability for viewing of images on a television screen (page 157). • Direct connection to a printer for printing (page 194) • Automatic transfer of images to a computer (pages 203, 212) IMPORTANT...
... Battery Charger (EX-Z60) 2 1 1 [CHARGE] lamp 2 Contacts 3 AC jack 3 USB Cradle (EX-Z60DX) Simply placing your CASIO digital camera onto the USB cradle lets you perform the following tasks. • Battery charging (page 40) • Viewing of images using the Photo Stand slideshow feature (page 152). • TV connectability for viewing of images on a television screen (page 157). • Direct connection to a printer for printing (page 194) • Automatic transfer of images to a computer (pages 203, 212) IMPORTANT...

Owners Manual
Page 51
... Sleep feature does not operate in the PLAY mode. • Pressing any button operation causes the monitor screen to conserve battery power. Performing any button while the camera is performed for information about how to use menus. Press [MENU]. 3. GETTING READY Configuring Power Saving Settings You can configure the settings described below to turn back on the camera. 2. To configure this feature: Sleep Auto Power Off Select this setting: Sleep Auto Power Off 5.
... Sleep feature does not operate in the PLAY mode. • Pressing any button operation causes the monitor screen to conserve battery power. Performing any button while the camera is performed for information about how to use menus. Press [MENU]. 3. GETTING READY Configuring Power Saving Settings You can configure the settings described below to turn back on the camera. 2. To configure this feature: Sleep Auto Power Off Select this setting: Sleep Auto Power Off 5.

Owners Manual
Page 55
... USB cradle while the rechargeable battery is dead or removed from the camera - If this happens, reconfigure the date and time settings. • If you make a mistake when setting the language or clock with the following procedure, you turn on the camera after the date and time settings have been cleared. GETTING READY Configuring Display Language and Clock Settings Be sure to configure the following settings before using the camera to record images...
... USB cradle while the rechargeable battery is dead or removed from the camera - If this happens, reconfigure the date and time settings. • If you make a mistake when setting the language or clock with the following procedure, you turn on the camera after the date and time settings have been cleared. GETTING READY Configuring Display Language and Clock Settings Be sure to configure the following settings before using the camera to record images...

Owners Manual
Page 86
...; will appear on close up subjects. IMPORTANT! • Use of the flash along with the Macro mode, a value will be replaced by the actual focusing range value. Press the shutter button to record the image. • The focus and image recording operations are identical to those in your image. • During movie recording, Macro mode uses fixed focus that is too far away, the camera automatically switches to the Auto Focus range (page 84). • Whenever you...
...; will appear on close up subjects. IMPORTANT! • Use of the flash along with the Macro mode, a value will be replaced by the actual focusing range value. Press the shutter button to record the image. • The focus and image recording operations are identical to those in your image. • During movie recording, Macro mode uses fixed focus that is too far away, the camera automatically switches to the Auto Focus range (page 84). • Whenever you...

Owners Manual
Page 98
... around the display. Because of this camera. Use and [̈] to select the sample scene you want , and then press [SET]. • Pressing [MENU] causes the selection boundary to jump to the first sample scene ("Auto"). • Use and [̈] to save your settings for later use, save a BEST SHOT user setup (page 101). Make sure that requires slow shutter speeds. Press the shutter button to record images at lower shutter speeds. Note...
... around the display. Because of this camera. Use and [̈] to select the sample scene you want , and then press [SET]. • Pressing [MENU] causes the selection boundary to jump to the first sample scene ("Auto"). • Use and [̈] to save your settings for later use, save a BEST SHOT user setup (page 101). Make sure that requires slow shutter speeds. Press the shutter button to record images at lower shutter speeds. Note...

Owners Manual
Page 123
... [SET]. OTHER RECORDING FUNCTIONS 3. Turning on . Flash mode icon (page 71) - When mode memory is turned off. - Use [̆] and [̄] to remember the status of that mode when you turn off the camera, and restore it the next time you turn the camera back on mode memory for a mode tells the camera to select the setting you turn mode memory on the display while Icon Help is turned off for the BEST SHOT mode, flash mode, focus mode, white balance mode, ISO sensitivity, AF Area, metering, self-timer, flash intensity, digital zoom mode, manual focus position...
... [SET]. OTHER RECORDING FUNCTIONS 3. Turning on . Flash mode icon (page 71) - When mode memory is turned off. - Use [̆] and [̄] to remember the status of that mode when you turn off the camera, and restore it the next time you turn the camera back on mode memory for a mode tells the camera to select the setting you turn mode memory on the display while Icon Help is turned off for the BEST SHOT mode, flash mode, focus mode, white balance mode, ISO sensitivity, AF Area, metering, self-timer, flash intensity, digital zoom mode, manual focus position...

Owners Manual
Page 131
... procedure to reset all of the camera's settings to select "Reset", and then press [SET]. • To cancel the procedure without resetting, select "Cancel" and press [SET]. World Time setup - Video Out 131 Use [̆] and [̄] to their initial defaults as shown under "Menu Reference" on page 235. 1. Home Time setup - Select the "Set Up" tab, select "Reset", and then press [̈]. 3. Language - Date Style - Time setting - OTHER RECORDING FUNCTIONS Resetting the Camera Use the...
... procedure to reset all of the camera's settings to select "Reset", and then press [SET]. • To cancel the procedure without resetting, select "Cancel" and press [SET]. World Time setup - Video Out 131 Use [̆] and [̄] to their initial defaults as shown under "Menu Reference" on page 235. 1. Home Time setup - Select the "Set Up" tab, select "Reset", and then press [̈]. 3. Language - Date Style - Time setting - OTHER RECORDING FUNCTIONS Resetting the Camera Use the...
Owners Manual
Page 159
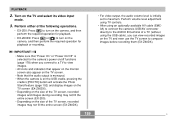
... using the USB cable), you connect to a TV to view images. • All icons and indicators that appear on the monitor screen also appear on the TV screen. • Note that "Power On" or "Power On/Off" is initially set to compose images before recording them (EX-Z60DX). PLAYBACK 2. IMPORTANT! • Make sure that the audio output is monaural. • When the camera is on the USB cradle, pressing the cradle's [PHOTO] button...
... using the USB cable), you connect to a TV to view images. • All icons and indicators that appear on the monitor screen also appear on the TV screen. • Note that "Power On" or "Power On/Off" is initially set to compose images before recording them (EX-Z60DX). PLAYBACK 2. IMPORTANT! • Make sure that the audio output is monaural. • When the camera is on the USB cradle, pressing the cradle's [PHOTO] button...

Owners Manual
Page 179
... format operation, check to make sure that data deleted by a format operation cannot be recovered. Press [MENU]. 3. Use [̆] and [̄] to appear. • To exit the format operation without formatting, select "Cancel". 179 to select "Format", and then press [SET]. FAVORITE folder images - Battery power going low during formatting can cause improper formatting and creates the risk of camera malfunction. • Never open the battery cover while the format operation is not low. BEST SHOT mode user setups...
... format operation, check to make sure that data deleted by a format operation cannot be recovered. Press [MENU]. 3. Use [̆] and [̄] to appear. • To exit the format operation without formatting, select "Cancel". 179 to select "Format", and then press [SET]. FAVORITE folder images - Battery power going low during formatting can cause improper formatting and creates the risk of camera malfunction. • Never open the battery cover while the format operation is not low. BEST SHOT mode user setups...
Owners Manual
Page 201
..., restart your computer restarts. What you to install the USB driver. • Note that appears, click "English". 4. The CD-ROM menu will appear again after your computer. Windows 98SE/98 Users • Start from your computer screen to step 6. 2. Click [USB driver B] and then [Install]. • This starts installation. • Follow the instructions that appear on your computer. 201 Click the [Exit] button on whether your computer. • Use...
..., restart your computer restarts. What you to install the USB driver. • Note that appears, click "English". 4. The CD-ROM menu will appear again after your computer. Windows 98SE/98 Users • Start from your computer screen to step 6. 2. Click [USB driver B] and then [Install]. • This starts installation. • Follow the instructions that appear on your computer. 201 Click the [Exit] button on whether your computer. • Use...

Owners Manual
Page 203
... of the AC adaptor depends on the camera. • This will display a "Removable Disk" dialog box. Turn on the area where you establish a USB connection between the camera and your computer will cause the camera's operation lamp to a household power outlet. • If you are using battery power without the AC adaptor, make sure that the battery is fully charged. • Note that the shape of the...
... of the AC adaptor depends on the camera. • This will display a "Removable Disk" dialog box. Turn on the area where you establish a USB connection between the camera and your computer will cause the camera's operation lamp to a household power outlet. • If you are using battery power without the AC adaptor, make sure that the battery is fully charged. • Note that the shape of the...
Owners Manual
Page 205
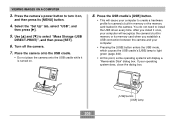
... [USB] button enters the USB mode, which causes the USB cradle's [USB] lamp to light green (page 240). • At this point, some operating systems will display a "Removable Disk" dialog box. After you install it is turned on , and then press its memory card when you establish a USB connection between the camera and your computer will cause your operating system does, close the dialog box. 205 [USB] button [USB] lamp Select the "Set Up...
... [USB] button enters the USB mode, which causes the USB cradle's [USB] lamp to light green (page 240). • At this point, some operating systems will display a "Removable Disk" dialog box. After you install it is turned on , and then press its memory card when you establish a USB connection between the camera and your computer will cause your operating system does, close the dialog box. 205 [USB] button [USB] lamp Select the "Set Up...

Owners Manual
Page 220
... page 230). Installation of the USB driver is not required (page 199). Establish a connection between the camera and computer. Using the Camera with a Windows Computer Your digital camera comes bundled with useful applications for image transfer Software Name USB driver Type B Management of images transferred to a computer Photo Loader 2.3 * DirectX 9.0c Supported Windows Versions XP/2000/Me 98SE/98 XP/2000/Me/98SE/98 Required Operation Establish a connection between the camera and computer. Install Photo Loader...
... page 230). Installation of the USB driver is not required (page 199). Establish a connection between the camera and computer. Using the Camera with a Windows Computer Your digital camera comes bundled with useful applications for image transfer Software Name USB driver Type B Management of images transferred to a computer Photo Loader 2.3 * DirectX 9.0c Supported Windows Versions XP/2000/Me 98SE/98 XP/2000/Me/98SE/98 Required Operation Establish a connection between the camera and computer. Install Photo Loader...

Owners Manual
Page 245
... accessing camera memory, disconnect the USB cable. 1) Check all connections. 2) Check the connection between the camera and USB cradle. 3) Install the USB driver on your computer (page 199). 4) • Turn on the camera. • Press the [USB] button on the USB cradle (EX-Z60DX). 3) USB driver is not installed. 4) Camera is not set securely on the USB cradle (EX-Z60DX). Monitor screen is in progress. APPENDIX Symptom All buttons and switches are disabled. Other 245 Possible Cause Circuit problem...
... accessing camera memory, disconnect the USB cable. 1) Check all connections. 2) Check the connection between the camera and USB cradle. 3) Install the USB driver on your computer (page 199). 4) • Turn on the camera. • Press the [USB] button on the USB cradle (EX-Z60DX). 3) USB driver is not installed. 4) Camera is not set securely on the USB cradle (EX-Z60DX). Monitor screen is in progress. APPENDIX Symptom All buttons and switches are disabled. Other 245 Possible Cause Circuit problem...

Owners Manual
Page 246
... driver installed. Possible Cause 1) Camera's display language, Home city, date style, date and time, and other settings have not been configured. 2) A problem with the camera. 246 Action 1) Check the settings (page 55). 2) Perform the reset operation to re-install the camera's USB driver. If the same message appears after you will make it is turned on , contact your retailer or a CASIO service center. APPENDIX Symptom Display language setting screen appears when the camera is connected. If this happens, you turn...
... driver installed. Possible Cause 1) Camera's display language, Home city, date style, date and time, and other settings have not been configured. 2) A problem with the camera. 246 Action 1) Check the settings (page 55). 2) Perform the reset operation to re-install the camera's USB driver. If the same message appears after you will make it is turned on , contact your retailer or a CASIO service center. APPENDIX Symptom Display language setting screen appears when the camera is connected. If this happens, you turn...


