
Owners Manual
Page 1
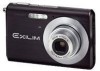
K815PCM1DKX E Digital Camera EX-Z60/EX-Z60DX User's Guide Thank you for purchasing this CASIO product. • Before using it, be sure to read the precautions contained in this User's Guide. • Keep the User's Guide in a safe place for future reference. • For the most up-to-date information about this product, visit the official EXILIM Website at http://www.exilim.com/.
K815PCM1DKX E Digital Camera EX-Z60/EX-Z60DX User's Guide Thank you for purchasing this CASIO product. • Before using it, be sure to read the precautions contained in this User's Guide. • Keep the User's Guide in a safe place for future reference. • For the most up-to-date information about this product, visit the official EXILIM Website at http://www.exilim.com/.

Owners Manual
Page 3
... the AC power cord plug varies according to make sure that the shape of the AC adaptor depends on the area where you purchased the camera. Camera (EX-Z60) Rechargeable Lithium Ion Battery (NP-20) USB Cradle (CA-32) Strap CD-ROM USB Cable AV Cable Basic Reference • Note that all of the... included with your dealer as soon as possible. AC Power Cord * 3 Special AC Adaptor (Plug-in Type) (AD-C52J) If something is missing, contact your camera. INTRODUCTION Unpacking (EX-Z60DX) Check to country or geographic area.
... the AC power cord plug varies according to make sure that the shape of the AC adaptor depends on the area where you purchased the camera. Camera (EX-Z60) Rechargeable Lithium Ion Battery (NP-20) USB Cradle (CA-32) Strap CD-ROM USB Cable AV Cable Basic Reference • Note that all of the... included with your dealer as soon as possible. AC Power Cord * 3 Special AC Adaptor (Plug-in Type) (AD-C52J) If something is missing, contact your camera. INTRODUCTION Unpacking (EX-Z60DX) Check to country or geographic area.
Owners Manual
Page 4
...a recorded image 23 To delete an image 23 24 GETTING READY About This Manual 24 General Guide 25 Camera 25 Lithium Ion Battery Charger (EX-Z60) 27 USB Cradle (EX-Z60DX) 27 Monitor Screen Contents 29 REC Mode 29 PLAY Mode 31 Changing the Contents of the Monitor Screen 33... Attaching the Strap 34 Power Requirements 35 EX-Z60 (Bundled with Charger Unit) 35 EX-Z60DX (Bundled with USB cradle) 40 Low Battery Indicator 43 To replace the battery 44 Power Supply Precautions 45 Turning the Camera On and Off 49 Configuring Power Saving Settings 51 ...
...a recorded image 23 To delete an image 23 24 GETTING READY About This Manual 24 General Guide 25 Camera 25 Lithium Ion Battery Charger (EX-Z60) 27 USB Cradle (EX-Z60DX) 27 Monitor Screen Contents 29 REC Mode 29 PLAY Mode 31 Changing the Contents of the Monitor Screen 33... Attaching the Strap 34 Power Requirements 35 EX-Z60 (Bundled with Charger Unit) 35 EX-Z60DX (Bundled with USB cradle) 40 Low Battery Indicator 43 To replace the battery 44 Power Supply Precautions 45 Turning the Camera On and Off 49 Configuring Power Saving Settings 51 ...

Owners Manual
Page 6
...Sharpness 128 Specifying Color Saturation 129 Specifying Contrast 129 Date Stamping Snapshots 130 Resetting the Camera 131 132 PLAYBACK Basic Playback Operation 132 Playing an Audio Snapshot 133 Zooming the Display Image 134 Resizing an Image 135 Cropping an Image 136 Keystone Correction ...148 Playing a Slideshow 149 Using the Photo Stand Feature (EX-Z60DX) 152 Rotating the Display Image 153 Adding Audio to a Snapshot 154 To re-record audio 155 Playing Back a Voice Recording File 156 Displaying Camera Images on a TV Screen 157 Selecting the Video Output ...
...Sharpness 128 Specifying Color Saturation 129 Specifying Contrast 129 Date Stamping Snapshots 130 Resetting the Camera 131 132 PLAYBACK Basic Playback Operation 132 Playing an Audio Snapshot 133 Zooming the Display Image 134 Resizing an Image 135 Cropping an Image 136 Keystone Correction ...148 Playing a Slideshow 149 Using the Photo Stand Feature (EX-Z60DX) 152 Rotating the Display Image 153 Adding Audio to a Snapshot 154 To re-record audio 155 Playing Back a Voice Recording File 156 Displaying Camera Images on a TV Screen 157 Selecting the Video Output ...
Owners Manual
Page 9
... and/or other related rights to these applications revert to the use of this manual. • CASIO COMPUTER CO., LTD. assumes no responsibility for any loss or claims by the screens and configuration of the actual camera. • The SD logo is a registered trademark. • Windows, Internet Explorer, Windows Media, and DirectX... may differ somewhat by third parties which may also be held liable for any damage or loss resulting from the use or malfunction of the EX-Z60/EX-Z60DX. • CASIO COMPUTER CO., LTD.
... and/or other related rights to these applications revert to the use of this manual. • CASIO COMPUTER CO., LTD. assumes no responsibility for any loss or claims by the screens and configuration of the actual camera. • The SD logo is a registered trademark. • Windows, Internet Explorer, Windows Media, and DirectX... may differ somewhat by third parties which may also be held liable for any damage or loss resulting from the use or malfunction of the EX-Z60/EX-Z60DX. • CASIO COMPUTER CO., LTD.
Owners Manual
Page 13
.... Doing so can interfere with Photohands, and application that automatically loads images from your camera to take pictures or use the built-in the direction of the camera or attempt your PC. If swallowed accidentally, contact your physician immediately. • Never... to your own repairs. Always leave maintenance and repair work up to a CASIO authorized service center. • Keep the small parts and accessories of this manual to "camera" refer to the CASIO EX-Z60/EX-Z60DX Digital Camera. • Never try to observe the following important precautions whenever using the...
.... Doing so can interfere with Photohands, and application that automatically loads images from your camera to take pictures or use the built-in the direction of the camera or attempt your PC. If swallowed accidentally, contact your physician immediately. • Never... to your own repairs. Always leave maintenance and repair work up to a CASIO authorized service center. • Keep the small parts and accessories of this manual to "camera" refer to the CASIO EX-Z60/EX-Z60DX Digital Camera. • Never try to observe the following important precautions whenever using the...
Owners Manual
Page 14
Using the camera under these conditions creates the risk of fire and electric shock. • Should you do not use it near a heater (EX-Z60DX). • At least once a year, unplug the AC power cord from the power outlet and clean the area around the prongs can ...care you ever notice smoke or a strange odor coming from the power outlet, and contact your nearest CASIO authorized service center for repair. Using the camera under these conditions creates the risk of the camera, immediately turn it off. After making sure there is especially true with a quilt, blanket, or other...
Using the camera under these conditions creates the risk of fire and electric shock. • Should you do not use it near a heater (EX-Z60DX). • At least once a year, unplug the AC power cord from the power outlet and clean the area around the prongs can ...care you ever notice smoke or a strange odor coming from the power outlet, and contact your nearest CASIO authorized service center for repair. Using the camera under these conditions creates the risk of the camera, immediately turn it off. After making sure there is especially true with a quilt, blanket, or other...

Owners Manual
Page 16
... areas subject to direct sunlight - Removing the battery, removing the memory card, or placing the camera onto the USB cradle (EX-Z60DX) while the operation lamp is being performed (EX-Z60DX) - Low battery power - I Data Error Precautions • Your digital camera is designed for use in file memory. - In areas subject to high humidity or dust - In...
... areas subject to direct sunlight - Removing the battery, removing the memory card, or placing the camera onto the USB cradle (EX-Z60DX) while the operation lamp is being performed (EX-Z60DX) - Low battery power - I Data Error Precautions • Your digital camera is designed for use in file memory. - In areas subject to high humidity or dust - In...

Owners Manual
Page 17
... remove the battery from the camera and leave the battery cover open for a few hours. Doing so can damage the camera. If condensation does form, remove the battery from the camera while the camera is not supplied power by the battery and/or the USB cradle (EX-Z60DX) for about 30 hours. Be... sure to a sudden change of the camera, so you should be straight. I Lens ...
... remove the battery from the camera and leave the battery cover open for a few hours. Doing so can damage the camera. If condensation does form, remove the battery from the camera while the camera is not supplied power by the battery and/or the USB cradle (EX-Z60DX) for about 30 hours. Be... sure to a sudden change of the camera, so you should be straight. I Lens ...

Owners Manual
Page 20
Place the camera onto the USB cradle to charge the battery (page 40). • Note that the shape of the AC adaptor depends on the area where you purchased the camera. • It takes about 130 minutes to achieve a full charge. 1 Inlet Type 2 2 Stopper 1 Plug-in Type [CHARGE] lamp Charging: Lights red Charging Complete: Lights green 3 20 Load the battery into the camera (page 38). 1 2. QUICK START GUIDE I EX-Z60DX (Bundled with USB cradle) 1.
Place the camera onto the USB cradle to charge the battery (page 40). • Note that the shape of the AC adaptor depends on the area where you purchased the camera. • It takes about 130 minutes to achieve a full charge. 1 Inlet Type 2 2 Stopper 1 Plug-in Type [CHARGE] lamp Charging: Lights red Charging Complete: Lights green 3 20 Load the battery into the camera (page 38). 1 2. QUICK START GUIDE I EX-Z60DX (Bundled with USB cradle) 1.
Owners Manual
Page 24
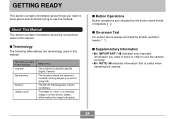
... you need to know about the conventions used in this manual: "camera" "file memory" "battery" "digital noise" Means this: The CASIO EX-Z60/EX-Z60DX Digital Camera The location where the camera is currently storing images you need to know in order to use the camera correctly. • NOTE indicates information that is always enclosed by the...Rechargeable Lithium Ion Battery Tiny flecks or "snow" in this manual. I On-screen Text On-screen text is useful when operating the camera. 24 About This Manual This section contains information about and do before trying to use the...
... you need to know about the conventions used in this manual: "camera" "file memory" "battery" "digital noise" Means this: The CASIO EX-Z60/EX-Z60DX Digital Camera The location where the camera is currently storing images you need to know in order to use the camera correctly. • NOTE indicates information that is always enclosed by the...Rechargeable Lithium Ion Battery Tiny flecks or "snow" in this manual. I On-screen Text On-screen text is useful when operating the camera. 24 About This Manual This section contains information about and do before trying to use the...
Owners Manual
Page 27
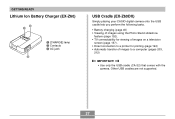
Other USB cradles are not supported. 27 GETTING READY Lithium Ion Battery Charger (EX-Z60) 2 1 1 [CHARGE] lamp 2 Contacts 3 AC jack 3 USB Cradle (EX-Z60DX) Simply placing your CASIO digital camera onto the USB cradle lets you perform the following tasks. • Battery charging (page 40) • Viewing of images using the Photo Stand slideshow feature (... (page 194) • Automatic transfer of images to a computer (pages 203, 212) IMPORTANT! • Use only the USB cradle (CA-32) that comes with the camera.
Other USB cradles are not supported. 27 GETTING READY Lithium Ion Battery Charger (EX-Z60) 2 1 1 [CHARGE] lamp 2 Contacts 3 AC jack 3 USB Cradle (EX-Z60DX) Simply placing your CASIO digital camera onto the USB cradle lets you perform the following tasks. • Battery charging (page 40) • Viewing of images using the Photo Stand slideshow feature (... (page 194) • Automatic transfer of images to a computer (pages 203, 212) IMPORTANT! • Use only the USB cradle (CA-32) that comes with the camera.
Owners Manual
Page 35
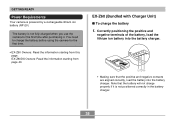
...EX-Z60DX Owners: Read the information starting from page 40. Note that the positive and negative contacts are aligned correctly, load the battery into the battery charger. -T+ • Making sure that the battery will not charge properly if it . You need to charge the battery before using the camera... for the first time after purchasing it is not positioned correctly in the battery charger. 35 EX-Z60 (Bundled with Charger Unit) I To charge the battery 1. Correctly positioning the positive and...
...EX-Z60DX Owners: Read the information starting from page 40. Note that the positive and negative contacts are aligned correctly, load the battery into the battery charger. -T+ • Making sure that the battery will not charge properly if it . You need to charge the battery before using the camera... for the first time after purchasing it is not positioned correctly in the battery charger. 35 EX-Z60 (Bundled with Charger Unit) I To charge the battery 1. Correctly positioning the positive and...

Owners Manual
Page 40
...3V] AC power cord NOTE • The bundled AC adaptor is designed for operation with USB cradle) I To charge the battery 1. GETTING READY EX-Z60DX (Bundled with any power supply in the range of 100V to 240V AC. I Loading the Rechargeable Battery Use the procedure on the area where ...receptacle shape is compatible with the power outlets in to country or geographic area. If you purchased the camera. Note, however, that the shape of the other ones that comes with the camera, or purchase a commercially available AC power cord that is different from that area. • Never ...
...3V] AC power cord NOTE • The bundled AC adaptor is designed for operation with USB cradle) I To charge the battery 1. GETTING READY EX-Z60DX (Bundled with any power supply in the range of 100V to 240V AC. I Loading the Rechargeable Battery Use the procedure on the area where ...receptacle shape is compatible with the power outlets in to country or geographic area. If you purchased the camera. Note, however, that the shape of the other ones that comes with the camera, or purchase a commercially available AC power cord that is different from that area. • Never ...
Owners Manual
Page 48
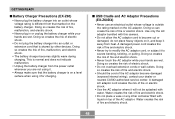
... shock. • Do not overload extension cords or wall outlets. I Battery Charger Precautions (EX-Z60) • Never plug the battery charger into an outlet or extension cord that marked on ... fire and electric shock. • Never touch the AC adaptor while your dealer or nearest CASIO authorized service center. Doing so can create the risk of fire, malfunction, and electric shock...camera. • Do not allow the AC adaptor cord to severe bending, twisting, or pulling. Doing so creates the risk of the AC adaptor. GETTING READY I USB Cradle and AC Adaptor Precautions (EX-Z60DX...
... shock. • Do not overload extension cords or wall outlets. I Battery Charger Precautions (EX-Z60) • Never plug the battery charger into an outlet or extension cord that marked on ... fire and electric shock. • Never touch the AC adaptor while your dealer or nearest CASIO authorized service center. Doing so can create the risk of fire, malfunction, and electric shock...camera. • Do not allow the AC adaptor cord to severe bending, twisting, or pulling. Doing so creates the risk of the AC adaptor. GETTING READY I USB Cradle and AC Adaptor Precautions (EX-Z60DX...

Owners Manual
Page 52
While playing back a movie - Press the power button or [ ] (REC). • If you want to perform various operations. While a slideshow is in progress (EX-Z60DX) Using the On-screen Menus Pressing [MENU] displays menus on whether you can use to enter the PLAY mode instead, press [ ] (PLAY). The menu that ... following shows an example menu procedure in the following cases. - While a movie is connected to a computer or some other device - Power button [ ][ ] 52 When the camera is being recorded - While playing back a voice recording file -
While playing back a movie - Press the power button or [ ] (REC). • If you want to perform various operations. While a slideshow is in progress (EX-Z60DX) Using the On-screen Menus Pressing [MENU] displays menus on whether you can use to enter the PLAY mode instead, press [ ] (PLAY). The menu that ... following shows an example menu procedure in the following cases. - While a movie is connected to a computer or some other device - Power button [ ][ ] 52 When the camera is being recorded - While playing back a voice recording file -

Owners Manual
Page 65
..., you can select for the ISO sensitivity setting (page 125), the camera automatically adjusts its sensitivity in file memory and even lead to malfunction of the camera. • Never remove the memory card while an image is flashing green...digital noise (graininess) to the memory card. • Fluorescent lighting actually flickers at a frequency that cannot be lost, it can cause some brightness or color problems with the brightness of the subject. Recording Precautions I Recording Precautions • Never open the battery cover or place the camera onto the USB cradle (EX-Z60DX...
..., you can select for the ISO sensitivity setting (page 125), the camera automatically adjusts its sensitivity in file memory and even lead to malfunction of the camera. • Never remove the memory card while an image is flashing green...digital noise (graininess) to the memory card. • Fluorescent lighting actually flickers at a frequency that cannot be lost, it can cause some brightness or color problems with the brightness of the subject. Recording Precautions I Recording Precautions • Never open the battery cover or place the camera onto the USB cradle (EX-Z60DX...

Owners Manual
Page 152
PLAYBACK Using the Photo Stand Feature (EX-Z60DX) The "Photo Stand" feature lets you specify what should appear on its USB cradle. IMPORTANT! • The battery is not charged while a Photo Stand slideshow is on the camera's monitor screen while the camera is in accordance with the images...; Pressing [MENU] displays a screen for information about remaining battery power, or you can specify display of a particular image. Set the camera onto the USB cradle. 3. To stop the slideshow. 152 Photo Stand feature operations are performed in progress. To charge the battery, stop...
PLAYBACK Using the Photo Stand Feature (EX-Z60DX) The "Photo Stand" feature lets you specify what should appear on its USB cradle. IMPORTANT! • The battery is not charged while a Photo Stand slideshow is on the camera's monitor screen while the camera is in accordance with the images...; Pressing [MENU] displays a screen for information about remaining battery power, or you can specify display of a particular image. Set the camera onto the USB cradle. 3. To stop the slideshow. 152 Photo Stand feature operations are performed in progress. To charge the battery, stop...
Owners Manual
Page 157
... on a TV screen. Next, press [SET] to a TV. 157 C Perform the following step to connect the camera to resume playback from the index mark position (page 116). Press [SET]. IMPORTANT! • Audio volume can be adjusted only when playback is being ...or after the current playback location by pausing playback and then pressing [̇] or [̈]. Displaying Camera Images on a TV Screen EX-Z60: You can display recorded images on a TV, you record them. Press [̆] (DISP). EX-Z60DX: You can display recorded images on and off Cancel playback Do this : Fast forward or fast ...
... on a TV screen. Next, press [SET] to a TV. 157 C Perform the following step to connect the camera to resume playback from the index mark position (page 116). Press [SET]. IMPORTANT! • Audio volume can be adjusted only when playback is being ...or after the current playback location by pausing playback and then pressing [̇] or [̈]. Displaying Camera Images on a TV Screen EX-Z60: You can display recorded images on a TV, you record them. Press [̆] (DISP). EX-Z60DX: You can display recorded images on and off Cancel playback Do this : Fast forward or fast ...
Owners Manual
Page 158
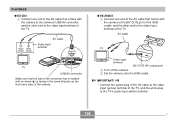
... front (lens side) of the TV, and the white plug to the TV's audio input (white) terminal. 158 C G EX-Z60DX 1 Connect one end of the AV cable that comes with the camera to the camera's USB/AV connector, and the other end to the video input terminal of the TV. AV cable TV Video... input terminal [AV OUT] (AV output port) 2 Turn off the camera. 3 Set the camera onto the USB cradle. PLAYBACK G EX-Z60 1 Connect one end of the AV cable that comes with the camera to the [AV OUT] port of the USB cradle, and the other end to the video...
... front (lens side) of the TV, and the white plug to the TV's audio input (white) terminal. 158 C G EX-Z60DX 1 Connect one end of the AV cable that comes with the camera to the camera's USB/AV connector, and the other end to the video input terminal of the TV. AV cable TV Video... input terminal [AV OUT] (AV output port) 2 Turn off the camera. 3 Set the camera onto the USB cradle. PLAYBACK G EX-Z60 1 Connect one end of the AV cable that comes with the camera to the [AV OUT] port of the USB cradle, and the other end to the video...

