Owners Manual
Page 19
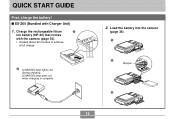
Charge the rechargeable litium 1 ion battery (NP-20) that comes with Charger Unit) 1. Load the battery into the camera (page 38). 1 2 Stopper 3 19 I EX-Z60 (Bundled with the camera (page 35). • It takes about 90 minutes to achieve a full charge. 2 [CHARGE] lamp lights red during charging. [CHARGE] lamp goes out when charging is complete. -T+ 2. QUICK START GUIDE QUICK START GUIDE First, charge the battery!
Charge the rechargeable litium 1 ion battery (NP-20) that comes with Charger Unit) 1. Load the battery into the camera (page 38). 1 2 Stopper 3 19 I EX-Z60 (Bundled with the camera (page 35). • It takes about 90 minutes to achieve a full charge. 2 [CHARGE] lamp lights red during charging. [CHARGE] lamp goes out when charging is complete. -T+ 2. QUICK START GUIDE QUICK START GUIDE First, charge the battery!

Owners Manual
Page 20
Load the battery into the camera (page 38). 1 2. Place the camera onto the USB cradle to charge the battery (page 40). • Note that the shape of the AC adaptor depends on the area where you purchased the camera. • It takes about 130 minutes to achieve a full charge. 1 Inlet Type 2 2 Stopper 1 Plug-in Type [CHARGE] lamp Charging: Lights red Charging Complete: Lights green 3 20 QUICK START GUIDE I EX-Z60DX (Bundled with USB cradle) 1.
Load the battery into the camera (page 38). 1 2. Place the camera onto the USB cradle to charge the battery (page 40). • Note that the shape of the AC adaptor depends on the area where you purchased the camera. • It takes about 130 minutes to achieve a full charge. 1 Inlet Type 2 2 Stopper 1 Plug-in Type [CHARGE] lamp Charging: Lights red Charging Complete: Lights green 3 20 QUICK START GUIDE I EX-Z60DX (Bundled with USB cradle) 1.

Owners Manual
Page 29
...Auto Daylight Cloudy Shade Day White Daylight Tungsten Manual • When you select Auto Flash as the flash mode, and then disappears. • If the camera detects that the example screens in this chapter are for illustrative purposes only. REC Mode I Screen Indicators 1234567 8 9 I 0 H A G B... C D F E 1 Flash mode indicator (page 71) Auto Flash Flash Off Flash On Soft Flash Red-eye reduction • appears momentarily when you select Auto with Key Customize (page 120), AWB appears only briefly, and then disappears from the display. 4 ...
...Auto Daylight Cloudy Shade Day White Daylight Tungsten Manual • When you select Auto Flash as the flash mode, and then disappears. • If the camera detects that the example screens in this chapter are for illustrative purposes only. REC Mode I Screen Indicators 1234567 8 9 I 0 H A G B... C D F E 1 Flash mode indicator (page 71) Auto Flash Flash Off Flash On Soft Flash Red-eye reduction • appears momentarily when you select Auto with Key Customize (page 120), AWB appears only briefly, and then disappears from the display. 4 ...

Owners Manual
Page 30
... (page 90) F Battery capacity (page 43) G Histogram (page 117) H Anti Shake indicator (page 102) I Focus frame (page 60) • Focusing complete: Green • Focusing failed: Red NOTE • An out of the following functions will cause Icon Help (page 122) text to turn off Icon Help if you want. Flash mode...
... (page 90) F Battery capacity (page 43) G Histogram (page 117) H Anti Shake indicator (page 102) I Focus frame (page 60) • Focusing complete: Green • Focusing failed: Red NOTE • An out of the following functions will cause Icon Help (page 122) text to turn off Icon Help if you want. Flash mode...

Owners Manual
Page 32
... mode indicator (page 71) Flash On Flash Off Soft Flash Red-eye reduction C Recording types Auto recording, easy BEST SHOT D Battery capacity (page 43) E Histogram (page 117) F EV value (page 90) IMPORTANT! • Some information may not display properly if you display an image that was recorded using a different digital camera model. 32
... mode indicator (page 71) Flash On Flash Off Soft Flash Red-eye reduction C Recording types Auto recording, easy BEST SHOT D Battery capacity (page 43) E Histogram (page 117) F EV value (page 90) IMPORTANT! • Some information may not display properly if you display an image that was recorded using a different digital camera model. 32

Owners Manual
Page 36
...power receptacle shape is different from that in your area, replace the AC power cord with one of the other ones that come with the camera, or purchase a commercially available AC power cord that is designed for operation with the power outlets in the range of the AC power ... READY 2. Note, however, that area. 36 Plug the battery charger into a household power outlet. • This will cause the [CHARGE] lamp to turn red. • Charging will take about 90 minutes. [CHARGE] lamp Battery Charger AC power cord NOTE • The battery charger is compatible with any power supply...
...power receptacle shape is different from that in your area, replace the AC power cord with one of the other ones that come with the camera, or purchase a commercially available AC power cord that is designed for operation with the power outlets in the range of the AC power ... READY 2. Note, however, that area. 36 Plug the battery charger into a household power outlet. • This will cause the [CHARGE] lamp to turn red. • Charging will take about 90 minutes. [CHARGE] lamp Battery Charger AC power cord NOTE • The battery charger is compatible with any power supply...

Owners Manual
Page 37
... to the allowable charging temperature range, which is complete, unplug the battery charger from the power outlet, and remove the battery from the camera can make proper charging impossible. GETTING READY 3. After charging is indicated when its [CHARGE] lamp goes out. Because of this happens, ...battery terminals can result in only partial charging. Charging will enter a standby state, which is indicated when the [CHARGE] lamp turns red. • Charging the battery while it is still warm immediately after removing it into an outlet that you charge the battery immediately before...
... to the allowable charging temperature range, which is complete, unplug the battery charger from the power outlet, and remove the battery from the camera can make proper charging impossible. GETTING READY 3. After charging is indicated when its [CHARGE] lamp goes out. Because of this happens, ...battery terminals can result in only partial charging. Charging will enter a standby state, which is indicated when the [CHARGE] lamp turns red. • Charging the battery while it is still warm immediately after removing it into an outlet that you charge the battery immediately before...

Owners Manual
Page 41
Turn off the camera. 3. After charging is complete, the [CHARGE] lamp will turn red, indicating that the shape of the AC adaptor power cord ...plug is turned on. [CHARGE] lamp • The [CHARGE] lamp on the USB cradle should turn green. • It takes about 130 minutes to achieve a full charge. When charging is complete, remove the camera...if the shape of the power cord plug varies according to 240V AC. With the camera positioned with the monitor screen facing forward as shown in the illustration, place it onto the ...
Turn off the camera. 3. After charging is complete, the [CHARGE] lamp will turn red, indicating that the shape of the AC adaptor power cord ...plug is turned on. [CHARGE] lamp • The [CHARGE] lamp on the USB cradle should turn green. • It takes about 130 minutes to achieve a full charge. When charging is complete, remove the camera...if the shape of the power cord plug varies according to 240V AC. With the camera positioned with the monitor screen facing forward as shown in the illustration, place it onto the ...

Owners Manual
Page 42
... and the charge operation may not start when the battery temperature returns to the allowable charging temperature range. • If the [CHARGE] lamp starts flashing red, it is loaded. Never use optionally available AD-C30, AD-C40, AD-C620 and AD-C630 AC adaptors with the battery or how it means... : battery charging, Photo Stand, image output to become warm) or when it will start right away if you try to charge immediately after using the camera (which causes battery to a TV, and USB data communication. 42 Do not use any of AC adaptor. Remove the...
... and the charge operation may not start when the battery temperature returns to the allowable charging temperature range. • If the [CHARGE] lamp starts flashing red, it is loaded. Never use optionally available AD-C30, AD-C40, AD-C620 and AD-C630 AC adaptors with the battery or how it means... : battery charging, Photo Stand, image output to become warm) or when it will start right away if you try to charge immediately after using the camera (which causes battery to a TV, and USB data communication. 42 Do not use any of AC adaptor. Remove the...

Owners Manual
Page 61
...is in focus. • The monitor screen uses various indicators and icons to focus the image. • When you informed of the camera's status. Continuous Shutter mode White balance Focus mode Flash mode Self-timer Recording types Metering mode indicator Memory capacity (Snapshots) Image quality (Snapshots...and the ISO sensitivity. Operation lamp G Operation Lamp and Focus Frame Operation When you see this: Green focus frame Green operation lamp Red focus frame Flashing green operation lamp It means this: The image is not in focus. Shutter button • You can tell whether...
...is in focus. • The monitor screen uses various indicators and icons to focus the image. • When you informed of the camera's status. Continuous Shutter mode White balance Focus mode Flash mode Self-timer Recording types Metering mode indicator Memory capacity (Snapshots) Image quality (Snapshots...and the ISO sensitivity. Operation lamp G Operation Lamp and Focus Frame Operation When you see this: Green focus frame Green operation lamp Red focus frame Flashing green operation lamp It means this: The image is not in focus. Shutter button • You can tell whether...

Owners Manual
Page 71
...the flash (Flash Off) Always fire the flash (Flash On) Always use . • The approximate effective range of the flash is shown below on zoom factor. 1. BASIC IMAGE RECORDING Using the Flash Perform the following steps to select the flash mode you select Auto as the flash mode, and then... disappears. 2. In the REC mode, press [̄] ( ). • Each press of red-eye in the image (Redeye reduction) In this case, the flash fires automatically when required Select this setting: * appears momentarily when you want to use...
...the flash (Flash Off) Always fire the flash (Flash On) Always use . • The approximate effective range of the flash is shown below on zoom factor. 1. BASIC IMAGE RECORDING Using the Flash Perform the following steps to select the flash mode you select Auto as the flash mode, and then... disappears. 2. In the REC mode, press [̄] ( ). • Each press of red-eye in the image (Redeye reduction) In this case, the flash fires automatically when required Select this setting: * appears momentarily when you want to use...

Owners Manual
Page 73
...mode. 73 Before pressing the shutter button, call out to the subjects so they all look at the camera while the pre-flash operation is not focused while using redeye reduction. • Red-eye reduction does not work very well if the subjects are located far away from the flash reflects ... who are looking directly at night or in the image. BASIC IMAGE RECORDING I About Red-eye Reduction Using the flash to record at the camera during the pre-flash. IMPORTANT! Flash Unit Status You can cause red spots inside the eyes of the eye. Operation lamp* The indicator is also shown on...
...mode. 73 Before pressing the shutter button, call out to the subjects so they all look at the camera while the pre-flash operation is not focused while using redeye reduction. • Red-eye reduction does not work very well if the subjects are located far away from the flash reflects ... who are looking directly at night or in the image. BASIC IMAGE RECORDING I About Red-eye Reduction Using the flash to record at the camera during the pre-flash. IMPORTANT! Flash Unit Status You can cause red spots inside the eyes of the eye. Operation lamp* The indicator is also shown on...

Owners Manual
Page 76
BASIC IMAGE RECORDING • When the flash is turned off ( ), mount the camera on a tripod to use, and then press [SET]. • Selecting "Off" in step 4 disables the self-timer. 76 Use [̆] and [̄] to select the ... when the subject is brightly lit. • Using flash in combination with another light source (daylight, fluorescent light, etc.) can cause digital noise, which makes images appear coarse. • When red-eye reduction ( ) is selected, flash intensity is dim. Recording images under dim lighting without the flash can result in accordance with...
BASIC IMAGE RECORDING • When the flash is turned off ( ), mount the camera on a tripod to use, and then press [SET]. • Selecting "Off" in step 4 disables the self-timer. 76 Use [̆] and [̄] to select the ... when the subject is brightly lit. • Using flash in combination with another light source (daylight, fluorescent light, etc.) can cause digital noise, which makes images appear coarse. • When red-eye reduction ( ) is selected, flash intensity is dim. Recording images under dim lighting without the flash can result in accordance with...

Owners Manual
Page 83
... name suggests, Auto Focus focuses the image automatically. The automatic focus operation starts when you see this: Green focus frame Green operation lamp Red focus frame Flashing green operation lamp It means this: The image is the Auto Focus range. The following is focused. Operation lamp ISO50 ... whether the image is not focused. 5. In the REC mode, press [MENU]. 2. Range: 40cm to ∞ (1.3´ to ∞) • Using optical zoom causes the above range to record the image. 83 Use [̆] and [̄] to select " ", and then press [SET]. 4. The image is focused by ...
... name suggests, Auto Focus focuses the image automatically. The automatic focus operation starts when you see this: Green focus frame Green operation lamp Red focus frame Flashing green operation lamp It means this: The image is the Auto Focus range. The following is focused. Operation lamp ISO50 ... whether the image is not focused. 5. In the REC mode, press [MENU]. 2. Range: 40cm to ∞ (1.3´ to ∞) • Using optical zoom causes the above range to record the image. 83 Use [̆] and [̄] to select " ", and then press [SET]. 4. The image is focused by ...

Owners Manual
Page 118
... far to the left , it means that there are too many light pixels. OTHER RECORDING FUNCTIONS • An RGB histogram that shows the distribution of R (red), G (green), and B (blue) components is dark. This type of an image. • When the histogram is light. NOTE • You can use key customization (page...
... far to the left , it means that there are too many light pixels. OTHER RECORDING FUNCTIONS • An RGB histogram that shows the distribution of R (red), G (green), and B (blue) components is dark. This type of an image. • When the histogram is light. NOTE • You can use key customization (page...

Owners Manual
Page 128
...image when you want, and then press [SET]. • Available filter settings are: Off, B/W, Sepia, Red, Green, Blue, Yellow, Pink, Purple IMPORTANT! • Using the camera's filter feature produces the same effect as attaching a color filter to select the setting you want, and ... To get this: High sharpness Normal sharpness Low sharpness Select this setting: +2 +1 0 -1 -2 128 OTHER RECORDING FUNCTIONS Using the Filter Function The camera's filter function lets you alter the tint of image outlines. 1. Select the "Quality" tab, select "Sharpness", and then press [̈]. 3. In...
...image when you want, and then press [SET]. • Available filter settings are: Off, B/W, Sepia, Red, Green, Blue, Yellow, Pink, Purple IMPORTANT! • Using the camera's filter feature produces the same effect as attaching a color filter to select the setting you want, and ... To get this: High sharpness Normal sharpness Low sharpness Select this setting: +2 +1 0 -1 -2 128 OTHER RECORDING FUNCTIONS Using the Filter Function The camera's filter function lets you alter the tint of image outlines. 1. Select the "Quality" tab, select "Sharpness", and then press [̈]. 3. In...

Owners Manual
Page 143
...;] or [̈]. Display the frame where you want to be cut everything after a specific frame 1. Press [SET]. Press [̇] or [̈]. Press [MENU]. • The red portion of the indicator bar shows what part will pause movie playback. 2. Press [̄]. • You can also display the same screen while in the...
...;] or [̈]. Display the frame where you want to be cut everything after a specific frame 1. Press [SET]. Press [̇] or [̈]. Press [MENU]. • The red portion of the indicator bar shows what part will pause movie playback. 2. Press [̄]. • You can also display the same screen while in the...

Owners Manual
Page 145
...", and then press [SET]. • The message "Busy.... Press [SET]. will remain on the display as the cut operation is displayed, press [̄]. • The red portion of the indicator bar shows what part will be located. When the cut . 7.
...", and then press [SET]. • The message "Busy.... Press [SET]. will remain on the display as the cut operation is displayed, press [̄]. • The red portion of the indicator bar shows what part will be located. When the cut . 7.

Owners Manual
Page 236
... / LP -2.0 / -1.7 / -1.3 / -1.0 / -0.7 / -0.3 / 0.0 / +0.3 / +0.7 / +1.0 / +1.3 / +1.7 / +2.0 Auto / (Daylight) / (Cloudy) / (Shade) / N (Day White) / D (Daylight) / (Tungsten) / Manual Auto / ISO 50 / ISO 100 / ISO 200 / ISO 400 Multi / Center weighted / Spot Off / B/W / Sepia / Red / Green / Blue / Yellow / Pink / Purple +2 / +1 / 0 / -1 / -2 +2 / +1 / 0 / -1 / -2 +2 / +1 / 0 / -1 / -2 +2 / +1 / 0 / -1 / -2 Auto / Off G Set Up Tab Menu Sounds Startup File No.
... / LP -2.0 / -1.7 / -1.3 / -1.0 / -0.7 / -0.3 / 0.0 / +0.3 / +0.7 / +1.0 / +1.3 / +1.7 / +2.0 Auto / (Daylight) / (Cloudy) / (Shade) / N (Day White) / D (Daylight) / (Tungsten) / Manual Auto / ISO 50 / ISO 100 / ISO 200 / ISO 400 Multi / Center weighted / Spot Off / B/W / Sepia / Red / Green / Blue / Yellow / Pink / Purple +2 / +1 / 0 / -1 / -2 +2 / +1 / 0 / -1 / -2 +2 / +1 / 0 / -1 / -2 +2 / +1 / 0 / -1 / -2 Auto / Off G Set Up Tab Menu Sounds Startup File No.

Owners Manual
Page 238
... and Pattern 3 flashes four times per second. I REC Mode Operation Lamp Self-timer lamp Meaning Green Red Amber Red Operational (Power on, Lit recording enabled) Pattern 3 Flash is off. / Sleep Lit state Pattern 2 ...Storing image Pattern 1 Storing movie data / processing image data Self-timer countdown Pattern 1 (10 to 3 seconds) Self-timer countdown Pattern 2 (3 to indicate the current operational status of the camera. APPENDIX Indicator Lamp Reference The camera...
... and Pattern 3 flashes four times per second. I REC Mode Operation Lamp Self-timer lamp Meaning Green Red Amber Red Operational (Power on, Lit recording enabled) Pattern 3 Flash is off. / Sleep Lit state Pattern 2 ...Storing image Pattern 1 Storing movie data / processing image data Self-timer countdown Pattern 1 (10 to 3 seconds) Self-timer countdown Pattern 2 (3 to indicate the current operational status of the camera. APPENDIX Indicator Lamp Reference The camera...