
Owners Manual
Page 3
... Precautions 11 Data Error Precautions 18 Operating conditions 18 Condensation 19 Lens 19 Other 20 21 QUICK START GUIDE First, charge the batteries 21 To configure display language and clock settings ..... 22 To record an image 23 To view a recorded image 23 To delete an image 24 25 GETTING READY About This Manual 25 General Guide 26 Monitor Screen Contents 28 REC mode 28 PLAY mode 30 Changing the Contents of the Monitor Screen 31 Indicator Lamps 31...
... Precautions 11 Data Error Precautions 18 Operating conditions 18 Condensation 19 Lens 19 Other 20 21 QUICK START GUIDE First, charge the batteries 21 To configure display language and clock settings ..... 22 To record an image 23 To view a recorded image 23 To delete an image 24 25 GETTING READY About This Manual 25 General Guide 26 Monitor Screen Contents 28 REC mode 28 PLAY mode 30 Changing the Contents of the Monitor Screen 31 Indicator Lamps 31...

Owners Manual
Page 4
...Using Zoom 56 Optical Zoom 56 Digital Zoom 57 Using the Flash 58 Flash Unit Status 60 Changing the Flash Intensity Setting 60 Flash Precautions 61 Using the Self-timer 62 Specifying Image Size and Quality 63 To specify the image size 63 To specify image quality 64 66 OTHER RECORDING FUNCTIONS Selecting the Focus Mode 66 Using Auto Focus 67 Using the Macro Mode 68 Using the Infinity Mode 69 Using Manual Focus 69 Using Focus Lock 70 4 Exposure Compensation (EV Shift 71 Adjusting White Balance 73 Adjusting White Balance Manually 74 Using the BESTSHOT Mode...
...Using Zoom 56 Optical Zoom 56 Digital Zoom 57 Using the Flash 58 Flash Unit Status 60 Changing the Flash Intensity Setting 60 Flash Precautions 61 Using the Self-timer 62 Specifying Image Size and Quality 63 To specify the image size 63 To specify image quality 64 66 OTHER RECORDING FUNCTIONS Selecting the Focus Mode 66 Using Auto Focus 67 Using the Macro Mode 68 Using the Infinity Mode 69 Using Manual Focus 69 Using Focus Lock 70 4 Exposure Compensation (EV Shift 71 Adjusting White Balance 73 Adjusting White Balance Manually 74 Using the BESTSHOT Mode...

Owners Manual
Page 6
... 132 Changing the Display Language 133 Configuring [ ] (REC) and [ ] (PLAY) Buttons Power On/Off Functions 134 Formatting Built-in Memory 135 136 USING A MEMORY CARD Using a Memory Card 137 To insert a memory card into the camera 137 To remove a memory card from the camera 138 Formatting a Memory Card 138 Memory Card Precautions 139 Copying Files 140 To copy all the files in built-in memory to a memory card 140 To copy a file from a memory card to built-in memory 141 142 VIEWING IMAGES ON A COMPUTER Using the Camera with a Windows Computer ........ 142 USB Connection...
... 132 Changing the Display Language 133 Configuring [ ] (REC) and [ ] (PLAY) Buttons Power On/Off Functions 134 Formatting Built-in Memory 135 136 USING A MEMORY CARD Using a Memory Card 137 To insert a memory card into the camera 137 To remove a memory card from the camera 138 Formatting a Memory Card 138 Memory Card Precautions 139 Copying Files 140 To copy all the files in built-in memory to a memory card 140 To copy a file from a memory card to built-in memory 141 142 VIEWING IMAGES ON A COMPUTER Using the Camera with a Windows Computer ........ 142 USB Connection...

Owners Manual
Page 8
... by deletion of data as stipulated above, all important data on other related rights to these applications revert to change without permission of snapshot files and movie files violates copyright laws and international contracts. Distribution to the use of Photo Loader and/or Photohands. • CASIO COMPUTER CO., LTD. software. assumes no responsibility for any damage or loss resulting from the use of this manual...
... by deletion of data as stipulated above, all important data on other related rights to these applications revert to change without permission of snapshot files and movie files violates copyright laws and international contracts. Distribution to the use of Photo Loader and/or Photohands. • CASIO COMPUTER CO., LTD. software. assumes no responsibility for any damage or loss resulting from the use of this manual...

Owners Manual
Page 10
... first image recorded for important events, and even can also be viewed and printed using a DPOF compatible printer. When connected directly to a printer that date, which was developed by professional print services. • PRINT Image Matching II Compatible Images include PRINT Image Matching II data (mode setting and other camera setup information). Images can also be incorporated into Web pages quickly and easily. • Calendar screen A simple operation displays a full-month calendar on time for that supports USB DIRECT-PRINT, you can also have a specific image appear...
... first image recorded for important events, and even can also be viewed and printed using a DPOF compatible printer. When connected directly to a printer that date, which was developed by professional print services. • PRINT Image Matching II Compatible Images include PRINT Image Matching II data (mode setting and other camera setup information). Images can also be incorporated into Web pages quickly and easily. • Calendar screen A simple operation displays a full-month calendar on time for that supports USB DIRECT-PRINT, you can also have a specific image appear...

Owners Manual
Page 18
... you turn off the camera - Disconnecting the USB cable or disconnecting the AC adaptor from the camera, or connecting the USB cable to high humidity or dust - In areas subject to 104°F). • Do not use or keep the camera in file memory. - INTRODUCTION Data Error Precautions • Your digital camera is being performed - Removing the batteries or memory card from the camera while a USB data communication operation is manufactured using precision digital components. Operating conditions...
... you turn off the camera - Disconnecting the USB cable or disconnecting the AC adaptor from the camera, or connecting the USB cable to high humidity or dust - In areas subject to 104°F). • Do not use or keep the camera in file memory. - INTRODUCTION Data Error Precautions • Your digital camera is being performed - Removing the batteries or memory card from the camera while a USB data communication operation is manufactured using precision digital components. Operating conditions...

Owners Manual
Page 23
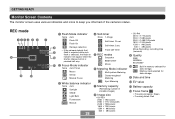
QUICK START GUIDE To record an image Green operation lamp 1 3 (See page 51 for details.) 99 1600 1200 NORMAL IN 1 / 1000 F2.6 03 / 12 / 24 12 : 58 To view a recorded image (See page 94 for details.) 1 Focus frame 2 1. Press [ ] (PLAY). 2. Press [ ] (REC). 2. Use [̇] and [̈] to compose the image, and then press the shutter release button half way. • When proper focus is achieved, the focus frame turns green and...
QUICK START GUIDE To record an image Green operation lamp 1 3 (See page 51 for details.) 99 1600 1200 NORMAL IN 1 / 1000 F2.6 03 / 12 / 24 12 : 58 To view a recorded image (See page 94 for details.) 1 Focus frame 2 1. Press [ ] (PLAY). 2. Press [ ] (REC). 2. Use [̇] and [̈] to compose the image, and then press the shutter release button half way. • When proper focus is achieved, the focus frame turns green and...
Owners Manual
Page 25
... storing images you record (page 52) The Rechargeable nickelmetal hydride batteries The CASIO BC-5H Charger Unit I Button Operations Button operations are indicated by double quotation marks (" "). This term as used in this : The CASIO QV-R41/QV-R51 Digital Camera The location where the camera is always enclosed by the button name inside of the following table defines the terminology used in this manual: "this camera" or "the camera" "file memory" "batteries" "charger unit" Means this manual. File memory...
... storing images you record (page 52) The Rechargeable nickelmetal hydride batteries The CASIO BC-5H Charger Unit I Button Operations Button operations are indicated by double quotation marks (" "). This term as used in this : The CASIO QV-R41/QV-R51 Digital Camera The location where the camera is always enclosed by the button name inside of the following table defines the terminology used in this manual: "this camera" or "the camera" "file memory" "batteries" "charger unit" Means this manual. File memory...
Owners Manual
Page 28
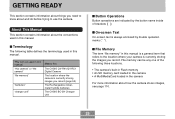
... Screen Contents The monitor screen uses various indicators and icons to keep you informed of storable images) 8 Image size • QV-R51 2560 ҂ 1920 pixels 2560 ҂ 1712 (3:2)pixels 2048 ҂ 1536 pixels 1600 ҂ 1200 pixels 1280 ҂ 960 pixels 640 ҂ 480 pixels B EV value C Battery capacity D Focus frame • Focusing complete: Green • Focusing failed: Red REC mode 1 Flash Mode indicator 4 Self-timer 1234 5 6 7 8 9 D 0 None Auto None 1-Image Flash Off Flash On Red-eye...
... Screen Contents The monitor screen uses various indicators and icons to keep you informed of storable images) 8 Image size • QV-R51 2560 ҂ 1920 pixels 2560 ҂ 1712 (3:2)pixels 2048 ҂ 1536 pixels 1600 ҂ 1200 pixels 1280 ҂ 960 pixels 640 ҂ 480 pixels B EV value C Battery capacity D Focus frame • Focusing complete: Green • Focusing failed: Red REC mode 1 Flash Mode indicator 4 Self-timer 1234 5 6 7 8 9 D 0 None Auto None 1-Image Flash Off Flash On Red-eye...

Owners Manual
Page 44
... time. 1. Use [̇] and [̈] to conserve battery power. When the camera is performed for information about how to change the currently selected setting, and then press [SET]. • Available Sleep settings are: "30 sec", "1 min", "2 min", and "Off". • Available Auto Power Off settings are disabled in the PLAY mode. • Pressing any operation for a specified amount of time in the Sleep state immediately turns the monitor screen...
... time. 1. Use [̇] and [̈] to conserve battery power. When the camera is performed for information about how to change the currently selected setting, and then press [SET]. • Available Sleep settings are: "30 sec", "1 min", "2 min", and "Off". • Available Auto Power Off settings are disabled in the PLAY mode. • Pressing any operation for a specified amount of time in the Sleep state immediately turns the monitor screen...

Owners Manual
Page 55
... the Macro mode or Manual Focus mode. The actual image is a simplified image for composing purposes. Always use the monitor screen to subject IMPORTANT! • The frame that is closer than the REC mode monitor screen image. • Certain levels of the REC mode monitor screen to compose images. Using the Optical Viewfinder You can cause the response of subject brightness can conserve battery power by turning off the camera's monitor screen...
... the Macro mode or Manual Focus mode. The actual image is a simplified image for composing purposes. Always use the monitor screen to subject IMPORTANT! • The frame that is closer than the REC mode monitor screen image. • Certain levels of the REC mode monitor screen to compose images. Using the Optical Viewfinder You can cause the response of subject brightness can conserve battery power by turning off the camera's monitor screen...

Owners Manual
Page 70
...;] and [̈] to aid in the Auto Focus mode. 70 The normal image reappears a short while later. 3. IMPORTANT! • In the Manual Focus mode, the [̇] and [̈] keys adjust focus, even if you can use to them (page 91). Record the image. Using Focus Lock Focus lock is a technique you used key customization to assign other functions to focus on the subject Manual focus position Do this: Press [̇]. Press [̈]. •...
...;] and [̈] to aid in the Auto Focus mode. 70 The normal image reappears a short while later. 3. IMPORTANT! • In the Manual Focus mode, the [̇] and [̈] keys adjust focus, even if you can use to them (page 91). Record the image. Using Focus Lock Focus lock is a technique you used key customization to assign other functions to focus on the subject Manual focus position Do this: Press [̇]. Press [̈]. •...
Owners Manual
Page 78
... a BESTSHOT user setup: focus mode, EV shift value, filter, metering mode, white balance mode, flash intensity, sharpness, saturation, contrast, flash mode, and ISO sensitivity. • Note that images recorded with this camera only can be used to create a BESTSHOT user setup. • You can have up to select " BESTSHOT", and then press [SET]. • This enters the BESTSHOT mode and displays a sample scene. 4. QV-R41 : UQR41nnn.JPE (n = 0 to 9) QV-R51 : UQR51nnn.JPE (n = 0 to delete. 5. Select...
... a BESTSHOT user setup: focus mode, EV shift value, filter, metering mode, white balance mode, flash intensity, sharpness, saturation, contrast, flash mode, and ISO sensitivity. • Note that images recorded with this camera only can be used to create a BESTSHOT user setup. • You can have up to select " BESTSHOT", and then press [SET]. • This enters the BESTSHOT mode and displays a sample scene. 4. QV-R41 : UQR41nnn.JPE (n = 0 to 9) QV-R51 : UQR51nnn.JPE (n = 0 to delete. 5. Select...
Owners Manual
Page 98
... image creates a new file that the current image cannot be cropped. • The cropping operation cannot be cropped. • If the message "This function is not supported for smaller image sizes. • For a 640 x 480 size image, you want to extract is not enough memory to store the cropped image. • When you display a trimmed image on the camera's monitor screen, the date and time indicates when the image was originally recorded...
... image creates a new file that the current image cannot be cropped. • The cropping operation cannot be cropped. • If the message "This function is not supported for smaller image sizes. • For a 640 x 480 size image, you want to extract is not enough memory to store the cropped image. • When you display a trimmed image on the camera's monitor screen, the date and time indicates when the image was originally recorded...

Owners Manual
Page 102
... view the large version of a date's image, move the date selection cursor to appear. • To exit the calendar screen, press [MENU]. • appears in sequence at a fixed interval. 1. In the PLAY mode, press [MENU]. 2. PLAYBACK • Pressing [̆] while the date...date, and then press [SET]. • This displays the first image that cannot be displayed by this camera. 3. Select the "PLAY" tab, select "Slideshow", and then press [̈]. 102 Playing a Slide Show Slide Show automatically plays back images in place of the image when the date contains data that was recorded...
... view the large version of a date's image, move the date selection cursor to appear. • To exit the calendar screen, press [MENU]. • appears in sequence at a fixed interval. 1. In the PLAY mode, press [MENU]. 2. PLAYBACK • Pressing [̆] while the date...date, and then press [SET]. • This displays the first image that cannot be displayed by this camera. 3. Select the "PLAY" tab, select "Slideshow", and then press [̈]. 102 Playing a Slide Show Slide Show automatically plays back images in place of the image when the date contains data that was recorded...

Owners Manual
Page 104
... the menu screen. • Pressing [MENU] instead of [SET] returns to select the setting you want , and then press [SET]. PLAYBACK To specify the slideshow images 1. To do this: Include all files in file memory in the slideshow Display a single file Include all files in the FAVORITE folder (page 153) in the slideshow Select this setting: All images One Image Favorites 3. Use [̆] and [̄] to the menu screen without changing it...
... the menu screen. • Pressing [MENU] instead of [SET] returns to select the setting you want , and then press [SET]. PLAYBACK To specify the slideshow images 1. To do this: Include all files in file memory in the slideshow Display a single file Include all files in the FAVORITE folder (page 153) in the slideshow Select this setting: All images One Image Favorites 3. Use [̆] and [̄] to the menu screen without changing it...
Owners Manual
Page 143
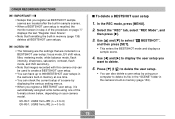
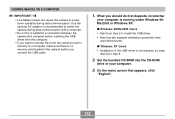
I Windows 98/Me/2000 Users • Start from the camera's built-in the camera before you connect the USB cable. 1. What you should do first depends on whether your computer. 3. I Windows XP Users • Installation of your computer is recommended to power the camera during data communication. On the menu screen that the example installation presented here uses Windows 98. VIEWING IMAGES ON A COMPUTER IMPORTANT! • Low battery power can cause the camera to power down suddenly...
I Windows 98/Me/2000 Users • Start from the camera's built-in the camera before you connect the USB cable. 1. What you should do first depends on whether your computer. 3. I Windows XP Users • Installation of your computer is recommended to power the camera during data communication. On the menu screen that the example installation presented here uses Windows 98. VIEWING IMAGES ON A COMPUTER IMPORTANT! • Low battery power can cause the camera to power down suddenly...
Owners Manual
Page 154
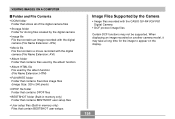
... user setups Image Files Supported by the Camera • Image files recorded with the CASIO QV-R41/QV-R51 Digital Camera • DCF protocol image files Certain DCF functions may take a long time for storing files created by the digital camera • Image file File that contains an image recorded with the digital camera (File Name Extension: JPG) • Movie file File that contains a movie recorded with the digital camera (File Name Extension: AVI) • Album folder Folder that contains files used by the album function • Album HTML file File used by the album function (File...
... user setups Image Files Supported by the Camera • Image files recorded with the CASIO QV-R41/QV-R51 Digital Camera • DCF protocol image files Certain DCF functions may take a long time for storing files created by the digital camera • Image file File that contains an image recorded with the digital camera (File Name Extension: JPG) • Movie file File that contains a movie recorded with the digital camera (File Name Extension: AVI) • Album folder Folder that contains files used by the album function • Album HTML file File used by the album function (File...
Owners Manual
Page 163
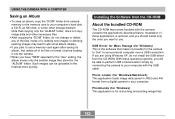
... over a USB connection. Installation of these operating systems, you plan to your computer. Photohands (for Windows) This application is for the "Use" setting, the album shows only the smaller image files stored in JPEG and AVI format from a digital camera to use . Adding new images or deleting existing images may lead to abnormal album display. • If you will be uploaded to use a memory card again after saving its album, first delete all...
... over a USB connection. Installation of these operating systems, you plan to your computer. Photohands (for Windows) This application is for the "Use" setting, the album shows only the smaller image files stored in JPEG and AVI format from a digital camera to use . Adding new images or deleting existing images may lead to abnormal album display. • If you will be uploaded to use a memory card again after saving its album, first delete all...
Owners Manual
Page 177
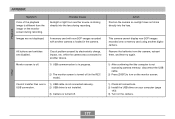
... a memory card using another device. 1) USB communication is in progress. 2) The monitor screen is turned off (in the camera. Cannot transfer files over a 1) USB cable is not accessing camera memory, disconnect the USB cable. 2) Press [DISP] to another digital camera. A memory card with non-DCF images recorded with another source is shining directly into the lens. Circuit problem caused by electrostatic charge, impact, etc. Playback APPENDIX Symptom Color of the playback image is different from the image on the camera. Images are disabled. Remove...
... a memory card using another device. 1) USB communication is in progress. 2) The monitor screen is turned off (in the camera. Cannot transfer files over a 1) USB cable is not accessing camera memory, disconnect the USB cable. 2) Press [DISP] to another digital camera. A memory card with non-DCF images recorded with another source is shining directly into the lens. Circuit problem caused by electrostatic charge, impact, etc. Playback APPENDIX Symptom Color of the playback image is different from the image on the camera. Images are disabled. Remove...


