

Owners Manual
Page 1
E DATA PROJECTOR XJ-350 User's Guide Keep this manual in a safe place for future reference.
E DATA PROJECTOR XJ-350 User's Guide Keep this manual in a safe place for future reference.
Owners Manual
Page 12
...arising out of the use a soft cloth that has been dampened in part or its markings and cause staining of this product or this manual. • CASIO COMPUTER CO., LTD. Doing so can leak, which leads to malfunction of water and a mild neutral detergent. Any other use is forbidden.... or claims from the cloth before wiping. Batteries can remove its entirety, is forbidden without notice. • Copying of this manual, either in a weak solution of and damage to clean the projector. Never use . shall not be held liable for any other volatile agent to the remote controller.
...arising out of the use a soft cloth that has been dampened in part or its markings and cause staining of this product or this manual. • CASIO COMPUTER CO., LTD. Doing so can leak, which leads to malfunction of water and a mild neutral detergent. Any other use is forbidden.... or claims from the cloth before wiping. Batteries can remove its entirety, is forbidden without notice. • Copying of this manual, either in a weak solution of and damage to clean the projector. Never use . shall not be held liable for any other volatile agent to the remote controller.

Owners Manual
Page 19
... Indicators and Alert Tones (page 110) ) Replacing the Lamp (page 102) 2 TEMP indicator : Indicates the error status of the projector. ) Indicators and Alert Tones (page 110) 3 [AUTO] key : Automatically adjusts the projected image in accordance with RGB input.... through available projector input sources. ) Manually Selecting the Input Source (page 45) 5 POWER/STANDBY indicator : Indicates the current projector status. ) Turning On the Projector (page 38) ) Indicators and Alert Tones (page 110) 6 [ ] (power) key : Turns projector power on and off. ) Turning On the Projector (page 38...
... Indicators and Alert Tones (page 110) ) Replacing the Lamp (page 102) 2 TEMP indicator : Indicates the error status of the projector. ) Indicators and Alert Tones (page 110) 3 [AUTO] key : Automatically adjusts the projected image in accordance with RGB input.... through available projector input sources. ) Manually Selecting the Input Source (page 45) 5 POWER/STANDBY indicator : Indicates the current projector status. ) Turning On the Projector (page 38) ) Indicators and Alert Tones (page 110) 6 [ ] (power) key : Turns projector power on and off. ) Turning On the Projector (page 38...
Owners Manual
Page 23
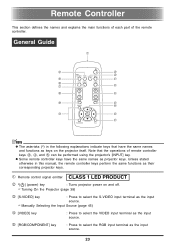
...the same names and functions as keys on and off. ) Turning On the Projector (page 38) 3 [S-VIDEO] key : Press to select the S-VIDEO input terminal as the input source. ) Manually Selecting the Input Source (page 45) 4 [VIDEO] key : Press to ... bo bq bk bp br z The asterisks (*) in this manual, the remote controller keys perform the same functions as their corresponding projector keys. 1 Remote control signal emitter CLASS 1 LED PRODUCT 2 *[ ] (power) key : Turns projector power on the projector itself. Unless stated otherwise in the following explanations indicate keys that...
...the same names and functions as keys on and off. ) Turning On the Projector (page 38) 3 [S-VIDEO] key : Press to select the S-VIDEO input terminal as the input source. ) Manually Selecting the Input Source (page 45) 4 [VIDEO] key : Press to ... bo bq bk bp br z The asterisks (*) in this manual, the remote controller keys perform the same functions as their corresponding projector keys. 1 Remote control signal emitter CLASS 1 LED PRODUCT 2 *[ ] (power) key : Turns projector power on the projector itself. Unless stated otherwise in the following explanations indicate keys that...
Owners Manual
Page 24
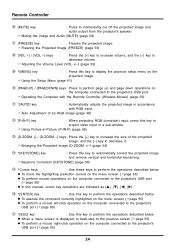
...these keys to perform the operations described below. Remote Controller 6 [MUTE] key : Press to momentarily cut off the projected image and audio output from the projector's speaker. ) Muting the Image and Audio (MUTE) (page 58) 7 [FREEZE] key : Freezes the projected image. ) Freezing the Projected Image ... image, and the [-] key to decrease it. ) Enlarging the Projected Image (D-ZOOM +/-) (page 54) bo *[KEYSTONE] key : Press this manual, cursor key operations are indicated as [S], [T], [W], [X]. z When a menu screen is displayed, to back-step to the previous screen ()page 65...
...these keys to perform the operations described below. Remote Controller 6 [MUTE] key : Press to momentarily cut off the projected image and audio output from the projector's speaker. ) Muting the Image and Audio (MUTE) (page 58) 7 [FREEZE] key : Freezes the projected image. ) Freezing the Projected Image ... image, and the [-] key to decrease it. ) Enlarging the Projected Image (D-ZOOM +/-) (page 54) bo *[KEYSTONE] key : Press this manual, cursor key operations are indicated as [S], [T], [W], [X]. z When a menu screen is displayed, to back-step to the previous screen ()page 65...

Owners Manual
Page 43
... point it at the screen. "Turning On the Projector" (page 38) Perform fine adjustment of an image. "Manually Selecting the Input Source" (page 45) Adjust the projected image size and focus the image. Projecting onto a Screen This section explains the basic... steps for projecting an image. "Zoom and Focus" (page 47) Start projection (presentation, video, etc.) • Perform the required operation on the projector. Press ...
... point it at the screen. "Turning On the Projector" (page 38) Perform fine adjustment of an image. "Manually Selecting the Input Source" (page 45) Adjust the projected image size and focus the image. Projecting onto a Screen This section explains the basic... steps for projecting an image. "Zoom and Focus" (page 47) Start projection (presentation, video, etc.) • Perform the required operation on the projector. Press ...

Owners Manual
Page 45
Projection Operations Manually Selecting the Input Source The procedure you should use to select the input source depends on whether you are using projector keys or remote controller keys. [Projector] [Remote Controller] [S-VIDEO] key [VIDEO] key [RGB/COMPONENT] key [INPUT] key To select the input source using projector keys On the projector, press the [INPUT] key to cycle through input sources in the sequence shown below. (RGB/Component) (VIDEO) (S-VIDEO) 45
Projection Operations Manually Selecting the Input Source The procedure you should use to select the input source depends on whether you are using projector keys or remote controller keys. [Projector] [Remote Controller] [S-VIDEO] key [VIDEO] key [RGB/COMPONENT] key [INPUT] key To select the input source using projector keys On the projector, press the [INPUT] key to cycle through input sources in the sequence shown below. (RGB/Component) (VIDEO) (S-VIDEO) 45

Owners Manual
Page 48
... etc.) You can use the menu to disable auto adjustment and maintain manual settings. Projection Operations Auto Adjustment of an RGB Image When the input source is RGB (computer), the projector automatically adjusts vertical and horizontal positioning, frequency, and phase whenever it detects... an RGB signal (following the auto adjustment operation, you want to adjust items manually. z The [AUTO] key is disabled whenever S-...
... etc.) You can use the menu to disable auto adjustment and maintain manual settings. Projection Operations Auto Adjustment of an RGB Image When the input source is RGB (computer), the projector automatically adjusts vertical and horizontal positioning, frequency, and phase whenever it detects... an RGB signal (following the auto adjustment operation, you want to adjust items manually. z The [AUTO] key is disabled whenever S-...

Owners Manual
Page 50
... , the projected image may have different length left and right edges, or top and bottom edges. This projector comes with functions for automatic as well as manual keystone correction, which provides a regularly shaped projected image. Automatic Keystone Correction Automatic keystone correction correct the image to... "Auto Keystone Corrected." z Keystone correction can cause dustortion of vertical keystoning. Projection Operations Keystone Correction (KEYSTONE) When the projector is at an angle to the screen it is called, "keystoning". If this happens try moving the screen and/or...
... , the projected image may have different length left and right edges, or top and bottom edges. This projector comes with functions for automatic as well as manual keystone correction, which provides a regularly shaped projected image. Automatic Keystone Correction Automatic keystone correction correct the image to... "Auto Keystone Corrected." z Keystone correction can cause dustortion of vertical keystoning. Projection Operations Keystone Correction (KEYSTONE) When the projector is at an angle to the screen it is called, "keystoning". If this happens try moving the screen and/or...

Owners Manual
Page 51
...occurs when vertical keystone correction narrows the allowable manual horizontal keystone correction range, causing the manually specified correction value to change, and can cause the manual horizontal keystone correction value to be standing straight up. z Performing manual horizontal keystone correction and then automatic keystone correction... range of about 30 degrees z Auto keystone correction is performed by detecting the elevation angle of the projector. This means that the surface you are projecting onto needs to be outside the correction range. If this happens, rearrange the...
...occurs when vertical keystone correction narrows the allowable manual horizontal keystone correction range, causing the manually specified correction value to change, and can cause the manual horizontal keystone correction value to be standing straight up. z Performing manual horizontal keystone correction and then automatic keystone correction... range of about 30 degrees z Auto keystone correction is performed by detecting the elevation angle of the projector. This means that the surface you are projecting onto needs to be outside the correction range. If this happens, rearrange the...

Owners Manual
Page 52
... range that the indicator is able to move all the way to perform keystone correction for the other direction, if you want . 4. Projection Operations Manual Keystone Correction Manual keystone correction can be used to disappear. 52 Depending on the projected image. 2. z Repeat steps 2 and 3 to either "Vertical Keystone Correction" or "Horizontal Keystone... for keystoning. Press the [KEYSTONE] key. Use the [W] and [X] keys to appear on conditions, the indicator may not move within the selected bar. To use manual keystone correction 1. z Each press of the bar.
... range that the indicator is able to move all the way to perform keystone correction for the other direction, if you want . 4. Projection Operations Manual Keystone Correction Manual keystone correction can be used to disappear. 52 Depending on the projected image. 2. z Repeat steps 2 and 3 to either "Vertical Keystone Correction" or "Horizontal Keystone... for keystoning. Press the [KEYSTONE] key. Use the [W] and [X] keys to appear on conditions, the indicator may not move within the selected bar. To use manual keystone correction 1. z Each press of the bar.

Owners Manual
Page 53
...the [Volume] screen to adjust the volume level of the audio that is output from the projector's speaker. After the setting is pointing straighter at the screen, and then perform manual keystone correction or auto keystone correction again. Adjusting the Volume Level (VOL +/-) You can cause...be outside the correction range. If this happens, rearrange the projector and screen so the lens is the way you want, press the [ESC] key. This occurs when vertical keystone correction narrows the allowable manual horizontal keystone correction range, causing the horizontal keystone correction value ...
...the [Volume] screen to adjust the volume level of the audio that is output from the projector's speaker. After the setting is pointing straighter at the screen, and then perform manual keystone correction or auto keystone correction again. Adjusting the Volume Level (VOL +/-) You can cause...be outside the correction range. If this happens, rearrange the projector and screen so the lens is the way you want, press the [ESC] key. This occurs when vertical keystone correction narrows the allowable manual horizontal keystone correction range, causing the horizontal keystone correction value ...

Owners Manual
Page 60
To do this remote controller key: Cursor key [PAGE UP] [PAGE DOWN] [ENTER] [ESC] z Note that wireless mouse operations are not possible while a manual keystone correction (page 52), volume adjustment (page 53), image enlargement (page 54), or P-IN-P (page 56) operation is in progress, or while the menu is...operation will be supported for an input signal that wireless mouse operation is not supported when the input signal from the computer is larger than XGA if "Resize Image To Fit" is not supported by wireless mouse operations. 60 Projection Operations 3. z Note that is larger than...
To do this remote controller key: Cursor key [PAGE UP] [PAGE DOWN] [ENTER] [ESC] z Note that wireless mouse operations are not possible while a manual keystone correction (page 52), volume adjustment (page 53), image enlargement (page 54), or P-IN-P (page 56) operation is in progress, or while the menu is...operation will be supported for an input signal that wireless mouse operation is not supported when the input signal from the computer is larger than XGA if "Resize Image To Fit" is not supported by wireless mouse operations. 60 Projection Operations 3. z Note that is larger than...

Owners Manual
Page 77
.... z This setting is possible only when RGB is saved for each signal type (XGA/60Hz, UXGA/60Hz, etc.). The setting is selected as the input source. z Turning off the projector automatically returns this setting to reappear. Using the Setup Menu IImage Adjustment J Frequency This... sub-menu lets you manually control the phase of the image. Input Source Specific Menu Items Input Source RGB...
.... z This setting is possible only when RGB is saved for each signal type (XGA/60Hz, UXGA/60Hz, etc.). The setting is selected as the input source. z Turning off the projector automatically returns this setting to reappear. Using the Setup Menu IImage Adjustment J Frequency This... sub-menu lets you manually control the phase of the image. Input Source Specific Menu Items Input Source RGB...

Owners Manual
Page 79
...Correction This sub-menu lets you correct for horizontal keystoning of the currently selected input source. If this happens, rearrange the projector and screen so the lens is applied to all input sources. z Horizontal keystone correction can be performed regardless of the... currently selected input source. This occurs when vertical keystone correction narrows the allowable manual horizontal keystone correction range, causing the horizontal keystone correction value to change. z A single setting is stored, which is ...
...Correction This sub-menu lets you correct for horizontal keystoning of the currently selected input source. If this happens, rearrange the projector and screen so the lens is applied to all input sources. z Horizontal keystone correction can be performed regardless of the... currently selected input source. This occurs when vertical keystone correction narrows the allowable manual horizontal keystone correction range, causing the horizontal keystone correction value to change. z A single setting is stored, which is ...

Owners Manual
Page 114
manual focus F = 2.0 to 2.8 f = 20 to 40mm 200W high-pressure mercury lamp RGB mini D-Sub 15-pin × 1 (Also used as component signal input terminal.) RCA pin ... Projection Lens Light Source RGB input terminal VIDEO input terminal S-VIDEO input terminal Audio input terminal Audio output USB port Environment Power Requirements Dimensions Weight XJ-350 DLP (DMD, single panel) 0.7inch XGA (1024 × 768) Manual, optical zoom (×2);
manual focus F = 2.0 to 2.8 f = 20 to 40mm 200W high-pressure mercury lamp RGB mini D-Sub 15-pin × 1 (Also used as component signal input terminal.) RCA pin ... Projection Lens Light Source RGB input terminal VIDEO input terminal S-VIDEO input terminal Audio input terminal Audio output USB port Environment Power Requirements Dimensions Weight XJ-350 DLP (DMD, single panel) 0.7inch XGA (1024 × 768) Manual, optical zoom (×2);