User Manual
Page 1
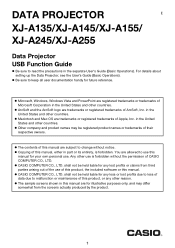
... product. 1 in the United States and other countries. Macintosh and Mac OS are trademarks or registered trademarks of ArcSoft, Inc. DATA PROJECTOR E XJ-A135/XJ-A145/XJ-A155/ XJ-A245/XJ-A255 Data Projector USB Function Guide Be sure to keep all user documentation handy for future reference. Microsoft, Windows, Windows Vista and PowerPoint are registered trademarks or trademarks of Microsoft Corporation in...
... product. 1 in the United States and other countries. Macintosh and Mac OS are trademarks or registered trademarks of ArcSoft, Inc. DATA PROJECTOR E XJ-A135/XJ-A145/XJ-A155/ XJ-A245/XJ-A255 Data Projector USB Function Guide Be sure to keep all user documentation handy for future reference. Microsoft, Windows, Windows Vista and PowerPoint are registered trademarks or trademarks of Microsoft Corporation in...

User Manual
Page 2
... ECA File 14 Using Viewer to Project the Contents of a File on a Memory Device 18 Connecting a Memory Device to the Data Projector 18 Starting Projection with Viewer 20 Projecting an ECA (Presentation) File 22 Projecting an Image File 25 Projecting a Slideshow 26 Projecting a Movie File 27 File Menu Operations 30 Configuring Viewer Settings 33 Viewer Troubleshooting 36 Memory Devices ...36 File Display and Playback 37 Viewer Error Messages 38 2
... ECA File 14 Using Viewer to Project the Contents of a File on a Memory Device 18 Connecting a Memory Device to the Data Projector 18 Starting Projection with Viewer 20 Projecting an ECA (Presentation) File 22 Projecting an Image File 25 Projecting a Slideshow 26 Projecting a Movie File 27 File Menu Operations 30 Configuring Viewer Settings 33 Viewer Troubleshooting 36 Memory Devices ...36 File Display and Playback 37 Viewer Error Messages 38 2

User Manual
Page 3
Performing a Presentation Using the YC-400/YC-430 Document Camera 39 YC Camera Application Function and Operation Overview 39 Connecting the Document Camera to the Data Projector 39 YC Camera Application Operations 42 YC Camera Application Projection Operations 42 Configuring YC Camera Application Setup Menu Settings 46 Projecting the Screen Image of a Graphing Calculator 50 To project the screen image of a graphing calculator 50 3
Performing a Presentation Using the YC-400/YC-430 Document Camera 39 YC Camera Application Function and Operation Overview 39 Connecting the Document Camera to the Data Projector 39 YC Camera Application Operations 42 YC Camera Application Projection Operations 42 Configuring YC Camera Application Setup Menu Settings 46 Projecting the Screen Image of a Graphing Calculator 50 To project the screen image of a graphing calculator 50 3

User Manual
Page 6
...-400/YC-430) You can connect a CASIO fx-9860G series graphing calculator to the Data Projector's USB port and project the images of documents placed on page 39. Graphing Calculator (CASIO fx-9860G Series) You can connect a CASIO Document Camera to the Data Projector's USB port and project calculator screen images with the projector. YC-400/YC-430 USB For more information, see "Projecting the Screen Image of the YC-400/YC-430...
...-400/YC-430) You can connect a CASIO fx-9860G series graphing calculator to the Data Projector's USB port and project the images of documents placed on page 39. Graphing Calculator (CASIO fx-9860G Series) You can connect a CASIO Document Camera to the Data Projector's USB port and project calculator screen images with the projector. YC-400/YC-430 USB For more information, see "Projecting the Screen Image of the YC-400/YC-430...

User Manual
Page 7
... Data Projector does this case, the image that is connected to the Data Projector's USB port while it is turned on depends on the current configuration of the Data Projector's plug-and-play setting). When plug-and-play setting, see "Setup Menu Contents" in the background, depending upon the type of USB device that is enabled under the Data Projector's initial default settings. When plug-and-play is currently being projected...
... Data Projector does this case, the image that is connected to the Data Projector's USB port while it is turned on depends on the current configuration of the Data Projector's plug-and-play setting). When plug-and-play setting, see "Setup Menu Contents" in the background, depending upon the type of USB device that is enabled under the Data Projector's initial default settings. When plug-and-play is currently being projected...

User Manual
Page 8
... comes with resolution of the YC-400 Multi Projection Camera. ArcSoft MediaConverter 3 for CASIO Projector Software for updating the firmware of at least 1024 × 768 that is supported by above operating systems and the computer being run Display: Full-color display with the projector. Multi Projection Camera Update Software Software for converting movie files. Installing the Software The following conditions Windows® 7, Windows Vista®, or Windows® XP...
... comes with resolution of the YC-400 Multi Projection Camera. ArcSoft MediaConverter 3 for CASIO Projector Software for updating the firmware of at least 1024 × 768 that is supported by above operating systems and the computer being run Display: Full-color display with the projector. Multi Projection Camera Update Software Software for converting movie files. Installing the Software The following conditions Windows® 7, Windows Vista®, or Windows® XP...
User Manual
Page 18
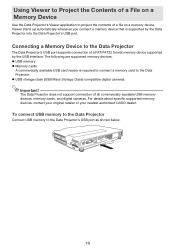
... specific supported memory devices, contact your original retailer or your nearest authorized CASIO dealer. The Data Projector does not support connection of a file on a memory device. To connect USB memory to the Data Projector Connect USB memory to the Data Projector The Data Projector's USB port supports connection of a FAT/FAT32 format memory device supported by the Data Projector into the Data Projector's USB port. Using Viewer to Project the Contents of a File on a Memory Device Use the Data Projector's Viewer application to project...
... specific supported memory devices, contact your original retailer or your nearest authorized CASIO dealer. The Data Projector does not support connection of a file on a memory device. To connect USB memory to the Data Projector Connect USB memory to the Data Projector The Data Projector's USB port supports connection of a FAT/FAT32 format memory device supported by the Data Projector into the Data Projector's USB port. Using Viewer to Project the Contents of a File on a Memory Device Use the Data Projector's Viewer application to project...

User Manual
Page 20
...; This displays the input source selection screen. 2. Starting Projection with Viewer If the Data Projector is turned on and you are performing the procedure under "Connecting a Memory Device to the Data Projector" (page 18) to connect USB memory to the Data Projector will cause the main Viewer window shown below to : Enters the Presentation Mode for projection of "Projecting an Image File" (page 25) images files. Menu Item Presentation Slides Movie Viewer Setup Function...
...; This displays the input source selection screen. 2. Starting Projection with Viewer If the Data Projector is turned on and you are performing the procedure under "Connecting a Memory Device to the Data Projector" (page 18) to connect USB memory to the Data Projector will cause the main Viewer window shown below to : Enters the Presentation Mode for projection of "Projecting an Image File" (page 25) images files. Menu Item Presentation Slides Movie Viewer Setup Function...
User Manual
Page 27
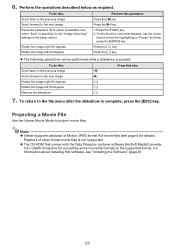
... the function menu that appears, use the cursor keys to move the highlighting to the next image Pause the slideshow (This option is available only when "Auto" is not supported. The CD-ROM that comes with the Data Projector contains software (ArcSoft MediaConverter 3 for CASIO Projector) for details). Playback of Motion JPEG format AVI movie files (see "Installing the Software" (page...
... the function menu that appears, use the cursor keys to move the highlighting to the next image Pause the slideshow (This option is available only when "Auto" is not supported. The CD-ROM that comes with the Data Projector contains software (ArcSoft MediaConverter 3 for CASIO Projector) for details). Playback of Motion JPEG format AVI movie files (see "Installing the Software" (page...
User Manual
Page 33
...-New): Displays files by the time they were last modified, from the main Viewer window is the list view or icon view. Manual*: Specifies manual image scrolling. Press the [FUNC] key. 2. On the function menu that appears, use the Viewer setup menu to the oldest. Zoom*: Causes movies to their original sizes. Initialize Viewer Setup Returns all Viewer settings to be played back at the Data Projector's maximum possible size...
...-New): Displays files by the time they were last modified, from the main Viewer window is the list view or icon view. Manual*: Specifies manual image scrolling. Press the [FUNC] key. 2. On the function menu that appears, use the Viewer setup menu to the oldest. Zoom*: Causes movies to their original sizes. Initialize Viewer Setup Returns all Viewer settings to be played back at the Data Projector's maximum possible size...
User Manual
Page 36
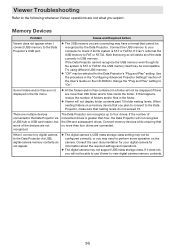
... will delete all of the User's Guide on a memory device that you plan to connect to the Data Projector, make sure that doing so will not be able to use Viewer to view digital camera memory contents. 36 The Data Projector can recognize up to FAT or FAT32. Viewer Troubleshooting Refer to the following whenever Viewer operations are not recognized. Memory Devices...
... will delete all of the User's Guide on a memory device that you plan to connect to the Data Projector, make sure that doing so will not be able to use Viewer to view digital camera memory contents. 36 The Data Projector can recognize up to FAT or FAT32. Viewer Troubleshooting Refer to the following whenever Viewer operations are not recognized. Memory Devices...
User Manual
Page 38
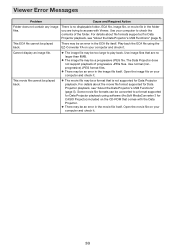
... Data Projector playback, see "About the Data Projector's USB Functions" (page 5). Use your computer and check it . 38 This ECA file cannot be an error in the folder you are no displayable folder, ECA file, image file, or movie file in the movie file itself. Play back the ECA file using software (ArcSoft MediaConverter 3 for CASIO Projector) included on your computer to a format supported for Data Projector...
... Data Projector playback, see "About the Data Projector's USB Functions" (page 5). Use your computer and check it . 38 This ECA file cannot be an error in the folder you are no displayable folder, ECA file, image file, or movie file in the movie file itself. Play back the ECA file using software (ArcSoft MediaConverter 3 for CASIO Projector) included on your computer to a format supported for Data Projector...

User Manual
Page 39
... the plug-and-play setting, see "Installing the Software" (page 8). For more information, see "Setup Menu Contents" in the User's Guide. The resolution of documents placed onto the document camera's document stage. A YC-400 document camera can project the image of documents placed on the document stage of the document camera. Connecting the Document Camera to the Data Projector This section provides...
... the plug-and-play setting, see "Installing the Software" (page 8). For more information, see "Setup Menu Contents" in the User's Guide. The resolution of documents placed onto the document camera's document stage. A YC-400 document camera can project the image of documents placed on the document stage of the document camera. Connecting the Document Camera to the Data Projector This section provides...

User Manual
Page 40
... Camera stand USB cable Document stage 3. To connect the document camera to adjust the document camera position. 40 Follow the instructions shown in the message to the Data Projector and project the image of the document stage along with the document camera. With nothing on the document stage, press the [P] (power) button on the camera stand. This will turn on the Data Projector. ...
... Camera stand USB cable Document stage 3. To connect the document camera to adjust the document camera position. 40 Follow the instructions shown in the message to the Data Projector and project the image of the document stage along with the document camera. With nothing on the document stage, press the [P] (power) button on the camera stand. This will turn on the Data Projector. ...

User Manual
Page 44
... positioned correctly, position adjustment will end and the dialog box will be projected in accordance with the settings on the YC Camera Application Setup Menu (page 46). 44 At this time the monitor screen (the image being projected. Note This operation will be projected. Remove all documents and objects from the document stage. 2. Press the [FUNC] key to display the YC Camera application...
... positioned correctly, position adjustment will end and the dialog box will be projected in accordance with the settings on the YC Camera Application Setup Menu (page 46). 44 At this time the monitor screen (the image being projected. Note This operation will be projected. Remove all documents and objects from the document stage. 2. Press the [FUNC] key to display the YC Camera application...
User Manual
Page 48
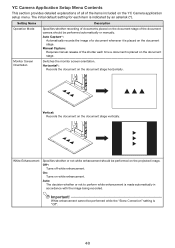
... setup menu. Off*: Turns off white enhancement. On: Turns on the document stage. White enhancement cannot be performed automatically or manually. Auto Capture*: Automatically records the image of a document whenever it is placed on white enhancement. Manual Capture: Requires manual release of the shutter each item is placed on the document stage vertically. Switches the monitor screen orientation. The initial default setting for each time a document is indicated...
... setup menu. Off*: Turns off white enhancement. On: Turns on the document stage. White enhancement cannot be performed automatically or manually. Auto Capture*: Automatically records the image of a document whenever it is placed on white enhancement. Manual Capture: Requires manual release of the shutter each item is placed on the document stage vertically. Switches the monitor screen orientation. The initial default setting for each time a document is indicated...

User Manual
Page 49
... YC Camera application setup menu items to their initial default settings. On*: Turns on automatic skew correction. Off: Does not display the monitor image. Project Document Monitor Image Specifies whether or not the camera's monitor image should be projected when a document is removed from the document stage. Initialize YC Camera Returns all settings on the YC Camera application setup menu to their initial factory defaults" on page...
... YC Camera application setup menu items to their initial default settings. On*: Turns on automatic skew correction. Off: Does not display the monitor image. Project Document Monitor Image Specifies whether or not the camera's monitor image should be projected when a document is removed from the document stage. Initialize YC Camera Returns all settings on the YC Camera application setup menu to their initial factory defaults" on page...
User Manual
Page 50
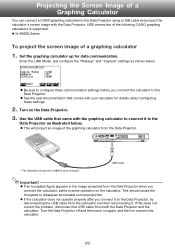
... configure these communication settings before you connect the calculator to the Data Projector. See the user documentation that came with the Data Projector. Projecting the Screen Image of a Graphing Calculator You can connect a CASIO graphing calculator to the Data Projector using a USB cable and project the calculator's screen image with the graphing calculator to connect it . Turn on again, and then re-connect the calculator. 50 Enter the LINK Mode, and configure the...
... configure these communication settings before you connect the calculator to the Data Projector. See the user documentation that came with the Data Projector. Projecting the Screen Image of a Graphing Calculator You can connect a CASIO graphing calculator to the Data Projector using a USB cable and project the calculator's screen image with the graphing calculator to connect it . Turn on again, and then re-connect the calculator. 50 Enter the LINK Mode, and configure the...

Brochure
Page 1
...; PDF's. HDMI Direct Digital Input PRESENTATIONS WITHOUT A PC You provide the thumb drive and we will provide the software to prior Casio product with mercury lamp. MERCURY LAMP FREE You Could Save Up to $800.* You could save up to prior Casio product with a mercury Lamp. SUPER COLOR Hybrid light source results in a 50% increase in 2,000 hours. Scheduled lamp change is the thinnest high brightness projector in 2,000 hours...
...; PDF's. HDMI Direct Digital Input PRESENTATIONS WITHOUT A PC You provide the thumb drive and we will provide the software to prior Casio product with mercury lamp. MERCURY LAMP FREE You Could Save Up to $800.* You could save up to prior Casio product with a mercury Lamp. SUPER COLOR Hybrid light source results in a 50% increase in 2,000 hours. Scheduled lamp change is the thinnest high brightness projector in 2,000 hours...
Brochure
Page 2
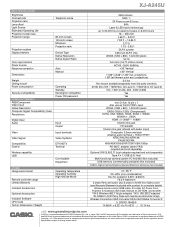
... screen size Projection range Projection system Display element Color reproduction Power source Keystone correction Dimensions Telephoto mode 60-inch screen 100-inch screen Minimum Projection ratio Device Type Native Resolution Native Aspect Ratio Auto Manual Weight Ceiling mount Power consumption Security compatibility INTERFACE TERMINALS RGB/Component Video Input Native Resolution Computer Signal Compatibility (max.) Resolutions Operating Standby Kensington compatible Power ON password Digital input Audio Input Output Video Video Signal Compatibility Control Wireless capability USB...
... screen size Projection range Projection system Display element Color reproduction Power source Keystone correction Dimensions Telephoto mode 60-inch screen 100-inch screen Minimum Projection ratio Device Type Native Resolution Native Aspect Ratio Auto Manual Weight Ceiling mount Power consumption Security compatibility INTERFACE TERMINALS RGB/Component Video Input Native Resolution Computer Signal Compatibility (max.) Resolutions Operating Standby Kensington compatible Power ON password Digital input Audio Input Output Video Video Signal Compatibility Control Wireless capability USB...


