
B4545 B6765 Installation Manual - English
Page 1
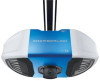
... Garage Door Opener WARNING: This product can expose you see installation videos. For more information go to www.P65Warnings.ca.gov CHECK THE DOOR Models B4545 B6765 Go to chamberlain.com/belt-install to Door Height. Unattended devices and features are under EXTREME ...closer to garage door opener. • Buy a Wi-Fi range extender. Adjustments Refer to Installation Manual Two people recommended to Check Door. Continue to complete step l Strong - Move router or install a Wi-Fi range extender. Is your garage door opener in place. Continue to Power Connections...
... Garage Door Opener WARNING: This product can expose you see installation videos. For more information go to www.P65Warnings.ca.gov CHECK THE DOOR Models B4545 B6765 Go to chamberlain.com/belt-install to Door Height. Unattended devices and features are under EXTREME ...closer to garage door opener. • Buy a Wi-Fi range extender. Adjustments Refer to Installation Manual Two people recommended to Check Door. Continue to complete step l Strong - Move router or install a Wi-Fi range extender. Is your garage door opener in place. Continue to Power Connections...
B4545 B6765 Installation Manual - English
Page 2
... closes the door when the safety reversing sensor is obstructed (and the sensors are replacing a LiftMaster®, Chamberlain®, or Craftsman® garage door opener you to install the proper outlet. The camera powers up or down to opener (H) and secure with ring fastener (KK... kit. NOTE: If anything interferes with the door's upward travel . If anything interferes with the door's downward travel . Attach manual/release safety reverse test label in the desired UP position press and release the Adjustment Button. Attach entrapment warning label on garage door...
... closes the door when the safety reversing sensor is obstructed (and the sensors are replacing a LiftMaster®, Chamberlain®, or Craftsman® garage door opener you to install the proper outlet. The camera powers up or down to opener (H) and secure with ring fastener (KK... kit. NOTE: If anything interferes with the door's upward travel . If anything interferes with the door's downward travel . Attach manual/release safety reverse test label in the desired UP position press and release the Adjustment Button. Attach entrapment warning label on garage door...

B4545 B6765 Users Guide - English French
Page 1
... 20 HomeLink® 20 Erase the Memory 21 To Open the Door Manually 21 Maintenance 22 Troubleshooting 23 Warranty 25 Repair Parts 28 Rail Assembly Parts 28 Installation Parts 28 Model B4545 29 Model B6765 30 Go to chamberlain.com/belt-install to see installation videos. l Periodic checks of the camera icon including the points ( ). 2. Take...
... 20 HomeLink® 20 Erase the Memory 21 To Open the Door Manually 21 Maintenance 22 Troubleshooting 23 Warranty 25 Repair Parts 28 Rail Assembly Parts 28 Installation Parts 28 Model B4545 29 Model B6765 30 Go to chamberlain.com/belt-install to see installation videos. l Periodic checks of the camera icon including the points ( ). 2. Take...

B4545 B6765 Users Guide - English French
Page 2
...examples of Purchase: Product serial number myQ serial number 2 Go to chamberlain.com/belt-install to close without being in strict accordance with the cautionary statements that allows the door to see installation videos. When you see this Signal Word on the following pages, they... Preparation Safety Symbol and Signal Word Review This garage door opener has been designed and tested to the Installation Manual. Read them . Mechanical Electrical When you see this manual. For more information go to www.P65Warnings.ca.gov Unattended Operation The Timer-to-Close (TTC) feature...
...examples of Purchase: Product serial number myQ serial number 2 Go to chamberlain.com/belt-install to close without being in strict accordance with the cautionary statements that allows the door to see installation videos. When you see this Signal Word on the following pages, they... Preparation Safety Symbol and Signal Word Review This garage door opener has been designed and tested to the Installation Manual. Read them . Mechanical Electrical When you see this manual. For more information go to www.P65Warnings.ca.gov Unattended Operation The Timer-to-Close (TTC) feature...

B4545 B6765 Users Guide - English French
Page 4
... completion of the door. 10. ALL repairs to garage door control in the Installation Manual unless otherwise noted. 4 NEVER wear watches, rings or loose clothing while installing or servicing opener. Installation IMPORTANT INSTALLATION INSTRUCTIONS To reduce the risk of 5 feet (1.5 m) above the floor. 6. Install garage door opener ONLY on a one-piece door if using devices or...
... completion of the door. 10. ALL repairs to garage door control in the Installation Manual unless otherwise noted. 4 NEVER wear watches, rings or loose clothing while installing or servicing opener. Installation IMPORTANT INSTALLATION INSTRUCTIONS To reduce the risk of 5 feet (1.5 m) above the floor. 6. Install garage door opener ONLY on a one-piece door if using devices or...

B4545 B6765 Users Guide - English French
Page 5
...ceiling, otherwise garage door might NOT reverse when required. Installation If you are under EXTREME tension. Follow the instructions which are replacing a LiftMaster®, Chamberlain®, or Craftsman® garage door opener you need to install the header bracket on a 2x4 (on wall or ... minimal. (It may use the existing header bracket, see page 6) when clearance is in the Installation Manual. Close the door and mark the inside vertical centerline of balance. Install the Header Bracket Header Wall Vertical Centerline of Travel 2x4 One-piece door with track. l ALWAYS...
...ceiling, otherwise garage door might NOT reverse when required. Installation If you are under EXTREME tension. Follow the instructions which are replacing a LiftMaster®, Chamberlain®, or Craftsman® garage door opener you need to install the header bracket on a 2x4 (on wall or ... minimal. (It may use the existing header bracket, see page 6) when clearance is in the Installation Manual. Close the door and mark the inside vertical centerline of balance. Install the Header Bracket Header Wall Vertical Centerline of Travel 2x4 One-piece door with track. l ALWAYS...

B4545 B6765 Users Guide - English French
Page 6
... bracket can attach the header bracket either to the wall above the garage door, or to Installation step 2 in the Installation Manual Door Spring Header Wall I ) on the vertical centerline with the lag screws (II) provided. Drill 3/16" pilot holes and fasten the bracket securely to...bracket securely to a structural support with the arrow pointing toward the ceiling). 2. Follow the instructions which will work best for your particular requirements. Installation Attach the Header Bracket You can be mounted flush against the ceiling when clearance is pointing away from the wall. Do not...
... bracket can attach the header bracket either to the wall above the garage door, or to Installation step 2 in the Installation Manual Door Spring Header Wall I ) on the vertical centerline with the lag screws (II) provided. Drill 3/16" pilot holes and fasten the bracket securely to...bracket securely to a structural support with the arrow pointing toward the ceiling). 2. Follow the instructions which will work best for your particular requirements. Installation Attach the Header Bracket You can be mounted flush against the ceiling when clearance is pointing away from the wall. Do not...

B4545 B6765 Users Guide - English French
Page 7
...manufacturer or installing dealer for use on the door. Sectional Doors Only 1. Drill 5/16" holes through the door and secure bracket with 5/16"-18x2" carriage bolts, lock washers and nuts (not provided). (Figure 4) NOTE: The self-threading screws (OO) are replacing a LiftMaster, Chamberlain, or .... To continue, go to side door bracket holes. Metal or light weight doors using a vertical angle iron brace in the Installation Manual. Mark, drill holes and install as stamped inside bracket. 2. Secure the door bracket with self-threading screws (OO). (Figure 3) Wood doors: l Use ...
...manufacturer or installing dealer for use on the door. Sectional Doors Only 1. Drill 5/16" holes through the door and secure bracket with 5/16"-18x2" carriage bolts, lock washers and nuts (not provided). (Figure 4) NOTE: The self-threading screws (OO) are replacing a LiftMaster, Chamberlain, or .... To continue, go to side door bracket holes. Metal or light weight doors using a vertical angle iron brace in the Installation Manual. Mark, drill holes and install as stamped inside bracket. 2. Secure the door bracket with self-threading screws (OO). (Figure 3) Wood doors: l Use ...
B4545 B6765 Users Guide - English French
Page 9
Attach the straight door arm to the door bracket using the clevis pin. Installation For sectional door installations, see Installation step 11 in the Installation Manual HARDWARE PP Clevis Pin 5/16"x1-1/4" KK Ring Fastener QQ Clevis Pin 5/16"x1" MM Lock Washer LL Hex Bolt NN ...clevis pin. Disconnect the trolley by pulling the emergency release handle. 2. Fasten the straight door arm and the curved door arm together to Installation step 14 in the Installation Manual. Secure with a 2 or 3 hole overlap) using the bolts, nuts, and lock washers. 3. Pull the emergency release handle toward...
Attach the straight door arm to the door bracket using the clevis pin. Installation For sectional door installations, see Installation step 11 in the Installation Manual HARDWARE PP Clevis Pin 5/16"x1-1/4" KK Ring Fastener QQ Clevis Pin 5/16"x1" MM Lock Washer LL Hex Bolt NN ...clevis pin. Disconnect the trolley by pulling the emergency release handle. 2. Fasten the straight door arm and the curved door arm together to Installation step 14 in the Installation Manual. Secure with a 2 or 3 hole overlap) using the bolts, nuts, and lock washers. 3. Pull the emergency release handle toward...

B4545 B6765 Users Guide - English French
Page 10
.... If the door track will move in the Installation Manual Wall Installation 3/16" Pre-Drill Lag Screws (not provided) P No more than 6" (15 cm) Wood Block (Not Provided) Extension Bracket (Not Provided) Floor Installation Concrete Anchors (not provided) P No more than...device MUST NOT be used. The sensors should be no more than 6" (15 cm) above the floor. Wall Installation Position sensor brackets (P) on wall. Make sure safety reversing sensors are no more than 6" (15 cm) above the... and Wiring For track mounting, see Electrical and Wiring step 6 in the Installation Manual.
.... If the door track will move in the Installation Manual Wall Installation 3/16" Pre-Drill Lag Screws (not provided) P No more than 6" (15 cm) Wood Block (Not Provided) Extension Bracket (Not Provided) Floor Installation Concrete Anchors (not provided) P No more than...device MUST NOT be used. The sensors should be no more than 6" (15 cm) above the floor. Wall Installation Position sensor brackets (P) on wall. Make sure safety reversing sensors are no more than 6" (15 cm) above the... and Wiring For track mounting, see Electrical and Wiring step 6 in the Installation Manual.

B4545 B6765 Users Guide - English French
Page 11
Run the wire from both sensors to Electrical and Wiring 10 in the Installation Manual 3 HARDWARE Insulated Staple (Not Shown) 2 Staple 7/16" (11 mm) ...Reversing Sensors Without Pre-Wiring 1. Strip 7/16" (11 mm) of insulation from the terminal, push in the Installation Manual. 1 Electrical and Wiring 8 - Insert the white wires into the grey terminal on the garage door opener.... To insert or remove the wires from each set of wires. Electrical and Wiring For installation with pre-wiring, see Electrical and Wiring step 8 in the tab with staples. 2. Attach the wire...
Run the wire from both sensors to Electrical and Wiring 10 in the Installation Manual 3 HARDWARE Insulated Staple (Not Shown) 2 Staple 7/16" (11 mm) ...Reversing Sensors Without Pre-Wiring 1. Strip 7/16" (11 mm) of insulation from the terminal, push in the Installation Manual. 1 Electrical and Wiring 8 - Insert the white wires into the grey terminal on the garage door opener.... To insert or remove the wires from each set of wires. Electrical and Wiring For installation with pre-wiring, see Electrical and Wiring step 8 in the tab with staples. 2. Attach the wire...

B4545 B6765 Users Guide - English French
Page 12
...not glowing: 1. Reinstall the cover. Make sure the sensors are aligned. 1 2 To continue, go to Electrical and Wiring step 11 in the Installation Manual To continue, go to the green ground screw. and the ground wire to Electrical and Wiring step 15 in the...to local code): 1. Electrical and Wiring For typical wiring, see Electrical and Wiring step 13 in the Installation Manual. To align the safety reversing sensors, see Electrical and Wiring step 10 in the Installation Manual. To make a permanent connection through the 7/8-inch hole in ANY way to make it fit outlet....
...not glowing: 1. Reinstall the cover. Make sure the sensors are aligned. 1 2 To continue, go to Electrical and Wiring step 11 in the Installation Manual To continue, go to the green ground screw. and the ground wire to Electrical and Wiring step 15 in the...to local code): 1. Electrical and Wiring For typical wiring, see Electrical and Wiring step 13 in the Installation Manual. To align the safety reversing sensors, see Electrical and Wiring step 10 in the Installation Manual. To make a permanent connection through the 7/8-inch hole in ANY way to make it fit outlet....

B4545 B6765 Users Guide - English French
Page 13
...DOWN) position. The electronic controls sense the amount of force required to Adjustments step 1 in the Installation Manual. Adjustments For sectional door installations see Adjustments in the Installation Manual 13 Correct Incorrect Open (UP) Close (DOWN) Door MUST reverse on floor. To continue, go...with the door's upward travel . l Incorrect adjustment of safety reversal system. Adjustments One-Piece Doors Only Without a properly installed safety reversal system, persons (particularly small children) could be SERIOUSLY INJURED or KILLED by a closing . To prevent damage ...
...DOWN) position. The electronic controls sense the amount of force required to Adjustments step 1 in the Installation Manual. Adjustments For sectional door installations see Adjustments in the Installation Manual 13 Correct Incorrect Open (UP) Close (DOWN) Door MUST reverse on floor. To continue, go...with the door's upward travel . l Incorrect adjustment of safety reversal system. Adjustments One-Piece Doors Only Without a properly installed safety reversal system, persons (particularly small children) could be SERIOUSLY INJURED or KILLED by a closing . To prevent damage ...

B4545 B6765 Users Guide - English French
Page 16
... Disconnect ALL electric and battery power BEFORE performing ANY service or maintenance. Battery Status LED For battery installation, see Electrical and Wiring step 16 in the Installation Manual The battery backup allows access in battery backup mode. myQ® App and Timer-to-Close) Charge... door opener. The following features are normal. Check with local codes for replacement battery. Unplug the garage door opener. l Use ONLY Chamberlain part # 041A6357-1 for disposal instructions. The battery does not have to be replaced. Open and close devices and features (e.g. l A...
... Disconnect ALL electric and battery power BEFORE performing ANY service or maintenance. Battery Status LED For battery installation, see Electrical and Wiring step 16 in the Installation Manual The battery backup allows access in battery backup mode. myQ® App and Timer-to-Close) Charge... door opener. The following features are normal. Check with local codes for replacement battery. Unplug the garage door opener. l Use ONLY Chamberlain part # 041A6357-1 for disposal instructions. The battery does not have to be replaced. Open and close devices and features (e.g. l A...
B4545 B6765 Users Guide - English French
Page 22
...this garage door opener includes 100 premium LEDs. If you will operate during an electrical power outage, see the Installation Manual - Replace the batteries with the LED, contact customer service or a certified door professional. Adjustments. l DO... the light pod and gently wipe out with the visor clip. Adjustments 1. Maintenance Maintenance Schedule EVERY MONTH l Manually operate door. The garage door opener does not require additional lubrication. Do not grease the door tracks. l ... of the garage. l Test the safety reversal system, see the Installation Manual -
...this garage door opener includes 100 premium LEDs. If you will operate during an electrical power outage, see the Installation Manual - Replace the batteries with the LED, contact customer service or a certified door professional. Adjustments. l DO... the light pod and gently wipe out with the visor clip. Adjustments 1. Maintenance Maintenance Schedule EVERY MONTH l Manually operate door. The garage door opener does not require additional lubrication. Do not grease the door tracks. l ... of the garage. l Test the safety reversal system, see the Installation Manual -
B4545 B6765 Users Guide - English French
Page 23
... and close the door. Replace motor if necessary. Program travel , see Program the Travel in the Installation Quickstart. Check travel module if necessary. Manually open and close the door. Inspect safety sensor wire at the logic board. No movement, only a single click. Door is binding ... . 23 Make sure nothing is a short or reversed wire for proper assembly, replace if necessary. Check for the door control are not installed, connected, or wires may be cut wire. Battery backup charging circuit error, replace the logic board. Make sure nothing is faulty. The garage...
... and close the door. Replace motor if necessary. Program travel , see Program the Travel in the Installation Quickstart. Check travel module if necessary. Manually open and close the door. Inspect safety sensor wire at the logic board. No movement, only a single click. Door is binding ... . 23 Make sure nothing is a short or reversed wire for proper assembly, replace if necessary. Check for the door control are not installed, connected, or wires may be cut wire. Battery backup charging circuit error, replace the logic board. Make sure nothing is faulty. The garage...

B4545 B6765 Users Guide - English French
Page 26
Proper installation, operation, maintenance, and testing of children, at least 5 feet from the nearest standing surface and away from potential harm. Garage Door Openers are necessary to ... be out of reach of the garage door and automatic opener are Not Toys Discuss garage door and opener safety with your garage door opener's manual as it provides more details and safety considerations than can be supplied with or use the button where you can lead to read all moving...
Proper installation, operation, maintenance, and testing of children, at least 5 feet from the nearest standing surface and away from potential harm. Garage Door Openers are necessary to ... be out of reach of the garage door and automatic opener are Not Toys Discuss garage door and opener safety with your garage door opener's manual as it provides more details and safety considerations than can be supplied with or use the button where you can lead to read all moving...
B4545 B6765 Users Guide - English French
Page 27
...or damage on the opener to close the door manually using the manual disconnect and open 3-4 feet above the floor. WARNING - Only qualified individuals should move freely and without difficulty. Visually check the door and installation: l Starting with the 2x4 and then reverse direction.... l If you don't have the owner's manuals, contact the manufacturer(s) and request a copy for your specific model(s). Test the opener...
...or damage on the opener to close the door manually using the manual disconnect and open 3-4 feet above the floor. WARNING - Only qualified individuals should move freely and without difficulty. Visually check the door and installation: l Starting with the 2x4 and then reverse direction.... l If you don't have the owner's manuals, contact the manufacturer(s) and request a copy for your specific model(s). Test the opener...
B4545 B6765 Users Guide - English French
Page 28
...trolley nut Not shown Wear pads Hardware bag 2 4 1 3 Part Number 041A5250 144C0054M 004A1008 041A5665 041C5141-2 041D0598-1 041A6689 041B4103 041A7276 041A7920-2 Installation Parts Description 1 Curved door arm 2 Door bracket with clevis pin and fastener 3 Emergency release rope and handle 4 Header bracket with clevis ... door arm 9 White and red/white wire 10 3V CR2032 lithium battery 11 Hanging brackets Not shown User's Guide Installation Manual 1 2 3 11 8 5 4 6 8 6 7 5 7 Part Number 041B0035B 041A5047-1 041A2828 041A5047-2 K029B0137 041A5266-3 041A5034 4178B0034B 041B4494-1 K010A0020 ...
...trolley nut Not shown Wear pads Hardware bag 2 4 1 3 Part Number 041A5250 144C0054M 004A1008 041A5665 041C5141-2 041D0598-1 041A6689 041B4103 041A7276 041A7920-2 Installation Parts Description 1 Curved door arm 2 Door bracket with clevis pin and fastener 3 Emergency release rope and handle 4 Header bracket with clevis ... door arm 9 White and red/white wire 10 3V CR2032 lithium battery 11 Hanging brackets Not shown User's Guide Installation Manual 1 2 3 11 8 5 4 6 8 6 7 5 7 Part Number 041B0035B 041A5047-1 041A2828 041A5047-2 K029B0137 041A5266-3 041A5034 4178B0034B 041B4494-1 K010A0020 ...

