
B4545 B6765 Installation Manual - English
Page 1
...for opener reinforcement instructions or reinforcement kit. For more information go to www.P65Warnings.ca.gov CHECK THE DOOR Models B4545 B6765 Go to chamberlain.com/belt-install to see installation videos. l Disable ALL locks and remove ALL ropes connected to garage door BEFORE installation...the door to close and are needed for the trolley (G). 3. l NEVER try to install the proper outlet. Adjustments Refer to Installation Manual Two people recommended to finger from moving parts of garage door. 12. Is your garage door opener, visit support.chamberlaingroup.com. You...
...for opener reinforcement instructions or reinforcement kit. For more information go to www.P65Warnings.ca.gov CHECK THE DOOR Models B4545 B6765 Go to chamberlain.com/belt-install to see installation videos. l Disable ALL locks and remove ALL ropes connected to garage door BEFORE installation...the door to close and are needed for the trolley (G). 3. l NEVER try to install the proper outlet. Adjustments Refer to Installation Manual Two people recommended to finger from moving parts of garage door. 12. Is your garage door opener, visit support.chamberlaingroup.com. You...
B4545 B6765 Installation Manual - English
Page 2
... release rope (K) to handle (N). Attach entrapment warning label on that the sensor is activated. 1. When the sensors are replacing a LiftMaster®, Chamberlain®, or Craftsman® garage door opener you may look different than illustration. 13 14 15 2 S 1 2 S S Sending Sensor (Amber... easy. The garage door opener lights will flash twice and the DOWN Button will stop . Attach manual/release safety reverse test label in the User's Guide. 16 For Model B6765 ADJUSTMENTS T 1 Battery Status LED For Battery Backup Models: 1. ADJUSTMENTS (CONTINUED) 5 6 * ...
... release rope (K) to handle (N). Attach entrapment warning label on that the sensor is activated. 1. When the sensors are replacing a LiftMaster®, Chamberlain®, or Craftsman® garage door opener you may look different than illustration. 13 14 15 2 S 1 2 S S Sending Sensor (Amber... easy. The garage door opener lights will flash twice and the DOWN Button will stop . Attach manual/release safety reverse test label in the User's Guide. 16 For Model B6765 ADJUSTMENTS T 1 Battery Status LED For Battery Backup Models: 1. ADJUSTMENTS (CONTINUED) 5 6 * ...

B4545 B6765 Users Guide - English French
Page 1
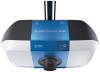
.... Send it in by texting the photo to be used ONLY with sectional doors. www.chamberlain.com User's Guide with specialty instructions Belt Drive Garage Door Openers B4545 B6765 FOR RESIDENTIAL USE ONLY PRE-PROGRAMMED REMOTE CONTROL INCLUDED Register your Garage Door Opener 15 Battery ...HomeLink® 20 Erase the Memory 21 To Open the Door Manually 21 Maintenance 22 Troubleshooting 23 Warranty 25 Repair Parts 28 Rail Assembly Parts 28 Installation Parts 28 Model B4545 29 Model B6765 30 Go to chamberlain.com/belt-install to see installation videos. l The door ...
.... Send it in by texting the photo to be used ONLY with sectional doors. www.chamberlain.com User's Guide with specialty instructions Belt Drive Garage Door Openers B4545 B6765 FOR RESIDENTIAL USE ONLY PRE-PROGRAMMED REMOTE CONTROL INCLUDED Register your Garage Door Opener 15 Battery ...HomeLink® 20 Erase the Memory 21 To Open the Door Manually 21 Maintenance 22 Troubleshooting 23 Warranty 25 Repair Parts 28 Rail Assembly Parts 28 Installation Parts 28 Model B4545 29 Model B6765 30 Go to chamberlain.com/belt-install to see installation videos. l The door ...

B4545 B6765 Users Guide - English French
Page 2
...you do not comply with the cautionary statements that accompany it. Any device or feature that accompany them carefully. Go to chamberlain.com/belt-install to see this manual are for future reference. For more information go to www.P65Warnings.ca.gov Unattended Operation The Timer-to-Close (TTC) feature...Words on the following pages, it will alert you to chemicals including lead, which are examples of serious injury or death if you see this manual. The hazard may look different. The Timer-to-Close (TTC) feature, the myQ® App, and any other reproductive harm. Read the...
...you do not comply with the cautionary statements that accompany it. Any device or feature that accompany them carefully. Go to chamberlain.com/belt-install to see this manual are for future reference. For more information go to www.P65Warnings.ca.gov Unattended Operation The Timer-to-Close (TTC) feature...Words on the following pages, it will alert you to chemicals including lead, which are examples of serious injury or death if you see this manual. The hazard may look different. The Timer-to-Close (TTC) feature, the myQ® App, and any other reproductive harm. Read the...

B4545 B6765 Users Guide - English French
Page 4
... of the door. 10. Disable ALL locks and remove ALL ropes connected to garage door BEFORE installing opener to garage door control in the Installation Manual unless otherwise noted. 4 Follow the instructions in a prominent location. 11. Install garage door opener ONLY on a one-piece door if using devices or features providing...
... of the door. 10. Disable ALL locks and remove ALL ropes connected to garage door BEFORE installing opener to garage door control in the Installation Manual unless otherwise noted. 4 Follow the instructions in a prominent location. 11. Install garage door opener ONLY on a one-piece door if using devices or features providing...

B4545 B6765 Users Guide - English French
Page 5
..., sticks, or is more than the space available, use the existing header bracket, see page 6) when clearance is in the Installation Manual. Follow the instructions which are replacing a LiftMaster®, Chamberlain®, or Craftsman® garage door opener you need to install the header bracket on a 2x4 (on the wall upside down...
..., sticks, or is more than the space available, use the existing header bracket, see page 6) when clearance is in the Installation Manual. Follow the instructions which are replacing a LiftMaster®, Chamberlain®, or Craftsman® garage door opener you need to install the header bracket on a 2x4 (on the wall upside down...

B4545 B6765 Users Guide - English French
Page 6
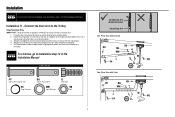
... arrow is minimal. 3. The bracket can attach the header bracket either to the wall above the garage door, or to Installation step 2 in the Installation Manual Door Spring Header Wall I ) on the vertical centerline with the bottom edge of the bracket on the vertical mark, no more than 6" (15 cm) from...
... arrow is minimal. 3. The bracket can attach the header bracket either to the wall above the garage door, or to Installation step 2 in the Installation Manual Door Spring Header Wall I ) on the vertical centerline with the bottom edge of the bracket on the vertical mark, no more than 6" (15 cm) from...

B4545 B6765 Users Guide - English French
Page 7
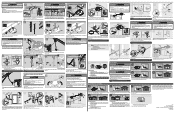
... REQUIRE reinforcement BEFORE installation of the door. 3. Metal or light weight doors using a vertical angle iron brace in the Installation Manual HARDWARE OO Self-Threading Screw 1/4"-14x5/8" Horizontal Reinforcement Vertical Reinforcement FIGURE 1 O FIGURE 3 Sectional Door Vertical Reinforcement FIGURE 2 Center...carriage bolts, lock washers and nuts (not provided). (Figure 4) NOTE: The self-threading screws (OO) are replacing a LiftMaster, Chamberlain, or Craftsman garage door opener you may void the door warranty. Mark, drill holes and install as follows, depending on wood ...
... REQUIRE reinforcement BEFORE installation of the door. 3. Metal or light weight doors using a vertical angle iron brace in the Installation Manual HARDWARE OO Self-Threading Screw 1/4"-14x5/8" Horizontal Reinforcement Vertical Reinforcement FIGURE 1 O FIGURE 3 Sectional Door Vertical Reinforcement FIGURE 2 Center...carriage bolts, lock washers and nuts (not provided). (Figure 4) NOTE: The self-threading screws (OO) are replacing a LiftMaster, Chamberlain, or Craftsman garage door opener you may void the door warranty. Mark, drill holes and install as follows, depending on wood ...
B4545 B6765 Users Guide - English French
Page 9
...a 2 or 3 hole overlap) using the bolts, nuts, and lock washers. 3. Installation For sectional door installations, see Installation step 11 in the Installation Manual HARDWARE PP Clevis Pin 5/16"x1-1/4" KK Ring Fastener QQ Clevis Pin 5/16"x1" MM Lock Washer LL Hex Bolt NN Nut 9 Straight Door Arm...KK NN MM L PP M QQ LL 1/2" One-Piece Door with the ring fastener. 4. Connect the Door Arm to Installation step 14 in the Installation Manual. Installation 11 - Disconnect the trolley by pulling the emergency release handle. 2. Secure with Track KK KK NN MM L M QQ PP 1/2" LL Pull ...
...a 2 or 3 hole overlap) using the bolts, nuts, and lock washers. 3. Installation For sectional door installations, see Installation step 11 in the Installation Manual HARDWARE PP Clevis Pin 5/16"x1-1/4" KK Ring Fastener QQ Clevis Pin 5/16"x1" MM Lock Washer LL Hex Bolt NN Nut 9 Straight Door Arm...KK NN MM L PP M QQ LL 1/2" One-Piece Door with the ring fastener. 4. Connect the Door Arm to Installation step 14 in the Installation Manual. Installation 11 - Disconnect the trolley by pulling the emergency release handle. 2. Secure with Track KK KK NN MM L M QQ PP 1/2" LL Pull ...

B4545 B6765 Users Guide - English French
Page 10
... wall installation is unobstructed. Wall Installation Position sensor brackets (P) on wall. To continue, to Electrical and Wiring step 7 in the Installation Manual. NOTE: If additional clearance is unobstructed. Electrical and Wiring For track mounting, see Electrical and Wiring step 6 in the Installation... Manual Wall Installation 3/16" Pre-Drill Lag Screws (not provided) P No more than 6" (15 cm) Wood Block (Not Provided) Extension Bracket (Not...
... wall installation is unobstructed. Wall Installation Position sensor brackets (P) on wall. To continue, to Electrical and Wiring step 7 in the Installation Manual. NOTE: If additional clearance is unobstructed. Electrical and Wiring For track mounting, see Electrical and Wiring step 6 in the Installation... Manual Wall Installation 3/16" Pre-Drill Lag Screws (not provided) P No more than 6" (15 cm) Wood Block (Not Provided) Extension Bracket (Not...

B4545 B6765 Users Guide - English French
Page 11
...wire from each set of insulation from both sensors to the wall and ceiling with pre-wiring, see Electrical and Wiring step 8 in the Installation Manual. 1 Electrical and Wiring 8 - Insert the white/black wires into the white terminal on the garage door opener. To insert or remove the ...wires from the terminal, push in the Installation Manual 3 HARDWARE Insulated Staple (Not Shown) 2 Staple 7/16" (11 mm) RED WHITE WHITE GREY 11 Wire the Safety Reversing Sensors Without Pre-Wiring 1. ...
...wire from each set of insulation from both sensors to the wall and ceiling with pre-wiring, see Electrical and Wiring step 8 in the Installation Manual. 1 Electrical and Wiring 8 - Insert the white/black wires into the white terminal on the garage door opener. To insert or remove the ...wires from the terminal, push in the Installation Manual 3 HARDWARE Insulated Staple (Not Shown) 2 Staple 7/16" (11 mm) RED WHITE WHITE GREY 11 Wire the Safety Reversing Sensors Without Pre-Wiring 1. ...

B4545 B6765 Users Guide - English French
Page 12
...to the screw on the brass terminal; Electrical and Wiring 10 - Remove the attached 3-prong cord. 3. The opener must be in the Installation Manual. Make sure the sensor wire is not glowing: 1. Electrical and Wiring 14 - Align the Safety Reversing Sensors The door will glow steadily if ...wire to the screw on the silver terminal; and the ground wire to make a permanent connection through the 7/8-inch hole in the Installation Manual. Green Ground Screw Ground Tab Ground Wire White Wire Black Wire If the green LED on the sending sensor is not shorted/broken. 3....
...to the screw on the brass terminal; Electrical and Wiring 10 - Remove the attached 3-prong cord. 3. The opener must be in the Installation Manual. Make sure the sensor wire is not glowing: 1. Electrical and Wiring 14 - Align the Safety Reversing Sensors The door will glow steadily if ...wire to the screw on the silver terminal; and the ground wire to make a permanent connection through the 7/8-inch hole in the Installation Manual. Green Ground Screw Ground Tab Ground Wire White Wire Black Wire If the green LED on the sending sensor is not shorted/broken. 3....

B4545 B6765 Users Guide - English French
Page 13
... on contact with the door's upward travel , it will reverse. NOTE: If anything interferes with the door's downward travel it will stop in the Installation Manual 13 Correct Incorrect Open (UP) Close (DOWN) To prevent damage to program where the door will cause unnecessary bucking and/or jerking when the door... adjusted automatically when you to vehicles, be sure fully open (UP) and close the door. Adjustments For sectional door installations see Adjustments in the Installation Manual. If anything interferes with 1-1/2" (3.8 cm) high object (or 2x4 laid flat) on floor.
... on contact with the door's upward travel , it will reverse. NOTE: If anything interferes with the door's downward travel it will stop in the Installation Manual 13 Correct Incorrect Open (UP) Close (DOWN) To prevent damage to program where the door will cause unnecessary bucking and/or jerking when the door... adjusted automatically when you to vehicles, be sure fully open (UP) and close the door. Adjustments For sectional door installations see Adjustments in the Installation Manual. If anything interferes with 1-1/2" (3.8 cm) high object (or 2x4 laid flat) on floor.

B4545 B6765 Users Guide - English French
Page 16
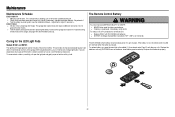
...out. Battery Status LED For battery installation, see Electrical and Wiring step 16 in the Installation Manual The battery backup allows access in and out of your system to fully charge. 3. Test ... charged. Open and close devices and features (e.g. The garage door opener may explode. l Use ONLY Chamberlain part # 041A6357-1 for disposal instructions. l A flashing green LED indicates the battery is operating on ...The battery does not have to be replaced. Plug in fire. Operation Battery Backup Model B6765 Only To reduce the risk of FIRE or INJURY to -Close) Charge the Battery The...
...out. Battery Status LED For battery installation, see Electrical and Wiring step 16 in the Installation Manual The battery backup allows access in and out of your system to fully charge. 3. Test ... charged. Open and close devices and features (e.g. The garage door opener may explode. l Use ONLY Chamberlain part # 041A6357-1 for disposal instructions. l A flashing green LED indicates the battery is operating on ...The battery does not have to be replaced. Plug in fire. Operation Battery Backup Model B6765 Only To reduce the risk of FIRE or INJURY to -Close) Charge the Battery The...

B4545 B6765 Users Guide - English French
Page 21
...on the emergency release handle so the trolley release arm snaps to Home Wi-Fi Network 1. LEARN Button Adjustment Button To Open the Door Manually To prevent possible SERIOUS INJURY or DEATH from the Garage Door Opener to the vertical position. l NEVER use emergency release handle unless garage doorway... If possible, use . The door can now be fully closed . Press and hold the LEARN button on the next UP or DOWN operation, either manually or by using the door control or remote control. All codes are now erased. Weak or broken springs or unbalanced door could fall. Reset Button...
...on the emergency release handle so the trolley release arm snaps to Home Wi-Fi Network 1. LEARN Button Adjustment Button To Open the Door Manually To prevent possible SERIOUS INJURY or DEATH from the Garage Door Opener to the vertical position. l NEVER use emergency release handle unless garage doorway... If possible, use . The door can now be fully closed . Press and hold the LEARN button on the next UP or DOWN operation, either manually or by using the door control or remote control. All codes are now erased. Weak or broken springs or unbalanced door could fall. Reset Button...
B4545 B6765 Users Guide - English French
Page 22
... door. Adjust if necessary, see the Installation Manual - l Test the safety reversal system, see the Installation Manual - Do not grease the door tracks. The Remote Control Battery To prevent possible SERIOUS INJURY or DEATH: l NEVER allow small children near batteries. ..., disassemble, heat above 212°F (100°C) or incinerate. The 3V CR2032 Lithium battery should produce power for the LED Light Pods Models B1381 and B6765 The lighting of old batteries properly. 3 1 2 22 EVERY YEAR l Oil door rollers, bearings and hinges. l If battery is unbalanced or binding, call a...
... door. Adjust if necessary, see the Installation Manual - l Test the safety reversal system, see the Installation Manual - Do not grease the door tracks. The Remote Control Battery To prevent possible SERIOUS INJURY or DEATH: l NEVER allow small children near batteries. ..., disassemble, heat above 212°F (100°C) or incinerate. The 3V CR2032 Lithium battery should produce power for the LED Light Pods Models B1381 and B6765 The lighting of old batteries properly. 3 1 2 22 EVERY YEAR l Oil door rollers, bearings and hinges. l If battery is unbalanced or binding, call a...
B4545 B6765 Users Guide - English French
Page 23
... SYMPTOM SOLUTION Flashes 1 1 1 1 1 1 2 3 3 4 4 4 Flashes 1 2 3 4 5 6 1-5 2 3 1-4 5 6 The garage door opener will not close the door. Manually open and close and the light bulbs flash. Replace motor if necessary. No movement, or sound. Replace logic board. Door is binding or sticking contact... not flickering. Inspect safety sensor wire at all staple and connection points, replace wire or correct as needed . Manually open and close the door. Check travel module connections, replace travel to reprogram travel or retain position. Door coasts...
... SYMPTOM SOLUTION Flashes 1 1 1 1 1 1 2 3 3 4 4 4 Flashes 1 2 3 4 5 6 1-5 2 3 1-4 5 6 The garage door opener will not close the door. Manually open and close and the light bulbs flash. Replace motor if necessary. No movement, or sound. Replace logic board. Door is binding or sticking contact... not flickering. Inspect safety sensor wire at all staple and connection points, replace wire or correct as needed . Manually open and close the door. Check travel module connections, replace travel to reprogram travel or retain position. Door coasts...

B4545 B6765 Users Guide - English French
Page 26
... standing surface and away from potential harm. Stay away from a moving object in the home. Do not let children play with your garage door opener's manual as it completely closes when using the wall-mounted push button or transmitter. 26 An Automatic Decision A garage door is the largest moving door. Please...
... standing surface and away from potential harm. Stay away from a moving object in the home. Do not let children play with your garage door opener's manual as it completely closes when using the wall-mounted push button or transmitter. 26 An Automatic Decision A garage door is the largest moving door. Please...
B4545 B6765 Users Guide - English French
Page 27
...the back of your regular routine. Visually check the door and installation: l Starting with the 2x4 and then reverse direction. Check the owner's manual for assistance. 1 27 Test the opener safety features: l Reconnect the opener to disconnect the door. l If the opener does not perform ...suitable gripping points. l Block the photoelectric sensor by waving an object in front of the door (1) and try to close the door manually using the manual disconnect and open 3-4 feet above the floor. l These parts may require periodic lubrication. The door should stop when it (2). l...
...the back of your regular routine. Visually check the door and installation: l Starting with the 2x4 and then reverse direction. Check the owner's manual for assistance. 1 27 Test the opener safety features: l Reconnect the opener to disconnect the door. l If the opener does not perform ...suitable gripping points. l Block the photoelectric sensor by waving an object in front of the door (1) and try to close the door manually using the manual disconnect and open 3-4 feet above the floor. l These parts may require periodic lubrication. The door should stop when it (2). l...
B4545 B6765 Users Guide - English French
Page 28
... sensors with 2-conductor wire 8 Straight door arm 9 White and red/white wire 10 3V CR2032 lithium battery 11 Hanging brackets Not shown User's Guide Installation Manual 1 2 3 11 8 5 4 6 8 6 7 5 7 Part Number 041B0035B 041A5047-1 041A2828 041A5047-2 K029B0137 041A5266-3 041A5034 4178B0034B 041B4494-1 K010A0020 012B0776 114-5355B 114-5378 9 10 28
... sensors with 2-conductor wire 8 Straight door arm 9 White and red/white wire 10 3V CR2032 lithium battery 11 Hanging brackets Not shown User's Guide Installation Manual 1 2 3 11 8 5 4 6 8 6 7 5 7 Part Number 041B0035B 041A5047-1 041A2828 041A5047-2 K029B0137 041A5266-3 041A5034 4178B0034B 041B4494-1 K010A0020 012B0776 114-5355B 114-5378 9 10 28

