C870 Owner s Manual - English
Page 1
... Using your garage door opener. • This garage door opener is located on the front panel of your Garage Door Opener.....34 To Open the Door Manually ...........34 Smart Control Panel 35-36 Remote Control and Keyless Entry 36 Homelink 36 To Erase the Memory 37 Maintenance 38 Troubleshooting 39-40 Accessories 41 Warranty 42 Repair Parts 43-44 www.chamberlain.com...
... Using your garage door opener. • This garage door opener is located on the front panel of your Garage Door Opener.....34 To Open the Door Manually ...........34 Smart Control Panel 35-36 Remote Control and Keyless Entry 36 Homelink 36 To Erase the Memory 37 Maintenance 38 Troubleshooting 39-40 Accessories 41 Warranty 42 Repair Parts 43-44 www.chamberlain.com...

C870 Owner s Manual - English
Page 2
... the following pages, they will alert you see these Safety Symbols and Signal Words on the bottom of the door center. l ONLY operate garage door opener at 120V, 60 Hz to the garage door. 2. Raise and lower the door to www.P65Warnings.ca.gov. See page 11. If balanced, it will alert you begin: 1. Read the warnings...
... the following pages, they will alert you see these Safety Symbols and Signal Words on the bottom of the door center. l ONLY operate garage door opener at 120V, 60 Hz to the garage door. 2. Raise and lower the door to www.P65Warnings.ca.gov. See page 11. If balanced, it will alert you begin: 1. Read the warnings...

C870 Owner s Manual - English
Page 3
... of wood : May be needed to install the safety reversing sensor. You're all set! Also used to fasten the header bracket to your garage door opener to position the garage door opener during installation and for more than 7 feet (2.13 m) high. 5/32 3/16 5/16 1/2 5/8 1/4 7/16 9/16 7/16 3 l ... interference from anywhere using the MyQ app. Try one of the following : • Move your router closer to the garage door opener to your garage door opener will require hardware not provided. Hold your mobile device in your Wi-Fi network. If you will need any of the...
... of wood : May be needed to install the safety reversing sensor. You're all set! Also used to fasten the header bracket to your garage door opener to position the garage door opener during installation and for more than 7 feet (2.13 m) high. 5/32 3/16 5/16 1/2 5/8 1/4 7/16 9/16 7/16 3 l ... interference from anywhere using the MyQ app. Try one of the following : • Move your router closer to the garage door opener to your garage door opener will require hardware not provided. Hold your mobile device in your Wi-Fi network. If you will need any of the...

C870 Owner s Manual - English
Page 4
... and adjustment is complete. Model Power Door Control Remote Control Wireless Keypad C870 Max Lift Power System™ Smart Control Panel® 3-button (2) ü A. Door bracket D. Straight door arm (Packaged inside the front rail section) J. Door control O. The images throughout this manual. Curved door arm E. Rail (1 front and 4 center sections) I N L K J O Garage door opener (motor unit) K. Sprocket cover and screws...
... and adjustment is complete. Model Power Door Control Remote Control Wireless Keypad C870 Max Lift Power System™ Smart Control Panel® 3-button (2) ü A. Door bracket D. Straight door arm (Packaged inside the front rail section) J. Door control O. The images throughout this manual. Curved door arm E. Rail (1 front and 4 center sections) I N L K J O Garage door opener (motor unit) K. Sprocket cover and screws...
C870 Owner s Manual - English
Page 6
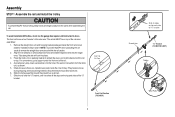
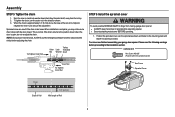
To avoid installation difficulties, do not run the garage door opener until it reaches all packing material. Place the motor unit on the ...plastic wear pads inside the front rail and set aside for Installation Step 5 and 9. Remove the straight door arm and hanging bracket packaged inside the inner trolley. Snap them back into the hole in the second ... on packing material to do so. NOTE: To prevent INJURY while unpacking the rail carefully remove the straight door arm stored within the rail section. 2. Slide the rail onto the "U" bracket, until instructed to protect ...
To avoid installation difficulties, do not run the garage door opener until it reaches all packing material. Place the motor unit on the ...plastic wear pads inside the front rail and set aside for Installation Step 5 and 9. Remove the straight door arm and hanging bracket packaged inside the inner trolley. Snap them back into the hole in the second ... on packing material to do so. NOTE: To prevent INJURY while unpacking the rail carefully remove the straight door arm stored within the rail section. 2. Slide the rail onto the "U" bracket, until instructed to protect ...

C870 Owner s Manual - English
Page 7
... Use the carton to ensure proper operation. 3. If dry, regrease to support the front end of power tools may permanently damage the garage door opener. Place the idler pulley into the cover protection bolt hole on the front rail section. Locate the rail tab. Insert a 1/4"-20x1-3/4"...unit. 3. The inside center should be sure it to hang until Assembly Step 4. 2. Rotate the pulley to garage door opener, use ONLY those bolts/fasteners mounted in the garage door opener) Chain/cable Bolt "U" Bracket Cover Protection Bolt Hole Lock Nut Bolt Lock Washer Nut 7 Rail Grease Inside Pulley ...
... Use the carton to ensure proper operation. 3. If dry, regrease to support the front end of power tools may permanently damage the garage door opener. Place the idler pulley into the cover protection bolt hole on the front rail section. Locate the rail tab. Insert a 1/4"-20x1-3/4"...unit. 3. The inside center should be sure it to hang until Assembly Step 4. 2. Rotate the pulley to garage door opener, use ONLY those bolts/fasteners mounted in the garage door opener) Chain/cable Bolt "U" Bracket Cover Protection Bolt Hole Lock Nut Bolt Lock Washer Nut 7 Rail Grease Inside Pulley ...
C870 Owner s Manual - English
Page 8
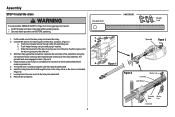
.... 6. Be sure the chain is not twisted, then connect it to the trolley assembly. l Securely attach sprocket cover BEFORE operating. 1. Push the open end of the pins. Remove the screwdriver. Check to make sure the chain is not twisted. (Figure 3) 7. Assembly STEP 4 Install the chain ...on the trolley, as shown. (Figure 1) a. The sprocket teeth must engage the chain. (Figure 2) 4. Connect the cable to finger from moving garage door opener: l ALWAYS keep hand clear of the clip-on spring onto the other pin. 3. Pull the cable around the sprocket and continuing to the threaded ...
.... 6. Be sure the chain is not twisted, then connect it to the trolley assembly. l Securely attach sprocket cover BEFORE operating. 1. Push the open end of the pins. Remove the screwdriver. Check to make sure the chain is not twisted. (Figure 3) 7. Assembly STEP 4 Install the chain ...on the trolley, as shown. (Figure 1) a. The sprocket teeth must engage the chain. (Figure 2) 4. Connect the cable to finger from moving garage door opener: l ALWAYS keep hand clear of the clip-on spring onto the other pin. 3. Pull the cable around the sprocket and continuing to the threaded ...
C870 Owner s Manual - English
Page 9
...attach sprocket cover BEFORE operating. 1. Assembly STEP 5 Tighten the chain 1. HARDWARE Hex Screw #8x3/8" (Packed with the door closed. Spin the inner nut and lock washer down the trolley threaded shaft, away from moving garage door opener: l ALWAYS keep hand clear of Rail 9 To Tighten Outer Nut Trolley Outer Lock Threaded Nut Washer Shaft... SERIOUS INJURY to the installation section. To tighten the chain, turn the outer nut in the direction shown. 3. You have now finished assembling your garage door opener. Please read the following warnings before adjusting the chain.
...attach sprocket cover BEFORE operating. 1. Assembly STEP 5 Tighten the chain 1. HARDWARE Hex Screw #8x3/8" (Packed with the door closed. Spin the inner nut and lock washer down the trolley threaded shaft, away from moving garage door opener: l ALWAYS keep hand clear of Rail 9 To Tighten Outer Nut Trolley Outer Lock Threaded Nut Washer Shaft... SERIOUS INJURY to the installation section. To tighten the chain, turn the outer nut in the direction shown. 3. You have now finished assembling your garage door opener. Please read the following warnings before adjusting the chain.

C870 Owner s Manual - English
Page 10
... entanglement. 5. NEVER connect garage door opener to power source until instructed to be made by a trained door systems technician BEFORE installing opener. 4. Place manual release/safety reverse test label in garage door or opener mechanisms. 9. NEVER wear watches, rings or loose clothing while installing or servicing opener. Door MUST reverse on inside of garage door. 12. Install wall-mounted garage door control: l within reach...
... entanglement. 5. NEVER connect garage door opener to power source until instructed to be made by a trained door systems technician BEFORE installing opener. 4. Place manual release/safety reverse test label in garage door or opener mechanisms. 9. NEVER wear watches, rings or loose clothing while installing or servicing opener. Door MUST reverse on inside of garage door. 12. Install wall-mounted garage door control: l within reach...
C870 Owner s Manual - English
Page 13
... Pin 5/16"x1-1/2" Ring Fastener STEP 4 Position the garage door opener To prevent damage to clear the spring. 2. Slide the outer trolley toward the garage door opener. Have someone hold the opener securely on a temporary support to allow the rail to garage door, rest garage door opener rail on 2x4 placed on the garage floor below the header bracket. Installation STEP 3 Attach the...
... Pin 5/16"x1-1/2" Ring Fastener STEP 4 Position the garage door opener To prevent damage to clear the spring. 2. Slide the outer trolley toward the garage door opener. Have someone hold the opener securely on a temporary support to allow the rail to garage door, rest garage door opener rail on 2x4 placed on the garage floor below the header bracket. Installation STEP 3 Attach the...

C870 Owner s Manual - English
Page 14
... each hanging bracket to the support bracket. 3. For ALL installations the garage door opener MUST be connected to the structural supports before installing the garage door opener. 2. On finished ceilings, use the lag screws to attach a support bracket (not provided) to structural supports. Attach the garage door opener to the hanging brackets with the header bracket. Cut both pieces...
... each hanging bracket to the support bracket. 3. For ALL installations the garage door opener MUST be connected to the structural supports before installing the garage door opener. 2. On finished ceilings, use the lag screws to attach a support bracket (not provided) to structural supports. Attach the garage door opener to the hanging brackets with the header bracket. Cut both pieces...
C870 Owner s Manual - English
Page 18
... too far, you may cut 6 inches (15 cm) from the curved door arm. 1. Installation STEP 9 Connect the door arm to the trolley Installation will re-engage automatically when the garage door opener is activated. Close the door. The trolley will vary according to increase door arm rigidity and attach using bolts, nuts, and lock washers. Secure with...
... too far, you may cut 6 inches (15 cm) from the curved door arm. 1. Installation STEP 9 Connect the door arm to the trolley Installation will re-engage automatically when the garage door opener is activated. Close the door. The trolley will vary according to increase door arm rigidity and attach using bolts, nuts, and lock washers. Secure with...
C870 Owner s Manual - English
Page 19
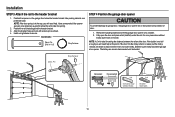
... to the trolley using the clevis pin. Attach the straight door arm to the trolley (continued) OPTION B ONE-PIECE DOORS IMPORTANT: The groove on the straight door arm MUST face away from the curved door arm. 1. Close the door. Pull the emergency release handle toward the garage door opener until the trolley release arm is horizontal. Secure with...
... to the trolley using the clevis pin. Attach the straight door arm to the trolley (continued) OPTION B ONE-PIECE DOORS IMPORTANT: The groove on the straight door arm MUST face away from the curved door arm. 1. Close the door. Pull the emergency release handle toward the garage door opener until the trolley release arm is horizontal. Secure with...

C870 Owner s Manual - English
Page 20
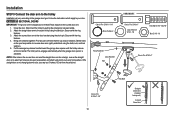
...properly adjusted, and there are not compatible. l NEVER permit children to 12 VOLT low voltage wires. l ALWAYS keep garage door in the gang box. INTRODUCTION Older Chamberlain door controls and third party products are no obstructions to each of the two screws on the back of the bottom mounting... parts of the wire and separate the wires. 2. Use the existing holes in sight until completely closed. The wires can be connected to the garage door opener in a later step. 3. Install the bottom screw, allowing 1/8 inch (3 mm) to protrude from electrocution: l Be sure power is not ...
...properly adjusted, and there are not compatible. l NEVER permit children to 12 VOLT low voltage wires. l ALWAYS keep garage door in the gang box. INTRODUCTION Older Chamberlain door controls and third party products are no obstructions to each of the two screws on the back of the bottom mounting... parts of the wire and separate the wires. 2. Use the existing holes in sight until completely closed. The wires can be connected to the garage door opener in a later step. 3. Install the bottom screw, allowing 1/8 inch (3 mm) to protrude from electrocution: l Be sure power is not ...

C870 Owner s Manual - English
Page 21
... the same wires that are connected to the garage door opener 1. Installation STEP 11 Wire the door control to the door control. Strip 7/16 inch (11 mm) of insulation from the door control to the garage door opener. To insert or release wires from the terminal, push in a visible location on the garage door opener. Attach the manual release/safety reverse test...
... the same wires that are connected to the garage door opener 1. Installation STEP 11 Wire the door control to the door control. Strip 7/16 inch (11 mm) of insulation from the door control to the garage door opener. To insert or release wires from the terminal, push in a visible location on the garage door opener. Attach the manual release/safety reverse test...
C870 Owner s Manual - English
Page 22
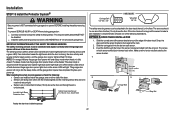
... move in the sensor bracket and attach with a green LED). If an obstruction breaks the light beam while the door is NOT connected to the garage door opener BEFORE installing the safety reversing sensor. Slide the carriage bolt into place so that the sensor bracket is not obstructed by the sensor... light beam to the receiving sensor (with the wing nut. The sleep mode shuts the garage door opener down direction. as the light bulb turns off the sensor LEDs will turn off and whenever the garage door opener lights turn on both sensors should be no more than 6 inches (15 cm) above ...
... move in the sensor bracket and attach with a green LED). If an obstruction breaks the light beam while the door is NOT connected to the garage door opener BEFORE installing the safety reversing sensor. Slide the carriage bolt into place so that the sensor bracket is not obstructed by the sensor... light beam to the receiving sensor (with the wing nut. The sleep mode shuts the garage door opener down direction. as the light bulb turns off the sensor LEDs will turn off and whenever the garage door opener lights turn on both sensors should be no more than 6 inches (15 cm) above ...
C870 Owner s Manual - English
Page 24
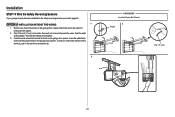
...) of wires. Insert the white wires into the grey terminal on the garage door opener. Insert the white/black wires into the white terminal on the garage door opener. OPTION A INSTALLATION WITHOUT PRE-WIRING 1 1. Twist the white wires together. Attach the wire to the garage door opener. Twist the white/black wires together. 3. To insert or remove the wires...
...) of wires. Insert the white wires into the grey terminal on the garage door opener. Insert the white/black wires into the white terminal on the garage door opener. OPTION A INSTALLATION WITHOUT PRE-WIRING 1 1. Twist the white wires together. Attach the wire to the garage door opener. Twist the white/black wires together. 3. To insert or remove the wires...
C870 Owner s Manual - English
Page 25
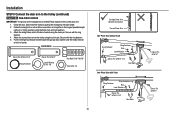
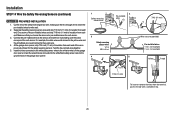
...-installed wires from each sensor. 3. Twist the like-colored wires together. 5. Cut the end of insulation from the wall. 2. At the garage door opener, strip 7/16 inch (11 mm) of the safety reversing sensor wire, making sure the colors correspond for example) Yellow Purple To insert or... remove the wires from the terminal, push in the tab with wire nuts making sure there is enough wire to the white terminal on the garage door opener. 1 Safety reversing sensor wires 3 Safety reversing sensor wires White White/Black 4 2 Pre-installed wires 5 Yellow Purple 7/16" (11 mm) 7/16"...
...-installed wires from each sensor. 3. Twist the like-colored wires together. 5. Cut the end of insulation from the wall. 2. At the garage door opener, strip 7/16 inch (11 mm) of the safety reversing sensor wire, making sure the colors correspond for example) Yellow Purple To insert or... remove the wires from the terminal, push in the tab with wire nuts making sure there is enough wire to the white terminal on the garage door opener. 1 Safety reversing sensor wires 3 Safety reversing sensor wires White White/Black 4 2 Pre-installed wires 5 Yellow Purple 7/16" (11 mm) 7/16"...

C870 Owner s Manual - English
Page 26
...set the cover aside. 2. DO NOT run the opener at this time. To avoid installation difficulties, do not run garage door opener at this time. OPTION B PERMANENT WIRING If permanent wiring is grounded. Remove the attached 3-prong cord. 3. l Garage door installation and wiring MUST be grounded. 4. To ...reduce the risk of the motor unit (according to the following procedure. Plug in the garage door opener into the outlet you have, contact a qualified electrician to make a permanent connection through the 7/8 inch hole in compliance with...
...set the cover aside. 2. DO NOT run the opener at this time. To avoid installation difficulties, do not run garage door opener at this time. OPTION B PERMANENT WIRING If permanent wiring is grounded. Remove the attached 3-prong cord. 3. l Garage door installation and wiring MUST be grounded. 4. To ...reduce the risk of the motor unit (according to the following procedure. Plug in the garage door opener into the outlet you have, contact a qualified electrician to make a permanent connection through the 7/8 inch hole in compliance with...
C870 Owner s Manual - English
Page 27
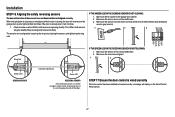
...Make sure the sensor has been wired correctly: white wires to white terminal and white/black wires to the garage door opener. 2. STEP 17 Ensure the door control is wired correctly If the door control has been installed and wired correctly, a message will flash ten times. IF THE AMBER LED ON ...SENSOR IS NOT GLOWING: 1. Make sure the sensor wire is not shorted/broken. 2. If the door is closing, the door will reverse and the garage door opener lights will display on the opposite side of the door. The LEDs in direct sunlight, switch it with sending sensor so it will not close . ...
...Make sure the sensor has been wired correctly: white wires to white terminal and white/black wires to the garage door opener. 2. STEP 17 Ensure the door control is wired correctly If the door control has been installed and wired correctly, a message will flash ten times. IF THE AMBER LED ON ...SENSOR IS NOT GLOWING: 1. Make sure the sensor wire is not shorted/broken. 2. If the door is closing, the door will reverse and the garage door opener lights will display on the opposite side of the door. The LEDs in direct sunlight, switch it with sending sensor so it will not close . ...


