C870 Owner s Manual - English
Page 1
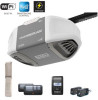
...located on a one-piece door if using devices or features providing unattended close. Owner's Manual C870 Chain Drive Garage Door Opener FOR RESIDENTIAL USE ONLY PRE-PROGRAMMED REMOTE CONTROL INCLUDED TO WATCH...tinyurl.com/lgh5x3h Smart Garage Opener • Please read this manual and the enclosed safety materials carefully! • Fasten the manual near the garage door after installation. • The door ... install on the front panel of your Garage Door Opener.....34 To Open the Door Manually ...........34 Smart Control Panel 35-36 Remote Control and Keyless Entry 36 Homelink 36 To...
...located on a one-piece door if using devices or features providing unattended close. Owner's Manual C870 Chain Drive Garage Door Opener FOR RESIDENTIAL USE ONLY PRE-PROGRAMMED REMOTE CONTROL INCLUDED TO WATCH...tinyurl.com/lgh5x3h Smart Garage Opener • Please read this manual and the enclosed safety materials carefully! • Fasten the manual near the garage door after installation. • The door ... install on the front panel of your Garage Door Opener.....34 To Open the Door Manually ...........34 Smart Control Panel 35-36 Remote Control and Keyless Entry 36 Homelink 36 To...

C870 Owner s Manual - English
Page 2
... door. 2. If there is installed, operated, maintained and tested in this Signal Word on the bottom of serious injury or death if you see this manual. Disable locks and remove any other reproductive harm. Raise and lower the door to avoid entanglement. Otherwise, the safety reversal system may not work properly...
... door. 2. If there is installed, operated, maintained and tested in this Signal Word on the bottom of serious injury or death if you see this manual. Disable locks and remove any other reproductive harm. Raise and lower the door to avoid entanglement. Otherwise, the safety reversal system may not work properly...

C870 Owner s Manual - English
Page 4
... Save the carton and packing material until the installation and adjustment is complete. Model Power Door Control Remote Control Wireless Keypad C870 Max Lift Power System™ Smart Control Panel® 3-button (2) ü A. Curved door arm E. Sprocket cover and...Pulley C. Straight door arm (Packaged inside the front rail section) J. Emergency release rope and handle H. The images throughout this manual are not included in this manual. Header bracket B. "U" bracket M. Door control O. Remote control P. Instructions for reference only and your product may look different...
... Save the carton and packing material until the installation and adjustment is complete. Model Power Door Control Remote Control Wireless Keypad C870 Max Lift Power System™ Smart Control Panel® 3-button (2) ü A. Curved door arm E. Sprocket cover and...Pulley C. Straight door arm (Packaged inside the front rail section) J. Emergency release rope and handle H. The images throughout this manual are not included in this manual. Header bracket B. "U" bracket M. Door control O. Remote control P. Instructions for reference only and your product may look different...

C870 Owner s Manual - English
Page 10
... in garage door or opener mechanisms. 9. Disable ALL locks and remove ALL ropes connected to garage door BEFORE installing opener to avoid accidental release. 7. Place manual release/safety reverse test label in plain view on wall next to cables, spring assemblies and other adjacent walking surface. Mount the emergency release within...
... in garage door or opener mechanisms. 9. Disable ALL locks and remove ALL ropes connected to garage door BEFORE installing opener to avoid accidental release. 7. Place manual release/safety reverse test label in plain view on wall next to cables, spring assemblies and other adjacent walking surface. Mount the emergency release within...

C870 Owner s Manual - English
Page 14
... the lag screws to attach a support bracket (not provided) to structural supports. Attach the end of each side of the garage. Remove the 2x4 and manually close the door. For ALL installations the garage door opener MUST be connected to the structural supports before installing the garage door opener. 2. Measure the...
... the lag screws to attach a support bracket (not provided) to structural supports. Attach the end of each side of the garage. Remove the 2x4 and manually close the door. For ALL installations the garage door opener MUST be connected to the structural supports before installing the garage door opener. 2. Measure the...

C870 Owner s Manual - English
Page 21
...) Staple 3 RED WHITE WHITE GREY 21 Connect the wire to the red and white terminals on the wall near the garage door opener. 3. Attach the manual release/safety reverse test label in the tab with the staple as this may cause a short or an open circuit. 2. Attach the entrapment warning label...
...) Staple 3 RED WHITE WHITE GREY 21 Connect the wire to the red and white terminals on the wall near the garage door opener. 3. Attach the manual release/safety reverse test label in the tab with the staple as this may cause a short or an open circuit. 2. Attach the entrapment warning label...

C870 Owner s Manual - English
Page 34
... controls. If the garage door opener senses an obstruction while closing, the door will reconnect on the next UP or DOWN operation, either manually or by holding the button on the door control or the ENTER button on the keyless entry until the door is clear of your Garage... The lights will close from a falling garage door: l If possible, use halogen, short neck, or specialty light bulbs as necessary. To Open the Door Manually To prevent possible SERIOUS INJURY or DEATH from a remote control, TTC, or the MyQ® Smartphone Control app. If the door is activated. l The ...
... controls. If the garage door opener senses an obstruction while closing, the door will reconnect on the next UP or DOWN operation, either manually or by holding the button on the door control or the ENTER button on the keyless entry until the door is clear of your Garage... The lights will close from a falling garage door: l If possible, use halogen, short neck, or specialty light bulbs as necessary. To Open the Door Manually To prevent possible SERIOUS INJURY or DEATH from a remote control, TTC, or the MyQ® Smartphone Control app. If the door is activated. l The ...

C870 Owner s Manual - English
Page 38
..., explosion or chemical burn: l Replace ONLY with only 3V CR2032 coin cell batteries. IL N'EXISTEAUCUNEPIÈCESUSCEPTIBLED'ÊTREENTRETENUEPAR L'UTILISATEUR. Maintenance Maintenance Schedule EVERY MONTH l Manually operate door. If it is swallowed, immediately notify doctor. Do not grease the door tracks. Operation issubject to 3 years. l Test the safety reversal system. Adjust...
..., explosion or chemical burn: l Replace ONLY with only 3V CR2032 coin cell batteries. IL N'EXISTEAUCUNEPIÈCESUSCEPTIBLED'ÊTREENTRETENUEPAR L'UTILISATEUR. Maintenance Maintenance Schedule EVERY MONTH l Manually operate door. If it is swallowed, immediately notify doctor. Do not grease the door tracks. Operation issubject to 3 years. l Test the safety reversal system. Adjust...

C870 Owner s Manual - English
Page 39
... 6-8" (15-20 cm), stops and reverses. Inspect door control wires at all staple and connection points, replace wire or correct as needed . Manually open and close the door. Battery backup charging circuit error, replace the logic board. If door is faulty. Communication error to coasting position or have...with self-diagnostic capabilities. Inspect safety sensor wire at all staple and connection points, replace wire or correct as needed . Manually open and close the door. Replace travel module and at the logic board. Replace logic board if necessary. Replace logic board...
... 6-8" (15-20 cm), stops and reverses. Inspect door control wires at all staple and connection points, replace wire or correct as needed . Manually open and close the door. Battery backup charging circuit error, replace the logic board. If door is faulty. Communication error to coasting position or have...with self-diagnostic capabilities. Inspect safety sensor wire at all staple and connection points, replace wire or correct as needed . Manually open and close the door. Replace travel module and at the logic board. Replace logic board if necessary. Replace logic board...

C870 Owner s Manual - English
Page 43
... wire 041A5034 8 Straight Door Arm 4178B0034B 9 White and Red/White Wire 041B4494-1 10 3V CR2032 Lithium Battery K010A0020 11 Hanging Brackets 012B0776 Not Shown Owner's Manual 114A5239 2 3 11 CEILING MOUNT ONLY UP 4 1 7 6 9 5 8 10 43
... wire 041A5034 8 Straight Door Arm 4178B0034B 9 White and Red/White Wire 041B4494-1 10 3V CR2032 Lithium Battery K010A0020 11 Hanging Brackets 012B0776 Not Shown Owner's Manual 114A5239 2 3 11 CEILING MOUNT ONLY UP 4 1 7 6 9 5 8 10 43

