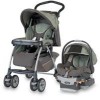
User Guide
Page 2
... Child in Carrier 26 Safety Tips for Securing Child 28 Secure Child Checklist 29 Vehicle Information Unsafe Vehicle Belts 30 Installation Positions 31 Installation with Base LATCH or Vehicle Belt 32 Installation Using Vehicle Belt 32 Installation Using LATCH 34 Uninstalling Base 33, 36 Installation without Base 37 Installation in Aircraft 38 Cleaning and Maintenance 39 Replacement Parts 40
... Child in Carrier 26 Safety Tips for Securing Child 28 Secure Child Checklist 29 Vehicle Information Unsafe Vehicle Belts 30 Installation Positions 31 Installation with Base LATCH or Vehicle Belt 32 Installation Using Vehicle Belt 32 Installation Using LATCH 34 Uninstalling Base 33, 36 Installation without Base 37 Installation in Aircraft 38 Cleaning and Maintenance 39 Replacement Parts 40

User Guide
Page 3
.... NHTSA.gov. If you have any questions regarding installation or use, please call: Chicco Customer Service 1-877-424-4226 Please have Model Number available when you call the U.S. You MUST follow the detailed instructions in this restraint to be reached in Vehicle 5 ... your Chicco Child Restraint, or any problems with your name, address, and the restraint's model number and manufacturing d a t e t o : Chicco USA, Inc. 1835 Freedom Road Lancaster, PA 17601 or call 1-877-424-4226 For recall information, call . NEED HELP? The model number can be recalled for safety...
.... NHTSA.gov. If you have any questions regarding installation or use, please call: Chicco Customer Service 1-877-424-4226 Please have Model Number available when you call the U.S. You MUST follow the detailed instructions in this restraint to be reached in Vehicle 5 ... your Chicco Child Restraint, or any problems with your name, address, and the restraint's model number and manufacturing d a t e t o : Chicco USA, Inc. 1835 Freedom Road Lancaster, PA 17601 or call 1-877-424-4226 For recall information, call . NEED HELP? The model number can be recalled for safety...
User Guide
Page 4
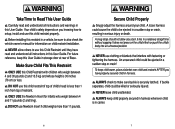
...owner's manual for infants who weigh between 4 and 11 pounds (2 and 5 kg). ALWAYS keep child warm, place a blanket over child and restraint AFTER you knowing how to setup, install and use this child restraint if top of restraint. Your child's safety depends on you have read and understand all instructions... between 4 and 30 pounds (2 and 13...User Guide in storage door at rear of Base. Make Sure Child Fits This Restraint ONLY USE this User Guide. Before installing this User Guide. WARNING Take Time to Read This User Guide Carefully read and understood all instructions...
...owner's manual for infants who weigh between 4 and 11 pounds (2 and 5 kg). ALWAYS keep child warm, place a blanket over child and restraint AFTER you knowing how to setup, install and use this child restraint if top of restraint. Your child's safety depends on you have read and understand all instructions... between 4 and 30 pounds (2 and 13...User Guide in storage door at rear of Base. Make Sure Child Fits This Restraint ONLY USE this User Guide. Before installing this User Guide. WARNING Take Time to Read This User Guide Carefully read and understood all instructions...

User Guide
Page 5
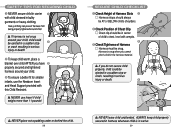
... to vehicle owner's manual before installing this restraint in a seating position with this Child Restraint unsecured in this restraint forward facing. Refer to Base. NEVER install in a sudden stop or crash. BEFORE each time you must follow the step by an airbag. An unsecured child restraint could be killed or seriously injured if you install this User Guide.
... to vehicle owner's manual before installing this restraint in a seating position with this Child Restraint unsecured in this restraint forward facing. Refer to Base. NEVER install in a sudden stop or crash. BEFORE each time you must follow the step by an airbag. An unsecured child restraint could be killed or seriously injured if you install this User Guide.
User Guide
Page 6
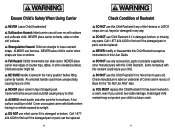
...4226 to find out if the damaged part or parts can be replaced. 10 WARNING Check Condition of Restraint DO NOT use any way. DO NOT use this User Guide. NEVER place carrier near edges of shopping cart. Carrier will not be replaced. Items not tested with this Child Restraint... Hazard: Infant carrier can be secure and could burn child! Cover unoccupied carrier with this Child Restraint if it is locked in a future crash. 11 NEVER modify or disassemble this Child Restraint except as instructed to child. WARNING Ensure Child's Safety When Using Carrier NEVER ...
...4226 to find out if the damaged part or parts can be replaced. 10 WARNING Check Condition of Restraint DO NOT use any way. DO NOT use this User Guide. NEVER place carrier near edges of shopping cart. Carrier will not be replaced. Items not tested with this Child Restraint... Hazard: Infant carrier can be secure and could burn child! Cover unoccupied carrier with this Child Restraint if it is locked in a future crash. 11 NEVER modify or disassemble this Child Restraint except as instructed to child. WARNING Ensure Child's Safety When Using Carrier NEVER ...
User Guide
Page 7
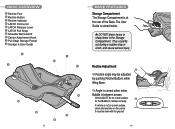
...b Recline Button c Recline Indicator d LATCH Connector e LATCH Release Lever f LATCH Pull Strap g Shoulder Belt Lockoff h Carrier Attachment Hook i Pull Strap Storage Pocket j Storage & User Guide j c i h f e b g d a 12 BASE FEATURES Storage Compartment The Storage Compartment is between arrows. They could fly out during a sudden stop or crash, and ...cause serious injury. Vehicle MUST be level with the ground. 13 If vehicle is stored inside. The User Guide is not on a level surface, check the level line on a level surface 2 for the Bubble to indicate correctly.
...b Recline Button c Recline Indicator d LATCH Connector e LATCH Release Lever f LATCH Pull Strap g Shoulder Belt Lockoff h Carrier Attachment Hook i Pull Strap Storage Pocket j Storage & User Guide j c i h f e b g d a 12 BASE FEATURES Storage Compartment The Storage Compartment is between arrows. They could fly out during a sudden stop or crash, and ...cause serious injury. Vehicle MUST be level with the ground. 13 If vehicle is stored inside. The User Guide is not on a level surface, check the level line on a level surface 2 for the Bubble to indicate correctly.

User Guide
Page 8
... Strap Storage Pocket. 4 When not using LATCH, the LATCH Connectors and Pull Strap MUST be safely installed using your vehicle. See vehicle owner's manual or label on seat belt for detailed installation instructions. 15 LATCH is a Child Restraint attachment system that is standard in your vehicle belts. It locks the vehicle shoulder belt in place, ensuring a stable...
... Strap Storage Pocket. 4 When not using LATCH, the LATCH Connectors and Pull Strap MUST be safely installed using your vehicle. See vehicle owner's manual or label on seat belt for detailed installation instructions. 15 LATCH is a Child Restraint attachment system that is standard in your vehicle belts. It locks the vehicle shoulder belt in place, ensuring a stable...
User Guide
Page 9
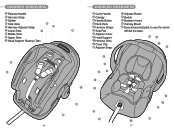
a h i b c d p e f n g k o j p m l 17 CARRIER OVERVIEW a Release Handle b Harness Strap c Splitter d Side Hook e Harness Adjuster Strap g h f Lower Slots f a g Middle Slots h Upper Slots i Head Support Fastener Tabs b c i d e 16 CARRIER OVERVIEW a Carry Handle b Canopy c Handle Button d Neck Pads e Harness Straps f Seat Pad g Adjuster Cover h Head Support i Harness Slots j Chest Clip k Adjuster Strap l Adjuster Button m Buckle n Newborn Insert o Canopy Mount p Easy-access belt path, to use the carrier without the base.
a h i b c d p e f n g k o j p m l 17 CARRIER OVERVIEW a Release Handle b Harness Strap c Splitter d Side Hook e Harness Adjuster Strap g h f Lower Slots f a g Middle Slots h Upper Slots i Head Support Fastener Tabs b c i d e 16 CARRIER OVERVIEW a Carry Handle b Canopy c Handle Button d Neck Pads e Harness Straps f Seat Pad g Adjuster Cover h Head Support i Harness Slots j Chest Clip k Adjuster Strap l Adjuster Button m Buckle n Newborn Insert o Canopy Mount p Easy-access belt path, to use the carrier without the base.
User Guide
Page 10
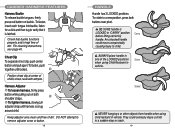
... LOCKED positions Store when using child restraint in vehicle. To rotate to verify that buckle functions properly and is latched. For cleaning instructions, see page 40. Harness Adjuster a To loosen harness, firmly press button while pulling out on buckle. b To tighten harness,...center button and pull apart. a Position chest clip at center of dirt. They could move unexpectedly, causing injury to remove adjuster cover or button. 18 HANDLE Handle has 3 LOCKED positions. CARRIER HARNESS FEATURES Harness Buckle To release buckle tongues, firmly press red button...
... LOCKED positions Store when using child restraint in vehicle. To rotate to verify that buckle functions properly and is latched. For cleaning instructions, see page 40. Harness Adjuster a To loosen harness, firmly press button while pulling out on buckle. b To tighten harness,...center button and pull apart. a Position chest clip at center of dirt. They could move unexpectedly, causing injury to remove adjuster cover or button. 18 HANDLE Handle has 3 LOCKED positions. CARRIER HARNESS FEATURES Harness Buckle To release buckle tongues, firmly press red button...

User Guide
Page 11
To replace canopy, reverse previous steps. The harness height may have to be... always be BELOW the lower harness slots. 3 When properly installed, the Newborn Insert and harness should look like drawing. Press button on canopy mount to provide additional support and ensure a secure harness fit for smaller 1 infants. Release... bow from rear of carrier. Slide canopy fabric off bow and detach canopy from canopy b mount on opposite side of carrier if using insert, read the instructions on...
To replace canopy, reverse previous steps. The harness height may have to be... always be BELOW the lower harness slots. 3 When properly installed, the Newborn Insert and harness should look like drawing. Press button on canopy mount to provide additional support and ensure a secure harness fit for smaller 1 infants. Release... bow from rear of carrier. Slide canopy fabric off bow and detach canopy from canopy b mount on opposite side of carrier if using insert, read the instructions on...

User Guide
Page 12
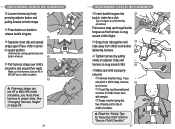
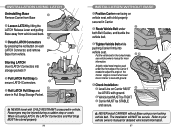
... push firmly into base. CARRIER/BASE ATTACHMENT 1 To secure carrier to provide a additional support for a young infant's head. Head support could interfere with harness in upper slots. If using a blanket/cover, make sure it is securely latched. b To Install Head Support, pull Fastener Tabs through slots ABOVE the slots used with attachment hooks. 2 To release...
... push firmly into base. CARRIER/BASE ATTACHMENT 1 To secure carrier to provide a additional support for a young infant's head. Head support could interfere with harness in upper slots. If using a blanket/cover, make sure it is securely latched. b To Install Head Support, pull Fastener Tabs through slots ABOVE the slots used with attachment hooks. 2 To release...

User Guide
Page 13
...pounds (2 and 5 kg). Call 1-877-424-4226 to splitter. The Chicco KeyFit 30 Child Restraint can be free of twists and securely 4 fastened to splitter ...replacement harness. 25 A premature infant may have difficulty breathing or have other strap. NEVER remove Harness or harness components from splitter. 3 Pull end of loose strap out of pad and return it back through 3 correct slot. DO NOT USE Child Restraint if any part... 5 Repeat for other medical problems when placed in a seated position. 24 CHANGING HARNESS HEIGHT 1 With child firmly seated in a REAR-FACING Child ...
...pounds (2 and 5 kg). Call 1-877-424-4226 to splitter. The Chicco KeyFit 30 Child Restraint can be free of twists and securely 4 fastened to splitter ...replacement harness. 25 A premature infant may have difficulty breathing or have other strap. NEVER remove Harness or harness components from splitter. 3 Pull end of loose strap out of pad and return it back through 3 correct slot. DO NOT USE Child Restraint if any part... 5 Repeat for other medical problems when placed in a seated position. 24 CHANGING HARNESS HEIGHT 1 With child firmly seated in a REAR-FACING Child ...
User Guide
Page 14
... Securing Child" and the "Secure Child Checklist" 27 CLICK! Make sure that they are not AT or BELOW child's shoulders, you can pinch a fold in seated position.
... Securing Child" and the "Secure Child Checklist" 27 CLICK! Make sure that they are not AT or BELOW child's shoulders, you can pinch a fold in seated position.
User Guide
Page 15
... in center of child's chest, level with child dressed in serious injury or death. 3 NEVER leave child unattended. NEVER use the Newborn Insert and Head Support provided with this Child Restraint. ALWAYS keep child warm, place a blanket over child AFTER you cannot pinch a fold in harness whenever child is snug when...
... in center of child's chest, level with child dressed in serious injury or death. 3 NEVER leave child unattended. NEVER use the Newborn Insert and Head Support provided with this Child Restraint. ALWAYS keep child warm, place a blanket over child AFTER you cannot pinch a fold in harness whenever child is snug when...
User Guide
Page 16
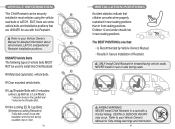
...-Locking (ELR) Lap Belts. (Emergency Locking Retractors) These belts remain loose after installation and only lock during a sudden stop or crash. 30 INSTALLATION POSITIONS Accident statistics indicate that : • Is Recommended by Vehicle Owner's Manual. • Results in rear seating positions. Refer to your Vehicle Owner's Manual for use with this Child Restraint: 3 1 Motorized (automatic) vehicle belts. 2 Door...
...-Locking (ELR) Lap Belts. (Emergency Locking Retractors) These belts remain loose after installation and only lock during a sudden stop or crash. 30 INSTALLATION POSITIONS Accident statistics indicate that : • Is Recommended by Vehicle Owner's Manual. • Results in rear seating positions. Refer to your Vehicle Owner's Manual for use with this Child Restraint: 3 1 Motorized (automatic) vehicle belts. 2 Door...

User Guide
Page 17
...and buckle the vehicle belt. (Do not put the shoulder belt in Carrier. NEVER travel with Child Restraint unsecured in forward facing 1 vehicle seat with attachment of Carrier to Base. 6 CHECK Installation: a Belts MUST be STABLE. Only use the lockoff on a level surface for the... Bubble to the Base. Passengers may be safely installed using Vehicle Lap Belt only (no Shoulder ...
...and buckle the vehicle belt. (Do not put the shoulder belt in Carrier. NEVER travel with Child Restraint unsecured in forward facing 1 vehicle seat with attachment of Carrier to Base. 6 CHECK Installation: a Belts MUST be STABLE. Only use the lockoff on a level surface for the... Bubble to the Base. Passengers may be safely installed using Vehicle Lap Belt only (no Shoulder ...

User Guide
Page 18
...indicate correctly. 4 Attach LATCH Connectors by pushing Recline Buttons while lifting Base. Vehicle must be safely installed using Vehicle Belts or LATCH. Refer to vehicle owner's manual for 3 the Bubble to the Base. 35 This Child Restraint can be on a level surface ...for information about LATCH and child restraint installation positions. 34 INSTALLATION USING LATCH 5 Tighten LATCH Belts by pulling firmly on LATCH Pull Strap while pressing Base firmly into vehicle seat...
...indicate correctly. 4 Attach LATCH Connectors by pushing Recline Buttons while lifting Base. Vehicle must be safely installed using Vehicle Belts or LATCH. Refer to vehicle owner's manual for 3 the Bubble to the Base. 35 This Child Restraint can be on a level surface ...for information about LATCH and child restraint installation positions. 34 INSTALLATION USING LATCH 5 Tighten LATCH Belts by pulling firmly on LATCH Pull Strap while pressing Base firmly into vehicle seat...
User Guide
Page 19
... into 1 storage pockets. Refer to secure LATCH Connectors. NEVER travel with CHILD RESTRAINT unsecured in the locked mode, 34 see vehicle owner's manual for detailed vehicle belt information. 37 c Carrier MUST be stored properly. 36 INSTALLATION WITHOUT BASE 1 Position Carrier rear facing on vehicle seat, with child properly secured in Pull Strap Storage Pocket. When...
... into 1 storage pockets. Refer to secure LATCH Connectors. NEVER travel with CHILD RESTRAINT unsecured in the locked mode, 34 see vehicle owner's manual for detailed vehicle belt information. 37 c Carrier MUST be stored properly. 36 INSTALLATION WITHOUT BASE 1 Position Carrier rear facing on vehicle seat, with child properly secured in Pull Strap Storage Pocket. When...

User Guide
Page 20
...Carrier. 2 2 Route Aircraft Lap Belt under Adjuster Cover. Carefully follow instructions in "Changing Harness Height." 1 Unhook elastic band attached around handle pivots, and disconnect chest clip and buckle. 2 2 Carefully pull seat pad from under both Belt Guides, and fasten the aircraft belt. 3 Tighten Aircraft ...the Carrier. Guide harness assembly through slots in cold water on Carrier MUST be spot-cleaned with floor. NEVER use in commercial aircraft. Be sure to contact your airline prior to travel, to ensure the harness is level with floor. 4 Check Installation: a Level...
...Carrier. 2 2 Route Aircraft Lap Belt under Adjuster Cover. Carefully follow instructions in "Changing Harness Height." 1 Unhook elastic band attached around handle pivots, and disconnect chest clip and buckle. 2 2 Carefully pull seat pad from under both Belt Guides, and fasten the aircraft belt. 3 Tighten Aircraft ...the Carrier. Guide harness assembly through slots in cold water on Carrier MUST be spot-cleaned with floor. NEVER use in commercial aircraft. Be sure to contact your airline prior to travel, to ensure the harness is level with floor. 4 Check Installation: a Level...

User Guide
Page 21
Air dry. Cleaning Plastics Sponge clean using warm water and mild soap. Towel dry. To order replacement parts, call: Chicco Customer Service 1-877-424-4226 Please have the Restraint model and serial numbers available to order a replacement. Cleaning Buckle and LATCH Hardware Sponge clean, or rinse in cup of warm water. DO NOT USE ANY SOAPS OR LUBRICANTS...
Air dry. Cleaning Plastics Sponge clean using warm water and mild soap. Towel dry. To order replacement parts, call: Chicco Customer Service 1-877-424-4226 Please have the Restraint model and serial numbers available to order a replacement. Cleaning Buckle and LATCH Hardware Sponge clean, or rinse in cup of warm water. DO NOT USE ANY SOAPS OR LUBRICANTS...


