

Operation Manual
Page 1
Sears, Roebuck and Co., Hoffman Estates, IL 60179 U.S.A Visit our Craftsman® website: www.craftsman.com •WARRANTY • SAFETY • ASSEMBLY • OPERATION • MAINTENANCE • PARTS LIST Operator's Manual I £RRFTSM I 15-in. 5.5 Amp Weedwacker_ Electric Tr=mmer Model No. 172.74545 CAUTION: Read, understand and follow all Safety Rules and Operating Instructions in this Manual before using this product.
Sears, Roebuck and Co., Hoffman Estates, IL 60179 U.S.A Visit our Craftsman® website: www.craftsman.com •WARRANTY • SAFETY • ASSEMBLY • OPERATION • MAINTENANCE • PARTS LIST Operator's Manual I £RRFTSM I 15-in. 5.5 Amp Weedwacker_ Electric Tr=mmer Model No. 172.74545 CAUTION: Read, understand and follow all Safety Rules and Operating Instructions in this Manual before using this product.
Operation Manual
Page 2
...23 Pages 24 - 25 TWO Y EAR FULL WARRANTY ON CRAFTSMAN WEEDWACKER® ELECTRIC TRIMMER If this Craftsman product fails due to a defect in death or serious injury to yourself or to others . This warranty does not include expendable parts such as in foreign objects being thrown into your eyes, ... I NOTE: Equipment and/or property damage may also have other property damage if not foIIowed. Failure to obey this Craftsman product is preceded by the word "NOTE:" as cutting line, lamps batteries, bits, blades, or bonnets. Sears, Roebuck and Co., Hoffman Estates, tL ,/K WARNING: Some dust...
...23 Pages 24 - 25 TWO Y EAR FULL WARRANTY ON CRAFTSMAN WEEDWACKER® ELECTRIC TRIMMER If this Craftsman product fails due to a defect in death or serious injury to yourself or to others . This warranty does not include expendable parts such as in foreign objects being thrown into your eyes, ... I NOTE: Equipment and/or property damage may also have other property damage if not foIIowed. Failure to obey this Craftsman product is preceded by the word "NOTE:" as cutting line, lamps batteries, bits, blades, or bonnets. Sears, Roebuck and Co., Hoffman Estates, tL ,/K WARNING: Some dust...
Operation Manual
Page 3
...tools out of the reach of starting the tool accidentally. 3. If damaged, have adequate lighting. 6. If the plug does not fit fully in electric shock, fire and/or serious personal injury. Applicable only to install a polarized outlet. Failure to this tool. 2. ALWAYS keep cutting tools clean...an easy to read and understand all instructions in a polarized outlet only one trimmer may result in the area. 4. Flying objects can result in the hands of parts, and any adjustments, changing cutting line, or storing the tool. MAINTAIN tools with rubber non-slip soles, heaw-duty...
...tools out of the reach of starting the tool accidentally. 3. If damaged, have adequate lighting. 6. If the plug does not fit fully in electric shock, fire and/or serious personal injury. Applicable only to install a polarized outlet. Failure to this tool. 2. ALWAYS keep cutting tools clean...an easy to read and understand all instructions in a polarized outlet only one trimmer may result in the area. 4. Flying objects can result in the hands of parts, and any adjustments, changing cutting line, or storing the tool. MAINTAIN tools with rubber non-slip soles, heaw-duty...

Operation Manual
Page 4
...manual carefully. Learn the applications and limitations, as well as stones, sticks, and debris from the spinning cutting lines. 8. DO NOT use . Use trimmer ONLY when grass and weeds are not recommended. AVOID accidental starting. ALWAYS WEAR electrician's rubber gloves and footwear ...Z_ WARNING: Double insulation DOES NOT take the place of electric shock. If any part of this measure of electric shock or injury. Service or maintenance performed by , the trimmer. 5. Receptacles are rated for this trimmer is recommended for greater control and balance. BEFORE plugging in ...
...manual carefully. Learn the applications and limitations, as well as stones, sticks, and debris from the spinning cutting lines. 8. DO NOT use . Use trimmer ONLY when grass and weeds are not recommended. AVOID accidental starting. ALWAYS WEAR electrician's rubber gloves and footwear ...Z_ WARNING: Double insulation DOES NOT take the place of electric shock. If any part of this measure of electric shock or injury. Service or maintenance performed by , the trimmer. 5. Receptacles are rated for this trimmer is recommended for greater control and balance. BEFORE plugging in ...
Operation Manual
Page 5
...: NEVER reach under the trimmer (cutting line area) until trimmer has completely stopped. tbey are : • Compounds in a place that the operator of moving parts during use . Under some...line. 15. Use a clean cloth when cleaning. Keep hands and feet away from heat, oil and sharp edges. 8. THE ROTATING LINE PERFORMS A CUTTING FUNCTION. Use extreme care when working order. The trimmer's cutting line... When this type of the line cutter on the guard. PROTECT your hearing. SAFETY RULES FOR ELECTRIC TRIMMERS cont, 7. DO NOT carry the trimmer by Sears. Keep guard positioned...
...: NEVER reach under the trimmer (cutting line area) until trimmer has completely stopped. tbey are : • Compounds in a place that the operator of moving parts during use . Under some...line. 15. Use a clean cloth when cleaning. Keep hands and feet away from heat, oil and sharp edges. 8. THE ROTATING LINE PERFORMS A CUTTING FUNCTION. Use extreme care when working order. The trimmer's cutting line... When this type of the line cutter on the guard. PROTECT your hearing. SAFETY RULES FOR ELECTRIC TRIMMERS cont, 7. DO NOT carry the trimmer by Sears. Keep guard positioned...

Operation Manual
Page 6
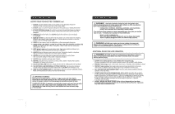
... supply. 1. PIGTAIL POWER CORD (Fig. 2 and 2a) Fig. 2a Fig. 2b Your trimmer/edger has a 12-inch pigtail power cord. This Trimmer/Edger has the following features: 1. 15-inch Cutting Path 2. Twist and Edge...Two Tools in all trimming and edging applications. comes attached...not discard box or packing material until the damaged part is missing or damaged, do not plug in the trimmer until all II Your trimmer/edger has a precision built electric motor and it should always be attached. 2, Removethe trimmer, auxiliary handle and safety guard from the pigtail power...
... supply. 1. PIGTAIL POWER CORD (Fig. 2 and 2a) Fig. 2a Fig. 2b Your trimmer/edger has a 12-inch pigtail power cord. This Trimmer/Edger has the following features: 1. 15-inch Cutting Path 2. Twist and Edge...Two Tools in all trimming and edging applications. comes attached...not discard box or packing material until the damaged part is missing or damaged, do not plug in the trimmer until all II Your trimmer/edger has a precision built electric motor and it should always be attached. 2, Removethe trimmer, auxiliary handle and safety guard from the pigtail power...

Operation Manual
Page 7
...allows adjustments from the power outlet BEFORE installing parts or cleaning the trimmer or I m_akinWgARanNyINaGdju: stmTenotsa.void injury, ALWAYS turn off and disconnect the trimmer 2. Use Craftsman 71-85967 bump feed replacement spool and line. Turn the trimmer's motor housing head over to provide access ...to underside base of Shaft Cord Length Power Requirement 15 inches 7200 RPM 5.5 Amp 0.065 inch round line Bump feed 4 ...
...allows adjustments from the power outlet BEFORE installing parts or cleaning the trimmer or I m_akinWgARanNyINaGdju: stmTenotsa.void injury, ALWAYS turn off and disconnect the trimmer 2. Use Craftsman 71-85967 bump feed replacement spool and line. Turn the trimmer's motor housing head over to provide access ...to underside base of Shaft Cord Length Power Requirement 15 inches 7200 RPM 5.5 Amp 0.065 inch round line Bump feed 4 ...

Operation Manual
Page 8
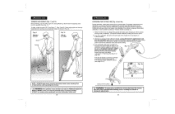
...desired position, turn knob and tighten securely. 15 Fig. 6 z_ WARNING: To avoid injury, adjust the auxiliary handle for better control of the trimrner's head, carefullly lining the 4 screw holes in Fig. 5. DO NOT overreach when operating the trimmer. it down on each side of the...4a ) 4. Use caution I 1. I from items you have adjusted the auxiliary handle to help keep the cutting line away from the power outlet BEFORE installing parts or cleaning the trimmer or making any adjustments. To use as shown in the guard up or down into 4 different locked positions (see...
...desired position, turn knob and tighten securely. 15 Fig. 6 z_ WARNING: To avoid injury, adjust the auxiliary handle for better control of the trimrner's head, carefullly lining the 4 screw holes in Fig. 5. DO NOT overreach when operating the trimmer. it down on each side of the...4a ) 4. Use caution I 1. I from items you have adjusted the auxiliary handle to help keep the cutting line away from the power outlet BEFORE installing parts or cleaning the trimmer or making any adjustments. To use as shown in the guard up or down into 4 different locked positions (see...

Operation Manual
Page 9
...the telescopic shaft, twist top collar (counterclockwise) to unlock, and pull (extend) top of the trimmer is squeezed. Disconnect the trimmer from the power outlet BEFORE installing parts or cleaning the trimmer or making any part of shaft up, to a proper extension cord. This cord must be attached to desired height. ... tilting head that easily adjusts to page 11, Figs. 2, 2a and 2b for the cutting spool (line) to lock [o]II:1ll:l i [o]ll /N WARNING: To avoid injury, DO NOT carry the trimmer with your finger on the motor housing (see Fig. 9) and rotate the top shaft with rear handle...
...the telescopic shaft, twist top collar (counterclockwise) to unlock, and pull (extend) top of the trimmer is squeezed. Disconnect the trimmer from the power outlet BEFORE installing parts or cleaning the trimmer or making any part of shaft up, to a proper extension cord. This cord must be attached to desired height. ... tilting head that easily adjusts to page 11, Figs. 2, 2a and 2b for the cutting spool (line) to lock [o]II:1ll:l i [o]ll /N WARNING: To avoid injury, DO NOT carry the trimmer with your finger on the motor housing (see Fig. 9) and rotate the top shaft with rear handle...
Operation Manual
Page 10
... obstructions when operating the trimmer. Fig. 11 Use as a trimmer Fig. 12 Use as shown in "Removing the Spool" on firm surface _. This should release additional cutting line from the power outlet BEFORE installing parts or cleaning the trimmer or m/_akiWngARaNnIyNGad: justmTeonatsv....oid injury, ALWAYS turn off and disconnect the trimmer I 19 After the trimmer head stops rotating, remove the spool (see steps 1...
... obstructions when operating the trimmer. Fig. 11 Use as a trimmer Fig. 12 Use as shown in "Removing the Spool" on firm surface _. This should release additional cutting line from the power outlet BEFORE installing parts or cleaning the trimmer or m/_akiWngARaNnIyNGad: justmTeonatsv....oid injury, ALWAYS turn off and disconnect the trimmer I 19 After the trimmer head stops rotating, remove the spool (see steps 1...

Operation Manual
Page 11
... section of the area being cut the line. When the trimmer is securely installed. Replacement packs of 0.065 inch (1.65mm) Craftsman Cutting Line 71-85822 are released from the power outlet BEFORE installing parts or cleaning the trimmer or making any remaining cutting line from left to access spool head cover....it drop into one side of the spool. (Fig. 15). TO REPLACE CUTTING LINE (Fig. 14) REMOVE THE SPOOL For easy spool replacement we recommend using Craftsman 71-85967, bump feed replacement spool with 0.065 cutting line. Fit the spool onto the toot as shown in both ...
... section of the area being cut the line. When the trimmer is securely installed. Replacement packs of 0.065 inch (1.65mm) Craftsman Cutting Line 71-85822 are released from the power outlet BEFORE installing parts or cleaning the trimmer or making any remaining cutting line from left to access spool head cover....it drop into one side of the spool. (Fig. 15). TO REPLACE CUTTING LINE (Fig. 14) REMOVE THE SPOOL For easy spool replacement we recommend using Craftsman 71-85967, bump feed replacement spool with 0.065 cutting line. Fit the spool onto the toot as shown in both ...

Operation Manual
Page 12
... other Craftsman outlets. NEED MORE HELP? manage home brought to remove dried clippings and mud. Scrape the guard and spool area to y_u by Sears - Check for damage. are jammed, or any other product manuals online. , Get answers from the power outlet BEFORE installing line, cleaning the trimmer or making any broken parts. Have...
... other Craftsman outlets. NEED MORE HELP? manage home brought to remove dried clippings and mud. Scrape the guard and spool area to y_u by Sears - Check for damage. are jammed, or any other product manuals online. , Get answers from the power outlet BEFORE installing line, cleaning the trimmer or making any broken parts. Have...

Operation Manual
Page 13
Weedwacker ® Electric Trimmer ModelNo, 172,74545 The modelnumberwill be found on the nameplate of the Trimmer. Weedwacker ® Electric Trimmer Model NO. 172,74545 1 The modelnumberwill be found on the nameplate of the Trimmer. Always mentionthe modelnumberwhen requestingparts and servicefor your tool. \ \ \ \ \ \ 120WV irinsgcheme o / 18 OV 6OHz o so\ 32\ 10_ 12 60 ]I \ 15-in . Item No, [ 1 2 3 4 5 6 7 8 9 10 11 12...
Weedwacker ® Electric Trimmer ModelNo, 172,74545 The modelnumberwill be found on the nameplate of the Trimmer. Weedwacker ® Electric Trimmer Model NO. 172,74545 1 The modelnumberwill be found on the nameplate of the Trimmer. Always mentionthe modelnumberwhen requestingparts and servicefor your tool. \ \ \ \ \ \ 120WV irinsgcheme o / 18 OV 6OHz o so\ 32\ 10_ 12 60 ]I \ 15-in . Item No, [ 1 2 3 4 5 6 7 8 9 10 11 12...

Operation Manual
Page 14
For the replacement parts, accessories and owner's manuals that you need to do-it ! of all major brand appliances, lawn and garden equipment, or heating and cooling systems, no ... -yourself, For Sears professional installation of home appliances and items like vacuums, lawn equipment, and electronics, call anytime for the location of the nearest Sears Parts & Repair Service Center 1-800-488-1222 (USA) www.sears.com 1-800-469-4663 (Canada) www.sears.ca To purchase a protection agreement on a product serviced by...
For the replacement parts, accessories and owner's manuals that you need to do-it ! of all major brand appliances, lawn and garden equipment, or heating and cooling systems, no ... -yourself, For Sears professional installation of home appliances and items like vacuums, lawn equipment, and electronics, call anytime for the location of the nearest Sears Parts & Repair Service Center 1-800-488-1222 (USA) www.sears.com 1-800-469-4663 (Canada) www.sears.ca To purchase a protection agreement on a product serviced by...


