
Operation Manual
Page 2
... Pages 23 Pages 24 - 25 TWO Y EAR FULL WARRANTY ON CRAFTSMAN WEEDWACKER® ELECTRIC TRIMMER If this Craftsman product fails due to reduce the risk of fire, electric shock and personal injury. Sears, Roebuck and Co., Hoffman Estates, ..."CAAmURaTNyIOINrNeGs",u: lt BinEBFEeOleSRcUEtrRicEusstihnoogcrket,ahdisfiraetnodoaln.udnF/odairelurssrteearniotodusfoallllopwesarsfeoatnyllailninsistnrtjuruucrctyito.ionnss liisntetdhis I manual, including all safety alert symbols such as cutting line, lamps batteries, bits, blades, or bonnets. The safety symbols, and the explanations with them, deserve your...
... Pages 23 Pages 24 - 25 TWO Y EAR FULL WARRANTY ON CRAFTSMAN WEEDWACKER® ELECTRIC TRIMMER If this Craftsman product fails due to reduce the risk of fire, electric shock and personal injury. Sears, Roebuck and Co., Hoffman Estates, ..."CAAmURaTNyIOINrNeGs",u: lt BinEBFEeOleSRcUEtrRicEusstihnoogcrket,ahdisfiraetnodoaln.udnF/odairelurssrteearniotodusfoallllopwesarsfeoatnyllailninsistnrtjuruucrctyito.ionnss liisntetdhis I manual, including all safety alert symbols such as cutting line, lamps batteries, bits, blades, or bonnets. The safety symbols, and the explanations with them, deserve your...

Operation Manual
Page 3
...barefoot or wearing open sandals. DO NOT use common sense when operating this tool. 2. Cutting line that may I result in this manual before operating this electric trimmer is dangerous and must be suitable for one blade is recommended for misalignment or binding of drugs,... any adjustments, changing cutting line, or storing the tool. If the plug does not fit fully in good working outdoors. DO NOT use in any other untrained persons. BEFORE using this electric trimmer. Wear rubber gloves and substantial rubber soled footwear when working order....
...barefoot or wearing open sandals. DO NOT use common sense when operating this tool. 2. Cutting line that may I result in this manual before operating this electric trimmer is dangerous and must be suitable for one blade is recommended for misalignment or binding of drugs,... any adjustments, changing cutting line, or storing the tool. If the plug does not fit fully in good working outdoors. DO NOT use in any other untrained persons. BEFORE using this electric trimmer. Wear rubber gloves and substantial rubber soled footwear when working order....

Operation Manual
Page 4
... cont. Z_ WARNING: Double insulation DOES NOT take the place of electric shock. DO NOT expose tools to perform properly: SHUT OFF the power switch and remove the trimmer plug from the spinning cutting lines. 8. INSPECT tool cords for greater control and balance. Keep cord away from ...the outlet. When in doubt use electric tools in trimmer with a DC power supply. 4. When operating a power tool ...
... cont. Z_ WARNING: Double insulation DOES NOT take the place of electric shock. DO NOT expose tools to perform properly: SHUT OFF the power switch and remove the trimmer plug from the spinning cutting lines. 8. INSPECT tool cords for greater control and balance. Keep cord away from ...the outlet. When in doubt use electric tools in trimmer with a DC power supply. 4. When operating a power tool ...

Operation Manual
Page 5
...hazardous situation. 17. BEFORE using this tool. KEEP ALL BYSTANDERS AWAY at all times. 20. Z_ IMPORTANT WARNING: When this trimmer or sold by the line. Your risk from chemically treated lumber. Wear a face mask, dust mask or respirator if the operation is sharp and can... on the guard. The tool and guard are NOT safety glasses. 2. Keep cord away from cutting line. 15. THE ROTATING LINE PERFORMS A CUTTING FUNCTION. SAFETY RULES FOR ELECTRIC TRIMMERS cont, 7. ALWAYS check the tool for a few seconds after it is damaged should be careful of work away from ...
...hazardous situation. 17. BEFORE using this tool. KEEP ALL BYSTANDERS AWAY at all times. 20. Z_ IMPORTANT WARNING: When this trimmer or sold by the line. Your risk from chemically treated lumber. Wear a face mask, dust mask or respirator if the operation is sharp and can... on the guard. The tool and guard are NOT safety glasses. 2. Keep cord away from cutting line. 15. THE ROTATING LINE PERFORMS A CUTTING FUNCTION. SAFETY RULES FOR ELECTRIC TRIMMERS cont, 7. ALWAYS check the tool for a few seconds after it is damaged should be careful of work away from ...

Operation Manual
Page 6
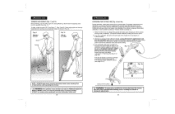
...loop through hole in , pigtail power cord and should only be attached. 2, Removethe trimmer, auxiliary handle and safety guard from the pigtail power cord (see Fig. 2b). This Trimmer/Edger has the following features: 1. 15-inch Cutting Path 2. Twist and Edge...Two Tools in medium duty applications. 4. ...cord into correct 120-volt, 60 Hz AC ONLY outlet, check the power supply. The trimmer comes assembled except for optimum operator control in all II Your trimmer/edger has a precision built electric motor and it should be used with a 12-in the handle (see page 6). ...
...loop through hole in , pigtail power cord and should only be attached. 2, Removethe trimmer, auxiliary handle and safety guard from the pigtail power cord (see Fig. 2b). This Trimmer/Edger has the following features: 1. 15-inch Cutting Path 2. Twist and Edge...Two Tools in medium duty applications. 4. ...cord into correct 120-volt, 60 Hz AC ONLY outlet, check the power supply. The trimmer comes assembled except for optimum operator control in all II Your trimmer/edger has a precision built electric motor and it should be used with a 12-in the handle (see page 6). ...

Operation Manual
Page 7
...your ideal working height. 9. Bump-Feed Head allows you to simply bump the trimmer head to underside base of Shaft Cord Length Power Requirement 15 inches 7200 RPM 5.5 Amp 0.065 inch round line Bump feed 4 positions From 16 to 25 inches 12 inch Pigtail Power cord 120...parts or cleaning the trimmer or I INSTALLING THE SAFETY GUARD (Figs. 4 and 4a ) 1. Turn the trimmer's motor housing head over to provide access to advance cutting line. 11. This Trimmer/Edger has the following features cont.: 7. Lightweight and Ergonomicatly Designed for easy use . Use Craftsman 71-85967 bump ...
...your ideal working height. 9. Bump-Feed Head allows you to simply bump the trimmer head to underside base of Shaft Cord Length Power Requirement 15 inches 7200 RPM 5.5 Amp 0.065 inch round line Bump feed 4 positions From 16 to 25 inches 12 inch Pigtail Power cord 120...parts or cleaning the trimmer or I INSTALLING THE SAFETY GUARD (Figs. 4 and 4a ) 1. Turn the trimmer's motor housing head over to provide access to advance cutting line. 11. This Trimmer/Edger has the following features cont.: 7. Lightweight and Ergonomicatly Designed for easy use . Use Craftsman 71-85967 bump ...

Operation Manual
Page 8
... Fig. 5 14 ATTACHING THE AUXILIARY HANDLE cont. (Fig. 6 and 6a) NOTE: THE AUXILIARY HANDLE MUST BE ATTACHED to the trimmer shaft I /K CAUTION: Line cutter on the shaft and the auxiliary handle itself can be used to your desired working position. The auxiliary handle's bracket can be .... Use caution I Fig. 4 _emove 4 Screws Fig. 4a install Guard with 4 screws Line Cutter THE EDGE GUIDE (Fig. 5) Your trimmer comes with the 4 screw holes in desired position, turn knob and tighten securely. 15 I from items you don't want cut, such as flowers, or damaged, such as a...
... Fig. 5 14 ATTACHING THE AUXILIARY HANDLE cont. (Fig. 6 and 6a) NOTE: THE AUXILIARY HANDLE MUST BE ATTACHED to the trimmer shaft I /K CAUTION: Line cutter on the shaft and the auxiliary handle itself can be used to your desired working position. The auxiliary handle's bracket can be .... Use caution I Fig. 4 _emove 4 Screws Fig. 4a install Guard with 4 screws Line Cutter THE EDGE GUIDE (Fig. 5) Your trimmer comes with the 4 screw holes in desired position, turn knob and tighten securely. 15 I from items you don't want cut, such as flowers, or damaged, such as a...

Operation Manual
Page 9
... pull (extend) top of the trimmer is squeezed. To adjust the trimmer head angle: 1. Refer to page 11, Figs. 2, 2a and 2b for the cutting spool (line) to turn off and disconnect the trimmer from the power supply. 2. Turning Trimmer ON 1. Disconnect the trimmer from the power supply. /'}k WARNING...: To avoid injury, ALWAYS turn trimmer OFR 2. Head will stay ON as long as the trigger...
... pull (extend) top of the trimmer is squeezed. To adjust the trimmer head angle: 1. Refer to page 11, Figs. 2, 2a and 2b for the cutting spool (line) to turn off and disconnect the trimmer from the power supply. 2. Turning Trimmer ON 1. Disconnect the trimmer from the power supply. /'}k WARNING...: To avoid injury, ALWAYS turn trimmer OFR 2. Head will stay ON as long as the trigger...
Operation Manual
Page 10
... on and spinning, gently bump the spool housing on the spool. While the trimmer is operating. After the trimmer head stops rotating, gently pull at the cutting lines manually. Once the lines are being cut from the operator (See Fig. 11). TRIMMING AND EDGING (Figs. 11 and 12)...surface _. This should release additional cutting line from the power outlet BEFORE installing parts or cleaning the trimmer or m/_akiWngARaNnIyNGad: justmTeonatsv.oid injury, ALWAYS turn off and disconnect the trimmer I 19 If there is no line is released, bump the trimmer head more feeding if the cutting ...
... on and spinning, gently bump the spool housing on the spool. While the trimmer is operating. After the trimmer head stops rotating, gently pull at the cutting lines manually. Once the lines are being cut from the operator (See Fig. 11). TRIMMING AND EDGING (Figs. 11 and 12)...surface _. This should release additional cutting line from the power outlet BEFORE installing parts or cleaning the trimmer or m/_akiWngARaNnIyNGad: justmTeonatsv.oid injury, ALWAYS turn off and disconnect the trimmer I 19 If there is no line is released, bump the trimmer head more feeding if the cutting ...

Operation Manual
Page 11
... installing parts or cleaning the trimmer or making any remaining cutting line from the spool. 3. Remove and rewind the line spool. (See FILLING SPOOL WlTH CUTTING LINE, pg. 20). 21 I OPERATING TIPS 1. Replace the spool with a new factory pre-wound spool, Craftsman 71-85967, available from your...storing the trimmer to wind the line neatly and in the direction of the spool 6. Trimming with 0.065 cutting line. Release tabs Spool Rail 2. Wind the cutting line onto the spool in layers Do not crisscross (see Fig. 15). 20 FILLING SPOOL WITH CUTTING LINE cont. (Fig. 15) 4. Fit...
... installing parts or cleaning the trimmer or making any remaining cutting line from the spool. 3. Remove and rewind the line spool. (See FILLING SPOOL WlTH CUTTING LINE, pg. 20). 21 I OPERATING TIPS 1. Replace the spool with a new factory pre-wound spool, Craftsman 71-85967, available from your...storing the trimmer to wind the line neatly and in the direction of the spool 6. Trimming with 0.065 cutting line. Release tabs Spool Rail 2. Wind the cutting line onto the spool in layers Do not crisscross (see Fig. 15). 20 FILLING SPOOL WITH CUTTING LINE cont. (Fig. 15) 4. Fit...

Operation Manual
Page 12
...dried clippings and mud. for damaged, missing, or worn parts. Check for damage. I Z_ WARNING: To avoid damage or electric shock, DO NOT use the trimmer if it has any broken parts. I Wipe the outside of the air vents ALWAYS keep the air vents free from the .... NEED MORE HELP? z_ WARNING: To avoid injury, ALWAYS turn off and disconnect the trimmer from the power outlet BEFORE installing line, cleaning the trimmer or making I any adjustments. Before each use nylon monofilament (Craftsman Cutting Line 71-85822). z_, WARNING: To avoid injury, ALWAYS turn off and disconnect the...
...dried clippings and mud. for damaged, missing, or worn parts. Check for damage. I Z_ WARNING: To avoid damage or electric shock, DO NOT use the trimmer if it has any broken parts. I Wipe the outside of the air vents ALWAYS keep the air vents free from the .... NEED MORE HELP? z_ WARNING: To avoid injury, ALWAYS turn off and disconnect the trimmer from the power outlet BEFORE installing line, cleaning the trimmer or making I any adjustments. Before each use nylon monofilament (Craftsman Cutting Line 71-85822). z_, WARNING: To avoid injury, ALWAYS turn off and disconnect the...

Operation Manual
Page 13
... Cap 1 Winding Spool&Cutting Line 1 Bottom Cover 1 Winding Spool decorate Cover 1 Carbon Brush 2 Brush Holder 2 Brush Holder Assmebly 2 Rivet 1 Rear Bracket 1 Stator (120V) 1 Washer(_-) 1 Washer(_) 2 Armature(120V/ 1 Washer(--) 2 Bearing 608Z 1 Front Bracket 1 Stud M4X55 2 Washer byAxis 1 Fixing Block 1 metalSelfTappingScrew(ST3xt0) 15-in . Weedwacker ® Electric Trimmer Model NO. 172,74545 1 The modelnumberwill be found on...
... Cap 1 Winding Spool&Cutting Line 1 Bottom Cover 1 Winding Spool decorate Cover 1 Carbon Brush 2 Brush Holder 2 Brush Holder Assmebly 2 Rivet 1 Rear Bracket 1 Stator (120V) 1 Washer(_-) 1 Washer(_) 2 Armature(120V/ 1 Washer(--) 2 Bearing 608Z 1 Front Bracket 1 Stud M4X55 2 Washer byAxis 1 Fixing Block 1 metalSelfTappingScrew(ST3xt0) 15-in . Weedwacker ® Electric Trimmer Model NO. 172,74545 1 The modelnumberwill be found on...


