User Guide
Page 3
... 15 Earphones 15 Belt Clip 16 Pouch 17 Neckstrap 18 Remote Control 19 Importing Music into Creative MediaSource Player/ Organizer 21 Importing music from audio CDs 21 Shopping for music on the Internet 22 Transferring Music to Zen Micro 24 Transferring music tracks 24 Creating and transferring playlists 26 Synchronizing music with your computer...
... 15 Earphones 15 Belt Clip 16 Pouch 17 Neckstrap 18 Remote Control 19 Importing Music into Creative MediaSource Player/ Organizer 21 Importing music from audio CDs 21 Shopping for music on the Internet 22 Transferring Music to Zen Micro 24 Transferring music tracks 24 Creating and transferring playlists 26 Synchronizing music with your computer...
User Guide
Page 4
... 37 Recording with the built-in microphone 38 Playing recorded tracks 39 Deleting tracks 39 Viewing track information 39 Viewing player information 39 Using Zen Micro's Organizer Features 41 Synchronizing with Microsoft Outlook 41 Viewing the calendar 41 Viewing today's tasks 42 Viewing contacts 42 ...Storing Data Files in Zen Micro 43 Using Zen Micro as a Removable Disk 43 Changing the amount of memory space in Removable Disk mode 47 Personalizing Zen Micro 49 Adjusting Touch Pad settings 49 Setting the date and time 49 Setting...
... 37 Recording with the built-in microphone 38 Playing recorded tracks 39 Deleting tracks 39 Viewing track information 39 Viewing player information 39 Using Zen Micro's Organizer Features 41 Synchronizing with Microsoft Outlook 41 Viewing the calendar 41 Viewing today's tasks 42 Viewing contacts 42 ...Storing Data Files in Zen Micro 43 Using Zen Micro as a Removable Disk 43 Changing the amount of memory space in Removable Disk mode 47 Personalizing Zen Micro 49 Adjusting Touch Pad settings 49 Setting the date and time 49 Setting...

User Guide
Page 5
Using Zen Micro's equalizer (EQ 50 Setting playback at a constant volume 51 Labeling Zen Micro with your name 52 Setting the backlight duration 52 Setting the display contrast 52 Setting the idle shutdown time 53 Enabling Sleep Timer 53 Changing the menu language 53 Resetting Zen Micro 54 Adding and removing main menu items 54 Frequently Asked Questions 55 Safety Advice 63 General Specifications 64
Using Zen Micro's equalizer (EQ 50 Setting playback at a constant volume 51 Labeling Zen Micro with your name 52 Setting the backlight duration 52 Setting the display contrast 52 Setting the idle shutdown time 53 Enabling Sleep Timer 53 Changing the menu language 53 Resetting Zen Micro 54 Adding and removing main menu items 54 Frequently Asked Questions 55 Safety Advice 63 General Specifications 64
User Guide
Page 6
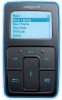
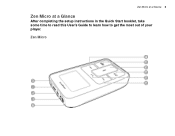
Zen Micro Zen Micro at a Glance 6 Zen Micro at a Glance After completing the setup instructions in the Quick Start booklet, take some time to read this User's Guide to learn how to get the most out of your player.
Zen Micro Zen Micro at a Glance 6 Zen Micro at a Glance After completing the setup instructions in the Quick Start booklet, take some time to read this User's Guide to learn how to get the most out of your player.

User Guide
Page 7
... back within a track. For more information using the Touch Pad, see "Touch Pad" on and off. Zen Micro at a Glance 7 Next/Fast-Forward button Press this button to adjust the volume. Power switch Turns your player on page 9. Touch Pad Use the Touch Pad to scroll through and select menu items. During playback...
... back within a track. For more information using the Touch Pad, see "Touch Pad" on and off. Zen Micro at a Glance 7 Next/Fast-Forward button Press this button to adjust the volume. Power switch Turns your player on page 9. Touch Pad Use the Touch Pad to scroll through and select menu items. During playback...

User Guide
Page 8
To transfer music and data files, connect one end of Zen Micro's Power Adapter to this port, and the other end of the supplied USB cable to this port, and the other end to the your player's controls. Zen Micro at a Glance 8 Lock Slide the Power switch to the Lock position to this jack. Headphone jack Connect Zen Micro's earphones to disable your computer's USB port. Turn on the power outlet if necessary. USB 2.0 port To charge Zen Micro's battery, connect one end of the USB cable to a power outlet. Microphone Make instant recordings with this built-in microphone.
To transfer music and data files, connect one end of Zen Micro's Power Adapter to this port, and the other end of the supplied USB cable to this port, and the other end to the your player's controls. Zen Micro at a Glance 8 Lock Slide the Power switch to the Lock position to this jack. Headphone jack Connect Zen Micro's earphones to disable your computer's USB port. Turn on the power outlet if necessary. USB 2.0 port To charge Zen Micro's battery, connect one end of the USB cable to a power outlet. Microphone Make instant recordings with this built-in microphone.

User Guide
Page 9
Touch Pad Zen Micro at a Glance 9 Move your finger up and down the Touch Pad to scroll through menu items.
Touch Pad Zen Micro at a Glance 9 Move your finger up and down the Touch Pad to scroll through menu items.

User Guide
Page 10
Zen Micro at a Glance 10 To rapidly scroll though menu items, hold down the top or bottom portion of the Touch Pad with your finger.
Zen Micro at a Glance 10 To rapidly scroll though menu items, hold down the top or bottom portion of the Touch Pad with your finger.

User Guide
Page 11
Zen Micro at a Glance 11 To select a menu item, lightly tap the Touch Pad.
Zen Micro at a Glance 11 To select a menu item, lightly tap the Touch Pad.

User Guide
Page 12
Move your finger up and down the Touch Pad to scroll through menu items, and press the Menu/Back button to return to view Zen Micro's main menu. Zen Micro at a Glance 12 Main Menu Press the Menu/Back button to the previous menu or screen.
Move your finger up and down the Touch Pad to scroll through menu items, and press the Menu/Back button to return to view Zen Micro's main menu. Zen Micro at a Glance 12 Main Menu Press the Menu/Back button to the previous menu or screen.

User Guide
Page 13
NOTE When you see the Now Playing screen, lightly tap the Touch Pad to adjust the volume. When you see the Now Playing screen, move your list of the LCD indicate Zen Micro's current settings and battery status. The Selected Music screen shows you turn on Zen Micro, or when a song is playing. Zen Micro at the top right corner of selected music tracks. Status icons at a Glance 13 Now Playing screen The Now Playing screen appears when you your finger up and down the Touch Pad to view the Selected Music screen.
NOTE When you see the Now Playing screen, lightly tap the Touch Pad to adjust the volume. When you see the Now Playing screen, move your list of the LCD indicate Zen Micro's current settings and battery status. The Selected Music screen shows you turn on Zen Micro, or when a song is playing. Zen Micro at the top right corner of selected music tracks. Status icons at a Glance 13 Now Playing screen The Now Playing screen appears when you your finger up and down the Touch Pad to view the Selected Music screen.

User Guide
Page 14
... and transfer it to Zen Micro. NOTE ■ After Zen Media Explorer is automatically installed when you set up the Zen Micro software on your computer. Zen Micro at any time. Zen Media Explorer is included with your player and is your computer. Zen Media Explorer Zen Media Explorer offers you connect Zen Micro to Creative MediaSource Player/Organizer's online Help. Creative MediaSource Player/Organizer is automatically...
... and transfer it to Zen Micro. NOTE ■ After Zen Media Explorer is automatically installed when you set up the Zen Micro software on your computer. Zen Micro at any time. Zen Media Explorer is included with your player and is your computer. Zen Media Explorer Zen Media Explorer offers you connect Zen Micro to Creative MediaSource Player/Organizer's online Help. Creative MediaSource Player/Organizer is automatically...
User Guide
Page 15
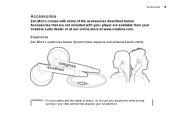
WARNING! For your safety and the safety of others, do not use your earphones while driving, cycling or any other activity that are not included with some of the accessories described below. Accessories 15 Accessories Zen Micro comes with your player are available from your full attention. Accessories that requires your Creative Labs dealer or at our online store at www.creative.com. Earphones Zen Micro's earphones feature dynamic bass response and enhanced audio clarity.
WARNING! For your safety and the safety of others, do not use your earphones while driving, cycling or any other activity that are not included with some of the accessories described below. Accessories 15 Accessories Zen Micro comes with your player are available from your full attention. Accessories that requires your Creative Labs dealer or at our online store at www.creative.com. Earphones Zen Micro's earphones feature dynamic bass response and enhanced audio clarity.

User Guide
Page 16
Belt Clip Use the Zen Micro belt clip to fasten Zen Micro to your belt. Accessories 16
Belt Clip Use the Zen Micro belt clip to fasten Zen Micro to your belt. Accessories 16

User Guide
Page 17
Pouch Zen Micro's protective pouch keeps Zen Micro snug and safe. Accessories 17
Pouch Zen Micro's protective pouch keeps Zen Micro snug and safe. Accessories 17

User Guide
Page 18
Accessories 18 NOTE Zen Micro's neckstrap is available separately in selected countries. Neckstrap With Zen Micro's neckstrap, your music collection goes wherever you go.
Accessories 18 NOTE Zen Micro's neckstrap is available separately in selected countries. Neckstrap With Zen Micro's neckstrap, your music collection goes wherever you go.

User Guide
Page 19
To Zen Micro's Headphone jack NOTE Zen Micro's remote control is available separately in selected countries. Accessories 19 Remote Control Zen Micro's optional remote control gives you easy access to basic playback functions.
To Zen Micro's Headphone jack NOTE Zen Micro's remote control is available separately in selected countries. Accessories 19 Remote Control Zen Micro's optional remote control gives you easy access to basic playback functions.

User Guide
Page 20
... Press this button to go the previous track. Previous/Rewind button Press this button to this button to move back within a track. Headphone jack Connect Zen Micro's earphones to go the next track. Volume Decrease button Press this jack. Press and hold this button to disable the remote control. + Volume Increase button...
... Press this button to go the previous track. Previous/Rewind button Press this button to this button to move back within a track. Headphone jack Connect Zen Micro's earphones to go the next track. Volume Decrease button Press this jack. Press and hold this button to disable the remote control. + Volume Increase button...
User Guide
Page 21
...can be illegal to encode MP3 or WMA files for WMA files is 128 kbps, although some are set higher, at 160 or 192 kbps. Creative MediaSource Player/Organizer reads the audio information on Zen Micro, first import music into Creative MediaSource Player/Organizer, and then transfer ...this music to your player. The time needed to successfully extract audio from Internet music sites...
...can be illegal to encode MP3 or WMA files for WMA files is 128 kbps, although some are set higher, at 160 or 192 kbps. Creative MediaSource Player/Organizer reads the audio information on Zen Micro, first import music into Creative MediaSource Player/Organizer, and then transfer ...this music to your player. The time needed to successfully extract audio from Internet music sites...

User Guide
Page 24
Transferring music tracks 1 Connect Zen Micro to play them back. Transferring Music to Zen Micro 24 Transferring Music to Zen Micro Music tracks that you transfer to Zen Micro must be MP3 or WMA files if you want to your computer's USB port with the supplied USB cable.
Transferring music tracks 1 Connect Zen Micro to play them back. Transferring Music to Zen Micro 24 Transferring Music to Zen Micro Music tracks that you transfer to Zen Micro must be MP3 or WMA files if you want to your computer's USB port with the supplied USB cable.


