User Guide
Page 1
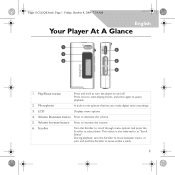
... make digital voice recordings. 3. Scroller Turn the Scroller to scroll through menu options and press the Scroller to increase the volume. 6. Pager S CLE QS.book Page 1 Friday, October 8, 2004 7:34 AM English Your Player At A Glance 1 6 2 3 5 4 1. Volume Increase button Press to select them. LCD Displays menu options. 4. Volume Decrease button Press to pause playback. 2. Press once to start playing tracks, and press again to decrease the volume. 5. Play/Pause button Press and hold...
... make digital voice recordings. 3. Scroller Turn the Scroller to scroll through menu options and press the Scroller to increase the volume. 6. Pager S CLE QS.book Page 1 Friday, October 8, 2004 7:34 AM English Your Player At A Glance 1 6 2 3 5 4 1. Volume Increase button Press to select them. LCD Displays menu options. 4. Volume Decrease button Press to pause playback. 2. Press once to start playing tracks, and press again to decrease the volume. 5. Play/Pause button Press and hold...
User Guide
Page 2
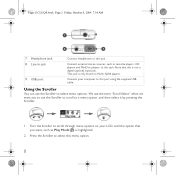
... players, to scroll through menu options on MuVo N200 players. This jack is highlighted. 2. Turn the Scroller to this menu option. 2 USB port Connect headphones to select this jack. We use the Scroller to this port using the supplied USB cable. Connect external stereo sources, such as Play Mode , is only found on your computer to select menu options. Press the Scroller to this is not a digital...
... players, to scroll through menu options on MuVo N200 players. This jack is highlighted. 2. Turn the Scroller to this menu option. 2 USB port Connect headphones to select this jack. We use the Scroller to this port using the supplied USB cable. Connect external stereo sources, such as Play Mode , is only found on your computer to select menu options. Press the Scroller to this is not a digital...

User Guide
Page 3
... Computer icon. Follow the instructions on your computer. 2. Insert the Installation and Applications CD into your operating system's online Help. 3. Start Windows Explorer. If it does not, follow the steps below: i. Right-click the CD-ROM/DVD-ROM drive icon, and then click AutoPlay. 4. If you have Windows XP or Windows 2000, you must install a device driver before using the player. iii. For more information...
... Computer icon. Follow the instructions on your computer. 2. Insert the Installation and Applications CD into your operating system's online Help. 3. Start Windows Explorer. If it does not, follow the steps below: i. Right-click the CD-ROM/DVD-ROM drive icon, and then click AutoPlay. 4. If you have Windows XP or Windows 2000, you must install a device driver before using the player. iii. For more information...

User Guide
Page 4
Pager S CLE QS.book Page 4 Friday, October 8, 2004 7:34 AM 2 Insert battery Use one AAA alkaline battery with your player for the first time, the menu will be in English. To change the language 1. The main menu appears. 2. Scroll Select the language that you turn on your player. Scroll Select the Settings option . 3. Press the Scroller. When you want. 4 Scroll Select the Language option . 4.
Pager S CLE QS.book Page 4 Friday, October 8, 2004 7:34 AM 2 Insert battery Use one AAA alkaline battery with your player for the first time, the menu will be in English. To change the language 1. The main menu appears. 2. Scroll Select the language that you turn on your player. Scroll Select the Settings option . 3. Press the Scroller. When you want. 4 Scroll Select the Language option . 4.
User Guide
Page 5
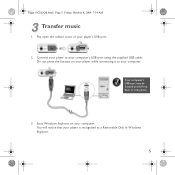
Your computer's USB port may be located on your computer. Connect your player to your computer's USB port using the supplied USB cable. Do not press the buttons on your player while connecting it to your computer. You will notice that your player's USB port. 2. Flip open the rubber cover of your player is recognized as a Removable Disk in Windows Explorer. 5 Start Windows Explorer on the front, back or side panels. 3. Pager S CLE QS.book Page 5 Friday, October 8, 2004 7:34 AM 3 Transfer music 1.
Your computer's USB port may be located on your computer. Connect your player to your computer's USB port using the supplied USB cable. Do not press the buttons on your player while connecting it to your computer. You will notice that your player's USB port. 2. Flip open the rubber cover of your player is recognized as a Removable Disk in Windows Explorer. 5 Start Windows Explorer on the front, back or side panels. 3. Pager S CLE QS.book Page 5 Friday, October 8, 2004 7:34 AM 3 Transfer music 1.

User Guide
Page 6
... as Creative MuVo Media Explorer, Creative MediaSource Player/Organizer, or Windows Media Player. 6 You can only do so with Digital Rights Management (DRM) cannot be copied to its online Help. 5. For more information about using Windows Explorer, refer to your player using Windows Explorer. To launch Creative MediaSource Player/Organizer, double-click the Creative MediaSource Player/Organizer shortcut icon on your digital music center for playing, creating, organizing and transferring digital music. For more advanced song management tasks, you can also transfer data files using...
... as Creative MuVo Media Explorer, Creative MediaSource Player/Organizer, or Windows Media Player. 6 You can only do so with Digital Rights Management (DRM) cannot be copied to its online Help. 5. For more information about using Windows Explorer, refer to your player using Windows Explorer. To launch Creative MediaSource Player/Organizer, double-click the Creative MediaSource Player/Organizer shortcut icon on your digital music center for playing, creating, organizing and transferring digital music. For more advanced song management tasks, you can also transfer data files using...
User Guide
Page 7
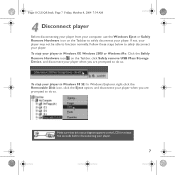
... safely disconnect your player. To stop your player in Windows XP, Windows 2000 or Windows Me: Click the Safely Remove Hardware icon on the LCD for at least five seconds before disconnecting your player may not be able to function normally. Make sure that this status diagram appears on the Taskbar, click Safely remove USB Mass Storage Device, and disconnect your...
... safely disconnect your player. To stop your player in Windows XP, Windows 2000 or Windows Me: Click the Safely Remove Hardware icon on the LCD for at least five seconds before disconnecting your player may not be able to function normally. Make sure that this status diagram appears on the Taskbar, click Safely remove USB Mass Storage Device, and disconnect your...
User Guide
Page 8
... to get you have finished using your player, press and hold the Play/Pause button until the Power off message disappears. • Remember to adjust the volume. 3. Note that requires your player turns on the LCD, followed by the MuVo logo. After you started. 2. The CREATIVE logo appears on . Press the Volume Increase and Volume Decrease buttons to set the volume at high volumes can impair your hearing...
... to get you have finished using your player, press and hold the Play/Pause button until the Power off message disappears. • Remember to adjust the volume. 3. Note that requires your player turns on the LCD, followed by the MuVo logo. After you started. 2. The CREATIVE logo appears on . Press the Volume Increase and Volume Decrease buttons to set the volume at high volumes can impair your hearing...

User Guide
Page 9
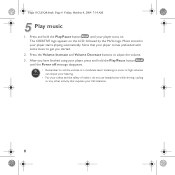
... Functions Playing music 1. Scroll Select the Settings option . 3. Press the Scroller. The player scans and stores all stations as presets and tunes in Japan, you will need to the Headphone jack. 2. Scroll to the audio track that it automatically saves all radio stations that you want to 32 radio presets. 1. The main menu appears. 2. Listening to FM radio (FM radio is available on MuVo N200 players only...
... Functions Playing music 1. Scroll Select the Settings option . 3. Press the Scroller. The player scans and stores all stations as presets and tunes in Japan, you will need to the Headphone jack. 2. Scroll to the audio track that it automatically saves all radio stations that you want to 32 radio presets. 1. The main menu appears. 2. Listening to FM radio (FM radio is available on MuVo N200 players only...

User Guide
Page 10
... Stereo cable. 2. An encoding progress bar appears on . Locking your player Locking your player disables all buttons on your player, press any button and Scroll Select the Unlock option . Scroll Select the Lock option . To unlock your player except the Scroller. The main menu appears. 3. appears at the top right corner of your player when you want to encode. 6. Press the Play/Pause button to start playing the song...
... Stereo cable. 2. An encoding progress bar appears on . Locking your player Locking your player disables all buttons on your player, press any button and Scroll Select the Unlock option . Scroll Select the Lock option . To unlock your player except the Scroller. The main menu appears. 3. appears at the top right corner of your player when you want to encode. 6. Press the Play/Pause button to start playing the song...

User Guide
Page 11
... I use Creative MuVo Media Explorer or Creative MediaSource Player/Organizer. Can I play valid media formats (MP3 and WMA files). Why are some files/tracks corrupted when transferred to "Disconnect player" on page 7. Visit www.creative.com for updates and downloads relating to your player first. You can . Before disconnecting your player from your computer, stop your player, you can transfer data files using Creative MuVo Media Explorer or Windows Explorer. Where can use my player as a portable data storage device? The player will...
... I use Creative MuVo Media Explorer or Creative MediaSource Player/Organizer. Can I play valid media formats (MP3 and WMA files). Why are some files/tracks corrupted when transferred to "Disconnect player" on page 7. Visit www.creative.com for updates and downloads relating to your player first. You can . Before disconnecting your player from your computer, stop your player, you can transfer data files using Creative MuVo Media Explorer or Windows Explorer. Where can use my player as a portable data storage device? The player will...
User Guide
Page 12
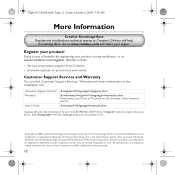
... to change without prior notice. Customer Support Services Warranty User's Guide d:\support\\support.chm d:\warranty\\\warranty.chm Please keep your region. The Creative logo, MuVo and Creative MediaSource are hereby recognized as such. Customer Support Services and Warranty You can find Customer Support Services, Warranty and other information in , and with the language that your product during installation, or at Creative's 24-hour self-help Knowledge Base. Microsoft, Windows and the Windows logo...
... to change without prior notice. Customer Support Services Warranty User's Guide d:\support\\support.chm d:\warranty\\\warranty.chm Please keep your region. The Creative logo, MuVo and Creative MediaSource are hereby recognized as such. Customer Support Services and Warranty You can find Customer Support Services, Warranty and other information in , and with the language that your product during installation, or at Creative's 24-hour self-help Knowledge Base. Microsoft, Windows and the Windows logo...

User Guide
Page 13
...use, lost revenues or lost data arising from or relating to this booklet, and also back up regularly. In no event will Creative's liability or damages to you observe the usage precautions laid out in your player regularly. Pager S CLE QS.book Page 13 Friday, October 8, 2004 7:34 AM Safety Advice As with any digital media...-based storage device, data should be...
...use, lost revenues or lost data arising from or relating to this booklet, and also back up regularly. In no event will Creative's liability or damages to you observe the usage precautions laid out in your player regularly. Pager S CLE QS.book Page 13 Friday, October 8, 2004 7:34 AM Safety Advice As with any digital media...-based storage device, data should be...

