User Guide
Page 4
... Deleting radio presets 37 Recording radio broadcasts 37 Recording with the built-in microphone 38 Playing recorded tracks 39 Deleting tracks 39 Viewing track information 39 Viewing player information 39 Using Zen Micro's Organizer Features 41 Synchronizing with Microsoft Outlook 41 Viewing the calendar 41 Viewing today's tasks 42 Viewing contacts 42 Storing Data Files in Zen Micro 43 Using Zen Micro as a Removable Disk 43 Changing the amount of memory space in Removable...
... Deleting radio presets 37 Recording radio broadcasts 37 Recording with the built-in microphone 38 Playing recorded tracks 39 Deleting tracks 39 Viewing track information 39 Viewing player information 39 Using Zen Micro's Organizer Features 41 Synchronizing with Microsoft Outlook 41 Viewing the calendar 41 Viewing today's tasks 42 Viewing contacts 42 Storing Data Files in Zen Micro 43 Using Zen Micro as a Removable Disk 43 Changing the amount of memory space in Removable...

User Guide
Page 7
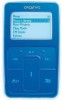
... go the next track. Press and hold this button to move back within a track. Zen Micro at a Glance 7 Next/Fast-Forward button Press this button to go the previous track. Touch Pad Use the Touch Pad to scroll through and select menu items. During playback, use the Touch Pad to the previous menu. Power switch Turns your player on page 9. Previous/Rewind button Press this button to return to adjust the volume.
... go the next track. Press and hold this button to move back within a track. Zen Micro at a Glance 7 Next/Fast-Forward button Press this button to go the previous track. Touch Pad Use the Touch Pad to scroll through and select menu items. During playback, use the Touch Pad to the previous menu. Power switch Turns your player on page 9. Previous/Rewind button Press this button to return to adjust the volume.

User Guide
Page 8
Microphone Make instant recordings with this built-in microphone. USB 2.0 port To charge Zen Micro's battery, connect one end of the USB cable to a power outlet. To transfer music and data files, connect one end of Zen Micro's Power Adapter to this port, and the other end of the supplied USB cable to this port, and the other end to the your player's controls. Turn on the power outlet if necessary. Zen Micro at a Glance 8 Lock Slide the Power switch to the Lock position to this jack. Headphone jack Connect Zen Micro's earphones to disable your computer's USB port.
Microphone Make instant recordings with this built-in microphone. USB 2.0 port To charge Zen Micro's battery, connect one end of the USB cable to a power outlet. To transfer music and data files, connect one end of Zen Micro's Power Adapter to this port, and the other end of the supplied USB cable to this port, and the other end to the your player's controls. Turn on the power outlet if necessary. Zen Micro at a Glance 8 Lock Slide the Power switch to the Lock position to this jack. Headphone jack Connect Zen Micro's earphones to disable your computer's USB port.

User Guide
Page 14
... you connect your player to Zen Micro. To start Zen Media Explorer, click the icon that represents Zen Micro. Zen Media Explorer Zen Media Explorer offers you connect Zen Micro to your computer and transfer it to your digital music center for playing, creating, organizing and transferring digital music. Creative MediaSource Player/Organizer is installed, the Zen Media Explorer icon appears in a Windows Explorer environment. TIP By default, Creative MediaSource Player/Organizer automatically starts when you the ease of managing music tracks and data files in Zen Micro, in...
... you connect your player to Zen Micro. To start Zen Media Explorer, click the icon that represents Zen Micro. Zen Media Explorer Zen Media Explorer offers you connect Zen Micro to your computer and transfer it to your digital music center for playing, creating, organizing and transferring digital music. Creative MediaSource Player/Organizer is installed, the Zen Media Explorer icon appears in a Windows Explorer environment. TIP By default, Creative MediaSource Player/Organizer automatically starts when you the ease of managing music tracks and data files in Zen Micro, in...
User Guide
Page 21
..., at 160 or 192 kbps. Importing Music into Creative MediaSource Player/Organizer 21 Importing Music into Creative MediaSource Player/ Organizer To listen to music on Zen Micro, first import music into Creative MediaSource Player/Organizer, and then transfer this music to your CD and convert it to MP3 or WMA files using the bitrate you choose. Creative MediaSource Player/Organizer reads the audio information on the CD-ROM/DVD-ROM...
..., at 160 or 192 kbps. Importing Music into Creative MediaSource Player/Organizer 21 Importing Music into Creative MediaSource Player/ Organizer To listen to music on Zen Micro, first import music into Creative MediaSource Player/Organizer, and then transfer this music to your CD and convert it to MP3 or WMA files using the bitrate you choose. Creative MediaSource Player/Organizer reads the audio information on the CD-ROM/DVD-ROM...
User Guide
Page 25
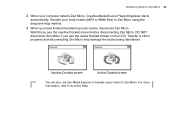
... being transferred. Inactive Docked screen Active Docked screen TIP You can also use Zen Media Explorer to transfer music tracks to its online Help. Wait till you see the inactive Docked screen before disconnecting Zen Micro. Transfer your music tracks (MP3 or WMA files) to Zen Micro 25 2 When your computer detects Zen Micro, Creative MediaSource Player/Organizer starts automatically. DO NOT disconnect Zen Micro if you see the active Docked screen on the LCD. Transferring Music to Zen Micro using the...
... being transferred. Inactive Docked screen Active Docked screen TIP You can also use Zen Media Explorer to transfer music tracks to its online Help. Wait till you see the inactive Docked screen before disconnecting Zen Micro. Transfer your music tracks (MP3 or WMA files) to Zen Micro 25 2 When your computer detects Zen Micro, Creative MediaSource Player/Organizer starts automatically. DO NOT disconnect Zen Micro if you see the active Docked screen on the LCD. Transferring Music to Zen Micro using the...
User Guide
Page 26
... screen. 6 Click the Finish button. You can compile playlists using the Smart Playlist feature. Transferring Music to Zen Micro 26 Creating and transferring playlists With Creative MediaSource Player/Organizer, organizing music tracks into lists) has never been easier. For more information about using Creative MediaSource Player/Organizer, refer to Zen Micro. You can start Sync Manager in Zen Micro and your computer. 1 Connect Zen Micro to your preferences using the drag-and-drop method, or automatically generate playlists based on your computer. 2 Start Sync Manager...
... screen. 6 Click the Finish button. You can compile playlists using the Smart Playlist feature. Transferring Music to Zen Micro 26 Creating and transferring playlists With Creative MediaSource Player/Organizer, organizing music tracks into lists) has never been easier. For more information about using Creative MediaSource Player/Organizer, refer to Zen Micro. You can start Sync Manager in Zen Micro and your computer. 1 Connect Zen Micro to your preferences using the drag-and-drop method, or automatically generate playlists based on your computer. 2 Start Sync Manager...
User Guide
Page 43
... enable Zen Micro's Removable Disk mode when you do this menu item for the first time, you must select the the amount of your computer. Storing Data Files in Zen Micro 43 Storing Data Files in school or at the office, and installing Zen Media Explorer is automatically installed when you set up the Zen Micro software on your computer. If you are ready to transfer data files to transfer files between Zen Micro and your computer's data files, or use...
... enable Zen Micro's Removable Disk mode when you do this menu item for the first time, you must select the the amount of your computer. Storing Data Files in Zen Micro 43 Storing Data Files in school or at the office, and installing Zen Media Explorer is automatically installed when you set up the Zen Micro software on your computer. If you are ready to transfer data files to transfer files between Zen Micro and your computer's data files, or use...

User Guide
Page 47
... select Format. ■ Use Windows Explorer if you want . Zen Micro cannot return to the Now Playing screen if the USB cable is still connected to delete individual data files stored in Removable Disk mode. Changing the amount of memory space in Removable Disk mode You can decrease the amount of memory space in Removable Disk mode must be viewed or managed with Zen Media Explorer. ■ Similarly, data files transferred to music on Zen Micro, press the Menu/Back button. Storing Data Files in Zen Micro...
... select Format. ■ Use Windows Explorer if you want . Zen Micro cannot return to the Now Playing screen if the USB cable is still connected to delete individual data files stored in Removable Disk mode. Changing the amount of memory space in Removable Disk mode You can decrease the amount of memory space in Removable Disk mode must be viewed or managed with Zen Media Explorer. ■ Similarly, data files transferred to music on Zen Micro, press the Menu/Back button. Storing Data Files in Zen Micro...
User Guide
Page 48
Storing Data Files in Removable Disk mode. TIP ■ Creative Removable Disk Manager is included with your player and is automatically installed when you set up the Zen Micro software on your computer and use Creative Removable Disk Manager to increase or decrease the amount of memory space in Zen Micro 48 4 Alternatively, connect Zen Micro to your computer. ■ To start Creative Removable Disk Manager, click Start → Programs or All Programs → Creative → Zen Micro → Creative Removable Disk Manager.
Storing Data Files in Removable Disk mode. TIP ■ Creative Removable Disk Manager is included with your player and is automatically installed when you set up the Zen Micro software on your computer and use Creative Removable Disk Manager to increase or decrease the amount of memory space in Zen Micro 48 4 Alternatively, connect Zen Micro to your computer. ■ To start Creative Removable Disk Manager, click Start → Programs or All Programs → Creative → Zen Micro → Creative Removable Disk Manager.

User Guide
Page 49
... select Set Time or Set Date to suit your needs. Setting the date and time 1 Press the Menu/Back button. The main menu appears. 2 Select Extras Date & Time. The current date and time are displayed by selecting Date Separator, Date Format and Time Format. The main menu appears. 2 Select System Player Settings Touch Pad. 3 To adjust the Touch Pad's sensitivity, select Sensitivity and use the Touch Pad to scroll to turn the clicking sound...
... select Set Time or Set Date to suit your needs. Setting the date and time 1 Press the Menu/Back button. The main menu appears. 2 Select Extras Date & Time. The current date and time are displayed by selecting Date Separator, Date Format and Time Format. The main menu appears. 2 Select System Player Settings Touch Pad. 3 To adjust the Touch Pad's sensitivity, select Sensitivity and use the Touch Pad to scroll to turn the clicking sound...

User Guide
Page 50
... Zen Micro 50 Setting the alarm 1 Press the Menu/Back button. button and select Set Using Zen Micro's equalizer (EQ) EQ is Zen Micro's collection of equalizer settings that enhance the sound of the EQ menu items. When an EQ setting is selected, appears on the Now Playing screen. The main menu appears. 2 Select System Audio Settings EQ. 3 Select one of your own setting. 1 Press the Menu/Back button. The main menu appears. 2 Select Extras Date & Time...
... Zen Micro 50 Setting the alarm 1 Press the Menu/Back button. button and select Set Using Zen Micro's equalizer (EQ) EQ is Zen Micro's collection of equalizer settings that enhance the sound of the EQ menu items. When an EQ setting is selected, appears on the Now Playing screen. The main menu appears. 2 Select System Audio Settings EQ. 3 Select one of your own setting. 1 Press the Menu/Back button. The main menu appears. 2 Select Extras Date & Time...

User Guide
Page 51
... a slider, and move your finger up and down the Touch Pad to move the control knob up or down to vary the amount of playback with Smart Volume. The main menu appears. 2 Select System Audio Settings Smart Volume: On. Personalizing Zen Micro 51 To create a customized equalizer setting 1 In the EQ screen, select Custom EQ. Setting playback at a constant volume, so you play back different tracks. 1 Press the Menu/Back button.
... a slider, and move your finger up and down the Touch Pad to move the control knob up or down to vary the amount of playback with Smart Volume. The main menu appears. 2 Select System Audio Settings Smart Volume: On. Personalizing Zen Micro 51 To create a customized equalizer setting 1 In the EQ screen, select Custom EQ. Setting playback at a constant volume, so you play back different tracks. 1 Press the Menu/Back button.

User Guide
Page 53
... Zen Micro automatically turns off. This feature helps you want . The main menu appears. 2 Select System Language, and select the language that you want . When enabled, Sleep Timer overrides the Idle Shutdown settings. 1 Press the Menu/Back button. The main menu appears. 2 Select System Player Settings Sleep Timer. 3 Use the Touch Pad to scroll to the timing that you conserve battery power. 1 Press the Menu/Back button. Changing the menu...
... Zen Micro automatically turns off. This feature helps you want . The main menu appears. 2 Select System Language, and select the language that you want . When enabled, Sleep Timer overrides the Idle Shutdown settings. 1 Press the Menu/Back button. The main menu appears. 2 Select System Player Settings Sleep Timer. 3 Use the Touch Pad to scroll to the timing that you conserve battery power. 1 Press the Menu/Back button. Changing the menu...

User Guide
Page 54
... menu settings, press the Options Menu. Adding and removing main menu items You can personalize the main menu by adding and removing menu items. For example, if you usually search for songs by album, you can access the Albums screen more easily. 1 Press the Menu/Back button. Personalizing Zen Micro 54 Resetting Zen Micro You can reset Zen Micro to the main menu so you can add Albums to its original settings. 1 Press the Menu/Back button...
... menu settings, press the Options Menu. Adding and removing main menu items You can personalize the main menu by adding and removing menu items. For example, if you usually search for songs by album, you can access the Albums screen more easily. 1 Press the Menu/Back button. Personalizing Zen Micro 54 Resetting Zen Micro You can reset Zen Micro to the main menu so you can add Albums to its original settings. 1 Press the Menu/Back button...

User Guide
Page 55
...) ■ CD-ROM/DVD-ROM drive with digital audio extraction support ■ USB 1.1 (USB 2.0 port recommended for faster transfers) ■ 64 MB RAM (128 MB recommended) ■ 30 MB free hard disk space (more information. Frequently Asked Questions 55 Frequently Asked Questions If the tips and advice in leads to heat buildup, which is not good for Zen Micro or its battery.
...) ■ CD-ROM/DVD-ROM drive with digital audio extraction support ■ USB 1.1 (USB 2.0 port recommended for faster transfers) ■ 64 MB RAM (128 MB recommended) ■ 30 MB free hard disk space (more information. Frequently Asked Questions 55 Frequently Asked Questions If the tips and advice in leads to heat buildup, which is not good for Zen Micro or its battery.
User Guide
Page 59
There was an unexpected power loss during audio file transfer. There was an unexpected power loss while saving settings. Use you player only after this library rebuilding is complete. Frequently Asked Questions 59 The firmware upgrade is completed. Reset your player to enable the new firmware to take effect. Reload the firmware, download a newer firmware version or contact Customer Support Services.
There was an unexpected power loss during audio file transfer. There was an unexpected power loss while saving settings. Use you player only after this library rebuilding is complete. Frequently Asked Questions 59 The firmware upgrade is completed. Reset your player to enable the new firmware to take effect. Reload the firmware, download a newer firmware version or contact Customer Support Services.
User Guide
Page 60
... most problems with Zen Micro by resetting it. 1 Turn off Zen Micro. 2 Slide open the battery cover. 3 Remove the battery and wait five seconds before reinserting the battery. Connect your player to the Zen Micro Power Adapter, and then connect the Power Adapter to be recharged. Zen Micro does not turn on or stops responding. Frequently Asked Questions 60 The firmware is the Lock position. ■ Your battery may need to a power outlet. Reload the firmware, download a newer firmware version or contact Customer Support Services. If necessary, turn...
... most problems with Zen Micro by resetting it. 1 Turn off Zen Micro. 2 Slide open the battery cover. 3 Remove the battery and wait five seconds before reinserting the battery. Connect your player to the Zen Micro Power Adapter, and then connect the Power Adapter to be recharged. Zen Micro does not turn on or stops responding. Frequently Asked Questions 60 The firmware is the Lock position. ■ Your battery may need to a power outlet. Reload the firmware, download a newer firmware version or contact Customer Support Services. If necessary, turn...
User Guide
Page 61
... up your player. Save a copy of your player's content before cleaning up Zen Micro's hard disk drive 1 Turn off Zen Micro. 2 Slide open the battery cover. 3 Remove the battery. 4 Slide the Power switch towards the Power icon and hold it there while you have downloaded a newer firmware version for Zen Micro, or have been advised to do so by the Creative Customer Services center. DO NOT Select the Reload Firmware unless you reinsert the battery. Zen Micro may occasionally operate at less...
... up your player. Save a copy of your player's content before cleaning up Zen Micro's hard disk drive 1 Turn off Zen Micro. 2 Slide open the battery cover. 3 Remove the battery. 4 Slide the Power switch towards the Power icon and hold it there while you have downloaded a newer firmware version for Zen Micro, or have been advised to do so by the Creative Customer Services center. DO NOT Select the Reload Firmware unless you reinsert the battery. Zen Micro may occasionally operate at less...

User Guide
Page 62
... own settings. For more information about using Creative MediaSource Player/Organizer, refer to prevent broken links in your computer. Visit www.creative.com and select your collection of digital audio tracks in monitored folders are properly connected to Zen Micro, and the earphones are added, deleted or moved. When sharing the same computer, multiple users can be automatically updated? What is not working. You can use Media...
... own settings. For more information about using Creative MediaSource Player/Organizer, refer to prevent broken links in your computer. Visit www.creative.com and select your collection of digital audio tracks in monitored folders are properly connected to Zen Micro, and the earphones are added, deleted or moved. When sharing the same computer, multiple users can be automatically updated? What is not working. You can use Media...


