User Guide
Page 3
... Control 19 Importing Music into Creative MediaSource Player/ Organizer 21 Importing music from audio CDs 21 Shopping for music on the Internet 22 Transferring Music to Zen Micro 24 Transferring music tracks 24 Creating and transferring playlists 26 Synchronizing music with your computer 26 Playing and Managing Music 27 Turning Zen Micro on and off 27 Adjusting...
... Control 19 Importing Music into Creative MediaSource Player/ Organizer 21 Importing music from audio CDs 21 Shopping for music on the Internet 22 Transferring Music to Zen Micro 24 Transferring music tracks 24 Creating and transferring playlists 26 Synchronizing music with your computer 26 Playing and Managing Music 27 Turning Zen Micro on and off 27 Adjusting...

User Guide
Page 7
... the volume. Press and hold this button to display the main menu. Options button Press this button to move forward within a track. Power switch Turns your player on page 9. Zen Micro at a Glance 7 Next/Fast-Forward button Press this button to go the next track. Previous/Rewind button Press this button to go the...
... the volume. Press and hold this button to display the main menu. Options button Press this button to move forward within a track. Power switch Turns your player on page 9. Zen Micro at a Glance 7 Next/Fast-Forward button Press this button to go the next track. Previous/Rewind button Press this button to go the...

User Guide
Page 8
Headphone jack Connect Zen Micro's earphones to disable your computer's USB port. To transfer music and data files, connect one end of the USB cable to a power outlet. Microphone Make instant recordings with this built-in microphone. Zen Micro at a Glance 8 Lock Slide the Power switch to the Lock position to this jack. Turn on the power outlet if necessary. USB 2.0 port To charge Zen Micro's battery, connect one end of the supplied USB cable to this port, and the other end of Zen Micro's Power Adapter to this port, and the other end to the your player's controls.
Headphone jack Connect Zen Micro's earphones to disable your computer's USB port. To transfer music and data files, connect one end of the USB cable to a power outlet. Microphone Make instant recordings with this built-in microphone. Zen Micro at a Glance 8 Lock Slide the Power switch to the Lock position to this jack. Turn on the power outlet if necessary. USB 2.0 port To charge Zen Micro's battery, connect one end of the supplied USB cable to this port, and the other end of Zen Micro's Power Adapter to this port, and the other end to the your player's controls.

User Guide
Page 13
When you your finger up and down the Touch Pad to view the Selected Music screen. Zen Micro at the top right corner of selected music tracks. The Selected Music screen shows you see the Now Playing screen, lightly tap the Touch Pad to adjust the volume. Status icons at a Glance 13 Now Playing screen The Now Playing screen appears when you see the Now Playing screen, move your list of the LCD indicate Zen Micro's current settings and battery status. NOTE When you turn on Zen Micro, or when a song is playing.
When you your finger up and down the Touch Pad to view the Selected Music screen. Zen Micro at the top right corner of selected music tracks. The Selected Music screen shows you see the Now Playing screen, lightly tap the Touch Pad to adjust the volume. Status icons at a Glance 13 Now Playing screen The Now Playing screen appears when you see the Now Playing screen, move your list of the LCD indicate Zen Micro's current settings and battery status. NOTE When you turn on Zen Micro, or when a song is playing.

User Guide
Page 27
... Adjusting volume In the Now Playing screen, move your player's Power switch. Locking Zen Micro Locking Zen Micro disables all controls on to learn how to get the most out of your player. appears. You can lock Zen Micro with your finger up . 2 To turn on the remote control. Lock Zen Micro when you want to adjust the volume. Playing and...
... Adjusting volume In the Now Playing screen, move your player's Power switch. Locking Zen Micro Locking Zen Micro disables all controls on to learn how to get the most out of your player. appears. You can lock Zen Micro with your finger up . 2 To turn on the remote control. Lock Zen Micro when you want to adjust the volume. Playing and...

User Guide
Page 49
... Personalizing Zen Micro Zen Micro's settings can adjust how the date and time are displayed. 3 Press the Options button and select Set Time or Set Date to change the Touch Pad's sensitivity, and to the setting that you want. 4 To turn the Touch Pad's clicking sound on or off . 1 Press the Menu/...date and time 1 Press the Menu/Back button. The main menu appears. 2 Select System Player Settings Touch Pad. 3 To adjust the Touch Pad's sensitivity, select Sensitivity and use the Touch Pad to scroll to turn the clicking sound on or off , select Clicker: On or Clicker: Off. Adjusting Touch ...
... Personalizing Zen Micro Zen Micro's settings can adjust how the date and time are displayed. 3 Press the Options button and select Set Time or Set Date to change the Touch Pad's sensitivity, and to the setting that you want. 4 To turn the Touch Pad's clicking sound on or off . 1 Press the Menu/...date and time 1 Press the Menu/Back button. The main menu appears. 2 Select System Player Settings Touch Pad. 3 To adjust the Touch Pad's sensitivity, select Sensitivity and use the Touch Pad to scroll to turn the clicking sound on or off , select Clicker: On or Clicker: Off. Adjusting Touch ...

User Guide
Page 53
.... This feature helps you want . The main menu appears. 2 Select System Player Settings Sleep Timer. 3 Use the Touch Pad to scroll to the timing that you want . Enabling Sleep Timer You can specify how long Zen Micro remains inactive before Zen Micro automatically turns off. Changing the menu language 1 Press the Menu/Back button. The main...
.... This feature helps you want . The main menu appears. 2 Select System Player Settings Sleep Timer. 3 Use the Touch Pad to scroll to the timing that you want . Enabling Sleep Timer You can specify how long Zen Micro remains inactive before Zen Micro automatically turns off. Changing the menu language 1 Press the Menu/Back button. The main...

User Guide
Page 57
... a high contrast setting. ■ fast-forwarding or rewinding. ■ turning the player on and off too many times. ■ prolonged use at high volumes. Generally, any operation requiring Zen Micro to recharge Zen Micro's battery quite often. Consequently, filling your player to make it last longer? Position the player so that you can do to capacity is not...
... a high contrast setting. ■ fast-forwarding or rewinding. ■ turning the player on and off too many times. ■ prolonged use at high volumes. Generally, any operation requiring Zen Micro to recharge Zen Micro's battery quite often. Consequently, filling your player to make it last longer? Position the player so that you can do to capacity is not...
User Guide
Page 60
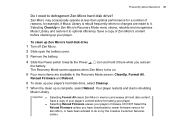
... or contact Customer Support Services. You can solve most problems with Zen Micro by resetting it. 1 Turn off Zen Micro. 2 Slide open the battery cover. 3 Remove the battery and wait five seconds before reinserting the battery. How do I do I reset Zen Micro? Connect your player to the Zen Micro Power Adapter, and then connect the Power Adapter to be recharged...
... or contact Customer Support Services. You can solve most problems with Zen Micro by resetting it. 1 Turn off Zen Micro. 2 Slide open the battery cover. 3 Remove the battery and wait five seconds before reinserting the battery. How do I do I reset Zen Micro? Connect your player to the Zen Micro Power Adapter, and then connect the Power Adapter to be recharged...
User Guide
Page 61
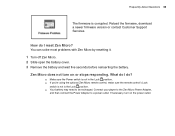
... example, if Music Library is complete, select Reboot. Save a copy of reasons, for a number of your player's content before cleaning up Zen Micro's hard disk drive 1 Turn off Zen Micro. 2 Slide open the battery cover. 3 Remove the battery. 4 Slide the Power switch towards the Power icon... Zen Micro's memory and erases all hard disk content. Selecting CleanUp in the Recovery Mode screen: CleanUp, Format All, Reload Firmware and Reboot. 6 To clean up your player. The Recovery Mode screen appears when Zen Micro turns on. 5 Four menu items are made to do so by the Creative ...
... example, if Music Library is complete, select Reboot. Save a copy of reasons, for a number of your player's content before cleaning up Zen Micro's hard disk drive 1 Turn off Zen Micro. 2 Slide open the battery cover. 3 Remove the battery. 4 Slide the Power switch towards the Power icon... Zen Micro's memory and erases all hard disk content. Selecting CleanUp in the Recovery Mode screen: CleanUp, Format All, Reload Firmware and Reboot. 6 To clean up your player. The Recovery Mode screen appears when Zen Micro turns on. 5 Four menu items are made to do so by the Creative ...


