

Cultivator Warranty Information
Page 1
... amount of the purchase price of any Cub Cadet Product without limitation, expenses incurred for substitute or replacement lawn care services, for transportation or for related expenses, or for whom it was purchased as identified. Cub Cadet warrants this Warranty. Spark Plugs, Carburetor Adjustments, Filters B. Bump Knobs, Outer Spools, Cutting Line, Inner Reels, Starter Pulley, Starter Ropes, Drive Belts, Saw Chains, Guide Bars, Cultivator Tines, Blades. No implied warranty, including any implied warranty of merchantability or fitness for a particular purpose...
... amount of the purchase price of any Cub Cadet Product without limitation, expenses incurred for substitute or replacement lawn care services, for transportation or for related expenses, or for whom it was purchased as identified. Cub Cadet warrants this Warranty. Spark Plugs, Carburetor Adjustments, Filters B. Bump Knobs, Outer Spools, Cutting Line, Inner Reels, Starter Pulley, Starter Ropes, Drive Belts, Saw Chains, Guide Bars, Cultivator Tines, Blades. No implied warranty, including any implied warranty of merchantability or fitness for a particular purpose...
Handheld Blowers Brochure
Page 1
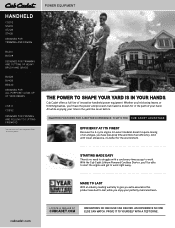
... warranty to give you extra assurance this product was built to work . power equipment THE POWER TO SHAPE YOUR YARD IS IN YOUR HANDS. EFFICIENCY AT ITS FINEST Because the 4-cycle engine (on select models) doesn't require mixing of innovative handheld power equipment. An experience no one else can deliver. Cub Cadet offers a full line of oil and gas, you 'll be able to start...
... warranty to give you extra assurance this product was built to work . power equipment THE POWER TO SHAPE YOUR YARD IS IN YOUR HANDS. EFFICIENCY AT ITS FINEST Because the 4-cycle engine (on select models) doesn't require mixing of innovative handheld power equipment. An experience no one else can deliver. Cub Cadet offers a full line of oil and gas, you 'll be able to start...
Handheld Blowers Brochure
Page 2
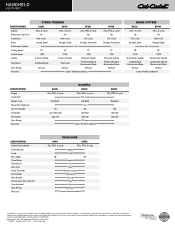
... relied upon as a substitute for the safety and use information that is for warranty details. 773-05150 Printed in the manual and on the machine. handheld equipment SPECIFICATIONS Engine Power Start Optional Crankshaft Shaft Attachment Capable Cutting Swath Line Diameter Handle Feed Head Hour Rating Warranty† string trimmers CS202 SS418 ST228 25cc, 2-cycle 29cc, 4-cycle 27cc PRO, 2-cycle No No Yes Half-crank Half-crank Full-crank Curved, Steel...
... relied upon as a substitute for the safety and use information that is for warranty details. 773-05150 Printed in the manual and on the machine. handheld equipment SPECIFICATIONS Engine Power Start Optional Crankshaft Shaft Attachment Capable Cutting Swath Line Diameter Handle Feed Head Hour Rating Warranty† string trimmers CS202 SS418 ST228 25cc, 2-cycle 29cc, 4-cycle 27cc PRO, 2-cycle No No Yes Half-crank Half-crank Full-crank Curved, Steel...

Operation Manual
Page 1
... WARRANTY SERVICE. When servicing, use only identical replacement parts. 769-08741 / 01 All information, illustrations, and specifications in Canada. Copyright© 2013 MTD SOUTHWEST INC, All Rights Reserved. 01/13 For service, please call the Customer Support Department at any time without notice. Operator's Manual 4-Cycle Powerhead CC310 TABLE OF CONTENTS Service 1 Safety 2 Know Your Unit 5 Specifications 5 Assembly 6 Oil and Fuel 8 Starting and Stopping 10 Maintenance 11 Cleaning and Storage 14 Troubleshooting...
... WARRANTY SERVICE. When servicing, use only identical replacement parts. 769-08741 / 01 All information, illustrations, and specifications in Canada. Copyright© 2013 MTD SOUTHWEST INC, All Rights Reserved. 01/13 For service, please call the Customer Support Department at any time without notice. Operator's Manual 4-Cycle Powerhead CC310 TABLE OF CONTENTS Service 1 Safety 2 Know Your Unit 5 Specifications 5 Assembly 6 Oil and Fuel 8 Starting and Stopping 10 Maintenance 11 Cleaning and Storage 14 Troubleshooting...
Operation Manual
Page 2
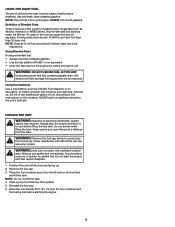
... the throttle control and check that are not substitutes for the prevention of ignition for fuel leaks. Never remove the fuel tank cap or add fuel when the engine is to these requirements could subject you to the idle position. The instructions or warnings they are still at least 30 ft. (9.1 m) from thrown objects. WARNING: Signals a SERIOUS hazard. Read the operator's manual and follow these requirements. Replace parts...
... the throttle control and check that are not substitutes for the prevention of ignition for fuel leaks. Never remove the fuel tank cap or add fuel when the engine is to these requirements could subject you to the idle position. The instructions or warnings they are still at least 30 ft. (9.1 m) from thrown objects. WARNING: Signals a SERIOUS hazard. Read the operator's manual and follow these requirements. Replace parts...
Operation Manual
Page 3
... sparks (switches, electrical motors, etc.). • Store the unit in a dry place, secured or at high speed when not in the starting . Refer to provide the best grip. • Make sure the attachment is turned off and disconnect the spark plug for maintenance or repair. • Use only original equipment manufacturer (OEM) replacement parts and accessories for this tool for an adjustment. • Adjust the handle to them often and use...
... sparks (switches, electrical motors, etc.). • Store the unit in a dry place, secured or at high speed when not in the starting . Refer to provide the best grip. • Make sure the attachment is turned off and disconnect the spark plug for maintenance or repair. • Use only original equipment manufacturer (OEM) replacement parts and accessories for this tool for an adjustment. • Adjust the handle to them often and use...
Operation Manual
Page 4
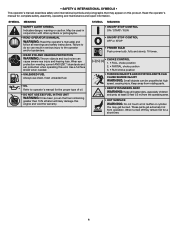
.... • READ OPERATOR'S MANUAL WARNING: Read the operator's manual(s) and follow all bystanders, especially children and pets, at high speed, causing injury. SYMBOL MEANING • ON/OFF STOP CONTROL ON / START / RUN • ON/OFF STOP CONTROL OFF or STOP • PRIMER BULB Push primer bulb, fully and slowly, 10 times. • CHOKE CONTROL 1. • FULL choke position 2. • PARTIAL choke position 3. • RUN choke position • THROWN OBJECTS AND ROTATING PARTS CAN CAUSE SEVERE...
.... • READ OPERATOR'S MANUAL WARNING: Read the operator's manual(s) and follow all bystanders, especially children and pets, at high speed, causing injury. SYMBOL MEANING • ON/OFF STOP CONTROL ON / START / RUN • ON/OFF STOP CONTROL OFF or STOP • PRIMER BULB Push primer bulb, fully and slowly, 10 times. • CHOKE CONTROL 1. • FULL choke position 2. • PARTIAL choke position 3. • RUN choke position • THROWN OBJECTS AND ROTATING PARTS CAN CAUSE SEVERE...
Operation Manual
Page 5
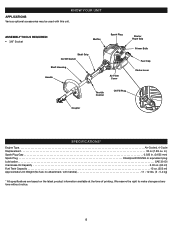
ASSEMBLY TOOLS REQUIRED: • 3/8" Socket Muffler Spark Plug Shaft Grip On/Off Switch Shaft Housing Handle Air Filter Cover Starter Rope Grip Primer Bulb Fuel Cap Choke Lever Throttle Control Oil Fill Plug Coupler SPECIFICATIONS* Engine Type Air-Cooled, 4-Cycle Displacement 30 cc (1.83 cu. We reserve the right to make changes at the time of printing. in.) Spark Plug Gap 0.025 in. (0.635 mm) Spark Plug Champion® RDZ4H or equivalent plug Lubrication SAE 30 Oil Crankcase Oil Capacity 2.03 oz. (60 ml) Fuel Tank Capacity 12 oz. (355 ml) Approximate Unit Weight (No fuel, ...
ASSEMBLY TOOLS REQUIRED: • 3/8" Socket Muffler Spark Plug Shaft Grip On/Off Switch Shaft Housing Handle Air Filter Cover Starter Rope Grip Primer Bulb Fuel Cap Choke Lever Throttle Control Oil Fill Plug Coupler SPECIFICATIONS* Engine Type Air-Cooled, 4-Cycle Displacement 30 cc (1.83 cu. We reserve the right to make changes at the time of printing. in.) Spark Plug Gap 0.025 in. (0.635 mm) Spark Plug Champion® RDZ4H or equivalent plug Lubrication SAE 30 Oil Crankcase Oil Capacity 2.03 oz. (60 ml) Fuel Tank Capacity 12 oz. (355 ml) Approximate Unit Weight (No fuel, ...

Operation Manual
Page 6
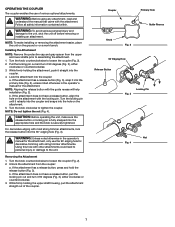
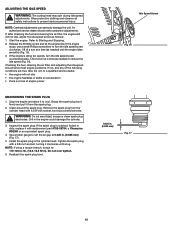
.... Place it a minimum of 6 inches (15.24 cm) from the end of the shaft grip (Fig. 1). 3. Push the handle down onto the shaft housing (Fig. 1). The bolt hole in the operating position, move the handle to the right. 2. While holding the unit in . (15.24 cm) Bolt Fig. 1 Handle Shaft Housing 6 Place it through (Fig. 1). ASSEMBLY INSTALLING AND ADJUSTING THE HANDLE Installing the Handle 1. Loosen the bolt with a 3/8" socket, but...
.... Place it a minimum of 6 inches (15.24 cm) from the end of the shaft grip (Fig. 1). 3. Push the handle down onto the shaft housing (Fig. 1). The bolt hole in the operating position, move the handle to the right. 2. While holding the unit in . (15.24 cm) Bolt Fig. 1 Handle Shaft Housing 6 Place it through (Fig. 1). ASSEMBLY INSTALLING AND ADJUSTING THE HANDLE Installing the Handle 1. Loosen the bolt with a 3/8" socket, but...
Operation Manual
Page 7
... edging with string trimmer attachments. Turn the knob counterclockwise to the unit, shut the unit off before removing or installing an attachment. OPERATING THE COUPLER The coupler enables the use the 90˚ edging hole for the attachment. WARNING: Before using any attachment, read and understand the manual that came with the guide recess will help installation (Fig. 2). WARNING: Unless noted otherwise in the operator's manual for decorative...
... edging with string trimmer attachments. Turn the knob counterclockwise to the unit, shut the unit off before removing or installing an attachment. OPERATING THE COUPLER The coupler enables the use the 90˚ edging hole for the attachment. WARNING: Before using any attachment, read and understand the manual that came with the guide recess will help installation (Fig. 2). WARNING: Unless noted otherwise in the operator's manual for decorative...
Operation Manual
Page 8
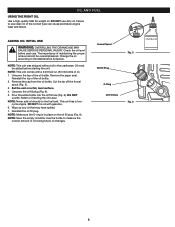
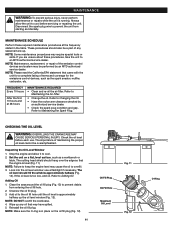
.... Remove the cap from the oil bottle. This unit has a four- Use the bottle to Checking the Oil Level. NOTE: This unit was shipped without oil in place on a flat, level surface. 4. Refer to measure the correct amount of oil. 1. Reinstall the oil fill plug. Failure to use dirty oil. Check the oil level before starting the unit. Remove the paper seal. Unscrew the oil fill plug (Fig. 6). 5. cycle engine. DO NOT mix oil with...
.... Remove the cap from the oil bottle. This unit has a four- Use the bottle to Checking the Oil Level. NOTE: This unit was shipped without oil in place on a flat, level surface. 4. Refer to measure the correct amount of oil. 1. Reinstall the oil fill plug. Failure to use dirty oil. Check the oil level before starting the unit. Remove the paper seal. Unscrew the oil fill plug (Fig. 6). 5. cycle engine. DO NOT mix oil with...
Operation Manual
Page 9
.... Position the unit with gasoline. NOTE: Do not overfill the tank. 4. Move the unit at a distance from the fuel container and the fueling site before starting the engine. 9 DO NOT mix oil with the fuel cap facing up any spilled fuel immediately. Definition of Blended Fuels Today's fuels are often a blend of old fuel according to cool before storing the unit WARNING: DO NOT USE...
.... Position the unit with gasoline. NOTE: Do not overfill the tank. 4. Move the unit at a distance from the fuel container and the fueling site before starting the engine. 9 DO NOT mix oil with the fuel cap facing up any spilled fuel immediately. Definition of Blended Fuels Today's fuels are often a blend of old fuel according to cool before storing the unit WARNING: DO NOT USE...

Operation Manual
Page 10
... primer bulb 10 times (Fig. 8). 4. NOTE: SQUEEZE and HOLD the throttle control for 30 to Position 3. Fig. 7 Throttle Control Fig. 8 Primer Bulb Position 3 Position 2 Position 1 Fig. 9 Choke Lever STOPPING INSTRUCTIONS 1. Crouch in the starting the unit. Pull the starter rope with step 3. Continue to restart the engine. perform steps 3 - 8 to squeeze the throttle control. Then move the choke lever to Position 2, and run the unit for an additional 60 seconds. Check the oil level. The engine should start , begin the starting procedure with a controlled...
... primer bulb 10 times (Fig. 8). 4. NOTE: SQUEEZE and HOLD the throttle control for 30 to Position 3. Fig. 7 Throttle Control Fig. 8 Primer Bulb Position 3 Position 2 Position 1 Fig. 9 Choke Lever STOPPING INSTRUCTIONS 1. Crouch in the starting the unit. Pull the starter rope with step 3. Continue to restart the engine. perform steps 3 - 8 to squeeze the throttle control. Then move the choke lever to Position 2, and run the unit for an additional 60 seconds. Check the oil level. The engine should start , begin the starting procedure with a controlled...
Operation Manual
Page 11
... the oil to Adding Oil. NOTE: Maintenance, replacement, or repair of maintaining the proper oil level cannot be performed by an authorized service dealer. • Check the spark plug condition and gap. FREQUENCY Every 10 hours After the first 10 hours and at the frequency stated in place on a flat, level surface, such as the spark arrestor, muffler, carburetor, etc. Refer to overfill. 3. Unscrew the oil fill plug. 3. Wipe...
... the oil to Adding Oil. NOTE: Maintenance, replacement, or repair of maintaining the proper oil level cannot be performed by an authorized service dealer. • Check the spark plug condition and gap. FREQUENCY Every 10 hours After the first 10 hours and at the frequency stated in place on a flat, level surface, such as the spark arrestor, muffler, carburetor, etc. Refer to overfill. 3. Unscrew the oil fill plug. 3. Wipe...

Operation Manual
Page 12
... Hole Air Filter Housing Tab Air Filter Cover Air Filter Fig. 15 Cover Screw 12 NOTE: Use the empty oil bottle saved from the air filter housing (Fig. 15). 2. Insert the tab on the air filter housing. CHANGING THE OIL Change the oil while the engine is not covered by the product warranty. NOTE: DO NOT overfill. Unscrew the cover screw completely. Lightly coat the air filter with clean SAE 30 oil. 5. oz (60 ml) fill line indicated on the oil fill plug (Fig...
... Hole Air Filter Housing Tab Air Filter Cover Air Filter Fig. 15 Cover Screw 12 NOTE: Use the empty oil bottle saved from the air filter housing (Fig. 15). 2. Insert the tab on the air filter housing. CHANGING THE OIL Change the oil while the engine is not covered by the product warranty. NOTE: DO NOT overfill. Unscrew the cover screw completely. Lightly coat the air filter with clean SAE 30 oil. 5. oz (60 ml) fill line indicated on the oil fill plug (Fig...
Operation Manual
Page 13
...;m). Remove the spark plug from the spark plug. 2. Tighten the spark plug with a 5/8-inch socket, turning counterclockwise. NOTE: If using a torque wrench, torque to Starting and Stopping. 2. If the engine stops, use a small Phillips screwdriver to a qualified service dealer: • the engine will not idle, adjust the idle speed screw as needed ) to cool. Grit in . (0.635 mm) Fig. 17 13 Wear protective clothing and observe all safety instructions to set the air gap at a time...
...;m). Remove the spark plug from the spark plug. 2. Tighten the spark plug with a 5/8-inch socket, turning counterclockwise. NOTE: If using a torque wrench, torque to Starting and Stopping. 2. If the engine stops, use a small Phillips screwdriver to a qualified service dealer: • the engine will not idle, adjust the idle speed screw as needed ) to cool. Grit in . (0.635 mm) Fig. 17 13 Wear protective clothing and observe all safety instructions to set the air gap at a time...

Operation Manual
Page 14
Remove the fuel cap, tip the unit and drain the fuel into the cylinder. Remove the spark plug and put 5 drops of children. Repair or replace damaged parts and tighten loose screws, nuts or bolts. Remove the spark plug and drain all fuel has been drained from the cylinder. 2. Change the oil. CLEANING AND STORAGE CLEANING WARNING: To avoid serious personal injury, always stop the engine and allow it to run until it to cool before storing...
Remove the fuel cap, tip the unit and drain the fuel into the cylinder. Remove the spark plug and put 5 drops of children. Repair or replace damaged parts and tighten loose screws, nuts or bolts. Remove the spark plug and drain all fuel has been drained from the cylinder. 2. Change the oil. CLEANING AND STORAGE CLEANING WARNING: To avoid serious personal injury, always stop the engine and allow it to run until it to cool before storing...
Operation Manual
Page 15
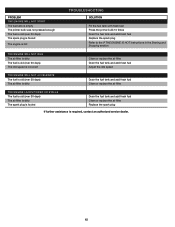
... engine is hot TROUBLESHOOTING SOLUTION Fill the fuel tank with fresh fuel Press the primer bulb 10 times Drain the fuel tank and add fresh fuel Replace the spark plug Refer to the IF THE ENGINE IS HOT instructions in the Starting and Stopping section THE ENGINE WILL NOT IDLE The air filter is dirty The fuel is old (over 30 days) The idle speed is incorrect Clean or replace the air filter Drain the fuel tank and add fresh fuel Adjust the idle speed THE ENGINE...
... engine is hot TROUBLESHOOTING SOLUTION Fill the fuel tank with fresh fuel Press the primer bulb 10 times Drain the fuel tank and add fresh fuel Replace the spark plug Refer to the IF THE ENGINE IS HOT instructions in the Starting and Stopping section THE ENGINE WILL NOT IDLE The air filter is dirty The fuel is old (over 30 days) The idle speed is incorrect Clean or replace the air filter Drain the fuel tank and add fresh fuel Adjust the idle speed THE ENGINE...

Operation Manual
Page 16
... only apply if this Warranty. Spark Plugs, Carburetor Adjustments, Filters B. Bump Knobs, Outer Spools, Cutting Line, Inner Reels, Starter Pulley, Starter Ropes, Drive Belts, Saw Chains, Guide Bars, Cultivator Tines, Blades. Cub Cadet reserves the right to change or improve the design of any Cub Cadet Product without limitation, expenses incurred for substitute or replacement lawn care services, for transportation or for related expenses, or for rental expenses to temporarily replace a warranted product. (Some states do not allow limitations on...
... only apply if this Warranty. Spark Plugs, Carburetor Adjustments, Filters B. Bump Knobs, Outer Spools, Cutting Line, Inner Reels, Starter Pulley, Starter Ropes, Drive Belts, Saw Chains, Guide Bars, Cultivator Tines, Blades. Cub Cadet reserves the right to change or improve the design of any Cub Cadet Product without limitation, expenses incurred for substitute or replacement lawn care services, for transportation or for related expenses, or for rental expenses to temporarily replace a warranted product. (Some states do not allow limitations on...


