
User Manual
Page 6
User Manual Web UI ...32 HOW TO USE THE GUIDED CONFIGURATIONS ...35 Quick Installation Tool ...35 Volume Creation Wizard ...40 Chapter 4 BASIC CONFIGURATION ...44 INTERFACE HIERARCHY...44 SYSTEM CONFIGURATION ...46 System Settings ...47 Network Settings...47 Login Settings ...48 Email Notification Settings...49 Log and Alert Settings ...50 HOST PORT / ISCSI CONFIGURATION...52 Network Setup ...52 Entity and iSCSI Settings...55 iSCSI Nodes ...56 Active Sessions ...58 CHAP Accounts...59 VOLUME CONFIGURATION ...60 Physical Disks ...61 RAID Groups ...63 Virtual Disks ...68 Snapshots...72 ...
User Manual Web UI ...32 HOW TO USE THE GUIDED CONFIGURATIONS ...35 Quick Installation Tool ...35 Volume Creation Wizard ...40 Chapter 4 BASIC CONFIGURATION ...44 INTERFACE HIERARCHY...44 SYSTEM CONFIGURATION ...46 System Settings ...47 Network Settings...47 Login Settings ...48 Email Notification Settings...49 Log and Alert Settings ...50 HOST PORT / ISCSI CONFIGURATION...52 Network Setup ...52 Entity and iSCSI Settings...55 iSCSI Nodes ...56 Active Sessions ...58 CHAP Accounts...59 VOLUME CONFIGURATION ...60 Physical Disks ...61 RAID Groups ...63 Virtual Disks ...68 Snapshots...72 ...

User Manual
Page 7
... Reserved. 7 User Manual Volume Restoration ...88 Reboot and Shutdown ...89 PERFORMANCE MONITOR ...90 Disk...90 iSCSI...90 Chapter 5 ADVANCED OPERATIONS ...92 VOLUME REBUILD ...92 MIGRATE AND MOVE RAID GROUPS ...93 EXTEND VIRTUAL DISKS...95 THIN PROVISIONING ...96 The Benefits of Thin provisioning ...97 Features Highlight ...98 Thin Provisioning Options ...100 Thin Provisioning Case ...101 DISK ROAMING...102 JBOD EXPANSION...102 Connecting JBOD...102 Upgrade Firmware ...103 MPIO...
... Reserved. 7 User Manual Volume Restoration ...88 Reboot and Shutdown ...89 PERFORMANCE MONITOR ...90 Disk...90 iSCSI...90 Chapter 5 ADVANCED OPERATIONS ...92 VOLUME REBUILD ...92 MIGRATE AND MOVE RAID GROUPS ...93 EXTEND VIRTUAL DISKS...95 THIN PROVISIONING ...96 The Benefits of Thin provisioning ...97 Features Highlight ...98 Thin Provisioning Options ...100 Thin Provisioning Case ...101 DISK ROAMING...102 JBOD EXPANSION...102 Connecting JBOD...102 Upgrade Firmware ...103 MPIO...
User Manual
Page 10
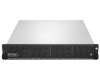
Overview D-Link Document - User Manual 1 Product Overview This user manual describes how to set up and use the D-Link DSN-6200/6500 series storage systems. The storage array, available in different configurations of fault tolerance by using D-link RAID technology and advanced array management features. Copyright@2014 D-Link System, Inc. Model Comparison D-Link storage system DSN-6200/6500 Series stands for data storage. D-Link storage systems can provide non-stop service with a high degree of , GbE iSCSI, 10GbE iSCSI and...
Overview D-Link Document - User Manual 1 Product Overview This user manual describes how to set up and use the D-Link DSN-6200/6500 series storage systems. The storage array, available in different configurations of fault tolerance by using D-link RAID technology and advanced array management features. Copyright@2014 D-Link System, Inc. Model Comparison D-Link storage system DSN-6200/6500 Series stands for data storage. D-Link storage systems can provide non-stop service with a high degree of , GbE iSCSI, 10GbE iSCSI and...
User Manual
Page 11
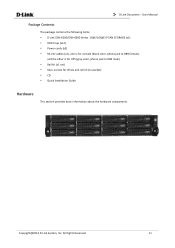
... Reserved. 11 User Manual Package Contents The package contains the following items: D-Link DSN-6200/DSN-6500 Series 1GbE/10GbE IP SAN STORAGE (x1) HDD trays (x12) Power cords (x2) RS-232 cables (x2), one... is for console (black color, phone jack to DB9 female), and the other is for UPS (gray color, phone jack to DB9 male) Rail kit (x1 set) Keys, screws for drives and rail kit (x1 packet) CD Quick Installation Guide Hardware...
... Reserved. 11 User Manual Package Contents The package contains the following items: D-Link DSN-6200/DSN-6500 Series 1GbE/10GbE IP SAN STORAGE (x1) HDD trays (x12) Power cords (x2) RS-232 cables (x2), one... is for console (black color, phone jack to DB9 female), and the other is for UPS (gray color, phone jack to DB9 male) Rail kit (x1 set) Keys, screws for drives and rail kit (x1 packet) CD Quick Installation Guide Hardware...

User Manual
Page 12
...) connectivity, not the hard drive activity. Blink: There is host interface activity (data I/O or management). OFF: There is designed specifically for USB LCD usage. Reset button: Press within 2 seconds to reset the system to default settings. Status LED: Red: System failure. Off: System OK. 1 2 Number 1 2 Description Power button and power LED: Blue: Power ON. Off: Power OFF. The default resets include: Copyright@2014 D-Link System, Inc. It DOES NOT offer external USB storage function. User Manual There is a power switch...
...) connectivity, not the hard drive activity. Blink: There is host interface activity (data I/O or management). OFF: There is designed specifically for USB LCD usage. Reset button: Press within 2 seconds to reset the system to default settings. Status LED: Red: System failure. Off: System OK. 1 2 Number 1 2 Description Power button and power LED: Blue: Power ON. Off: Power OFF. The default resets include: Copyright@2014 D-Link System, Inc. It DOES NOT offer external USB storage function. User Manual There is a power switch...

User Manual
Page 30
... User Name: admin Password: 123456 WARNING or ERROR events displayed on the LCD are required for login. Management Reset to Default Description Display system information including firmware version and amount of each item. LCD After booting up ) and (down) to create a volume. There are 2 options: DHCP (Get IP address from DHCP server) or static IP. Shows the enclosure data for remote access only. Alarm Mute Reset/Shutdown Quick Install Volume Wizard View IP Setting Change IP config Enc...
... User Name: admin Password: 123456 WARNING or ERROR events displayed on the LCD are required for login. Management Reset to Default Description Display system information including firmware version and amount of each item. LCD After booting up ) and (down) to create a volume. There are 2 options: DHCP (Get IP address from DHCP server) or static IP. Shows the enclosure data for remote access only. Alarm Mute Reset/Shutdown Quick Install Volume Wizard View IP Setting Change IP config Enc...
User Manual
Page 33
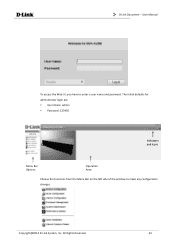
The initial defaults for administrator login are: User Name: admin Password: 123456 Indicators and Icons Menu Bar Options Operation Area Choose the functions from the Menu Bar on the left side of the window to enter a user name and password. All Rights Reserved. 33 User Manual To access the Web UI, you have to make any configuration changes. Copyright@2014 D-Link System, Inc. D-Link Document -
The initial defaults for administrator login are: User Name: admin Password: 123456 Indicators and Icons Menu Bar Options Operation Area Choose the functions from the Menu Bar on the left side of the window to enter a user name and password. All Rights Reserved. 33 User Manual To access the Web UI, you have to make any configuration changes. Copyright@2014 D-Link System, Inc. D-Link Document -

User Manual
Page 34
.... The default value is working well. Orange: One of the management web UI. Copyright@2014 D-Link System, Inc. The iSCSI Configuration menu bar option is connected. Red: UPS connection has failed. Return to seven indicators and three icons at the top-right corner. TIP: If the status indicators in IE. There are displayed in gray, not in blinking red, please enable Tools -> Internet Options...
.... The default value is working well. Orange: One of the management web UI. Copyright@2014 D-Link System, Inc. The iSCSI Configuration menu bar option is connected. Red: UPS connection has failed. Return to seven indicators and three icons at the top-right corner. TIP: If the status indicators in IE. There are displayed in gray, not in blinking red, please enable Tools -> Internet Options...

User Manual
Page 44
...L2, Button or Menu System Name / Date and Time / System Indication MAC Address / IP Address / DNS Server Address / Service Ports Login Options / Admin Password / User Password Email Settings / Send Test Mail SNMP Trap Settings / Windows Messenger / Syslog Server Settings / Admin Interface and Front Display Alerts / Device Buzzer Show information for: < Controller 1 | Controller 2 > Options: [iSCSI Bonding Settings | Delete iSCSI Bonding] / Set VLAN ID / iSCSI IP Address Settings / Make Default Gateway / [Enable | Disable] Jumbo Frames / Ping Host / Reset Port Entity Name / iSNS IP Address Show...
...L2, Button or Menu System Name / Date and Time / System Indication MAC Address / IP Address / DNS Server Address / Service Ports Login Options / Admin Password / User Password Email Settings / Send Test Mail SNMP Trap Settings / Windows Messenger / Syslog Server Settings / Admin Interface and Front Display Alerts / Device Buzzer Show information for: < Controller 1 | Controller 2 > Options: [iSCSI Bonding Settings | Delete iSCSI Bonding] / Set VLAN ID / iSCSI IP Address Settings / Make Default Gateway / [Enable | Disable] Jumbo Frames / Ping Host / Reset Port Entity Name / iSNS IP Address Show...
User Manual
Page 45
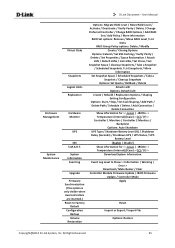
...45 User Manual Enclosure Management System Maintenance Virtual Disks Snapshots Logical Units Replication Hardware Monitor UPS SES S.M.A.R.T. D-Link Document - System information Event log Upgrade Firmware Synchronization (This option is only visible when dual controllers are inserted.) Reset to Factory Default Configuration Backup Volume Restoration Options: Migrate RAID Level / Move RAID Level / Activate / Deactivate / Verify Parity / Delete / Change Preferred Controller / Change RAID Options / Add RAID Set / Add Policy / More information RAID Set options: Remove / Move RAID Level / List...
...45 User Manual Enclosure Management System Maintenance Virtual Disks Snapshots Logical Units Replication Hardware Monitor UPS SES S.M.A.R.T. D-Link Document - System information Event log Upgrade Firmware Synchronization (This option is only visible when dual controllers are inserted.) Reset to Factory Default Configuration Backup Volume Restoration Options: Migrate RAID Level / Move RAID Level / Activate / Deactivate / Verify Parity / Delete / Change Preferred Controller / Change RAID Options / Add RAID Set / Add Policy / More information RAID Set options: Remove / Move RAID Level / List...

User Manual
Page 48
... changed here. Service Ports: If the default port numbers of DNS server can change the Admin and User passwords. Check it is DHCP. DNS Server Address: If necessary, the IP address of HTTP, HTTPS, and SSH are three options: DHCP, BOOTP, and Specify a Static IP Address. The default setting is done, click the Apply button. Login Settings The Login Settings tab is for remote administration usage. There are not allowed on this tab are: Enable dual management ports...
... changed here. Service Ports: If the default port numbers of DNS server can change the Admin and User passwords. Check it is DHCP. DNS Server Address: If necessary, the IP address of HTTP, HTTPS, and SSH are three options: DHCP, BOOTP, and Specify a Static IP Address. The default setting is done, click the Apply button. Login Settings The Login Settings tab is for remote administration usage. There are not allowed on this tab are: Enable dual management ports...

User Manual
Page 49
... Configuration -> Network Settings. The options available are Disable (default) and Enable options. Change Admin Password: Check it to the web UI at a time. Some email servers will be sent successfully. There are : Disable (default), 5 minutes, 30 minutes and 1 hour options. Login Lock: When the login lock is available. All Rights Reserved. 49 Email Notification Settings The Email Notification Settings tab is 12 alphanumeric characters. Change User Password: Check it to three email addresses...
... Configuration -> Network Settings. The options available are Disable (default) and Enable options. Change Admin Password: Check it to the web UI at a time. Some email servers will be sent successfully. There are : Disable (default), 5 minutes, 30 minutes and 1 hour options. Login Lock: When the login lock is available. All Rights Reserved. 49 Email Notification Settings The Email Notification Settings tab is 12 alphanumeric characters. Change User Password: Check it to three email addresses...
User Manual
Page 52
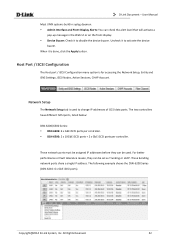
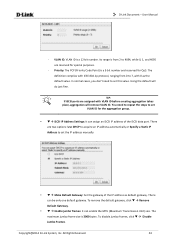
... the Web UI or on the front display. Device Buzzer: Check it to change IP addresses of iSCSI data ports. For better performance or fault tolerance reason, they can be used to disable the device buzzer. D-Link Document - When it to activate the device buzzer. These network ports must be assigned IP addresses before they can be set as Trunking or LACP. Uncheck it is for accessing the Network Setup...
... the Web UI or on the front display. Device Buzzer: Check it to change IP addresses of iSCSI data ports. For better performance or fault tolerance reason, they can be used to disable the device buzzer. D-Link Document - When it to activate the device buzzer. These network ports must be assigned IP addresses before they can be set as Trunking or LACP. Uncheck it is for accessing the Network Setup...
User Manual
Page 54
... 0 as default gateway. TIP: If iSCSI ports are two options: Use DHCP to acquire an IP address automatically or Specify a Static IP Address to set this value. There are assigned with IEEE 802.1p protocol, ranging from 2 to set the IP address manually. ▼ Make Default Gateway: Set the gateway of the iSCSI data port. The maximum jumbo frame size is a 12-bit number. Copyright@2014 D-Link System...
... 0 as default gateway. TIP: If iSCSI ports are two options: Use DHCP to acquire an IP address automatically or Specify a Static IP Address to set this value. There are assigned with IEEE 802.1p protocol, ranging from 2 to set the IP address manually. ▼ Make Default Gateway: Set the gateway of the iSCSI data port. The maximum jumbo frame size is a 12-bit number. Copyright@2014 D-Link System...
User Manual
Page 59
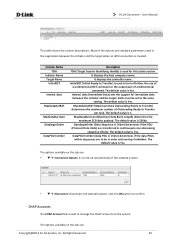
... manage the CHAP accounts on this active session. data (Immediate Data) sets the support for this tab are transferred in order and overlays forbidden. MaxDataOutR2T (Maximum Data Outstanding Ready to Transfer) determines the maximum number of a bidirectional command. D-Link Document - data MaxDataOutR2T MaxDataBurstLen DataSeginOrder DataPDU InOrder Description TSIH (Target Session Identifying Handle) is used to Transfer) is used for immediate data between the initiator and the target when an iSCSI connection...
... manage the CHAP accounts on this active session. data (Immediate Data) sets the support for this tab are transferred in order and overlays forbidden. MaxDataOutR2T (Maximum Data Outstanding Ready to Transfer) determines the maximum number of a bidirectional command. D-Link Document - data MaxDataOutR2T MaxDataBurstLen DataSeginOrder DataPDU InOrder Description TSIH (Target Session Identifying Handle) is used to Transfer) is used for immediate data between the initiator and the target when an iSCSI connection...
User Manual
Page 83
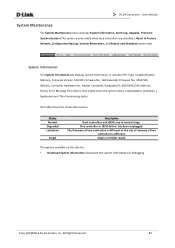
... firmware of two controllers is different or the size of memory of two controllers is Degraded or Lockdown.), Replication and Thin Provisioning status. System Information The System Information tab displays system information. D-Link Document - User Manual System Maintenance The System Maintenance menu accesses System Information, Event Log, Upgrade, Firmware Synchronization (This option is only visible when dual controllers are installed.), Reset to Factory Defaults, Configuration Backup, Volume Restoration, and Reboot and Shutdown...
... firmware of two controllers is different or the size of memory of two controllers is Degraded or Lockdown.), Replication and Thin Provisioning status. System Information The System Information tab displays system information. D-Link Document - User Manual System Maintenance The System Maintenance menu accesses System Information, Event Log, Upgrade, Firmware Synchronization (This option is only visible when dual controllers are installed.), Reset to Factory Defaults, Configuration Backup, Volume Restoration, and Reboot and Shutdown...

User Manual
Page 93
... to fail or be completed. No data protection. No protection for larger capacity. You need one hard drive to the original RAID group. Striping with the same physical disks of RAID 6 volumes. Copyright@2014 D-Link System, Inc. This table describes the relationship between RAID levels and recovery. RAID 3 allows one , and then the other in sequence. If it needs to rebuild two hard drives at the same time...
... to fail or be completed. No data protection. No protection for larger capacity. You need one hard drive to the original RAID group. Striping with the same physical disks of RAID 6 volumes. Copyright@2014 D-Link System, Inc. This table describes the relationship between RAID levels and recovery. RAID 3 allows one , and then the other in sequence. If it needs to rebuild two hard drives at the same time...
User Manual
Page 103
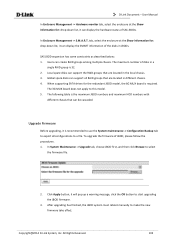
...@2014 D-Link System, Inc. User Manual In Enclosure Management -> Hardware monitor tab, select the enclosure at the Show information for: drop-down list, it is the maximum JBOD numbers and maximum HDD numbers with different chassis that can create RAID groups among multiple chassis. Global spare disks can display the hardware status of disks in the local chassis. 3. Upgrade Firmware Before upgrading, it can support all configurations to export all RAID groups that are...
...@2014 D-Link System, Inc. User Manual In Enclosure Management -> Hardware monitor tab, select the enclosure at the Show information for: drop-down list, it is the maximum JBOD numbers and maximum HDD numbers with different chassis that can create RAID groups among multiple chassis. Global spare disks can display the hardware status of disks in the local chassis. 3. Upgrade Firmware Before upgrading, it can support all configurations to export all RAID groups that are...
User Manual
Page 153
... Drive Slot Numbering 21 Dual Controllers 107 E Email Notification Settings 49 Send Test Email 49 Enclosure Management 78 Entity and iSCSI Settings 55 Event Log 84, 138 Clear 84 Download 84 Mute Buzzer 84 F Fast Rebuild 129 Configuration 130 Constraint 130 Solution 129 Firmware Synchronization 86 G GUI (Graphic User Interface 32 H Hardware Monitor 78 Auto Shutdown 79 Host Port Configuration 52 I Indicators and Icons 34 iSCSI 90 iSCSI (Internet SCSI 19 iSCSI Concepts 19 iSCSI Configuration...
... Drive Slot Numbering 21 Dual Controllers 107 E Email Notification Settings 49 Send Test Email 49 Enclosure Management 78 Entity and iSCSI Settings 55 Event Log 84, 138 Clear 84 Download 84 Mute Buzzer 84 F Fast Rebuild 129 Configuration 130 Constraint 130 Solution 129 Firmware Synchronization 86 G GUI (Graphic User Interface 32 H Hardware Monitor 78 Auto Shutdown 79 Host Port Configuration 52 I Indicators and Icons 34 iSCSI 90 iSCSI (Internet SCSI 19 iSCSI Concepts 19 iSCSI Configuration...
User Manual
Page 154
... Login Settings 48 Auto Logout 49 Change Admin Password 49 Change User Password 49 Login Lock 49 LUN (Logical Unit Number 75 M MC/S (Multiple Connections per Session 104, 122 MPIO (Multi Path Input/Output 104, 122 MTU (Maximum Transmission Unit 54 N Network Settings 47 DNS Server Address 48 Enable dual management ports 48 IP Address 48 MAC Address 48 Service Ports 48 Network Setup 52 Disable Jumbo Frames 54 Enable Jumbo Frames 54 iSCSI Bonding Settings 53 iSCSI IP Address Settings 54 Make Default Gateway...
... Login Settings 48 Auto Logout 49 Change Admin Password 49 Change User Password 49 Login Lock 49 LUN (Logical Unit Number 75 M MC/S (Multiple Connections per Session 104, 122 MPIO (Multi Path Input/Output 104, 122 MTU (Maximum Transmission Unit 54 N Network Settings 47 DNS Server Address 48 Enable dual management ports 48 IP Address 48 MAC Address 48 Service Ports 48 Network Setup 52 Disable Jumbo Frames 54 Enable Jumbo Frames 54 iSCSI Bonding Settings 53 iSCSI IP Address Settings 54 Make Default Gateway...


