Dacor DMO24 Support and Manuals
Get Help and Manuals for this Dacor item

Popular Dacor DMO24 Manual Pages
Installation Instruction - Over the Range Microwave Oven/Hood System - Page 1

...and 70" with deflector. OVER THE RANGE MICROWAVE OVEN/HOOD SYSTEM
INSTALLATION INSTRUCTIONS
Please read all instructions thoroughly before the Microwave Oven/Hood is designed to install this product. If a new electrical outlet is required, its installation should be completed by a qualified electrician before installing the Microwave Oven/Hood System. Preference range - 36" or more without...
Installation Instruction - Over the Range Microwave Oven/Hood System - Page 2
...supporting... grounding wire with the National Electrical Code and local codes and ordinances.
This oven is not ...Dacor nor the dealer can be flat for Power Cord
Figure 3
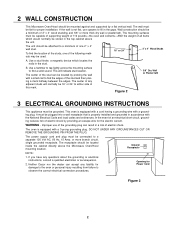
2
The center of the stud can accept any questions about the grounding or electrical instructions...studs will indicate stud location.
Opening for proper installation. Wall construction should be a minimum of ...
Installation Instruction - Over the Range Microwave Oven/Hood System - Page 3

...protection • Tape • Scissors • Pencil • Measure
6 INSTALLATION HARDWARE
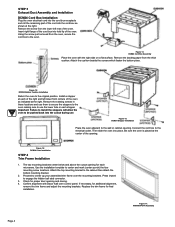
The INSTALLATION HARDWARE items 1-7 are packed separately. 4 HOOD EXHAUST DUCT
When the hood is...mm
1
Exhaust Damper Assembly
1
Charcoal Filter
1
PART CODE XTSSD50P35000 LX-BZ0195WRE0 XBRSD50P60000 XWHSD50-16300 LX-MZB001MRE0 LBSHC0040MRE0 XOTSD40P12000 FFTA-B003MRK0 / FFTA-B005MRK0 PFIL-B004MRE0
Figure 5...
Installation Instruction - Over the Range Microwave Oven/Hood System - Page 4
... THE OVEN
1. Lift carton off oven and remove all packing materials, Installation Instructions, Wall Template, Top Template, Charcoal Filter, Turntable and Turntable Support; CHECK THE OVEN. Check the oven for any damage, do not operate the oven and contact your dealer or DACOR AUTHORIZED SERVICER.
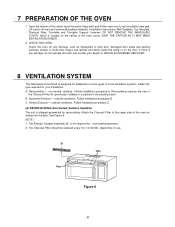
8 VENTILATION SYSTEM
This Microwave Oven/Hood is shipped assembled for...
Installation Instruction - Over the Range Microwave Oven/Hood System - Page 5

...Cover Bracket
Back of Wire Box. Remove and save 2 screws from back edge and 1 screw from the INSTALLATION HARDWARE and tighten into the slits in Step 1 above. See Figure 9.
4. (B) HORIZONTAL EXHAUST: Outside ...arrow on the Fan Cover Bracket, as shown in Figure 7.
2. See Figure 10.
5. Replace the Fan Cover Bracket by sliding it into the slits in the oven before proceeding. The Hood...
Installation Instruction - Over the Range Microwave Oven/Hood System - Page 6
... Replace the Fan Cover Bracket by sliding it cannot be withdrawn from the Toggle Nuts. 2. Figure 12
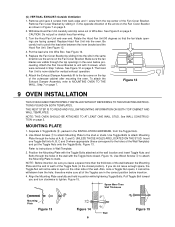
9 OVEN INSTALLATION
THIS OVEN CANNOT BE PROPERLY INSTALLED WITHOUT REFERRING TO THE MOUNTING INSTRUCTIONS FOUND...Fan Cover Bracket. See Figure 12.
5. Attach the Exhaust Damper Assembly 8 to instructions in position while tightening Toggle Bolts. Refer to the fan cover on the Fan Cover...
Installation Instruction - Over the Range Microwave Oven/Hood System - Page 7

.... Tighten two Mounting Screws (D) located in the INSTALLATION HARDWARE, to attach the unit to the wall. Use Tapping Screw 4 X12 mm 7 from the INSTALLATION HARDWARE and tighten into the 3 openings on the...the power supply cord and attach it all the way to the top cabinet. See Figure 19.
8. Install the oven by sliding it onto the arms of the top cabinet.
2. Use the two Top Cabinet...
Installation Instruction - Over the Range Microwave Oven/Hood System - Page 8

... all packing material from carton, flip carton upside down, cut along indicated dotted line as shown below. Read the Operation Manual. 5. Keep the Installation Instructions for the local electrical inspector's use.
See Figure 20. DACOR INC. • 950 So. OPTIONAL TIP:
After removing oven from the oven. 3. Raymond Ave., Pasadena, CA 91105 1-800-793...
Installation Instruction - Preference Microwave Trim Kit - Page 1
... or service agency. 3. Installation and service must be followed carefully to avoid personal injury. NOTES:
Contain helpful hints and tips to operating this appliance. TABLE OF STEPS
STEP 1 Verifying the package contents STEP 2 Planning the installation STEP 3 Exhaust duct assembly and installation STEP 4 Trim frame installation
Part No. 65266 Rev.
CONVENTIONS USED IN THESE INSTRUCTIONS...
Installation Instruction - Preference Microwave Trim Kit - Page 3
... is approved to allow certain microwaves to these instructions and the accompanying Use & Care Manual. Because the kit includes metal parts, caution should be installed above a range. Page 1
Improper installation, adjustment, alteration, service, or maintenance can cause personal injury
or property damage. WARNINGS:
1. If your Dacor oven is not followed exactly, a fire or...
Installation Instruction - Preference Microwave Trim Kit - Page 4

... 3: APMTK Trim Kit and DMO2420 Microwave with Dacor Warming Oven
120V Microwave Receptacle
Convection Microwave DCM24 w/APCTK27
25 1/4" (641mm) DCM24 w/APCTK30
28 1/4" (718mm)
27" Single Oven 25 1/2" (648mm) 30" Single Oven 28 1/2" (724mm)
120V Warming Oven
Receptacle
27" & 30" Warming Oven 25 1/2" (648mm)
19 1/8" (486mm)
15 5/8" (397mm)
Wooden Supports 2"x2" Nominal 1 9/16"x1...
Installation Instruction - Preference Microwave Trim Kit - Page 5

... duct (A)-1. Connect the cord box to duct (A)-1 using the three screws provided. Carefully guide the assembled oven into hold lip of the oven and insert it into place. Then ...the oven so that the feet of duct (BC) into the prepared opening . Figure 8: DMO2420 Installation
DCM24 Convection Microwave with APCTK Exhaust Duct Assembly
Insert the edge of duct (A)-3. Secure duct (B)...
Installation Instruction - Preference Microwave Trim Kit - Page 6
...Installation
Place the oven adjacent to be pushed back into place.
Use the installation... Important: Failure to install the stoppers will allow...Dacor wall oven control panel.
Figure 14: DCM24 Bottom Cushion Installation...: DCM24 Oven Installation
STEP 4 Trim Frame Installation
1. Confirm alignment..., for final installation. Replace the trim frame...right. Install a stopper at each ...
Installation Instruction - Preference Microwave Trim Kit - Page 8

Thin
1
1
SAVE AND READ THESE INSTRUCTIONS
Web Site:
www.dacor.com
For a Dealer/Service: (800) 772-7778
Corporate Phone: (800) 793-0093 Thick
1
1
Cushion - Item Number 1. 2. 3. 4. 5. 6. 7. 8. 9. 10. 11. 12. 13. Packing List Preference™ Microwave Trim Kit
Part Number Part Description
65266
Installation Instructions
APMTK27 APMTK30 APCTK27 ACPTK30
1
1
1
1
Trim Frame
1...
Dacor DMO24 Reviews
We have not received any reviews for Dacor yet.