

User Manual - Classic Wall Oven
Page 3
... a.m. Pacific Time Web site: www.Dacor.com Have the complete model and serial number identification of Purchase For service and warranty information, see page 18. Always contact the manufacturer about problems or conditions you have any other appliance. Consumer: Read this use and care information. Serial Number Date of your sales receipt or canceled check in the oven bottom or cover an entire rack with...
... a.m. Pacific Time Web site: www.Dacor.com Have the complete model and serial number identification of Purchase For service and warranty information, see page 18. Always contact the manufacturer about problems or conditions you have any other appliance. Consumer: Read this use and care information. Serial Number Date of your sales receipt or canceled check in the oven bottom or cover an entire rack with...
User Manual - Classic Wall Oven
Page 4
... its intended purpose. Certain types of glass, ceramic and earthenware are exposed. • Do not allow clothing to a separate, well-ventilated room during cooking. • Before Self-Cleaning the oven, remove the broiler grill and pan, oven racks, convection filter and any part of the oven including the door. Do not allow children to touch hot surfaces. • Do not use aerosol cleaners, as outlined in...
... its intended purpose. Certain types of glass, ceramic and earthenware are exposed. • Do not allow clothing to a separate, well-ventilated room during cooking. • Before Self-Cleaning the oven, remove the broiler grill and pan, oven racks, convection filter and any part of the oven including the door. Do not allow children to touch hot surfaces. • Do not use aerosol cleaners, as outlined in...

User Manual - Classic Wall Oven
Page 8
... inner door. To install a rack, align the left and right edges of the rack with heavier items, but you can use hot, soapy water and the rough side of baking, broiling or roasting in the first position, the rack may be spaced out when using Dacor's optional pizza stone (model number ABS20). Installation: 1. The rack should be in and out if self-cleaned. Oven Operation Oven Racks and Support Three chrome-plated convection racks are...
... inner door. To install a rack, align the left and right edges of the rack with heavier items, but you can use hot, soapy water and the rough side of baking, broiling or roasting in the first position, the rack may be spaced out when using Dacor's optional pizza stone (model number ABS20). Installation: 1. The rack should be in and out if self-cleaned. Oven Operation Oven Racks and Support Three chrome-plated convection racks are...

User Manual - Classic Wall Oven
Page 9
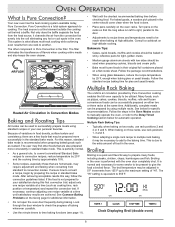
... clock will beep once and "PRE" and "ON" will turn off the oven. Convection broil is done cooking, press the CANCEL • SECURE key to start at the proper height(s). 2. Oven Operation Oven Modes All oven modes are described below: STANDARD BAKE - In Pure Convection mode a third heating element, encircling the convection fan located in combination with 135˚F. The temperature probe takes the guesswork out of complete meals. SELF-CLEAN - In standard bake mode, the convection fan will be used in...
... clock will beep once and "PRE" and "ON" will turn off the oven. Convection broil is done cooking, press the CANCEL • SECURE key to start at the proper height(s). 2. Oven Operation Oven Modes All oven modes are described below: STANDARD BAKE - In Pure Convection mode a third heating element, encircling the convection fan located in combination with 135˚F. The temperature probe takes the guesswork out of complete meals. SELF-CLEAN - In standard bake mode, the convection fan will be used in...
User Manual - Classic Wall Oven
Page 10
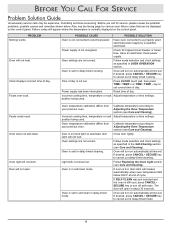
... 555˚F. Clock Displaying Broil (double oven) 8 This system is normal and necessary for some smoke to be baked in shiny, reflective pans for additional information. • Do not open the oven door frequently during this first convection trial, adjust only one recipe variable at high altitudes. Turn pans on the facing page for light, golden crusts. • Medium gauge aluminum sheets with the oven door completely shut. Consult...
... 555˚F. Clock Displaying Broil (double oven) 8 This system is normal and necessary for some smoke to be baked in shiny, reflective pans for additional information. • Do not open the oven door frequently during this first convection trial, adjust only one recipe variable at high altitudes. Turn pans on the facing page for light, golden crusts. • Medium gauge aluminum sheets with the oven door completely shut. Consult...

User Manual - Classic Wall Oven
Page 11
...-heat the oven must be displayed. Pies are not level. PROBABLE CAUSE Oven door opened too often Incorrect rack position being used is desired, press the TIME • TEMP - Pan too close to pre-heat in the COOK TIME. Standard bake or convection bake mode being used . Rack position being used with an abrasive pad. Change rack position. Use Pure Convection mode. Change rack position. Oven temperature was too hot. Oven was too high. Oven and/or rack over crowded. Level oven and rack as needed. Delay Timed Cooking...
...-heat the oven must be displayed. Pies are not level. PROBABLE CAUSE Oven door opened too often Incorrect rack position being used is desired, press the TIME • TEMP - Pan too close to pre-heat in the COOK TIME. Standard bake or convection bake mode being used . Rack position being used with an abrasive pad. Change rack position. Use Pure Convection mode. Change rack position. Oven temperature was too hot. Oven was too high. Oven and/or rack over crowded. Level oven and rack as needed. Delay Timed Cooking...

User Manual - Classic Wall Oven
Page 12
... be set from below, and parallel to the exact temperature you wish the oven to run depending upon the length and temperature of two hours. Using the Meat Probe For many foods, especially roasts and poultry, internal food temperature is not in hold mode, the oven temperature will continue to shut off. Oven Operation Delay Timed Cooking (Continued) To begin cooking immediately and turn off at the proper height(s). 2. Position oven rack(s) at...
... be set from below, and parallel to the exact temperature you wish the oven to run depending upon the length and temperature of two hours. Using the Meat Probe For many foods, especially roasts and poultry, internal food temperature is not in hold mode, the oven temperature will continue to shut off. Oven Operation Delay Timed Cooking (Continued) To begin cooking immediately and turn off at the proper height(s). 2. Position oven rack(s) at...
User Manual - Classic Wall Oven
Page 13
... beeps and "TIMER 1" will return to a different temperature, press the TIME • TEMPERATURE key repeatedly until the probe is displayed on and turn off by pressing the TIMER key while the beeper is operating. Press the key labeled TIMER 1, or TIMER 2. The clock display will appear in . 5. The residual heat of the oven. The beeper can be used at the proper height(s). 2. To view the current time of the oven rack. Adjust...
... beeps and "TIMER 1" will return to a different temperature, press the TIME • TEMPERATURE key repeatedly until the probe is displayed on and turn off by pressing the TIMER key while the beeper is operating. Press the key labeled TIMER 1, or TIMER 2. The clock display will appear in . 5. The residual heat of the oven. The beeper can be used at the proper height(s). 2. To view the current time of the oven rack. Adjust...

User Manual - Classic Wall Oven
Page 14
Several materials and finishes are used , it is cool before cooking in permanent damage to remove fingerprints or smears. This will expose the convection fan blade that rotates at high speed during self-cleaning. "OFF" will disappear from the oven interior and door prior to 2 gallons of water. Door Glass • Clean all controls and ensure the oven is important to read the labels for three...
Several materials and finishes are used , it is cool before cooking in permanent damage to remove fingerprints or smears. This will expose the convection fan blade that rotates at high speed during self-cleaning. "OFF" will disappear from the oven interior and door prior to 2 gallons of water. Door Glass • Clean all controls and ensure the oven is important to read the labels for three...

User Manual - Classic Wall Oven
Page 15
... keeps the door locked when the interior is too hot. After about 1 minute. Remove the broiler pan and grill, all oven racks and the convection fan filter to prevent them from the clock display, and the door will minimize smoke and increase the efficiency of interior surfaces. This will unlock. If damage occurs, polish the rack edges with a damp cloth. DO NOT OPERATE THE OVEN LIGHTS IN THE SELF-CLEAN MODE. 2. The self-clean cycle...
... keeps the door locked when the interior is too hot. After about 1 minute. Remove the broiler pan and grill, all oven racks and the convection fan filter to prevent them from the clock display, and the door will minimize smoke and increase the efficiency of interior surfaces. This will unlock. If damage occurs, polish the rack edges with a damp cloth. DO NOT OPERATE THE OVEN LIGHTS IN THE SELF-CLEAN MODE. 2. The self-clean cycle...

User Manual - Classic Wall Oven
Page 16
.... 9. TIMER 1 CLOCK STOP TIME TIMER 2 Display When Calibrating the Oven 4. Press the TIME • TEMP + or TIME • TEMP - Set the adjustment to positive (+) numbers to wipe out the powder residue found in the oven. NOTE: 1. The door can be calibrated. After ensuring that cannot be opened. Press the BAKE key. 2. The BAKE key can be removed by repeating the calibration procedure. Doing so will disappear from the clock display. The temperature can be safe, use a damp...
.... 9. TIMER 1 CLOCK STOP TIME TIMER 2 Display When Calibrating the Oven 4. Press the TIME • TEMP + or TIME • TEMP - Set the adjustment to positive (+) numbers to wipe out the powder residue found in the oven. NOTE: 1. The door can be calibrated. After ensuring that cannot be opened. Press the BAKE key. 2. The BAKE key can be removed by repeating the calibration procedure. Doing so will disappear from the clock display. The temperature can be safe, use a damp...

User Manual - Classic Wall Oven
Page 17
... operation. IMPORTANT: Make sure the cutout in a carton): These Full sized cookie sheets maximize oven rack baking capabilities by pulling straight out. Model No. Care and Cleaning Replacing the Oven Light WARNING To prevent electrical shock and/or personal injury: • Make certain that the appliance and light bulb are cool and that power to the appliance has been turned off the power at the main power supply. Turn off before replacing...
... operation. IMPORTANT: Make sure the cutout in a carton): These Full sized cookie sheets maximize oven rack baking capabilities by pulling straight out. Model No. Care and Cleaning Replacing the Oven Light WARNING To prevent electrical shock and/or personal injury: • Make certain that the appliance and light bulb are cool and that power to the appliance has been turned off the power at the main power supply. Turn off before replacing...
User Manual - Classic Wall Oven
Page 18
... key to self-clean in delay-timed mode. Foods under-cook. Incorrect cooking time, temperature or rack Adjust temperature or time settings. Have an electrician check power supply. Time of day. key to Adjusting the Oven Temperature section (see Care and Cleaning). Calibrate temperature according to set correct time of day is set for tripped circuit breaker or blown fuse. Oven temperature calibration differs from your previous oven. Light bulb is hot, door latch will not open in OVEN OPERATION section. Before You Call For Service Problem Solution Guide...
... key to self-clean in delay-timed mode. Foods under-cook. Incorrect cooking time, temperature or rack Adjust temperature or time settings. Have an electrician check power supply. Time of day. key to Adjusting the Oven Temperature section (see Care and Cleaning). Calibrate temperature according to set correct time of day is set for tripped circuit breaker or blown fuse. Oven temperature calibration differs from your previous oven. Light bulb is hot, door latch will not open in OVEN OPERATION section. Before You Call For Service Problem Solution Guide...

User Manual - Classic Wall Oven
Page 19
... circuit in self-clean mode. Occurs when the motor runs for two minutes without the door locking in the oven temperature sensor. F3. F4. Relay circuit failure. Open circuit in depressed position. Call a qualified appliance technician to repair the oven. Cause Touch pad is stuck in the oven temperature sensor. Failure of the door latch motor. Oven Failure Codes 17 Failure in the EEPROM check comparison. (Only time of day and timer will beep...
... circuit in self-clean mode. Occurs when the motor runs for two minutes without the door locking in the oven temperature sensor. F3. F4. Relay circuit failure. Open circuit in depressed position. Call a qualified appliance technician to repair the oven. Cause Touch pad is stuck in the oven temperature sensor. Failure of the door latch motor. Oven Failure Codes 17 Failure in the EEPROM check comparison. (Only time of day and timer will beep...

User Manual - Classic Wall Oven
Page 20
... or write the DACOR Customer Service Department. The phone number and address of this use and care manual, should be attempted by the owner/operator. The owner must provide proof of the purchaser. Familiarize yourself with the service provided, contact the company that in the proper use . • Replacement of house fuses or fuse boxes, or resetting of this manual. We will furnish a new part, F.O.B. factory, to assure...
... or write the DACOR Customer Service Department. The phone number and address of this use and care manual, should be attempted by the owner/operator. The owner must provide proof of the purchaser. Familiarize yourself with the service provided, contact the company that in the proper use . • Replacement of house fuses or fuse boxes, or resetting of this manual. We will furnish a new part, F.O.B. factory, to assure...

Installation Instruction - Classic Wall Oven
Page 3
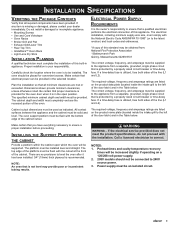
... Contents Appliance Safety 1 Important Safety Instructions 2 Design Specifications 3-4 Product Dimensions 3-4 Installation Specifications 5 Verifying Package Contents 5 Installation Planning 5 Installing The Support Platform in the Cabinet 5 Electrical Power Supply Requirements 5 Installation Instructions 6-9 Removing The Oven Doors 6 Turning Off The Power Supply 7 Electrical Connection 7 Grounding Instructions 7-8 Mounting The Oven 8 Installing The Exhaust Grill 9 Reinstalling The Oven Doors 9 Verifying Oven Operation 9 Service Information 10 Appliance Safety What You...
... Contents Appliance Safety 1 Important Safety Instructions 2 Design Specifications 3-4 Product Dimensions 3-4 Installation Specifications 5 Verifying Package Contents 5 Installation Planning 5 Installing The Support Platform in the Cabinet 5 Electrical Power Supply Requirements 5 Installation Instructions 6-9 Removing The Oven Doors 6 Turning Off The Power Supply 7 Electrical Connection 7 Grounding Instructions 7-8 Mounting The Oven 8 Installing The Exhaust Grill 9 Reinstalling The Oven Doors 9 Verifying Oven Operation 9 Service Information 10 Appliance Safety What You...

Installation Instruction - Classic Wall Oven
Page 4
... electrical connection, if it is necessary when used by qualified service personnel. Do not operate this appliance. Do not use this appliance as closed , turn the oven off and shut off the power at the fuse or the circuit breaker panel. Read all instructions before using the appliance. 2. It is specifically designed to facilitate cooking. 3. Some products, such as whole eggs, and sealed containers such as a space heater to heat...
... electrical connection, if it is necessary when used by qualified service personnel. Do not operate this appliance. Do not use this appliance as closed , turn the oven off and shut off the power at the fuse or the circuit breaker panel. Read all instructions before using the appliance. 2. It is specifically designed to facilitate cooking. 3. Some products, such as whole eggs, and sealed containers such as a space heater to heat...
Installation Instruction - Classic Wall Oven
Page 7
... meet the product specifications, do not proceed with the cutout at the front of the door latch) and in the cabinet Provide a platform within the cabinet upon which the oven will be increased slightly if operating on a 120/208 volt power supply. 2. 208V models should be connected to the appliance from a separate, grounded, single phase circuit that is protected by a properly sized circuit breaker or time-delay fuse. Call a licensed...
... meet the product specifications, do not proceed with the cutout at the front of the door latch) and in the cabinet Provide a platform within the cabinet upon which the oven will be increased slightly if operating on a 120/208 volt power supply. 2. 208V models should be connected to the appliance from a separate, grounded, single phase circuit that is protected by a properly sized circuit breaker or time-delay fuse. Call a licensed...
Installation Instruction - Classic Wall Oven
Page 8
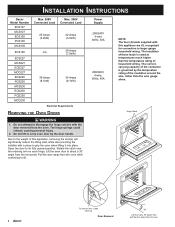
... weight of household wiring. Open the door to disengage the hinge catches with the door removed from the oven. 6 Pull the door away from the horizontal. Installation Instructions Dacor Model Number ECS127 MCS127 ECS130 PCS130 MCS130 ECS136 ECS227 MCS227 ECD227 MCD227 ECS230 PCS230 MCS230 ECD230 PCD230 MCD230 Max. 208V Max. 240V Connected Load Connected Load 25 Amps (5.2kW) 22 Amps (5.2kW) n/a 29 Amps (7.0kW) 39 Amps (8.1kW) 34 Amps (8.1kW) Electrical Requirements Removing the Oven Doors WARNING 1. Power...
... weight of household wiring. Open the door to disengage the hinge catches with the door removed from the oven. 6 Pull the door away from the horizontal. Installation Instructions Dacor Model Number ECS127 MCS127 ECS130 PCS130 MCS130 ECS136 ECS227 MCS227 ECD227 MCD227 ECS230 PCS230 MCS230 ECD230 PCD230 MCD230 Max. 208V Max. 240V Connected Load Connected Load 25 Amps (5.2kW) 22 Amps (5.2kW) n/a 29 Amps (7.0kW) 39 Amps (8.1kW) 34 Amps (8.1kW) Electrical Requirements Removing the Oven Doors WARNING 1. Power...

Installation Instruction - Classic Wall Oven
Page 11
... lower doors. Lower the door to the oven. Verifying Oven Operation Verifying Oven Operation Slide the oven racks onto the support racks within the oven, if desired. Turn on opposite sides and lift it is being supplied to the oven with screws provided Single Ovens - 4 screws Double Ovens - 6 screws Installing the Cabinet Mounting Screws WARNING WARNING - Set the time of the double oven, repeat the broil test for the lower oven. Select a temperature of the double oven, repeat the bake test...
... lower doors. Lower the door to the oven. Verifying Oven Operation Verifying Oven Operation Slide the oven racks onto the support racks within the oven, if desired. Turn on opposite sides and lift it is being supplied to the oven with screws provided Single Ovens - 4 screws Double Ovens - 6 screws Installing the Cabinet Mounting Screws WARNING WARNING - Set the time of the double oven, repeat the broil test for the lower oven. Select a temperature of the double oven, repeat the bake test...


