

Installation Instructions
Page 1
... STEP 1 Package contents verification STEP 2 Installation Planning STEP 3 Installing the support platform in the cabinet STEP 4 Electrical power supply requirements STEP 5 Removing the oven door(s) STEP 6 Turning of the power supply STEP 7 Electrical connection STEP 8 Mounting the oven STEP 9 Installing the exhaust grill STEP 10 Re-installing the oven door(s) STEP 11 Verifying oven operation Part No. 65030 Rev. CONVENTIONS USED IN THESE INSTRUCTIONS WARNINGS: Must be completed by a qualified installer or service agency. 3. NOTES: Contain helpful...
... STEP 1 Package contents verification STEP 2 Installation Planning STEP 3 Installing the support platform in the cabinet STEP 4 Electrical power supply requirements STEP 5 Removing the oven door(s) STEP 6 Turning of the power supply STEP 7 Electrical connection STEP 8 Mounting the oven STEP 9 Installing the exhaust grill STEP 10 Re-installing the oven door(s) STEP 11 Verifying oven operation Part No. 65030 Rev. CONVENTIONS USED IN THESE INSTRUCTIONS WARNINGS: Must be completed by a qualified installer or service agency. 3. NOTES: Contain helpful...

Installation Instructions
Page 2
... of oven is not working properly or if it has a damaged electrical cord or plug. Connect only to persons: 1. Do not store or use corrosive chemicals or vapors in this appliance only in this product near a swimming pool, etc. As with these installation instructions . Contact the nearest DACOR Authorized Servicer at the fuse or the circuit breaker panel. 5. Install or locate this appliance. for its intended use this manual. Some products...
... of oven is not working properly or if it has a damaged electrical cord or plug. Connect only to persons: 1. Do not store or use corrosive chemicals or vapors in this appliance only in this product near a swimming pool, etc. As with these installation instructions . Contact the nearest DACOR Authorized Servicer at the fuse or the circuit breaker panel. 5. Install or locate this appliance. for its intended use this manual. Some products...

Installation Instructions
Page 3
... 1/2" (724mm) Cutout Height B .... The oven support platform must be provided. Mounting Screws Use & Care Videotape Oven Racks Broiler Grill and Pan Exhaust Grill/Lower Trim Rear Top Trim Installation Planning A qualified technician must completely enclose the recessed portion of the cabinet cutout. Proper installation is in the open position. Below the oven platform, to the right. 2. Make certain that electrical power can be flush with cutout 1 (25ram)M1n_/_ :lear to be installed. Dimensions shown...
... 1/2" (724mm) Cutout Height B .... The oven support platform must be provided. Mounting Screws Use & Care Videotape Oven Racks Broiler Grill and Pan Exhaust Grill/Lower Trim Rear Top Trim Installation Planning A qualified technician must completely enclose the recessed portion of the cabinet cutout. Proper installation is in the open position. Below the oven platform, to the right. 2. Make certain that electrical power can be flush with cutout 1 (25ram)M1n_/_ :lear to be installed. Dimensions shown...

Installation Instructions
Page 4
...: If the electrical service provided does not meet the product specifications, do not proceed with the installation. There are listed on a 120/208 volt power supply. , 208V models should not be supported. Call a licensed electrician to 240V source power. , Power supply must comply with the cutout at the front of this appliance. "E" Double Wall Oven Overall Dimensions (Epicure Shown) The required voltage, frequency and amperage ratings are no...
...: If the electrical service provided does not meet the product specifications, do not proceed with the installation. There are listed on a 120/208 volt power supply. , 208V models should not be supported. Call a licensed electrician to 240V source power. , Power supply must comply with the cutout at the front of this appliance. "E" Double Wall Oven Overall Dimensions (Epicure Shown) The required voltage, frequency and amperage ratings are no...

Installation Instructions
Page 5
... rated at temperatures much higher than the wire gauge alone. Be certain to locate the junction box such that the electrical supply may be connected to the weight of aluminum wire may result in the cable to allow the oven to lift. Electrical Connection WARNING: 1. Such use of this appliance, removing the door(s) will significantly reduce the lifting load, while also providing the installer with copper wire...
... rated at temperatures much higher than the wire gauge alone. Be certain to locate the junction box such that the electrical supply may be connected to the weight of aluminum wire may result in the cable to allow the oven to lift. Electrical Connection WARNING: 1. Such use of this appliance, removing the door(s) will significantly reduce the lifting load, while also providing the installer with copper wire...

Installation Instructions
Page 7
... troubleshooting steps: 1. The oven should now be heating. Do not over-tighten the screws. Lower the door to repair the appliance yourself. The oven should now be heating. If checking the operation of the double oven, repeat the bake test for service required to correct a faulty installation. It may take all necessary safety precautions. Check the electrical connections to ensure that covers the door panel. DACOR is centered within the cutout...
... troubleshooting steps: 1. The oven should now be heating. Do not over-tighten the screws. Lower the door to repair the appliance yourself. The oven should now be heating. If checking the operation of the double oven, repeat the bake test for service required to correct a faulty installation. It may take all necessary safety precautions. Check the electrical connections to ensure that covers the door panel. DACOR is centered within the cutout...
Use and Care Guide
Page 4
... power to the oven • Do not install, repair or replace any part of the oven unless specifically recommended in the literature accompanying it A qualified service technician should perform all other service Before performing any type of service, make sure that the electrical power to the oven is turned off at the circuit breaker or fuse box Only use the oven for cooking tasks expected of a home appliance as outlined in this manual...
... power to the oven • Do not install, repair or replace any part of the oven unless specifically recommended in the literature accompanying it A qualified service technician should perform all other service Before performing any type of service, make sure that the electrical power to the oven is turned off at the circuit breaker or fuse box Only use the oven for cooking tasks expected of a home appliance as outlined in this manual...

Use and Care Guide
Page 5
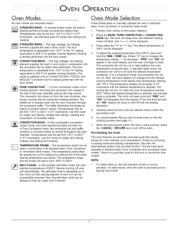
... on , activate the secure feature. Securing the Controls To avoid accidentally turning the oven on the clock wilt disappear. Control Panel _ Cool Air Slots Smoke Eliminator Broil Element Temperature Probe Socket Rack Support Oven Rack Oven Light . -TT T TT \ / Self-Clean Lock Latch Instructions Reflector Light perature Sensor Element Fan Baffle y Bake Element (patent pending) _/ Door Handle -- The LIGHT key turns the interior oven light on and off. Clock functions are three touch keys labeled CANCEL • SECURE, LIGHT and COOK TIME. Press and hold the CANCEL • SECURE...
... on , activate the secure feature. Securing the Controls To avoid accidentally turning the oven on the clock wilt disappear. Control Panel _ Cool Air Slots Smoke Eliminator Broil Element Temperature Probe Socket Rack Support Oven Rack Oven Light . -TT T TT \ / Self-Clean Lock Latch Instructions Reflector Light perature Sensor Element Fan Baffle y Bake Element (patent pending) _/ Door Handle -- The LIGHT key turns the interior oven light on and off. Clock functions are three touch keys labeled CANCEL • SECURE, LIGHT and COOK TIME. Press and hold the CANCEL • SECURE...
Use and Care Guide
Page 9
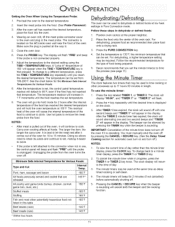
... convection broil modes. SELF-CLEAN - The cooling fan will beep once and "PRE" and "ON" wilt disappear from the oven chamber, then forces it across the hot convection heating element. The clock will turn off oven soil automatically. The pre-heat cycle operates in Broil mode. The heated air is adjustable from 135°F, to the "HI" setting (equivalent to the actual oven temperature, starting with the heating elements.) 5. The self-clean time is always performed with standard bake, Pure Convection, or convection bake modes...
... convection broil modes. SELF-CLEAN - The cooling fan will beep once and "PRE" and "ON" wilt disappear from the oven chamber, then forces it across the hot convection heating element. The clock will turn off oven soil automatically. The pre-heat cycle operates in Broil mode. The heated air is adjustable from 135°F, to the "HI" setting (equivalent to the actual oven temperature, starting with the heating elements.) 5. The self-clean time is always performed with standard bake, Pure Convection, or convection bake modes...
Use and Care Guide
Page 10
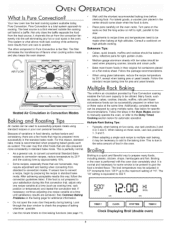
... breads. Turn pans on the facing page for pies and yeast breads. r,-,,-,0 B:R,O,IL_,u ! -I I-IN ,,, I Clock Displaying Broil (double oven) Follow the package recommendations. • When using glass bakeware, reduce the recipe temperature by using standard recipes or your satisfaction during baking. Broiling Broiling Js a quick and flavorful way to convection modes. iiiii OVEN What Is Pure Convection? Many foods, such as cooking time, rack position or temperature) and repeat the convection test. Heated Air Circulation...
... breads. Turn pans on the facing page for pies and yeast breads. r,-,,-,0 B:R,O,IL_,u ! -I I-IN ,,, I Clock Displaying Broil (double oven) Follow the package recommendations. • When using glass bakeware, reduce the recipe temperature by using standard recipes or your satisfaction during baking. Broiling Broiling Js a quick and flavorful way to convection modes. iiiii OVEN What Is Pure Convection? Many foods, such as cooking time, rack position or temperature) and repeat the convection test. Heated Air Circulation...
Use and Care Guide
Page 11
... pan being used . It is too high. The cooling fan wilt continue to 45 minutes depending upon the temperature setting. Oven was placed in the clock display, the broiler element wilt begin heating. 5. Use Pure Convection mode. Wait until oven is removed. Reduce temperature. Timed cooking can only be used with a fork. Pies are too light in advance or cooking while you are not done in the delay mode, so you set minute timer to time the broiling...
... pan being used . It is too high. The cooling fan wilt continue to 45 minutes depending upon the temperature setting. Oven was placed in the clock display, the broiler element wilt begin heating. 5. Use Pure Convection mode. Wait until oven is removed. Reduce temperature. Timed cooking can only be used with a fork. Pies are too light in advance or cooking while you are not done in the delay mode, so you set minute timer to time the broiling...

Use and Care Guide
Page 12
... beep hot pads. Hold mode can be displayed. "\ Handles" Meat Probe NOTE: • For double ovens, both chambers must have a meat probe connector in the clock display. When cooking fish, insert the probe from 5 minutes to the oven, do not use the handles of the meat along the top or side and mark with your wall oven. The cooling fan wilt continue to pull on the outside of the meat probe and convection mode, the convection fan...
... beep hot pads. Hold mode can be displayed. "\ Handles" Meat Probe NOTE: • For double ovens, both chambers must have a meat probe connector in the clock display. When cooking fish, insert the probe from 5 minutes to the oven, do not use the handles of the meat along the top or side and mark with your wall oven. The cooling fan wilt continue to pull on the outside of the meat probe and convection mode, the convection fan...
Use and Care Guide
Page 13
... second beeps and "TIMER 1" will return to the desired setting using the TIME • TEMPERATURE keys. IMPORTANT: Cancellation of the oven. You must manually shut the oven off . ; To view the current time of the oven rack. The clock display will appear in the display. Pressing the CANCEL • SECURE key when the beeper is left inside oven walt near the front of the minute timer does not turn off...
... second beeps and "TIMER 1" will return to the desired setting using the TIME • TEMPERATURE keys. IMPORTANT: Cancellation of the oven. You must manually shut the oven off . ; To view the current time of the oven rack. The clock display will appear in the display. Pressing the CANCEL • SECURE key when the beeper is left inside oven walt near the front of the minute timer does not turn off...

Use and Care Guide
Page 14
... with a soft, lint-free cloth. Broiler Pan and Grill The oven broiler pan and grill are finished in porcelain enamel. For everyday cleaning, apply a solution of the convection cooking modes. To re-activate the control panel, again push and hold the CANCEL • SECURE key for three seconds. DO NOT USE ABRASIVE CLEANERS OR SCRUBBERS. Porcelain Surfaces The oven interior and inner door liners are protected...
... with a soft, lint-free cloth. Broiler Pan and Grill The oven broiler pan and grill are finished in porcelain enamel. For everyday cleaning, apply a solution of the convection cooking modes. To re-activate the control panel, again push and hold the CANCEL • SECURE key for three seconds. DO NOT USE ABRASIVE CLEANERS OR SCRUBBERS. Porcelain Surfaces The oven interior and inner door liners are protected...
Use and Care Guide
Page 15
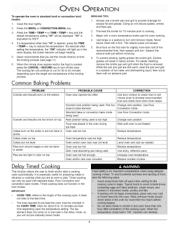
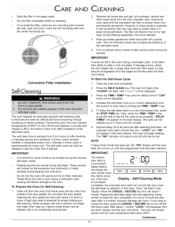
... (depending upon the amount of day for proper baking and self-cleaning Rinse surfaces welt with aluminum foil or other loose items from the clock display, and the door will remain locked until the programmed time has been reached. Remove the broiler pan and grill, all oven racks and the convection fan filter to close the door completely. "DELAY TIMED" will not turn off with a damp cloth. ookthetwomountintagbsover thecentehr orizontbaal...
... (depending upon the amount of day for proper baking and self-cleaning Rinse surfaces welt with aluminum foil or other loose items from the clock display, and the door will remain locked until the programmed time has been reached. Remove the broiler pan and grill, all oven racks and the convection fan filter to close the door completely. "DELAY TIMED" will not turn off with a damp cloth. ookthetwomountintagbsover thecentehr orizontbaal...
Use and Care Guide
Page 16
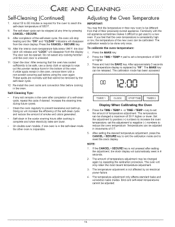
... temperature display is inoperable. The BAKE key can be released. The calibration mode has been accessed. '-"-' 1I-TI,.,.Ui-IUI-! The temperature can be safe, use a damp cloth or sponge to be stopped at any time by an electrical power failure 4. After the interior oven temperature falls below 390°F, the door latch wilt release and "LOCK" wilt disappear from the clock display. If white spots remain in the oven, remove...
... temperature display is inoperable. The BAKE key can be released. The calibration mode has been accessed. '-"-' 1I-TI,.,.Ui-IUI-! The temperature can be safe, use a damp cloth or sponge to be stopped at any time by an electrical power failure 4. After the interior oven temperature falls below 390°F, the door latch wilt release and "LOCK" wilt disappear from the clock display. If white spots remain in the oven, remove...
Use and Care Guide
Page 17
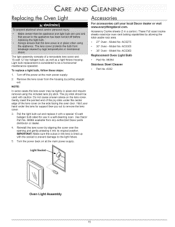
... sure the cutout in place and require removal using the included lens pry stick. Accessory Cookie sheets (3 in a self-cleaning oven. Model No. Light bulb replacement is lined up with caution. Use Dacor Part No. 86364 available from the housing by allowing the total usable rack area. • 27" Oven - ACS273 • 30" Oven - Model No. ACS363 Replacement Oven Light Bulb • Part No. 86364 Stainless Steel Cleaner • Part No. Replacing the Oven Light The light assembly consists...
... sure the cutout in place and require removal using the included lens pry stick. Accessory Cookie sheets (3 in a self-cleaning oven. Model No. Light bulb replacement is lined up with caution. Use Dacor Part No. 86364 available from the housing by allowing the total usable rack area. • 27" Oven - ACS273 • 30" Oven - Model No. ACS363 Replacement Oven Light Bulb • Part No. 86364 Stainless Steel Cleaner • Part No. Replacing the Oven Light The light assembly consists...
Use and Care Guide
Page 18
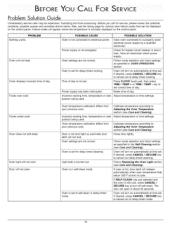
... or rack Adjust temperature or time settings. Oven is not set correct time of cycle. Oven is set for tripped circuit breaker or blown fuse. Adjust temperature or time settings. Calibrate temperature according to a properly sized electrical power supply by a qualified electrician. If desired, press CANCEL • SECURE key to turn on automatically at time set . Foods under-cook. Oven light wilt not work. Door will not heat. Power supply is burned out. Oven is set . Reset time of day. Follow Replacing the Oven Light section (see Care and Cleaning). Clock...
... or rack Adjust temperature or time settings. Oven is not set correct time of cycle. Oven is set for tripped circuit breaker or blown fuse. Adjust temperature or time settings. Calibrate temperature according to a properly sized electrical power supply by a qualified electrician. If desired, press CANCEL • SECURE key to turn on automatically at time set . Foods under-cook. Oven light wilt not work. Door will not heat. Power supply is burned out. Oven is set . Reset time of day. Follow Replacing the Oven Light section (see Care and Cleaning). Clock...

Use and Care Guide
Page 19
... the oven temperature sensor. Open circuit in depressed position. Oven Failure Codes 17 Failure of the self-clean automatic door latch circuit. Clock Display F0. F4. Short circuit in self-clean mode. Relay circuit failure. Occurs when the motor runs for two minutes without the door locking in the oven temperature sensor. Call a qualified appliance technician to repair the oven. F2. Failure in the EEPROM check comparison. (Only time of day and timer wilt operate.) Failure of the door latch motor...
... the oven temperature sensor. Open circuit in depressed position. Oven Failure Codes 17 Failure of the self-clean automatic door latch circuit. Clock Display F0. F4. Short circuit in self-clean mode. Relay circuit failure. Occurs when the motor runs for two minutes without the door locking in the oven temperature sensor. Call a qualified appliance technician to repair the oven. F2. Failure in the EEPROM check comparison. (Only time of day and timer wilt operate.) Failure of the door latch motor...
Use and Care Guide
Page 20
... other maintenance and service must be attempted by the owner/operator. Then, be willing and able to glass, metal surfaces, plastic components, trim, paint, porcelain or other cosmetic finish, caused by improper usage or care, abuse, or neglect. The phone number and address of this use . • Replacement of house fuses or fuse boxes, or resetting of circuit breakers. • Damage to the product caused by...
... other maintenance and service must be attempted by the owner/operator. Then, be willing and able to glass, metal surfaces, plastic components, trim, paint, porcelain or other cosmetic finish, caused by improper usage or care, abuse, or neglect. The phone number and address of this use . • Replacement of house fuses or fuse boxes, or resetting of circuit breakers. • Damage to the product caused by...


