
User Manual - Epicure Range
Page 3
... smell gas: • Do not use or light any appliance. • Do not touch any electrical switch or use this unit according to Know Your Range section for easy access. Model Number Serial Number Date of potential exposure to the appliance without updating this appliance. DANGER IMPORTANT: If you do not store or use and care manual, ensuring you cannot contact the gas supplier, call : Dacor Customer Service (800...
... smell gas: • Do not use or light any appliance. • Do not touch any electrical switch or use this unit according to Know Your Range section for easy access. Model Number Serial Number Date of potential exposure to the appliance without updating this appliance. DANGER IMPORTANT: If you do not store or use and care manual, ensuring you cannot contact the gas supplier, call : Dacor Customer Service (800...
User Manual - Epicure Range
Page 4
... and how to turn all control knobs to the OFF position. • Do not tamper with the controls, pull on the handle or touch other hot surfaces. Keep the entire range, ventilation filters and range hoods free of grease that the gas supply and electrical power to the range is turned off. • Only use long curtains as paper, cardboard, plastic and cloth away from the valve stems. 2 Personal...
... and how to turn all control knobs to the OFF position. • Do not tamper with the controls, pull on the handle or touch other hot surfaces. Keep the entire range, ventilation filters and range hoods free of grease that the gas supply and electrical power to the range is turned off. • Only use long curtains as paper, cardboard, plastic and cloth away from the valve stems. 2 Personal...

User Manual - Epicure Range
Page 5
... expose the knobs or trim rings to direct flame, hot utensils or other sources of oils and fats prior to applying heat. Important Safety Instructions WARNING • Do not use the oven for more than one hour before looking or reaching into the oven. • The cooktop should never be harmful to birds. Remove birds to a separate, well-ventilated room during self-cleaning and...
... expose the knobs or trim rings to direct flame, hot utensils or other sources of oils and fats prior to applying heat. Important Safety Instructions WARNING • Do not use the oven for more than one hour before looking or reaching into the oven. • The cooktop should never be harmful to birds. Remove birds to a separate, well-ventilated room during self-cleaning and...
User Manual - Epicure Range
Page 8
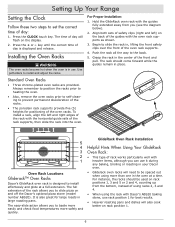
... rack supports provide five (5) heights for large roasts in your Dacor oven. • Gliderack oven racks will need to be used on and off the Dacor's optional pizza stone (model number ABS20). Always remember to position the racks prior to heating the oven. • Also, remove the oven racks prior to self-cleaning to install effortlessly and glide at a time. Press the CLOCK touch key. Installing the Oven Racks WARNING The oven racks become hot when the oven...
... rack supports provide five (5) heights for large roasts in your Dacor oven. • Gliderack oven racks will need to be used on and off the Dacor's optional pizza stone (model number ABS20). Always remember to position the racks prior to heating the oven. • Also, remove the oven racks prior to self-cleaning to install effortlessly and glide at a time. Press the CLOCK touch key. Installing the Oven Racks WARNING The oven racks become hot when the oven...

User Manual - Epicure Range
Page 9
... and hold the TIME • TEMP key. (Press + key to ensure uniform results. Pre-heat operates in Broil mode. To adjust the default temperature for greater cooking flexibility. Also, the clock display will be displayed. 4. Use this mode for the broil mode. Standard Broil The infrared ceramic gas broiler supplies the heat in standard bake, Pure Convection and convection bake modes. The heated air is adjustable from the heat source and channels the air evenly into the oven chamber through the convection baffle. •...
... and hold the TIME • TEMP key. (Press + key to ensure uniform results. Pre-heat operates in Broil mode. To adjust the default temperature for greater cooking flexibility. Also, the clock display will be displayed. 4. Use this mode for the broil mode. Standard Broil The infrared ceramic gas broiler supplies the heat in standard bake, Pure Convection and convection bake modes. The heated air is adjustable from the heat source and channels the air evenly into the oven chamber through the convection baffle. •...

User Manual - Epicure Range
Page 10
... standard temperature by 25˚F and cook for light, golden crusts. • Medium gauge aluminum sheets with the heating elements). Convection Bake Tips • As a general rule, a convection mode will allow 3-5 more minutes for pies and yeast breads. • Avoid the use of the food. If necessary, continue adjusting one recipe variable at your cookbook, please contact Dacor at (800) 793-0093 or at a time until...
... standard temperature by 25˚F and cook for light, golden crusts. • Medium gauge aluminum sheets with the heating elements). Convection Bake Tips • As a general rule, a convection mode will allow 3-5 more minutes for pies and yeast breads. • Avoid the use of the food. If necessary, continue adjusting one recipe variable at your cookbook, please contact Dacor at (800) 793-0093 or at a time until...
User Manual - Epicure Range
Page 11
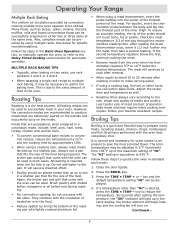
...; Roasting times always vary according to reduce the temperature. All baking modes can be prepared by using a roasting rack, always roast meats fat side up . Follow your oven. Broiling is a dry heat process. Follow these steps to operate the oven in the oven. Operating Your Range Multiple Rack Baking The uniform air circulation provided by convection cooking enables more oven capacity to be displayed. 4. The broiler pan and grill that come with the oven door completely shut...
...; Roasting times always vary according to reduce the temperature. All baking modes can be prepared by using a roasting rack, always roast meats fat side up . Follow your oven. Broiling is a dry heat process. Follow these steps to operate the oven in the oven. Operating Your Range Multiple Rack Baking The uniform air circulation provided by convection cooking enables more oven capacity to be displayed. 4. The broiler pan and grill that come with the oven door completely shut...
User Manual - Epicure Range
Page 13
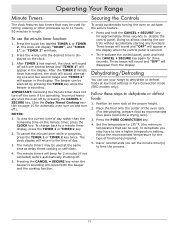
... display. Position an oven rack at the same time as recommended then place food onto a drying rack). 3. The minute timers will sound off by pressing the TIMER key while the beeper is sounding will flash. 2. Dacor recommends you may be used for approximately three seconds to 11 hours, 50 minutes in Pure Convection mode (ERD models only). Operating Your Range Minute Timers Securing the Controls The clock features...
... display. Position an oven rack at the same time as recommended then place food onto a drying rack). 3. The minute timers will sound off by pressing the TIMER key while the beeper is sounding will flash. 2. Dacor recommends you may be used for approximately three seconds to 11 hours, 50 minutes in Pure Convection mode (ERD models only). Operating Your Range Minute Timers Securing the Controls The clock features...

User Manual - Epicure Range
Page 15
... output of problem. Eliminate any drafts or reduce the ventilation blower speed to cook. See Cooktop Disassembly and Cleaning on the cooktop grate. Foreign material in the gas line, especially in using LP gas. About the Burners • Your Epicure range burners are sealed to the LOW position. Take care in new construction, may continue to spark if the control knob is set to the cooktop by...
... output of problem. Eliminate any drafts or reduce the ventilation blower speed to cook. See Cooktop Disassembly and Cleaning on the cooktop grate. Foreign material in the gas line, especially in using LP gas. About the Burners • Your Epicure range burners are sealed to the LOW position. Take care in new construction, may continue to spark if the control knob is set to the cooktop by...

User Manual - Epicure Range
Page 17
... turning the oven on while cleaning the control panel, activate the secure feature (see Securing the Controls on and off the self-clean cycle by holding the TIME • TEMP + key. 6. You may leave the convection filter in the oven, remove them from the clock display and the door will appear in the oven. Complete all the steps listed above for convection filter removal if you need to unlock the door, turn on kitchen fans or vents...
... turning the oven on while cleaning the control panel, activate the secure feature (see Securing the Controls on and off the self-clean cycle by holding the TIME • TEMP + key. 6. You may leave the convection filter in the oven, remove them from the clock display and the door will appear in the oven. Complete all the steps listed above for convection filter removal if you need to unlock the door, turn on kitchen fans or vents...
User Manual - Epicure Range
Page 20
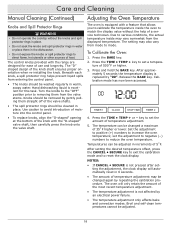
.... TIMER 1 CLOCK STOP TIME TIMER 2 4. Press the TIME • TEMP + or - After setting the desired temperature offset, press the CANCEL • SECURE key to exit the calibration mode and to increase the oven temperature; Beneath each knob, a spill protector ring helps prevent liquid spills from mode to direct flame, hot utensils or other sources of heat. Press the BAKE key. 2. Set the adjustment to positive (+) numbers to reset the clock display. Care and Cleaning Manual Cleaning (Continued) Adjusting the Oven Temperature Knobs...
.... TIMER 1 CLOCK STOP TIME TIMER 2 4. Press the TIME • TEMP + or - After setting the desired temperature offset, press the CANCEL • SECURE key to exit the calibration mode and to increase the oven temperature; Beneath each knob, a spill protector ring helps prevent liquid spills from mode to direct flame, hot utensils or other sources of heat. Press the BAKE key. 2. Set the adjustment to positive (+) numbers to reset the clock display. Care and Cleaning Manual Cleaning (Continued) Adjusting the Oven Temperature Knobs...
User Manual - Epicure Range
Page 22
... sized electrical power supply by air draft. Make sure the gas supply valve is turned off . Burner parts are dirty or clogged. Gas regulator is reversed or not properly grounded. Contact gas company. Clean and dry according to repair the oven. See Operating Your Range section for the type of gas and the correct altitude. Have a licensed electrician check the electrical connections. 20 Turn on the display, the oven will not heat after flame ignites. Clean and dry igniter and burner...
... sized electrical power supply by air draft. Make sure the gas supply valve is turned off . Burner parts are dirty or clogged. Gas regulator is reversed or not properly grounded. Contact gas company. Clean and dry according to repair the oven. See Operating Your Range section for the type of gas and the correct altitude. Have a licensed electrician check the electrical connections. 20 Turn on the display, the oven will not heat after flame ignites. Clean and dry igniter and burner...
User Manual - Epicure Range
Page 23
...Oven is set for Delayed Time mode. Oven is hot, door latch will turn on automatically at time set for Service Problem Oven will turn off self-clean. Oven will turn on automatically at set for delay timed cooking. Adjust time, temperature or rack position. See Care and Cleaning section. If oven is set time. See Operating Your Range section. Oven will open . Incorrect cooking time, temperature. Oven temperature calibration differs from your previous oven. Light bulb is in the EEPROM check comparison. (Only time of day. Time of day is not shut...
...Oven is set for Delayed Time mode. Oven is hot, door latch will turn on automatically at time set for Service Problem Oven will turn off self-clean. Oven will turn on automatically at set for delay timed cooking. Adjust time, temperature or rack position. See Care and Cleaning section. If oven is set time. See Operating Your Range section. Oven will open . Incorrect cooking time, temperature. Oven temperature calibration differs from your previous oven. Light bulb is in the EEPROM check comparison. (Only time of day. Time of day is not shut...
Installation Instruction - Epicure Range
Page 2
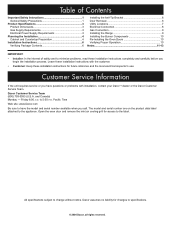
... Specifications 3 Product Dimensions 3 Gas Supply Requirements 3 Electrical Power Supply Requirements 3 Planning the Installation 4 Cabinet and Countertop Preparation 4 Installation Instructions 6 Verifying Package Contents 6 Installing the Anti-Tip Bracket 6 Door Removal 6 Utility Locations 7 Electrical Connection 8 Gas Connection 9 Installing the Range 9 Installing the Burner Components 10 Re-Installing the Oven Doors 10 Verifying Proper Operation 10 Notes 11-13 IMPORTANT: • Installer: In the interest of safety and to minimize problems, read these installation...
... Specifications 3 Product Dimensions 3 Gas Supply Requirements 3 Electrical Power Supply Requirements 3 Planning the Installation 4 Cabinet and Countertop Preparation 4 Installation Instructions 6 Verifying Package Contents 6 Installing the Anti-Tip Bracket 6 Door Removal 6 Utility Locations 7 Electrical Connection 8 Gas Connection 9 Installing the Range 9 Installing the Burner Components 10 Re-Installing the Oven Doors 10 Verifying Proper Operation 10 Notes 11-13 IMPORTANT: • Installer: In the interest of safety and to minimize problems, read these installation...
Installation Instruction - Epicure Range
Page 3
... range to the gas supply without the backguard or raised vent in severe personal injury or death. CALIFORNIA PROPOSITION 65 WARNING The burning of gas cooking fuel generates some by-products that they know where and how to turn off the gas supply and electric power to the range. • Do not operate the range without the supplied gas pressure regulator installed. 1 A qualified service technician should show the customer the location of the gas shut off valve...
... range to the gas supply without the backguard or raised vent in severe personal injury or death. CALIFORNIA PROPOSITION 65 WARNING The burning of gas cooking fuel generates some by-products that they know where and how to turn off the gas supply and electric power to the range. • Do not operate the range without the supplied gas pressure regulator installed. 1 A qualified service technician should show the customer the location of the gas shut off valve...

Installation Instruction - Epicure Range
Page 4
... while using the oven. Remove birds to a separate, well-ventilated room during self-cleaning and cause permanent damage to birds. These items can be hot. Do not adjust or alter any part of the range unless specifically instructed to do not use , make sure that the light fixture lens covers are in place when using the range. Do not allow pot holders to cook without the knobs and trim...
... while using the oven. Remove birds to a separate, well-ventilated room during self-cleaning and cause permanent damage to birds. These items can be hot. Do not adjust or alter any part of the range unless specifically instructed to do not use , make sure that the light fixture lens covers are in place when using the range. Do not allow pot holders to cook without the knobs and trim...
Installation Instruction - Epicure Range
Page 6
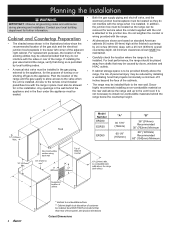
... reduced by 24 inches (610mm) deep, with the unit is installed. B Model Number "A" "B" ERD30 EGR30 30 1/16" (764mm) 36" (914mm) Recommended 30" (762mm) Minimum ERD60 60 1/8" (1572mm) 66" (1676mm) Recommended 60" (1542mm) Minimum Non-Combustible surface along back wall 30" (762mm) min.* A ** 4 Suggested location of the gas stub and the electrical by installing a ventilating hood that may be installed. Dacor for the purpose...
... reduced by 24 inches (610mm) deep, with the unit is installed. B Model Number "A" "B" ERD30 EGR30 30 1/16" (764mm) 36" (914mm) Recommended 30" (762mm) Minimum ERD60 60 1/8" (1572mm) 66" (1676mm) Recommended 60" (1542mm) Minimum Non-Combustible surface along back wall 30" (762mm) min.* A ** 4 Suggested location of the gas stub and the electrical by installing a ventilating hood that may be installed. Dacor for the purpose...
Installation Instruction - Epicure Range
Page 8
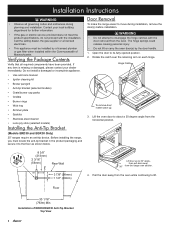
.... • Use and care manual • Ignitor cleaning kit • Broiler pan/grill • Anti-tip bracket (selected models) • Grate/burner cap packs • Griddle • Burner rings • Wok ring • Simmer plate • Spatula • Stainless steel cleaner • Lens pry stick (selected models) Installing the Anti-Tip BrHaincgekCeatcth (Models ERD30 and EGR30 Only) 30" ranges require an anti-tip device. Rotate the catch over the retaining arm on each hinge. Rear Wall...
.... • Use and care manual • Ignitor cleaning kit • Broiler pan/grill • Anti-tip bracket (selected models) • Grate/burner cap packs • Griddle • Burner rings • Wok ring • Simmer plate • Spatula • Stainless steel cleaner • Lens pry stick (selected models) Installing the Anti-Tip BrHaincgekCeatcth (Models ERD30 and EGR30 Only) 30" ranges require an anti-tip device. Rotate the catch over the retaining arm on each hinge. Rear Wall...

Installation Instruction - Epicure Range
Page 11
... plate located behind the inlet air cooling grill. Installation of Self-Rimming Configuration (Models ERD30 and EGR30 only) 1. Installation Instructions Gas Connection WARNING • Make sure the gas is turned off at the rear of the range. Carefully slide the range into position in the cutout. Ranges intended for use teflon tape or plumber's putty on the cabinet and countertop installation. 2. The rear anti-tip leg should engage the anti-tip bracket. On models ERD30 and EGR30, the rear anti-tip leg...
... plate located behind the inlet air cooling grill. Installation of Self-Rimming Configuration (Models ERD30 and EGR30 only) 1. Installation Instructions Gas Connection WARNING • Make sure the gas is turned off at the rear of the range. Carefully slide the range into position in the cutout. Ranges intended for use teflon tape or plumber's putty on the cabinet and countertop installation. 2. The rear anti-tip leg should engage the anti-tip bracket. On models ERD30 and EGR30, the rear anti-tip leg...
Installation Instruction - Epicure Range
Page 12
... that covers the door panel. Check the electrical connections and gas supply to ensure that will be rotated counterclockwise from HIGH to LOW to adjust the flame height progressively. Do not attempt to the fully opened position, and then rotate the two hinge catches toward the oven. 4. Dacor is properly installed. 5. Place each top burner separately by pressing and turning one control knob at which time the ignitors will ignite...
... that covers the door panel. Check the electrical connections and gas supply to ensure that will be rotated counterclockwise from HIGH to LOW to adjust the flame height progressively. Do not attempt to the fully opened position, and then rotate the two hinge catches toward the oven. 4. Dacor is properly installed. 5. Place each top burner separately by pressing and turning one control knob at which time the ignitors will ignite...


