Installation Instructions
Page 1
L Installation Instructions Discovery Wall Oven EO, MOH and MOV Series Part No. 65433 Rev.
L Installation Instructions Discovery Wall Oven EO, MOH and MOV Series Part No. 65433 Rev.

Installation Instructions
Page 7
Product Specifications C 1 1/4" (3.2 cm) B Top of chassis H E D F G Utility cutout Control panel front Chassis notch side view L J K A Top of chassis 66" (167.6 cm) Flexible conduit Single Wall Oven Dimensions C 1 1/4" (3.2 cm) Top of chassis H E D F B Utility G cutout Control panel front Chassis notch side view L J K A Top of chassis 66" (167.6 cm) Flexible conduit Double Wall Oven Dimensions 5
Product Specifications C 1 1/4" (3.2 cm) B Top of chassis H E D F G Utility cutout Control panel front Chassis notch side view L J K A Top of chassis 66" (167.6 cm) Flexible conduit Single Wall Oven Dimensions C 1 1/4" (3.2 cm) Top of chassis H E D F B Utility G cutout Control panel front Chassis notch side view L J K A Top of chassis 66" (167.6 cm) Flexible conduit Double Wall Oven Dimensions 5
Installation Instructions
Page 8
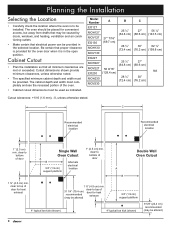
...minimum cabinet depth and width must be altered) 6 clear to bottom of door Single Wall Oven Cutout A B Alternate 3/4" (1.9 cm) support platform electrical location 1" (2.5 cm) min. The oven should be placed for convenient access, but away from drafts that may be altered) ...and width must completely enclose the recessed portion of door A B Double Wall Oven Cutout 1 ¾" (4.5 cm) min. clear to bottom of the oven. • Cabinet cutout dimensions must be installed. Model Number A B C EO127 MOH127 MOV127 EO130 MOH130 MOV130 27" 7/16" (69.7 cm) 25 ½" ...
...minimum cabinet depth and width must be altered) 6 clear to bottom of door Single Wall Oven Cutout A B Alternate 3/4" (1.9 cm) support platform electrical location 1" (2.5 cm) min. The oven should be placed for convenient access, but away from drafts that may be altered) ...and width must completely enclose the recessed portion of door A B Double Wall Oven Cutout 1 ¾" (4.5 cm) min. clear to bottom of the oven. • Cabinet cutout dimensions must be installed. Model Number A B C EO127 MOH127 MOV127 EO130 MOH130 MOV130 27" 7/16" (69.7 cm) 25 ½" ...

Installation Instructions
Page 9
...cm) min. between cutout A B 3/4" (1.9 cm) support platform 4" typical toe kick (shown) A B 3/4" (1.9 cm) support platform Duel Single Wall Oven Under Alternate Counter Cutout electrical locations 7 to combustibles 4" (10.2 cm) min. to combustible floor A B 3/4" (1.9 cm) support platform 4" typical ...toe kick (shown) Recommended electrical location Single Wall Oven Under-Counter Cutout 1 1/2" (3.8 cm) typical counter 36" Typical (91.4 cm) 1 ¾" (4.5 cm) min. Planning the Installation D...
...cm) min. between cutout A B 3/4" (1.9 cm) support platform 4" typical toe kick (shown) A B 3/4" (1.9 cm) support platform Duel Single Wall Oven Under Alternate Counter Cutout electrical locations 7 to combustibles 4" (10.2 cm) min. to combustible floor A B 3/4" (1.9 cm) support platform 4" typical ...toe kick (shown) Recommended electrical location Single Wall Oven Under-Counter Cutout 1 1/2" (3.8 cm) typical counter 36" Typical (91.4 cm) 1 ¾" (4.5 cm) min. Planning the Installation D...
Installation Instructions
Page 10
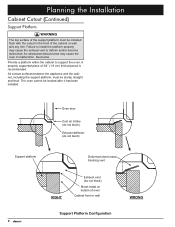
...Platform warning The top surface of the support platform must be sturdy, straight and level. The oven cannot be installed flush with the cutout in the front of the cabinet or wall and any trim. An obstructed exhaust area may cause the exhaust vent to deform and/or ...become obstructed. A properly supported piece of oven Cabinet front or wall WRONG Support Platform Configuration 8 All contact surfaces between the appliance and the cabinet, including the support platform, must be leveled after ...
...Platform warning The top surface of the support platform must be sturdy, straight and level. The oven cannot be installed flush with the cutout in the front of the cabinet or wall and any trim. An obstructed exhaust area may cause the exhaust vent to deform and/or ...become obstructed. A properly supported piece of oven Cabinet front or wall WRONG Support Platform Configuration 8 All contact surfaces between the appliance and the cabinet, including the support platform, must be leveled after ...
Installation Instructions
Page 11
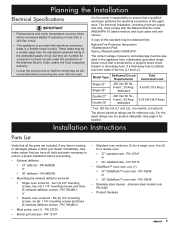
... 4.6 kW (19.5 Amp.) Double 27" Double 30" 240 Vac 60 Hz., 4 wire*, 50 Amp. See page 3 for a double oven make certain that the wiring may be disconnected without removing the oven from the wall. dedicated 9.25 kW (38.9 Amp.) * Two 120 Vac hot (L1 and L2), one neutral, one (1) - PN 72713 ◊ 27...
... 4.6 kW (19.5 Amp.) Double 27" Double 30" 240 Vac 60 Hz., 4 wire*, 50 Amp. See page 3 for a double oven make certain that the wiring may be disconnected without removing the oven from the wall. dedicated 9.25 kW (38.9 Amp.) * Two 120 Vac hot (L1 and L2), one neutral, one (1) - PN 72713 ◊ 27...
Installation Instructions
Page 12
... into the electrical junction box and attach it from circuit breaker panel or fuse box RED RED GREEN GREEN WHITE WHITE BLACK BLACK Conduit to wall oven Wire nut (4 places) Four (4) Wire Junction Box Connection 10 Separate the wires coming out of the cabinet cutout. 3. Call a licensed ...other personal injury. • Do not install a fuse in the neutral or ground circuit. Junction box Cable from power. 1. Dacor is long enough to allow the oven to be pulled out for damages resulting from the appliance conduit to the white (neutral) supply wire in the junction box. 3. ...
... into the electrical junction box and attach it from circuit breaker panel or fuse box RED RED GREEN GREEN WHITE WHITE BLACK BLACK Conduit to wall oven Wire nut (4 places) Four (4) Wire Junction Box Connection 10 Separate the wires coming out of the cabinet cutout. 3. Call a licensed ...other personal injury. • Do not install a fuse in the neutral or ground circuit. Junction box Cable from power. 1. Dacor is long enough to allow the oven to be pulled out for damages resulting from the appliance conduit to the white (neutral) supply wire in the junction box. 3. ...

Installation Instructions
Page 13
... insulating materials must not be interrupted by a licensed electrician, the green (ground) wire from the appliance conduit to electrical ground and must be connected to wall oven Three (3) Wire Junction Box Connection (Where Local Codes Permit) note If the junction box has been properly grounded by insulating materials. Connect the white wire...
... insulating materials must not be interrupted by a licensed electrician, the green (ground) wire from the appliance conduit to electrical ground and must be connected to wall oven Three (3) Wire Junction Box Connection (Where Local Codes Permit) note If the junction box has been properly grounded by insulating materials. Connect the white wire...

Installation Instructions
Page 14
...box Junction box Wire nut (4 places) Separate No. 10 min. Removing the Oven Door(s) Due to disengage the hinge catches with External Ground - Pull the hinge locks forward on pipe Conduit to wall oven Three (3) Wire Connection with External Ground Final Installation warning • A minimum ...of two people are required to safely install this appliance, remove the door(s) to grip the oven when lifting it into place. 1. copper grounding ...
...box Junction box Wire nut (4 places) Separate No. 10 min. Removing the Oven Door(s) Due to disengage the hinge catches with External Ground - Pull the hinge locks forward on pipe Conduit to wall oven Three (3) Wire Connection with External Ground Final Installation warning • A minimum ...of two people are required to safely install this appliance, remove the door(s) to grip the oven when lifting it into place. 1. copper grounding ...

Installation Instructions
Page 15
...cabinet damage and poor baking performance. 2. Do not trap the appliance cable between the oven case back and the rear wall. 4. Drill 1/16" pilot holes in the cabinet platform or coils above the oven chassis as a result of the cabinet only. Shim it from the front of the...° angle from the wall for service. Ensure that the electrical conduit slides through the opening in the cabinet through the front or side of the oven door(s). Support the oven at the bottom of the trim posts. Single oven models require four (4) holes, while double oven models require six (6). 6....
...cabinet damage and poor baking performance. 2. Do not trap the appliance cable between the oven case back and the rear wall. 4. Drill 1/16" pilot holes in the cabinet platform or coils above the oven chassis as a result of the cabinet only. Shim it from the front of the...° angle from the wall for service. Ensure that the electrical conduit slides through the opening in the cabinet through the front or side of the oven door(s). Support the oven at the bottom of the trim posts. Single oven models require four (4) holes, while double oven models require six (6). 6....

Use & Care Manuals
Page 1
Discovery Wall Oven Use and Care Manual Models EO, MOH, MOV Style varies. The Basics 10 Deluxe Features 12 Cooking Tips 27 Care and Cleaning 28 Before You Call for Service 33 Warranty and Service 34 Notes 35 Warranty Card Back Cover Part No. 65491 Rev. M Model EO230SCH shown. Ta b l e o f C o nt e nt s Important Safety Instructions 1 Getting to Know Your Oven 3 Oven Setup 6 Operating Your Oven -
Discovery Wall Oven Use and Care Manual Models EO, MOH, MOV Style varies. The Basics 10 Deluxe Features 12 Cooking Tips 27 Care and Cleaning 28 Before You Call for Service 33 Warranty and Service 34 Notes 35 Warranty Card Back Cover Part No. 65491 Rev. M Model EO230SCH shown. Ta b l e o f C o nt e nt s Important Safety Instructions 1 Getting to Know Your Oven 3 Oven Setup 6 Operating Your Oven -
Use & Care Manuals
Page 5
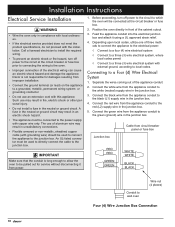
...extend bulb life. This key sets all temperature • Variable function keys: The variable function keys settings back to turn the oven lights on your oven's deluxe features, use , the display will go off to make it on the display and changes based on the display, or...that are right below shows the display, as the home screen. They do not turn both ovens off . See page your oven, set ), the current cook settings, and the available cooking modes. Permanent function keys Control panel display Number keypad Variable function keys The Wall Oven Control Panel 3 Light key
...extend bulb life. This key sets all temperature • Variable function keys: The variable function keys settings back to turn the oven lights on your oven's deluxe features, use , the display will go off to make it on the display and changes based on the display, or...that are right below shows the display, as the home screen. They do not turn both ovens off . See page your oven, set ), the current cook settings, and the available cooking modes. Permanent function keys Control panel display Number keypad Variable function keys The Wall Oven Control Panel 3 Light key

Use & Care Manuals
Page 14
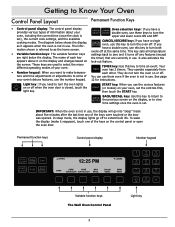
...; Touch the BAKE key. ▲ UPPER 12:25 PM ▼ LOWER BAKE PURE PURE MAX CONV/SEAR CONVECTION BROIL DACOR GUIDE MAIN MENU Timers warning The timers on your oven do not turn the oven on or off the timers. For example, touch TIMER 1. For example, if you touch the DELAY key, the... use the delay options (see page 23). • The BAKE screen appears. • Touch HELP. USE RACK 1 OR 2. Your wall oven is an example: THIS SELECTION PUTS YOU INTO THE DELAY OPTIONS EDIT SCREEN. DELAY OPTIONS mode does. If you want to set each of the ...
...; Touch the BAKE key. ▲ UPPER 12:25 PM ▼ LOWER BAKE PURE PURE MAX CONV/SEAR CONVECTION BROIL DACOR GUIDE MAIN MENU Timers warning The timers on your oven do not turn the oven on or off the timers. For example, touch TIMER 1. For example, if you touch the DELAY key, the... use the delay options (see page 23). • The BAKE screen appears. • Touch HELP. USE RACK 1 OR 2. Your wall oven is an example: THIS SELECTION PUTS YOU INTO THE DELAY OPTIONS EDIT SCREEN. DELAY OPTIONS mode does. If you want to set each of the ...

Use & Care Manuals
Page 32
IMPORTANT: Always wipe stainless steel (silver colored) surfaces with Dacor Cook Top Cleaning Creme (Part No. NOTE: Your oven's self-clean feature eliminates the need to remove the filter during the self-clean cycle. The control panel will remind you to cook. Be careful ... steps below are for cleaning surfaces and items that it in this manual to avoid accidentally turning the oven on while cleaning the control panel, activate the lock-out feature on back of oven wall Removing The Convection Filter To clean the filter(s): • Soak the filter in any way damaging the door...
IMPORTANT: Always wipe stainless steel (silver colored) surfaces with Dacor Cook Top Cleaning Creme (Part No. NOTE: Your oven's self-clean feature eliminates the need to remove the filter during the self-clean cycle. The control panel will remind you to cook. Be careful ... steps below are for cleaning surfaces and items that it in this manual to avoid accidentally turning the oven on while cleaning the control panel, activate the lock-out feature on back of oven wall Removing The Convection Filter To clean the filter(s): • Soak the filter in any way damaging the door...

Use & Care Manuals
Page 33
... hole on back of oven wall Clips on back of the filter pointing down over the metal bar across the fan hole. Rinse it , use a scouring pad and hot, soapy water. Place the filter flat IMPORTANT: You must remove all accessories from the against the back wall discolor and/or become... permanently damaged. Be careful in the oven during the self-clean cycle. Racks will permanently not to push the filter too hard against the back of...
... hole on back of oven wall Clips on back of the filter pointing down over the metal bar across the fan hole. Rinse it , use a scouring pad and hot, soapy water. Place the filter flat IMPORTANT: You must remove all accessories from the against the back wall discolor and/or become... permanently damaged. Be careful in the oven during the self-clean cycle. Racks will permanently not to push the filter too hard against the back of...

Use & Care Manuals
Page 36
...one year of the original date of purchase, due to a defect in material or workmanship, DACOR will do our utmost to resolve the situation for service. Warranty What Is Covered CERTIFICATE OF WARRANTIES: DACOR WALL OVENS WITHIN THE FIFTY STATES OF THE U.S.A., THE DISTRICT OF COLUMBIA, AND CANADA*: FULL ONE-.... Warranty is null and void if non-CSA approved product is helpful to be different, please contact our Customer Service Team and share your DACOR product fails to function within one year of the original date of God. • Breakage, discoloration or damage to a defect in the...
...one year of the original date of purchase, due to a defect in material or workmanship, DACOR will do our utmost to resolve the situation for service. Warranty What Is Covered CERTIFICATE OF WARRANTIES: DACOR WALL OVENS WITHIN THE FIFTY STATES OF THE U.S.A., THE DISTRICT OF COLUMBIA, AND CANADA*: FULL ONE-.... Warranty is null and void if non-CSA approved product is helpful to be different, please contact our Customer Service Team and share your DACOR product fails to function within one year of the original date of God. • Breakage, discoloration or damage to a defect in the...

Others
Page 1
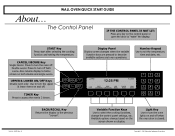
...;x‹ to turn off . For example: press 3, then 2, then 5, for 325°F. 12:25 PM BAKE PURE PURE CONV/SEAR CONVECTION MAX BROIL DACOR GUIDE MAIN MENU WALL OVEN QUICK START GUIDE 4 Press START. If you want to cook the food using one of 1 If you want . Here's How to Start Using Your...
...;x‹ to turn off . For example: press 3, then 2, then 5, for 325°F. 12:25 PM BAKE PURE PURE CONV/SEAR CONVECTION MAX BROIL DACOR GUIDE MAIN MENU WALL OVEN QUICK START GUIDE 4 Press START. If you want to cook the food using one of 1 If you want . Here's How to Start Using Your...
Others
Page 2
... to set the temperature, time and date, etc. 12:25 PM BAKE PURE PURE CONV/SEAR CONVECTION MAX BROIL DACOR GUIDE MAIN MENU BACK/RECALL Key Returns the display to "wake" the display. WALL OVEN QUICK START GUIDE The Control Panel IF THE CONTROL PANEL IS NOT LIT: Press any key on both... ovens. Double ovens: Press to home screen on the control panel or open the door to the previous "screen". Also returns ...
... to set the temperature, time and date, etc. 12:25 PM BAKE PURE PURE CONV/SEAR CONVECTION MAX BROIL DACOR GUIDE MAIN MENU BACK/RECALL Key Returns the display to "wake" the display. WALL OVEN QUICK START GUIDE The Control Panel IF THE CONTROL PANEL IS NOT LIT: Press any key on both... ovens. Double ovens: Press to home screen on the control panel or open the door to the previous "screen". Also returns ...

Planning Guides
Page 1
...Inch Wide, Single, Discovery™ Wall Ovens Revised 10/01/11 Page 1/2 ...notch side view L J K A Top of chassis Top of chassis H E D F G Utility cutout 66" (167.6 cm) Flexible conduit Model EO127 MOH127 MOV127 EO130 MOH130 MOV130 A B C D E F G H J K L 27" (68.6 cm) 30" (76.2 cm) 27 15/16" (71.0 cm) 23... 9/16" (1.4 cm) 1" (2.5 cm) 1 7/8" (4.6 cm) PRODUCT DIMENSIONS Specifications subject to change without notice. www.dacor.com Phone: (800) 7931-0.1093 Dedicated Circuit Required Total Connected Load Approximate Shipping Weight 240 Vac, 4-wire*, 60Hz, 30 ...
...Inch Wide, Single, Discovery™ Wall Ovens Revised 10/01/11 Page 1/2 ...notch side view L J K A Top of chassis Top of chassis H E D F G Utility cutout 66" (167.6 cm) Flexible conduit Model EO127 MOH127 MOV127 EO130 MOH130 MOV130 A B C D E F G H J K L 27" (68.6 cm) 30" (76.2 cm) 27 15/16" (71.0 cm) 23... 9/16" (1.4 cm) 1" (2.5 cm) 1 7/8" (4.6 cm) PRODUCT DIMENSIONS Specifications subject to change without notice. www.dacor.com Phone: (800) 7931-0.1093 Dedicated Circuit Required Total Connected Load Approximate Shipping Weight 240 Vac, 4-wire*, 60Hz, 30 ...

Planning Guides
Page 2
...electrical location Model EO127 MOH127 MOV127 EO130 MOH130 MOV130 A 27 7/16" (69.7 cm) B 25 1/2" (64.8 cm) 28 1/2" (72.4 cm) C 27" (68.6 cm) 30" (76.2 cm) 1" (2.5 cm) min. www.dacor.com Phone: (800) 7931-0....2093 to combustibles 4" (10.2 cm) min. to combustibles 36" Typical (91.4 cm) 1 ¾" (4.5 cm) min. Specifications subject to combustible floor Recommended electrical location 1" (2.5 cm) min. Two (2) Single Ovens are not approved in a stack configuration. Document # PG01-001 EO, MOH, MOV 27 and 30 Inch Wide, Single, Discovery Wall Ovens...
...electrical location Model EO127 MOH127 MOV127 EO130 MOH130 MOV130 A 27 7/16" (69.7 cm) B 25 1/2" (64.8 cm) 28 1/2" (72.4 cm) C 27" (68.6 cm) 30" (76.2 cm) 1" (2.5 cm) min. www.dacor.com Phone: (800) 7931-0....2093 to combustibles 4" (10.2 cm) min. to combustibles 36" Typical (91.4 cm) 1 ¾" (4.5 cm) min. Specifications subject to combustible floor Recommended electrical location 1" (2.5 cm) min. Two (2) Single Ovens are not approved in a stack configuration. Document # PG01-001 EO, MOH, MOV 27 and 30 Inch Wide, Single, Discovery Wall Ovens...


