
Installation Instructions
Page 7
Product Specifications C 1 1/4" (3.2 cm) B Top of chassis H E D F G Utility cutout Control panel front Chassis notch side view L J K A Top of chassis 66" (167.6 cm) Flexible conduit Single Wall Oven Dimensions C 1 1/4" (3.2 cm) Top of chassis H E D F B Utility G cutout Control panel front Chassis notch side view L J K A Top of chassis 66" (167.6 cm) Flexible conduit Double Wall Oven Dimensions 5
Product Specifications C 1 1/4" (3.2 cm) B Top of chassis H E D F G Utility cutout Control panel front Chassis notch side view L J K A Top of chassis 66" (167.6 cm) Flexible conduit Single Wall Oven Dimensions C 1 1/4" (3.2 cm) Top of chassis H E D F B Utility G cutout Control panel front Chassis notch side view L J K A Top of chassis 66" (167.6 cm) Flexible conduit Double Wall Oven Dimensions 5
Installation Instructions
Page 8
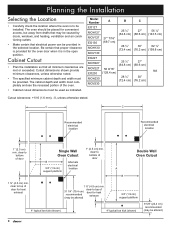
...clearances, unless otherwise noted. • The specified minimum cabinet depth and width must be provided in the open position. clear to top of door Single Wall Oven Cutout A B Alternate 3/4" (1.9 cm) support platform electrical location 1" (2.5 cm) min. clear to top of door for heat exhaust 1 ...A B Double Wall Oven Cutout 1 ¾" (4.5 cm) min. The oven should be placed for the oven door when it is to bottom of the oven. • Cabinet cutout dimensions must be installed. clear to be provided. Model Number A B C EO127 MOH127 MOV127 EO130 MOH130 MOV130 27"...
...clearances, unless otherwise noted. • The specified minimum cabinet depth and width must be provided in the open position. clear to top of door Single Wall Oven Cutout A B Alternate 3/4" (1.9 cm) support platform electrical location 1" (2.5 cm) min. clear to top of door for heat exhaust 1 ...A B Double Wall Oven Cutout 1 ¾" (4.5 cm) min. The oven should be placed for the oven door when it is to bottom of the oven. • Cabinet cutout dimensions must be installed. clear to be provided. Model Number A B C EO127 MOH127 MOV127 EO130 MOH130 MOV130 27"...

Installation Instructions
Page 9
clear to combustible floor Recommended electrical location 1" (2.5 cm) min. between cutout A B 3/4" (1.9 cm) support platform 4" typical toe kick (shown) A B 3/4" (1.9 cm) support platform Duel Single Wall Oven Under Alternate Counter Cutout electrical locations 7 to top of door for heat exhaust 4" (10.2 cm) min. to combustibles 36" Typical (91.4 cm) 1 ¾" (4.5 cm) min. ...
clear to combustible floor Recommended electrical location 1" (2.5 cm) min. between cutout A B 3/4" (1.9 cm) support platform 4" typical toe kick (shown) A B 3/4" (1.9 cm) support platform Duel Single Wall Oven Under Alternate Counter Cutout electrical locations 7 to top of door for heat exhaust 4" (10.2 cm) min. to combustibles 36" Typical (91.4 cm) 1 ¾" (4.5 cm) min. ...
Installation Instructions
Page 11
...240 Vac circuit. • This appliance is utilized, fuse both sides of this standard may be disconnected without removing the oven from the wall. A copy of the National Electric Code, and/or the local inspection authority. • Locate the junction box so ... a time-delay fuse is provided with the National Electric Code ANSI/NFPA 70 (latest revision) and local codes and ordinances. PN 72949 ◊ Single oven screw kit - four (4) 3/4" mounting screws, four (4) 1 1/4" mounting screws and three (3) exhaust deflector screws - Planning the Installation Electrical Specifications ...
...240 Vac circuit. • This appliance is utilized, fuse both sides of this standard may be disconnected without removing the oven from the wall. A copy of the National Electric Code, and/or the local inspection authority. • Locate the junction box so ... a time-delay fuse is provided with the National Electric Code ANSI/NFPA 70 (latest revision) and local codes and ordinances. PN 72949 ◊ Single oven screw kit - four (4) 3/4" mounting screws, four (4) 1 1/4" mounting screws and three (3) exhaust deflector screws - Planning the Installation Electrical Specifications ...

Installation Instructions
Page 15
... in the Cabinet warning • Use an appliance dolly to the cabinet cutout using the handles and gripping points shown. Single oven models require four (4) holes, while double oven models require six (6). 6. Do not over-tighten. Raise the door so that it if necessary. Be certain to install... the mounting screws may cause cabinet damage and poor baking performance. 2. Do not trap the appliance cable between the oven case back and the rear wall. 4. warning When installing the mounting screws into composite cabinets, install them into the recessed area until it is at all...
... in the Cabinet warning • Use an appliance dolly to the cabinet cutout using the handles and gripping points shown. Single oven models require four (4) holes, while double oven models require six (6). 6. Do not over-tighten. Raise the door so that it if necessary. Be certain to install... the mounting screws may cause cabinet damage and poor baking performance. 2. Do not trap the appliance cable between the oven case back and the rear wall. 4. warning When installing the mounting screws into composite cabinets, install them into the recessed area until it is at all...
Use & Care Manuals
Page 5
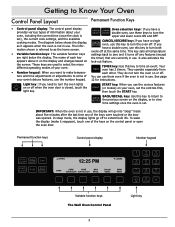
...once the clock is not in use. IMPORTANT: When the oven is upper and lower ovens ON and OFF. Permanent function keys Control panel display Number keypad Variable function keys The Wall Oven Control Panel 3 Light key Getting to Know Your Oven Control Panel Layout Permanent Function Keys • Control panel ...this key to return to the previous screen on or off to as it reappear), touch one of your UPPER LOWER Oven selection keys: If you have a single SECURE oven, use this key to time an event. each key the timer) that are right below shows the display, as ...
...once the clock is not in use. IMPORTANT: When the oven is upper and lower ovens ON and OFF. Permanent function keys Control panel display Number keypad Variable function keys The Wall Oven Control Panel 3 Light key Getting to Know Your Oven Control Panel Layout Permanent Function Keys • Control panel ...this key to return to the previous screen on or off to as it reappear), touch one of your UPPER LOWER Oven selection keys: If you have a single SECURE oven, use this key to time an event. each key the timer) that are right below shows the display, as ...

Use & Care Manuals
Page 33
...detergent and warm water. Rinse it with plenty of detergent and hot water. It will reset the lower oven on back of detergent and hot water. RESET UPR will reset the upper or a single oven, RESET LWR will become damaged. • The meat probe is heavily soiled, use a solution of ...the self-clean cycle. Place the filter flat IMPORTANT: You must remove all accessories from the against the back wall discolor and/or become difficult to clear the screen and continue using oven without cleaning the filter. the filter straight down . When you clean it , use a scouring pad and ...
...detergent and warm water. Rinse it with plenty of detergent and hot water. It will reset the lower oven on back of detergent and hot water. RESET UPR will reset the upper or a single oven, RESET LWR will become damaged. • The meat probe is heavily soiled, use a solution of ...the self-clean cycle. Place the filter flat IMPORTANT: You must remove all accessories from the against the back wall discolor and/or become difficult to clear the screen and continue using oven without cleaning the filter. the filter straight down . When you clean it , use a scouring pad and ...

Others
Page 1
For example: press 3, then 2, then 5, for 325°F. 12:25 PM BAKE PURE PURE CONV/SEAR CONVECTION MAX BROIL DACOR GUIDE MAIN MENU WALL OVEN QUICK START GUIDE 4 Press START. It's that easy! * Skip this step if the temperature already showing on the display is what ... Using Your New Oven... ...Right Now! 2 Select the way you want . If you have a these keys. Here's How to turn off . If you have a single oven, press CANCEL/SECURE to the world of cooking! WARNING: Please read the Important Safety Instructions section of the Discovery Wall Oven Use Care Manual ...
For example: press 3, then 2, then 5, for 325°F. 12:25 PM BAKE PURE PURE CONV/SEAR CONVECTION MAX BROIL DACOR GUIDE MAIN MENU WALL OVEN QUICK START GUIDE 4 Press START. It's that easy! * Skip this step if the temperature already showing on the display is what ... Using Your New Oven... ...Right Now! 2 Select the way you want . If you have a these keys. Here's How to turn off . If you have a single oven, press CANCEL/SECURE to the world of cooking! WARNING: Please read the Important Safety Instructions section of the Discovery Wall Oven Use Care Manual ...
Others
Page 2
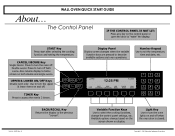
WALL OVEN QUICK START GUIDE The Control Panel IF THE CONTROL PANEL IS NOT LIT: Press any key on both ovens. Also returns display to home screen ...CONV/SEAR CONVECTION MAX BROIL DACOR GUIDE MAIN MENU BACK/RECALL Key Returns the display to describe available options and oven operations. UPPER & LOWER ON/OFF Keys Double oven only: Use to select the...Key Use to turn the upper & lower ovens on and off both double and single ovens. Available options change the control panel settings, etc. Double ovens: Press to access the oven's 2 timers. About... Copyright © 2005...
WALL OVEN QUICK START GUIDE The Control Panel IF THE CONTROL PANEL IS NOT LIT: Press any key on both ovens. Also returns display to home screen ...CONV/SEAR CONVECTION MAX BROIL DACOR GUIDE MAIN MENU BACK/RECALL Key Returns the display to describe available options and oven operations. UPPER & LOWER ON/OFF Keys Double oven only: Use to select the...Key Use to turn the upper & lower ovens on and off both double and single ovens. Available options change the control panel settings, etc. Double ovens: Press to access the oven's 2 timers. About... Copyright © 2005...

Planning Guides
Page 1
... 1 1/4" (3.2 cm) 1 1/4" (3.2 cm) HANDLE DIMENSIONS - www.dacor.com Phone: (800) 7931-0.1093 Dedicated Circuit Required Total Connected Load Approximate...front Chassis notch side view L J K A Top of chassis Top of chassis H E D F G Utility cutout 66" (167.6 cm) Flexible conduit Model EO127 MOH127 MOV127 EO130 MOH130 MOV130 A B C D E F G H J K L 27" (68.6 cm) 30" (76.2 cm) 27 15/16" (71.0 cm) 23 3/8" (59... Document # PG01-001 27 and 30 Inch Wide, Single, Discovery™ Wall Ovens Revised 10/01/11 Page 1/2 PLANNING GUIDE warning • Observe all governing...
... 1 1/4" (3.2 cm) 1 1/4" (3.2 cm) HANDLE DIMENSIONS - www.dacor.com Phone: (800) 7931-0.1093 Dedicated Circuit Required Total Connected Load Approximate...front Chassis notch side view L J K A Top of chassis Top of chassis H E D F G Utility cutout 66" (167.6 cm) Flexible conduit Model EO127 MOH127 MOV127 EO130 MOH130 MOV130 A B C D E F G H J K L 27" (68.6 cm) 30" (76.2 cm) 27 15/16" (71.0 cm) 23 3/8" (59... Document # PG01-001 27 and 30 Inch Wide, Single, Discovery™ Wall Ovens Revised 10/01/11 Page 1/2 PLANNING GUIDE warning • Observe all governing...

Planning Guides
Page 2
... (79.4 cm) recommended (may need to be altered) 4" typical toe kick (shown) CUTOUT DIMENSIONS 1 1/2" (3.8 cm) typical counter 1" (2.5 cm) min. www.dacor.com Phone: (800) 7931-0.2093 to change without notice. clear to top of cabinet may be removed. 2. 3/4" (1.9 cm) support platform (flush with cutout). 3. 1/8"... location Model EO127 MOH127 MOV127 EO130 MOH130 MOV130 A 27 7/16" (69.7 cm) B 25 1/2" (64.8 cm) 28 1/2" (72.4 cm) C 27" (68.6 cm) 30" (76.2 cm) 1" (2.5 cm) min. Document # PG01-001 EO, MOH, MOV 27 and 30 Inch Wide, Single, Discovery Wall Ovens Revised 10/01/11 Page ...
... (79.4 cm) recommended (may need to be altered) 4" typical toe kick (shown) CUTOUT DIMENSIONS 1 1/2" (3.8 cm) typical counter 1" (2.5 cm) min. www.dacor.com Phone: (800) 7931-0.2093 to change without notice. clear to top of cabinet may be removed. 2. 3/4" (1.9 cm) support platform (flush with cutout). 3. 1/8"... location Model EO127 MOH127 MOV127 EO130 MOH130 MOV130 A 27 7/16" (69.7 cm) B 25 1/2" (64.8 cm) 28 1/2" (72.4 cm) C 27" (68.6 cm) 30" (76.2 cm) 1" (2.5 cm) min. Document # PG01-001 EO, MOH, MOV 27 and 30 Inch Wide, Single, Discovery Wall Ovens Revised 10/01/11 Page ...


