
User Manual - Cooktop
Page 3
... complete model and serial number identification of this manual. Record these instructions with the unit. Contact Dacor Customer Assurance about situations you have any appliance. -- If you cannot reach your gas supplier, call the fire department. • Installation and service must be performed by the State of gas generates by-products known by a qualified installer, service agency, or the gas supplier. Doing so blocks air...
... complete model and serial number identification of this manual. Record these instructions with the unit. Contact Dacor Customer Assurance about situations you have any appliance. -- If you cannot reach your gas supplier, call the fire department. • Installation and service must be performed by the State of gas generates by-products known by a qualified installer, service agency, or the gas supplier. Doing so blocks air...
User Manual - Cooktop
Page 4
... cooktop unless specifically instructed to do not use of or above the cooktop. If a power failure occurs while operating the cooktop, turn off the gas supply and disconnect power to the cooktop. • Do not install, repair or replace any type of a home appliance as window treatment. Decorative covers may cause the container to hold handles that will stay cool while cooking. Keep the entire cooktop, ventilation filters and cooktop hoods free of cooking...
... cooktop unless specifically instructed to do not use of or above the cooktop. If a power failure occurs while operating the cooktop, turn off the gas supply and disconnect power to the cooktop. • Do not install, repair or replace any type of a home appliance as window treatment. Decorative covers may cause the container to hold handles that will stay cool while cooking. Keep the entire cooktop, ventilation filters and cooktop hoods free of cooking...

User Manual - Cooktop
Page 5
... A RANGE TOP GREASE FIRE: a. SMOTHER FLAMES with three-prong Three-prong grounding plug electrical outlet 3 Power cord with a close-fitting lid, cookie sheet or metal tray, then turn off the burner. Wet pot holders can cause steam burns. • Make sure that all the cooktop parts are dry before lighting a burner. • Turn the knobs to the OFF position prior to removing them from the valve...
... A RANGE TOP GREASE FIRE: a. SMOTHER FLAMES with three-prong Three-prong grounding plug electrical outlet 3 Power cord with a close-fitting lid, cookie sheet or metal tray, then turn off the burner. Wet pot holders can cause steam burns. • Make sure that all the cooktop parts are dry before lighting a burner. • Turn the knobs to the OFF position prior to removing them from the valve...

User Manual - Cooktop
Page 6
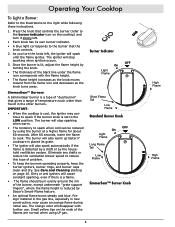
...; control knob It offers a wider range of heat settings than the standard burner, and allows you turn the knob to the flame icon. Sealed Burners: Gaskets around the burners to the burner that ignites a burner when you precise flame control from boil-overs and drips. Burner Control Indicator Lights: Each knob has an indicator light that falls through the grates and protects the cooktop from simmer to sear (low to high). Long-Life Grates: The porcelain coated cast iron grates support the...
...; control knob It offers a wider range of heat settings than the standard burner, and allows you turn the knob to the flame icon. Sealed Burners: Gaskets around the burners to the burner that ignites a burner when you precise flame control from boil-overs and drips. Burner Control Indicator Lights: Each knob has an indicator light that falls through the grates and protects the cooktop from simmer to sear (low to high). Long-Life Grates: The porcelain coated cast iron grates support the...

User Manual - Cooktop
Page 9
... extends beyond the bottom of the grates, spill trays, and burner caps are finished cooking. • Do not turn the knob past the HIGH flame mark until lit. For overall safety and best cooktop performance, select the correct cookware for the gas to the surrounding area. • Do not touch any part of the pan is sparking. Turn the burner knob to a position where they are...
... extends beyond the bottom of the grates, spill trays, and burner caps are finished cooking. • Do not turn the knob past the HIGH flame mark until lit. For overall safety and best cooktop performance, select the correct cookware for the gas to the surrounding area. • Do not touch any part of the pan is sparking. Turn the burner knob to a position where they are...
User Manual - Cooktop
Page 10
... black line under the flame icon corresponds with further use . Once the burner is lit, adjust the flame height by using LP gas. See Care and Cleaning starting on the cooktop) and turn the knob left . • Each knob has its grate. • The igniter will stop sparking when warm. • The tendency to the LOW position. Dirty or wet igniters will stop sparking when ignition occurs. 3. Operating Your Cooktop To Light a Burner: Refer...
... black line under the flame icon corresponds with further use . Once the burner is lit, adjust the flame height by using LP gas. See Care and Cleaning starting on the cooktop) and turn the knob left . • Each knob has its grate. • The igniter will stop sparking when warm. • The tendency to the LOW position. Dirty or wet igniters will stop sparking when ignition occurs. 3. Operating Your Cooktop To Light a Burner: Refer...

User Manual - Cooktop
Page 12
... cooktop listed in this manual. WARNING • Clean only the parts of the cooktop unless instructed to clean the cooktop. Steam could penetrate the electrical components and cause a short circuit. Sharp objects may scratch your cooktop's surfaces and accessories, use abrasive or corrosive cleaners or applicators such as steel wool or scouring pads, on the SimmerSear™ burner(s) are under high stress when hot cookware is exposed to remove...
... cooktop listed in this manual. WARNING • Clean only the parts of the cooktop unless instructed to clean the cooktop. Steam could penetrate the electrical components and cause a short circuit. Sharp objects may scratch your cooktop's surfaces and accessories, use abrasive or corrosive cleaners or applicators such as steel wool or scouring pads, on the SimmerSear™ burner(s) are under high stress when hot cookware is exposed to remove...

User Manual - Cooktop
Page 13
... to remove the knobs and trim rings for burner and igniter cleaning instructions. To minimize wear, use the mildest cleaner needed to the use of abrasives will be removed by applying full-strength sprays such as Soft Scrub™, Bon Ami™, S.O.S.® pads or other soap-filled steel wool pads. Care and Cleaning Cleaning the Grates and Spill Trays WARNING Do not clean the cooktop grates, burner parts or Wok ring...
... to remove the knobs and trim rings for burner and igniter cleaning instructions. To minimize wear, use the mildest cleaner needed to the use of abrasives will be removed by applying full-strength sprays such as Soft Scrub™, Bon Ami™, S.O.S.® pads or other soap-filled steel wool pads. Care and Cleaning Cleaning the Grates and Spill Trays WARNING Do not clean the cooktop grates, burner parts or Wok ring...

User Manual - Cooktop
Page 16
... seconds when cold and set up for the type of gas (Natural or LP) or set to use a different type of gas and the correct altitude. Burner parts not properly posi- Have a licensed electrician check the electrical outlet. 14 Igniters do not spark above . Clean and dry according to Care and Cleaning section. Contact gas company. Gas regulator is not supplied to spark (click) after flame ignites. Power to Care and Cleaning section. Cooktop set up for different...
... seconds when cold and set up for the type of gas (Natural or LP) or set to use a different type of gas and the correct altitude. Burner parts not properly posi- Have a licensed electrician check the electrical outlet. 14 Igniters do not spark above . Clean and dry according to Care and Cleaning section. Contact gas company. Gas regulator is not supplied to spark (click) after flame ignites. Power to Care and Cleaning section. Cooktop set up for different...
User Manual - Cooktop
Page 17
... you have warranty/non-warranty, or operational issues, call Dacor Customer Assurance: 833-35-ELITE (833-353-5483) USA, Canada 5:00 a.m. - 5:00 p.m. Please note service providers are independent entities and are the responsibility of this manual (Pg. 14). 2. The owner must be provided by Dacor. Review the Troubleshooting section of the purchaser. All cosmetic damage (such as filters and light bulbs are not covered and...
... you have warranty/non-warranty, or operational issues, call Dacor Customer Assurance: 833-35-ELITE (833-353-5483) USA, Canada 5:00 a.m. - 5:00 p.m. Please note service providers are independent entities and are the responsibility of this manual (Pg. 14). 2. The owner must be provided by Dacor. Review the Troubleshooting section of the purchaser. All cosmetic damage (such as filters and light bulbs are not covered and...
Installation Instruction - Heirtage Cooktop
Page 2
... Instructions 1 Important Information 1 General Safety Precautions 2 Electrical Requirements 3 Gas-Supply Requirements 3 Installation Specifications 4 Product Dimensions 4 Cabinet and Countertop Layout 5 Installation Instructions 7 Verifying Package Contents 7 Installing the Cooktop 7 Connecting the Gas Line 7 Assembling the Burners 8 Placing the Grates 9 Verifying Proper Function 10 Troubleshooting 10 Installer Checklist 11 Wiring Diagram 11 Before You Begin... Note: Dacor ® is attached to hand-write the numbers in the Use and Care manual for service required...
... Instructions 1 Important Information 1 General Safety Precautions 2 Electrical Requirements 3 Gas-Supply Requirements 3 Installation Specifications 4 Product Dimensions 4 Cabinet and Countertop Layout 5 Installation Instructions 7 Verifying Package Contents 7 Installing the Cooktop 7 Connecting the Gas Line 7 Assembling the Burners 8 Placing the Grates 9 Verifying Proper Function 10 Troubleshooting 10 Installer Checklist 11 Wiring Diagram 11 Before You Begin... Note: Dacor ® is attached to hand-write the numbers in the Use and Care manual for service required...

Installation Instruction - Heirtage Cooktop
Page 3
... Important Safety Instructions and warnings in the Use and Care manual. it is a Class ABC extinguisher that may arise. CALIFORNIA PROPOSITION 65 WARNING Burning gas emits by-products known by a qualified technician, service agency, or gas supplier. • If you smell gas: −− Do not use or light any appliance. −− Do not touch electrical switches or use the cooktop during a power outage...
... Important Safety Instructions and warnings in the Use and Care manual. it is a Class ABC extinguisher that may arise. CALIFORNIA PROPOSITION 65 WARNING Burning gas emits by-products known by a qualified technician, service agency, or gas supplier. • If you smell gas: −− Do not use or light any appliance. −− Do not touch electrical switches or use the cooktop during a power outage...
Installation Instruction - Heirtage Cooktop
Page 4
... that all other service. • Before service/installation, turn off the gas supply at the gas-supply valve and unplug the power cord. • Unplug the power cord before cleaning. (For cleaning instructions, see the User Manual.) • Use the cooktop for home use only.) • DO NOT TOUCH THE COOKTOP SURFACE DURING/IMMEDIATELY AFTER USE. • Do not operate the cooktop if its power cord is installed.) • DO NOT cut/remove the third...
... that all other service. • Before service/installation, turn off the gas supply at the gas-supply valve and unplug the power cord. • Unplug the power cord before cleaning. (For cleaning instructions, see the User Manual.) • Use the cooktop for home use only.) • DO NOT TOUCH THE COOKTOP SURFACE DURING/IMMEDIATELY AFTER USE. • Do not operate the cooktop if its power cord is installed.) • DO NOT cut/remove the third...
Installation Instruction - Heirtage Cooktop
Page 5
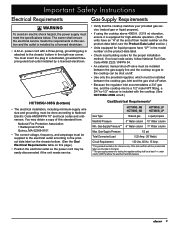
..., manual shut-off valve must be installed between the cooktop gas inlet and the gas shut-off . • Use only the provided regulator, which must meet the specifications below. Important Safety Instructions Electrical Requirements WARNING To avoid an electric shock hazard, the power supply must be at left.) Gas/Electrical Requirements* HCT305G_NG HCT365G_NG HCT305G_LP HCT365G_LP Gas Type Natural gas Liquid propane Manifold Pressure 5" Water column 10" Water column Min. The owner shall ensure the electrical service meets the requirements...
..., manual shut-off valve must be installed between the cooktop gas inlet and the gas shut-off . • Use only the provided regulator, which must meet the specifications below. Important Safety Instructions Electrical Requirements WARNING To avoid an electric shock hazard, the power supply must be at left.) Gas/Electrical Requirements* HCT305G_NG HCT365G_NG HCT305G_LP HCT365G_LP Gas Type Natural gas Liquid propane Manifold Pressure 5" Water column 10" Water column Min. The owner shall ensure the electrical service meets the requirements...
Installation Instruction - Heirtage Cooktop
Page 7
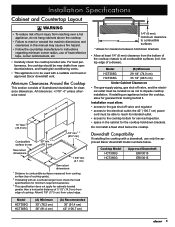
... measured from cooking surface (top of cooktop grate). 2 If installing with an overhead range hood, check the hood specifications for minimum required clearances. 3 This specification does not apply for clearance between hold -down brackets • Allow at least 1/4" (6 mm) clearance from the bottom of the cooktop chassis to all combustible surfaces (incl. Downdraft Compatibility If installing the cooktop with a suitable vent hood or approved Dacor downdraft vent. Model (B) Minimum HCT305G HCT365G 29 1/4" (74.3 cm) 35 1/4" (89.5 cm) Under-Cabinet Clearances • The gas...
... measured from cooking surface (top of cooktop grate). 2 If installing with an overhead range hood, check the hood specifications for minimum required clearances. 3 This specification does not apply for clearance between hold -down brackets • Allow at least 1/4" (6 mm) clearance from the bottom of the cooktop chassis to all combustible surfaces (incl. Downdraft Compatibility If installing the cooktop with a suitable vent hood or approved Dacor downdraft vent. Model (B) Minimum HCT305G HCT365G 29 1/4" (74.3 cm) 35 1/4" (89.5 cm) Under-Cabinet Clearances • The gas...

Installation Instruction - Heirtage Cooktop
Page 8
... (ERV3615 downdraft) (C) Minimum 3 1/4" (8.3 cm) 3/8" (1.0 cm) 3 1/4" (8.3 cm) 3/8" (1.0 cm) (D) 19 5/8" (49.9 cm) 22 3/4" (57.8 cm) 19 5/8" (49.9 cm) 22 3/4" (57.8 cm) (E) 27 5/8" (70.2 cm) 33 5/8" (85.4 cm) (F) Minimum 6 7/8" (17.5 cm) Cooktop with Downdraft: ERV Series 3/8" min. (1.0 cm) clearance required behind cutout Countertop Stiffener RNHCCT Series Cooktop Cabinet face 3/8" min. (1.0 cm) behind downdraft to clear stiffener ERVxx15 Downdraft Check downdraft dimensions/specifications to determine proper fit Floor 6 Countertop Cutout View Rear wall Vertical combustible surface...
... (ERV3615 downdraft) (C) Minimum 3 1/4" (8.3 cm) 3/8" (1.0 cm) 3 1/4" (8.3 cm) 3/8" (1.0 cm) (D) 19 5/8" (49.9 cm) 22 3/4" (57.8 cm) 19 5/8" (49.9 cm) 22 3/4" (57.8 cm) (E) 27 5/8" (70.2 cm) 33 5/8" (85.4 cm) (F) Minimum 6 7/8" (17.5 cm) Cooktop with Downdraft: ERV Series 3/8" min. (1.0 cm) clearance required behind cutout Countertop Stiffener RNHCCT Series Cooktop Cabinet face 3/8" min. (1.0 cm) behind downdraft to clear stiffener ERVxx15 Downdraft Check downdraft dimensions/specifications to determine proper fit Floor 6 Countertop Cutout View Rear wall Vertical combustible surface...

Installation Instruction - Heirtage Cooktop
Page 9
... inlet Power cord Beneath the Cooktop 2. Attach the gas-pressure regulator (included) to minimize gas-pressure loss).. Hold-down brackets (2) • Grates (3) • Burner sets (5) • Gas-pressure regulator (1) • Stainless-steel cleaner (1; Turn all lines and connections for leaks.) • The gas-supply pressure to the regulator must be closed to iso- stainless-steel models only) If parts are missing, contact Dacor Customer Service. (See If You Need Help... inch (3.5 kPa). • Disconnect he cooktop and shut-off valve to the downdraft installation instructions...
... inlet Power cord Beneath the Cooktop 2. Attach the gas-pressure regulator (included) to minimize gas-pressure loss).. Hold-down brackets (2) • Grates (3) • Burner sets (5) • Gas-pressure regulator (1) • Stainless-steel cleaner (1; Turn all lines and connections for leaks.) • The gas-supply pressure to the regulator must be closed to iso- stainless-steel models only) If parts are missing, contact Dacor Customer Service. (See If You Need Help... inch (3.5 kPa). • Disconnect he cooktop and shut-off valve to the downdraft installation instructions...
Installation Instruction - Heirtage Cooktop
Page 12
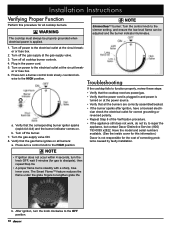
... SimmerSearTM burner: Turn the control knob to the simmer setting, and ensure the low-level flame can be properly grounded when electrical power is not responsible for gas to the electrical outlet at the gas-supply valve. 3. Verify that the corresponding burner igniter sparks (rapid tick-tick) and the burner indicator comes on at the circuit breaker or fuse box. 2. Turn off the burner. 7. Turn off the gas supply at the circuit breaker or fuse box. 6. Plug in and power is turned on . Installation Instructions...
... SimmerSearTM burner: Turn the control knob to the simmer setting, and ensure the low-level flame can be properly grounded when electrical power is not responsible for gas to the electrical outlet at the gas-supply valve. 3. Verify that the corresponding burner igniter sparks (rapid tick-tick) and the burner indicator comes on at the circuit breaker or fuse box. 2. Turn off the burner. 7. Turn off the gas supply at the circuit breaker or fuse box. 6. Plug in and power is turned on . Installation Instructions...

Installation Instruction - Heirtage Cooktop
Page 13
... Wiring Diagram WARNING Because miswiring can cause malfunction and dangerous operation, label all wires before disconnection when servicing controls, then verify proper function after service. Was the gas supply checked for the cooktop's proper installation cannot be overemphasized. □□ Is the cooktop's electrical outlet grounded/located as instructed and per applicable codes? (Pg. 3.) □□ Is gas service to the cooktop located/installed per as instructed and per applicable codes...
... Wiring Diagram WARNING Because miswiring can cause malfunction and dangerous operation, label all wires before disconnection when servicing controls, then verify proper function after service. Was the gas supply checked for the cooktop's proper installation cannot be overemphasized. □□ Is the cooktop's electrical outlet grounded/located as instructed and per applicable codes? (Pg. 3.) □□ Is gas service to the cooktop located/installed per as instructed and per applicable codes...

Specification - 30" Cooktop
Page 1
...Heritage Gas Cooktop 5 Burner SS Natural Gas HCT305GS/LP/H 30" Heritage Gas Cooktop 5 Burner SS Liquid Propane High Alt. LED BLUE NUMBER OF KNOBS 5 KNOBS PERMA-FLAME™ (AUTO RE-IGNITION) YES ERGONOMIC, ANGLED CONTROLS YES TECHNICAL DETAILS CIRCUIT BREAKER (A) 15 VOLTS (V) 120 FREQUENCY (HZ) 60 ENERGY SOURCE DIMENSIONS & WEIGHT APPLIANCE DIMENSIONS (H X W X D) (IN.) GAS 4" X 30" X 21" REQUIRED CUTOUT SIZE (W X D) (IN.) ACCESSORIES (OPTIONAL) WOK RING 27 5/8" X 19 5/8" AWR4 REMOVABLE NON-STICK GRIDDLE-GRILL AGDCT12 HCT305GS/LP 30" Heritage Gas Cooktop 5 Burner SS...
...Heritage Gas Cooktop 5 Burner SS Natural Gas HCT305GS/LP/H 30" Heritage Gas Cooktop 5 Burner SS Liquid Propane High Alt. LED BLUE NUMBER OF KNOBS 5 KNOBS PERMA-FLAME™ (AUTO RE-IGNITION) YES ERGONOMIC, ANGLED CONTROLS YES TECHNICAL DETAILS CIRCUIT BREAKER (A) 15 VOLTS (V) 120 FREQUENCY (HZ) 60 ENERGY SOURCE DIMENSIONS & WEIGHT APPLIANCE DIMENSIONS (H X W X D) (IN.) GAS 4" X 30" X 21" REQUIRED CUTOUT SIZE (W X D) (IN.) ACCESSORIES (OPTIONAL) WOK RING 27 5/8" X 19 5/8" AWR4 REMOVABLE NON-STICK GRIDDLE-GRILL AGDCT12 HCT305GS/LP 30" Heritage Gas Cooktop 5 Burner SS...

