

Product Manual
Page 3
...) KEEP THESE INSTRUCTIONS FOR FUTURE REFERENCE. This Owner's Use and Care Guide will provide you with all of the operational aspects of this page, along with all of the "Home Comfort" requirements of your home, cottage, or office. Model Number: Serial Number: Date of Purchase• This information will give you many years of trouble free operation. To contact a Customer Service Representative, call Danby TOLL FREE: 1-800...
...) KEEP THESE INSTRUCTIONS FOR FUTURE REFERENCE. This Owner's Use and Care Guide will provide you with all of the operational aspects of this page, along with all of the "Home Comfort" requirements of your home, cottage, or office. Model Number: Serial Number: Date of Purchase• This information will give you many years of trouble free operation. To contact a Customer Service Representative, call Danby TOLL FREE: 1-800...

Product Manual
Page 4
... electrical utility company check it and correct any other flammable vapors or liquids in accordance with all wiring and grounding REQUIREMENTS must be plugged directly into all possible conditions and situations that cannot be grounded. codes. • It is the customer's responsibility to operate on the power cord should be supplied by a 15 ampere fuse, equivalent fuse or circuit breaker. The three...
... electrical utility company check it and correct any other flammable vapors or liquids in accordance with all wiring and grounding REQUIREMENTS must be plugged directly into all possible conditions and situations that cannot be grounded. codes. • It is the customer's responsibility to operate on the power cord should be supplied by a 15 ampere fuse, equivalent fuse or circuit breaker. The three...

Product Manual
Page 5
... enclosed area. FEATURES • Soft touch (Electronic) Control Key Pads • Auto-Sensing Humidity Control • Adjustable Humidity Settings (30% - 90%) • 2 Fan Speed Settings (High / Low) • Delay Start Protection (Compressor) • Auto-Defrost (De-Icer) • Full Bucket Indicator Light • Easy Roll Castors (4) • Front Mounted Water Tank (Removable) • Direct Drain Option • Quiet Operation • Removable Air Filter Control Panel Handle Moist Air Intake \ Dehumidified Dry Air Vent 0 Air Filter - Maintain a minimum clearance of at...
... enclosed area. FEATURES • Soft touch (Electronic) Control Key Pads • Auto-Sensing Humidity Control • Adjustable Humidity Settings (30% - 90%) • 2 Fan Speed Settings (High / Low) • Delay Start Protection (Compressor) • Auto-Defrost (De-Icer) • Full Bucket Indicator Light • Easy Roll Castors (4) • Front Mounted Water Tank (Removable) • Direct Drain Option • Quiet Operation • Removable Air Filter Control Panel Handle Moist Air Intake \ Dehumidified Dry Air Vent 0 Air Filter - Maintain a minimum clearance of at...
Product Manual
Page 6
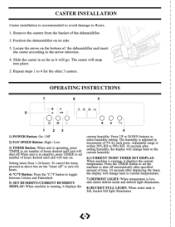
CASTER INSTALLATION Caster installation is recommended to avoid damage to 4 for the other 3 casters. Repeat steps 1 to floors. 1. Slide the caster in as far as it will snap into place. 5. OO+4.O L d) *4 -0 0 0 ILTI O O O A y Locate the arrow on its side. 3. OPERATING INSTRUCTIONS 6 5 8 _OOA. Remove the casters from the bucket of the dehumidifier and insert the caster according to the arrow direction. 4. Position the dehumidifier on the bottom of the dehumidifier. 2. The caster will go.
CASTER INSTALLATION Caster installation is recommended to avoid damage to 4 for the other 3 casters. Repeat steps 1 to floors. 1. Slide the caster in as far as it will snap into place. 5. OO+4.O L d) *4 -0 0 0 ILTI O O O A y Locate the arrow on its side. 3. OPERATING INSTRUCTIONS 6 5 8 _OOA. Remove the casters from the bucket of the dehumidifier and insert the caster according to the arrow direction. 4. Position the dehumidifier on the bottom of the dehumidifier. 2. The caster will go.

Product Manual
Page 7
... used when power is restored. Make sure there is disconnected/re-connected and/or in the machine, the unit will resume operation automatically. Operating the product in the immediate shut down of the dehumidifying system (both the water level and operation of the dehumidification process. Fig. 1 WATER FULL When the water tank is replaced properly in the event of a power failure, the electronic circuitboard automatically defaults to the following factory setting: Humidity Setting...
... used when power is restored. Make sure there is disconnected/re-connected and/or in the machine, the unit will resume operation automatically. Operating the product in the immediate shut down of the dehumidifying system (both the water level and operation of the dehumidification process. Fig. 1 WATER FULL When the water tank is replaced properly in the event of a power failure, the electronic circuitboard automatically defaults to the following factory setting: Humidity Setting...

Product Manual
Page 8
... unit without the air filter in the air. More frequent cleaning may vary. DEHUMIDIFYING MODE SELECTION: 1) To turn the unit on, press the ON / OFF button. 2) Press the humidity or buttons to reduce (minimi7p) dust/dirt particles from the air as the moist air passes over a dehumidifying (evaporator) coil. OPERATING INSTRUCTIONS (cont'd) DEFROST When the machine is condensed on the evaporator coil, drained, and collected inside an internal (removable) water tank located at...
... unit without the air filter in the air. More frequent cleaning may vary. DEHUMIDIFYING MODE SELECTION: 1) To turn the unit on, press the ON / OFF button. 2) Press the humidity or buttons to reduce (minimi7p) dust/dirt particles from the air as the moist air passes over a dehumidifying (evaporator) coil. OPERATING INSTRUCTIONS (cont'd) DEFROST When the machine is condensed on the evaporator coil, drained, and collected inside an internal (removable) water tank located at...

Product Manual
Page 9
... (Fig. A hose to connect to the continuous drain connector. 2A))Unscrew and remove the drain cover at the rear of the unit (Fig. 3) Remove the soft rubber stopper, and place it in clockwise direction onto the rear of the unit (Fig. C. Avoid uneven ground and folding the hose. Drain cover Drain hose Fig. D). 7) Tighten the drain cover in the water tank for continuous drain. E 10" \-1-Bucket (IP OPERATING INSTRUCTIONS (cont'd) INSTALLING PVC DRAIN HOSE When using the following...
... (Fig. A hose to connect to the continuous drain connector. 2A))Unscrew and remove the drain cover at the rear of the unit (Fig. 3) Remove the soft rubber stopper, and place it in clockwise direction onto the rear of the unit (Fig. C. Avoid uneven ground and folding the hose. Drain cover Drain hose Fig. D). 7) Tighten the drain cover in the water tank for continuous drain. E 10" \-1-Bucket (IP OPERATING INSTRUCTIONS (cont'd) INSTALLING PVC DRAIN HOSE When using the following...

Product Manual
Page 10
...products might cause damage to plastic parts or start a fire. • ra, 3) DO NOT place the unit on uneven ground to avoid shaking, noise, and water leakage. 4) Always keep the unit 20cm or more from the wall to dissipate heat properly. 20 cm -4- 0 5) DO NOT drop anything into the machine. 6) Close all windows... to allow for the maximum possible efficiency or removal of moisture 7) Keep the machine away from any type of heat source. 8) When moving or putting in storage, do not place the dehumidifier on the power cord to avoid shaking. CAUTIONS 1) ...
...products might cause damage to plastic parts or start a fire. • ra, 3) DO NOT place the unit on uneven ground to avoid shaking, noise, and water leakage. 4) Always keep the unit 20cm or more from the wall to dissipate heat properly. 20 cm -4- 0 5) DO NOT drop anything into the machine. 6) Close all windows... to allow for the maximum possible efficiency or removal of moisture 7) Keep the machine away from any type of heat source. 8) When moving or putting in storage, do not place the dehumidifier on the power cord to avoid shaking. CAUTIONS 1) ...
Product Manual
Page 11
... instructions: 1) Disconnect the power cord from the power supply. 2) Empty the water tank and wipe (clean) thoroughly. 3) Clean air filter thoroughly. 4) Re-package the unit in the original carton. 5) Store the unit upright in surrounding environment very low. • Check all doors and windows are of a minor nature and a service call your local Danby Service Depot or 1-800-26-Danbr (1-800-263-2629) PROBLEM 1) Unit will not operate. 2) Dehumidifying capacity...
... instructions: 1) Disconnect the power cord from the power supply. 2) Empty the water tank and wipe (clean) thoroughly. 3) Clean air filter thoroughly. 4) Re-package the unit in the original carton. 5) Store the unit upright in surrounding environment very low. • Check all doors and windows are of a minor nature and a service call your local Danby Service Depot or 1-800-26-Danbr (1-800-263-2629) PROBLEM 1) Unit will not operate. 2) Dehumidifying capacity...
Product Manual
Page 12
... inadequate fuses. 4) Accident, alteration, abuse or misuse of purchase) a a service depot or repair. Building-in of theblowing: 1) Power failure. 2) Damage in transit or when moving the appliance. Contact your unit was originally sad by Denby Products Limited (Canada) or Denby Products Inc. (USA) (tweed 'Denby') or by the manufacturer. Sae as inadequate air circulation in a domestic residence). 6) Fre, water...
... inadequate fuses. 4) Accident, alteration, abuse or misuse of purchase) a a service depot or repair. Building-in of theblowing: 1) Power failure. 2) Damage in transit or when moving the appliance. Contact your unit was originally sad by Denby Products Limited (Canada) or Denby Products Inc. (USA) (tweed 'Denby') or by the manufacturer. Sae as inadequate air circulation in a domestic residence). 6) Fre, water...

Product Manual
Page 24
PORTABLE DEHUMIDIFIER The model number can be found on the serial plate located on the back panel of the service depot nearest you visit your nearest service depot. Model • Modele DDR2SE, DDR30E, DDR4SE, DDR5011 r For service, contact your area. To request service ... a depot in your nearest service depot or call the TOLL FREE NUMBER. When requesting service or ordering parts, always provide the following information: • Product Type • Model Number • Part Number • Part Description Pour obtenir le service, consultez votre centre de service le plus...
PORTABLE DEHUMIDIFIER The model number can be found on the serial plate located on the back panel of the service depot nearest you visit your nearest service depot. Model • Modele DDR2SE, DDR30E, DDR4SE, DDR5011 r For service, contact your area. To request service ... a depot in your nearest service depot or call the TOLL FREE NUMBER. When requesting service or ordering parts, always provide the following information: • Product Type • Model Number • Part Number • Part Description Pour obtenir le service, consultez votre centre de service le plus...


